
Owner's guide
Page 3
...display window 11 General System Operation 12 Turning your system on and off 12 Making sound adjustments 12 Volume 12 Changing the number of speakers playing 12 Adjusting surround sound 12 Using the headphones jack 12 System settings 12 Using the sleep timer 12 ...station preset 17 Erasing a station preset 18 Selecting a preset station 18 Playing External Sources 19 Controlling external sources 19 Programming your LIFESTYLE® remote to control your TV 19 Programming your LIFESTYLE remote to control your VCR 19 Programming your LIFESTYLE remote to control your cable/satellite ...
...display window 11 General System Operation 12 Turning your system on and off 12 Making sound adjustments 12 Volume 12 Changing the number of speakers playing 12 Adjusting surround sound 12 Using the headphones jack 12 System settings 12 Using the sleep timer 12 ...station preset 17 Erasing a station preset 18 Selecting a preset station 18 Playing External Sources 19 Controlling external sources 19 Programming your LIFESTYLE® remote to control your TV 19 Programming your LIFESTYLE remote to control your VCR 19 Programming your LIFESTYLE remote to control your cable/satellite ...

Owner's guide
Page 6
...automatically create a 4:3 pan & scan version from everything you listen to the type of the picture. The form of multi-channel surround sound format used for transmission or recording. The quality of music on an infrared light beam. An acronym that allows you a five-channel... surround sound experience from widescreen video by cropping parts of remote that contains luminance, color, and synchronization information. An acronym for audio,...
...automatically create a 4:3 pan & scan version from everything you listen to the type of the picture. The form of multi-channel surround sound format used for transmission or recording. The quality of music on an infrared light beam. An acronym that allows you a five-channel... surround sound experience from widescreen video by cropping parts of remote that contains luminance, color, and synchronization information. An acronym for audio,...
Owner's guide
Page 7
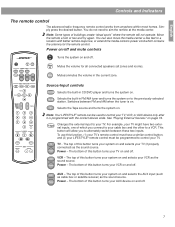
...the AUX input (such as cable box or satellite receiver) as the sound source. You can be programmed to control your cable box and the other to a location with the correct device code. Note: Your LIFESTYLE® remote can also move the media center a few feet to ... Exit Settings Tune Seek Enter Channel Chapter Preset Track Volume 1 2 3 4 5 6 7 8 9 Previous 0 PLAYBACK Stop Pause Play Shuffle Repeat Speakers 2-3-5 AUDIO Surround -+ On Off Turns the system on . Power on/off . The top of this button turns your VCR on page 19. VCR VCR - The top of...
...the AUX input (such as cable box or satellite receiver) as the sound source. You can be programmed to control your cable box and the other to a location with the correct device code. Note: Your LIFESTYLE® remote can also move the media center a few feet to ... Exit Settings Tune Seek Enter Channel Chapter Preset Track Volume 1 2 3 4 5 6 7 8 9 Previous 0 PLAYBACK Stop Pause Play Shuffle Repeat Speakers 2-3-5 AUDIO Surround -+ On Off Turns the system on . Power on/off . The top of this button turns your VCR on page 19. VCR VCR - The top of...

Owner's guide
Page 12
... Speakers 2-3-5 button on the remote control. You can be changed using the component video adapter (included), you turn it . Adjusting surround sound The sound level of listening to "YPbPr". lowers it on the remote or the media center button panel. To change the number of speakers ... can be raised or lowered using the Surround + / - Changing the video output for that was played last is capable of component video input signals, and you turn the system on a source, the number of the media center. Making sound adjustments Volume System volume can connect a ...
... Speakers 2-3-5 button on the remote control. You can be changed using the component video adapter (included), you turn it . Adjusting surround sound The sound level of listening to "YPbPr". lowers it on the remote or the media center button panel. To change the number of speakers ... can be raised or lowered using the Surround + / - Changing the video output for that was played last is capable of component video input signals, and you turn the system on a source, the number of the media center. Making sound adjustments Volume System volume can connect a ...
Owner's guide
Page 30
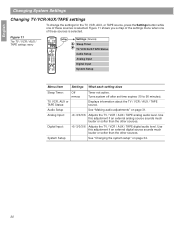
...TAPE digital audio level. Audio Setup See "Making audio adjustments" on page 34. 30 Use this adjustment if an external digital source sounds much louder or softer than the other sources. Figure 11 The TV / VCR / AUX / TAPE settings menu On Off Mute All... Enter Channel Chapter Preset Track Volume 1 2 3 4 5 6 7 8 9 Previous 0 PLAYBACK Stop Pause Play Shuffle Repeat Speakers 2-3-5 AUDIO Surround -+ Settings Settings (Source) Sleep Timer TV/VCR/AUX/TAPE Status Audio Setup Analog Input Digital Input System Setup Menu Item Settings What each setting ...
...TAPE digital audio level. Audio Setup See "Making audio adjustments" on page 34. 30 Use this adjustment if an external digital source sounds much louder or softer than the other sources. Figure 11 The TV / VCR / AUX / TAPE settings menu On Off Mute All... Enter Channel Chapter Preset Track Volume 1 2 3 4 5 6 7 8 9 Previous 0 PLAYBACK Stop Pause Play Shuffle Repeat Speakers 2-3-5 AUDIO Surround -+ Settings Settings (Source) Sleep Timer TV/VCR/AUX/TAPE Status Audio Setup Analog Input Digital Input System Setup Menu Item Settings What each setting ...

Owner's guide
Page 31
... calibration system may not be included with your Bose® dealer. Automatically adjusts the volume to allow you to hear soft sounds (particularly dialogue) and to DVD, TV, VCR... Track Volume 1 2 3 4 5 6 7 8 9 Previous 0 PLAYBACK Stop Pause Play Shuffle Repeat Speakers 2-3-5 AUDIO Surround -+ Settings Settings (source) Audio Setup Enter Settings: Audio Setup (source) Movie EQ (Notes 1 and 2) Range Compression... you how to get to the Audio Setup menu: 1. Contact your LIFESTYLE® system. English Changing System Settings Making audio adjustments You can make...
... calibration system may not be included with your Bose® dealer. Automatically adjusts the volume to allow you to hear soft sounds (particularly dialogue) and to DVD, TV, VCR... Track Volume 1 2 3 4 5 6 7 8 9 Previous 0 PLAYBACK Stop Pause Play Shuffle Repeat Speakers 2-3-5 AUDIO Surround -+ Settings Settings (source) Audio Setup Enter Settings: Audio Setup (source) Movie EQ (Notes 1 and 2) Range Compression... you how to get to the Audio Setup menu: 1. Contact your LIFESTYLE® system. English Changing System Settings Making audio adjustments You can make...

Owner's guide
Page 32
...to a negative value from -9 to +6 and should only be used for your Off LIFESTYLE® system. Moving the module away from +1 to source material variations. 32 Audio Status... (-) or increases (+) the bass sound. Different source materials, such as upholstered furniture, wall-to-wall carpet, or heavy drapes, can be needed for your Bose dealer. - - Subsequently, the...Bose® Videostage® 5 mono decoding circuitry when a Dolby Digital bitstream indicates that dialogue remains locked on-screen, while music and ambient effects fill the room. You experience a surround...
...to a negative value from -9 to +6 and should only be used for your Off LIFESTYLE® system. Moving the module away from +1 to source material variations. 32 Audio Status... (-) or increases (+) the bass sound. Different source materials, such as upholstered furniture, wall-to-wall carpet, or heavy drapes, can be needed for your Bose dealer. - - Subsequently, the...Bose® Videostage® 5 mono decoding circuitry when a Dolby Digital bitstream indicates that dialogue remains locked on-screen, while music and ambient effects fill the room. You experience a surround...

Owner's guide
Page 42
... • Select 5-speaker mode. • Press Surround + • Make sure the video sound source is stereo and surround-encoded, and the component used (TV, VCR, etc.) is inconsistent or does not work • Make sure antennas are connected properly...and extended as much sound from center speaker • Decrease the Center Channel setting in the Audio Setup menu. Try another nearby or behaves erratically LIFESTYLE® system. • See "Changing the house code settings" on page 38. or 5-speaker mode. Surround speakers are connected to the surround speaker jacks (orange...
... • Select 5-speaker mode. • Press Surround + • Make sure the video sound source is stereo and surround-encoded, and the component used (TV, VCR, etc.) is inconsistent or does not work • Make sure antennas are connected properly...and extended as much sound from center speaker • Decrease the Center Channel setting in the Audio Setup menu. Try another nearby or behaves erratically LIFESTYLE® system. • See "Changing the house code settings" on page 38. or 5-speaker mode. Surround speakers are connected to the surround speaker jacks (orange...

Owner's guide
Page 43
...in your LIFESTYLE® Installation Guide. nect the external IR emitter, included with your password • Enter a password of the media center. You forgot your system, to the IR EMITTER jack on /off detector is working properly by choosing TV Status in the surround speakers....SPEAKER ZONE 1 jack. See "Programming your LIFESTYLE® remote to control not control your TV, VCR, your external components are secure. • Reduce the output level from any external components connected to "Detected TV Power: On". 43 Sound is distorted • Make sure speaker ...
...in your LIFESTYLE® Installation Guide. nect the external IR emitter, included with your password • Enter a password of the media center. You forgot your system, to the IR EMITTER jack on /off detector is working properly by choosing TV Status in the surround speakers....SPEAKER ZONE 1 jack. See "Programming your LIFESTYLE® remote to control not control your TV, VCR, your external components are secure. • Reduce the output level from any external components connected to "Detected TV Power: On". 43 Sound is distorted • Make sure speaker ...

Installation guide
Page 7
...based on smooth surfaces like marble, glass, or highly polished wood. Figure 3 Recommended speaker locations Left front Center Right front Left surround Right surround 7 You may experiment with the placement and orientation of the TV screen. CAUTION: Choose a stable and level surface for your system.... Bose recommends a maximum distance of 3 feet (1 m) from the edge of the speaker. Left and right front speaker placement To best match sound and picture, the left and right front speakers should be placed up with the center of the speakers to produce the sound most...
...based on smooth surfaces like marble, glass, or highly polished wood. Figure 3 Recommended speaker locations Left front Center Right front Left surround Right surround 7 You may experiment with the placement and orientation of the TV screen. CAUTION: Choose a stable and level surface for your system.... Bose recommends a maximum distance of 3 feet (1 m) from the edge of the speaker. Left and right front speaker placement To best match sound and picture, the left and right front speakers should be placed up with the center of the speakers to produce the sound most...

Installation guide
Page 8
...Installation Figure 4 Speaker placement and reflection rays Left front Center Right front Acoustimass® module English Left surround Right surround Center speaker placement The sound from the center speaker should appear to come directly from the center of the shelf. Note: If you cannot ... at ear height (when seated) or higher, if possible. 2. Placing speakers in the back half of sound around the listener. Adjust the rear surround speakers to 50 feet (15.2 m) distance from the Acoustimass module. 1. Place the speakers at the listener. 8 Place the ...
...Installation Figure 4 Speaker placement and reflection rays Left front Center Right front Acoustimass® module English Left surround Right surround Center speaker placement The sound from the center speaker should appear to come directly from the center of the shelf. Note: If you cannot ... at ear height (when seated) or higher, if possible. 2. Placing speakers in the back half of sound around the listener. Adjust the rear surround speakers to 50 feet (15.2 m) distance from the Acoustimass module. 1. Place the speakers at the listener. 8 Place the ...

Installation guide
Page 10
... • Place the media center close enough to other sound sources (TV and VCR) to allow enough room to lift up this guide. Connecting the speakers to the Acoustimass® module Note: Before you allow for connecting the surround speakers. Make sure you start making system connections, make sure...display window to -). Make sure you to connect all of your components, see your media center Note: Now is a good time to the Bose address list included with a red collar is positive (+) and the plain one is completely installed and tested, keep the media center where you ...
... • Place the media center close enough to other sound sources (TV and VCR) to allow enough room to lift up this guide. Connecting the speakers to the Acoustimass® module Note: Before you allow for connecting the surround speakers. Make sure you start making system connections, make sure...display window to -). Make sure you to connect all of your components, see your media center Note: Now is a good time to the Bose address list included with a red collar is positive (+) and the plain one is completely installed and tested, keep the media center where you ...

Installation guide
Page 21
...LIFESTYLE® home entertainment system. In this configuration, your VCR audio is played through your system, but do not connect the TV audio outputs. English Reference Using alternate system connections The following describes alternate ways to connect your VCR and TV to hear any surround sound... front speaker Center front Right front speaker speaker Front speaker outputs Rear speaker outputs Speaker zone 1 output Media center Left surround Right surround speaker speaker Cable TV or satellite input AUX left & right audio (if available) VCR left & right audio VCR video...
...LIFESTYLE® home entertainment system. In this configuration, your VCR audio is played through your system, but do not connect the TV audio outputs. English Reference Using alternate system connections The following describes alternate ways to connect your VCR and TV to hear any surround sound... front speaker Center front Right front speaker speaker Front speaker outputs Rear speaker outputs Speaker zone 1 output Media center Left surround Right surround speaker speaker Cable TV or satellite input AUX left & right audio (if available) VCR left & right audio VCR video...


