
The Bose® Lifestyle® amplifier - Owner's guide
Page 6
... provides you with a simple solution when you want to add Bose® non-powered environmental speakers or Bose non-powered accessory speakers to expand your system, you can enjoy Bose quality sound and Lifestyle® system convenience in the amplifier, ensures full, rich stereo sound, even when the speakers are playing at low volumes.
... provides you with a simple solution when you want to add Bose® non-powered environmental speakers or Bose non-powered accessory speakers to expand your system, you can enjoy Bose quality sound and Lifestyle® system convenience in the amplifier, ensures full, rich stereo sound, even when the speakers are playing at low volumes.

The Bose® Lifestyle® amplifier - Owner's guide
Page 15
... FIXED REC PLAY AUX TAPE INPUT L R VIDEO SOUND AM LOOP 1 SYSTEM CONTROL 2 ~ POWER 12VAC IN 1.0A ANTENNA SEE INSTRUCTION MANUAL Fixed speaker outputs 30-ft audio input cable (supplied) Acoustimass module cable AM262840_00_V.pdf January 4, 2002 13 CAUTION: Before making connections, turn the Lifestyle® system off and disconnect the music center...
... FIXED REC PLAY AUX TAPE INPUT L R VIDEO SOUND AM LOOP 1 SYSTEM CONTROL 2 ~ POWER 12VAC IN 1.0A ANTENNA SEE INSTRUCTION MANUAL Fixed speaker outputs 30-ft audio input cable (supplied) Acoustimass module cable AM262840_00_V.pdf January 4, 2002 13 CAUTION: Before making connections, turn the Lifestyle® system off and disconnect the music center...

Owner's guide
Page 3
... window 11 General System Operation 12 Turning your system on and off 12 Making sound adjustments 12 Volume 12 Changing the number of speakers playing 12 Adjusting surround sound 12 Using the headphones jack 12 System settings 12 Using the sleep timer 12 ... station preset 17 Erasing a station preset 18 Selecting a preset station 18 Playing External Sources 19 Controlling external sources 19 Programming your LIFESTYLE® remote to control your TV 19 Programming your LIFESTYLE remote to control your VCR 19 Programming your LIFESTYLE remote to control your cable/satellite box...
... window 11 General System Operation 12 Turning your system on and off 12 Making sound adjustments 12 Volume 12 Changing the number of speakers playing 12 Adjusting surround sound 12 Using the headphones jack 12 System settings 12 Using the sleep timer 12 ... station preset 17 Erasing a station preset 18 Selecting a preset station 18 Playing External Sources 19 Controlling external sources 19 Programming your LIFESTYLE® remote to control your TV 19 Programming your LIFESTYLE remote to control your VCR 19 Programming your LIFESTYLE remote to control your cable/satellite box...

Owner's guide
Page 4
For example, "Use the Audio Setup menu to adjust the sound". • Messages appearing on the media center display. • Button names appear in boldface type. English Contents Changing the system setup 34 System setup menu ... the media center front panel, and menu items appearing on your TV screen will be used in this guide Operating instructions include names of your LIFESTYLE® system 40 Replacing the remote control batteries 41 Troubleshooting 41 Technical information 44 Accessories 45 Warranty 45 Contacting customer service 45 Conventions used . •...
For example, "Use the Audio Setup menu to adjust the sound". • Messages appearing on the media center display. • Button names appear in boldface type. English Contents Changing the system setup 34 System setup menu ... the media center front panel, and menu items appearing on your TV screen will be used in this guide Operating instructions include names of your LIFESTYLE® system 40 Replacing the remote control batteries 41 Troubleshooting 41 Technical information 44 Accessories 45 Warranty 45 Contacting customer service 45 Conventions used . •...

Owner's guide
Page 6
...a compressed audio format that contains luminance, color, and synchronization information. The U.S. Pan & Scan - The form of multi-channel surround sound format used extensively in Western Europe. DTS - DVD video - An acronym for storing and reproducing audio and video on DVD-ROM discs...technique of the picture. DVD-Video players can automatically create a 4:3 pan & scan version from everything you a five-channel surround sound experience from widescreen video by using a horizontal offset encoded with the video. PCM - S-video - A video interface standard that developed ...
...a compressed audio format that contains luminance, color, and synchronization information. The U.S. Pan & Scan - The form of multi-channel surround sound format used extensively in Western Europe. DTS - DVD video - An acronym for storing and reproducing audio and video on DVD-ROM discs...technique of the picture. DVD-Video players can automatically create a 4:3 pan & scan version from everything you a five-channel surround sound experience from widescreen video by using a horizontal offset encoded with the video. PCM - S-video - A video interface standard that developed ...
Owner's guide
Page 7
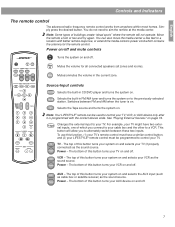
... the tuner is on to your TV. VCR VCR - AUX AUX - For example, your TV might have a similar control button, and (2) your LIFESTYLE® remote control must be used to aim the remote at the media center. Power Power - English Controls and Indicators The remote control The advanced... turns your system on and selects your TV on and off . 7 Note: Your LIFESTYLE® remote can also move the media center a few feet to a VCR. To use this button turns your VCR as the sound source. The top of this function, (1) your TV's remote control must have two ...
... the tuner is on to your TV. VCR VCR - AUX AUX - For example, your TV might have a similar control button, and (2) your LIFESTYLE® remote control must be used to aim the remote at the media center. Power Power - English Controls and Indicators The remote control The advanced... turns your system on and selects your TV on and off . 7 Note: Your LIFESTYLE® remote can also move the media center a few feet to a VCR. To use this button turns your VCR as the sound source. The top of this function, (1) your TV's remote control must have two ...

Owner's guide
Page 12
Making sound adjustments Volume System volume can connect a headset to the headset jack located on the right side of the media center. Using the headphones jack For ... change the video output setting, see "Using the settings menus" on page 22, and "Changing the system setup" on page 34. 12 Adjusting surround sound The sound level of the surround (rear) speakers in your system can be adjusted in the settings menu to "YPbPr". See "Using the settings menus" on page...
Making sound adjustments Volume System volume can connect a headset to the headset jack located on the right side of the media center. Using the headphones jack For ... change the video output setting, see "Using the settings menus" on page 22, and "Changing the system setup" on page 34. 12 Adjusting surround sound The sound level of the surround (rear) speakers in your system can be adjusted in the settings menu to "YPbPr". See "Using the settings menus" on page...

Owner's guide
Page 25
... playing. Hides subtitles. English Changing System Settings Menu Item Settings What each setting does Motion Control: Audio Track: Track __ Chooses one of the available sound tracks on page 36).
... playing. Hides subtitles. English Changing System Settings Menu Item Settings What each setting does Motion Control: Audio Track: Track __ Chooses one of the available sound tracks on page 36).
Owner's guide
Page 30
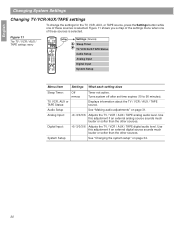
... time expires (10 to 90 minutes). Analog Input: -6/-3/0/3/6 Adjusts the TV / VCR / AUX / TAPE analog audio level. Use this adjustment if an external digital source sounds much louder or softer than the other sources. TV, VCR, AUX or TAPE Status: Displays information about the TV / VCR / AUX / TAPE source. English Changing... TV / VCR / AUX / TAPE digital audio level. System Setup See "Changing the system setup" on page 31. Use this adjustment if an external analog source sounds much louder or softer than the other sources.
... time expires (10 to 90 minutes). Analog Input: -6/-3/0/3/6 Adjusts the TV / VCR / AUX / TAPE analog audio level. Use this adjustment if an external digital source sounds much louder or softer than the other sources. TV, VCR, AUX or TAPE Status: Displays information about the TV / VCR / AUX / TAPE source. English Changing... TV / VCR / AUX / TAPE digital audio level. System Setup See "Changing the system setup" on page 31. Use this adjustment if an external analog source sounds much louder or softer than the other sources.

Owner's guide
Page 31
... when Dolby 1+1 is off. Range compression is not available. 3. Press the Enter button and the audio settings will be included with your Bose® dealer. Does not appear for FM, AM, or CD. Movie EQ mode is normally engaged when you turn the system on your... for each setting does Automatically sets bass and treble compensation for the proper playback of movie sound tracks. Figure 12 shows you from being overwhelmed by a loud special effect, such as an explosion. Contact your LIFESTYLE® system. Appears only when a disc contains a Dolby Digital 1+1 audio track. 4....
... when Dolby 1+1 is off. Range compression is not available. 3. Press the Enter button and the audio settings will be included with your Bose® dealer. Does not appear for FM, AM, or CD. Movie EQ mode is normally engaged when you turn the system on your... for each setting does Automatically sets bass and treble compensation for the proper playback of movie sound tracks. Figure 12 shows you from being overwhelmed by a loud special effect, such as an explosion. Contact your LIFESTYLE® system. Appears only when a disc contains a Dolby Digital 1+1 audio track. 4....

Owner's guide
Page 32
...pre-stereo) movies. Contact your Off LIFESTYLE® system. To restore the ADAPTiQ system adjustments, you must run and complete the process on the audio calibration process performed when you played Setup Disc 2. Decreasing the treble sound can be needed for mono TV ...compensates for your room acoustics. English Changing System Settings Menu Item Settings What each setting does Mono Decoding: On Off Automatically engages Bose® Videostage® 5 mono decoding circuitry when a Dolby Digital bitstream indicates that dialogue remains locked on Setup Disc 2. Mono...
...pre-stereo) movies. Contact your Off LIFESTYLE® system. To restore the ADAPTiQ system adjustments, you must run and complete the process on the audio calibration process performed when you played Setup Disc 2. Decreasing the treble sound can be needed for mono TV ...compensates for your room acoustics. English Changing System Settings Menu Item Settings What each setting does Mono Decoding: On Off Automatically engages Bose® Videostage® 5 mono decoding circuitry when a Dolby Digital bitstream indicates that dialogue remains locked on Setup Disc 2. Mono...

Owner's guide
Page 39
How do I set up a second remote to match the settings of the media center. • A second LIFESTYLE® system remote control to operate the zone 2 sound. Figure 16 Miniature zone code switches Set switches 1-4 to control zone 2? 1. Each listening area, whether a room or a group of the... in your home entertainment system. An existing stereo system can direct sound from the back side of rooms (including outdoor areas), is a zone? What do I need for setting up a second zone? • A Bose® powered speaker system that is set them according to two ...
How do I set up a second remote to match the settings of the media center. • A second LIFESTYLE® system remote control to operate the zone 2 sound. Figure 16 Miniature zone code switches Set switches 1-4 to control zone 2? 1. Each listening area, whether a room or a group of the... in your home entertainment system. An existing stereo system can direct sound from the back side of rooms (including outdoor areas), is a zone? What do I need for setting up a second zone? • A Bose® powered speaker system that is set them according to two ...

Owner's guide
Page 41
... • Check speaker connections. • Turn the media center off for any external components. If it . symbols on the back of the remote (Figure 18). 2. Alkaline batteries are plugged fully into place. Match the + and - Slide open the battery compartment on the batteries with the + and - This allows...8226; Unplug the media center power supply for 60 seconds, then reconnect it is, press the Mute button on the remote control to unmute the sound. • Make sure the audio input cable is firmly seated in the media center SPEAKER ZONE 1 jack and the multi-pin connector...
... • Check speaker connections. • Turn the media center off for any external components. If it . symbols on the back of the remote (Figure 18). 2. Alkaline batteries are plugged fully into place. Match the + and - Slide open the battery compartment on the batteries with the + and - This allows...8226; Unplug the media center power supply for 60 seconds, then reconnect it is, press the Mute button on the remote control to unmute the sound. • Make sure the audio input cable is firmly seated in the media center SPEAKER ZONE 1 jack and the multi-pin connector...

Owner's guide
Page 42
...64258;icting with another CD. 42 Radio does not work • Check batteries and their polarity (+ and -). Try another nearby or behaves erratically LIFESTYLE® system. • See "Changing the house code settings" on page 40. • The CD may be dirty. See "Making audio ... • Operate the remote control closer to avoid an area of weak signal coverage. No sound from surround speakers • Select 5-speaker mode. • Press Surround + • Make sure the video sound source is stereo and surround-encoded, and the component used (TV, VCR, etc.) is properly...
...64258;icting with another CD. 42 Radio does not work • Check batteries and their polarity (+ and -). Try another nearby or behaves erratically LIFESTYLE® system. • See "Changing the house code settings" on page 40. • The CD may be dirty. See "Making audio ... • Operate the remote control closer to avoid an area of weak signal coverage. No sound from surround speakers • Select 5-speaker mode. • Press Surround + • Make sure the video sound source is stereo and surround-encoded, and the component used (TV, VCR, etc.) is properly...

Owner's guide
Page 43
...ZONE 1 jack. When you may need to control not control your TV, VCR, your LIFESTYLE® Installation Guide. Select the 2-speaker round mode mode to reduce interference. See "Programming your LIFESTYLE® remote to con- Your TV turns on and off unexpectedly. • Reposition the... TV on . • Refer to the media center. FM sound is not obstructed. LIFESTYLE® remote does • Make sure correct codes are secure. • Reduce the output level from any external components connected ...
...ZONE 1 jack. When you may need to control not control your TV, VCR, your LIFESTYLE® Installation Guide. Select the 2-speaker round mode mode to reduce interference. See "Programming your LIFESTYLE® remote to con- Your TV turns on and off unexpectedly. • Reposition the... TV on . • Refer to the media center. FM sound is not obstructed. LIFESTYLE® remote does • Make sure correct codes are secure. • Reduce the output level from any external components connected ...

Installation guide
Page 7
Refer to the Bose address list included with the placement and orientation of the speakers to produce the sound most pleasing to you. The front cables allow the cube speakers to be placed at the edge of the TV picture (Figure 3). • Place the... of the speaker. Vibration can cause the speakers to move, particularly on room conditions and personal preference. You may wish to create reflected sound. Bose recommends a maximum distance of 3 feet (1 m) from the edge of a home theater. You may experiment with your system. CAUTION: Choose a stable and level surface for ...
Refer to the Bose address list included with the placement and orientation of the speakers to produce the sound most pleasing to you. The front cables allow the cube speakers to be placed at the edge of the TV picture (Figure 3). • Place the... of the speaker. Vibration can cause the speakers to move, particularly on room conditions and personal preference. You may wish to create reflected sound. Bose recommends a maximum distance of 3 feet (1 m) from the edge of a home theater. You may experiment with your system. CAUTION: Choose a stable and level surface for ...

Installation guide
Page 8
...above or below the center of the TV screen, or at the front edge of the sound source. The surround cables allow up to 20 feet (6.1 m) distance from the Acoustimass module. 1. Do not direct the sound straight at ear height (when seated) or higher, if possible. 2. Place the speakers... the tonal quality of the picture. The longer the path from the center of the sound. Placing speakers in a bookcase unit, be sure to attach the protective rubber feet to the bottom of sound around the listener. System Installation Figure 4 Speaker placement and reflection rays Left ...
...above or below the center of the TV screen, or at the front edge of the sound source. The surround cables allow up to 20 feet (6.1 m) distance from the Acoustimass module. 1. Do not direct the sound straight at ear height (when seated) or higher, if possible. 2. Place the speakers... the tonal quality of the picture. The longer the path from the center of the sound. Placing speakers in a bookcase unit, be sure to attach the protective rubber feet to the bottom of sound around the listener. System Installation Figure 4 Speaker placement and reflection rays Left ...

Installation guide
Page 9
...Acoustimass module: • Place the Acoustimass module along the wall to avoid blocking the sound output or creating too much bass. • For best bass performance, DO NOT place the Acoustimass module at least 18 inches (45 cm) from the Acoustimass module is slightly curved and the module may want...from any two walls or from scratches. DO NOT stand the module on page 2 of the Acoustimass module. Note: To avoid interference with the Bose® emblem faces into the room or along the same wall as the front speakers (see Figure 4). See Figure 5. The rubber feet provide ...
...Acoustimass module: • Place the Acoustimass module along the wall to avoid blocking the sound output or creating too much bass. • For best bass performance, DO NOT place the Acoustimass module at least 18 inches (45 cm) from the Acoustimass module is slightly curved and the module may want...from any two walls or from scratches. DO NOT stand the module on page 2 of the Acoustimass module. Note: To avoid interference with the Bose® emblem faces into the room or along the same wall as the front speakers (see Figure 4). See Figure 5. The rubber feet provide ...

Installation guide
Page 10
... of the front of the media center. • Place the media center close enough to other sound sources (TV and VCR) to -). To purchase extension cables, see your dealer or call Bose® customer service. Note: The surround speaker cables are not connected to the Acoustimass® module...you can view this information while using your system. Refer to the Bose address list included with your dealer or electronics store, or call Bose® customer service. Display window - Make sure you proceed. Refer to the Bose address list included with a red collar is positive (+) and the ...
... of the front of the media center. • Place the media center close enough to other sound sources (TV and VCR) to -). To purchase extension cables, see your dealer or call Bose® customer service. Note: The surround speaker cables are not connected to the Acoustimass® module...you can view this information while using your system. Refer to the Bose address list included with your dealer or electronics store, or call Bose® customer service. Display window - Make sure you proceed. Refer to the Bose address list included with a red collar is positive (+) and the ...

Installation guide
Page 17
This enables the media center to automatically switch the TV on, as shown in your LIFESTYLE® Operating Guide. Wait until your system is operating and you listen to TV sound through your LIFESTYLE® system, the speakers in your TV to select "Internal Speakers: Off" (your on-screen message may want to its...
This enables the media center to automatically switch the TV on, as shown in your LIFESTYLE® Operating Guide. Wait until your system is operating and you listen to TV sound through your LIFESTYLE® system, the speakers in your TV to select "Internal Speakers: Off" (your on-screen message may want to its...


