
The Bose® Lifestyle® amplifier - Owner's guide
Page 6
...damage to your product. If any way. Contact your system, you can enjoy Bose quality sound and Lifestyle® system convenience in the appropriate blank on page 15. 4 January 4, 2002 AM262840_00_V.pdf Bose proprietary Integrated Signal Processing technology, featured in Figure 1. The original packing materials ... voltage unit, DO NOT plug it in your yard, patio, swimming deck, garage, or utility room. Contact Bose Customer Service for purchasing the Lifestyle® stereo amplifier. Make sure the shipping carton for instructions on the rear panel of the product ...
...damage to your product. If any way. Contact your system, you can enjoy Bose quality sound and Lifestyle® system convenience in the appropriate blank on page 15. 4 January 4, 2002 AM262840_00_V.pdf Bose proprietary Integrated Signal Processing technology, featured in Figure 1. The original packing materials ... voltage unit, DO NOT plug it in your yard, patio, swimming deck, garage, or utility room. Contact Bose Customer Service for purchasing the Lifestyle® stereo amplifier. Make sure the shipping carton for instructions on the rear panel of the product ...

The Bose® Lifestyle® amplifier - Owner's guide
Page 15
...(left) FIXED OUTPUT jack. 5. SPSEPAEKAEKREROOUUTPTUPUTSTS INPUT 3.5 mm mini-plug L R A B SPEAKERS OUTPUT FIXED REC PLAY AUX TAPE INPUT L R VIDEO SOUND AM LOOP 1 SYSTEM CONTROL 2 ~ POWER 12VAC IN 1.0A ANTENNA SEE INSTRUCTION MANUAL Fixed speaker outputs 30-ft audio input cable (supplied) Acoustimass module... cable AM262840_00_V.pdf January 4, 2002 13 CAUTION: DO NOT connect the audio input cable for the Lifestyle® stereo amplifier to the SPEAKERS A or SPEAKERS B outputs. Insert the single multi-pin connector at one end...
...(left) FIXED OUTPUT jack. 5. SPSEPAEKAEKREROOUUTPTUPUTSTS INPUT 3.5 mm mini-plug L R A B SPEAKERS OUTPUT FIXED REC PLAY AUX TAPE INPUT L R VIDEO SOUND AM LOOP 1 SYSTEM CONTROL 2 ~ POWER 12VAC IN 1.0A ANTENNA SEE INSTRUCTION MANUAL Fixed speaker outputs 30-ft audio input cable (supplied) Acoustimass module... cable AM262840_00_V.pdf January 4, 2002 13 CAUTION: DO NOT connect the audio input cable for the Lifestyle® stereo amplifier to the SPEAKERS A or SPEAKERS B outputs. Insert the single multi-pin connector at one end...

Owner's guide
Page 3
... window 11 General System Operation 12 Turning your system on and off 12 Making sound adjustments 12 Volume 12 Changing the number of speakers playing 12 Adjusting surround sound 12 Using the headphones jack 12 System settings 12 Using the sleep timer 12 ... station preset 17 Erasing a station preset 18 Selecting a preset station 18 Playing External Sources 19 Controlling external sources 19 Programming your LIFESTYLE® remote to control your TV 19 Programming your LIFESTYLE remote to control your VCR 19 Programming your LIFESTYLE remote to control your cable/satellite box...
... window 11 General System Operation 12 Turning your system on and off 12 Making sound adjustments 12 Volume 12 Changing the number of speakers playing 12 Adjusting surround sound 12 Using the headphones jack 12 System settings 12 Using the sleep timer 12 ... station preset 17 Erasing a station preset 18 Selecting a preset station 18 Playing External Sources 19 Controlling external sources 19 Programming your LIFESTYLE® remote to control your TV 19 Programming your LIFESTYLE remote to control your VCR 19 Programming your LIFESTYLE remote to control your cable/satellite box...

Owner's guide
Page 4
...the media center display. • Button names appear in boldface type. For example, "Use the Audio Setup menu to adjust the sound". • Messages appearing on the media center display are represented by a narrow boldface uppercase type. English Contents Changing the system setup... setup submenu 37 Reference 38 Changing the house code settings 38 Setting up a second listening zone 39 Taking care of your LIFESTYLE® system 40 Replacing the remote control batteries 41 Troubleshooting 41 Technical information 44 Accessories 45 Warranty 45 Contacting customer service 45...
...the media center display. • Button names appear in boldface type. For example, "Use the Audio Setup menu to adjust the sound". • Messages appearing on the media center display are represented by a narrow boldface uppercase type. English Contents Changing the system setup... setup submenu 37 Reference 38 Changing the house code settings 38 Setting up a second listening zone 39 Taking care of your LIFESTYLE® system 40 Replacing the remote control batteries 41 Troubleshooting 41 Technical information 44 Accessories 45 Warranty 45 Contacting customer service 45...

Owner's guide
Page 6
... and MPEG audio, and other proprietary data formats. A video format which has black borders at the top and bottom of multi-channel surround sound format used on 12-cm optical discs. An acronym for audio, developed by Dolby Laboratories and accepted as YUV or Y, B-Y, R-Y. 6 ...containing one of the digital audio signal used extensively in Western Europe. A single video signal that allows you a five-channel surround sound experience from widescreen video by cropping parts of composite video systems. 1 - PCM - An acronym that sends/receives commands on a four...
... and MPEG audio, and other proprietary data formats. A video format which has black borders at the top and bottom of multi-channel surround sound format used on 12-cm optical discs. An acronym for audio, developed by Dolby Laboratories and accepted as YUV or Y, B-Y, R-Y. 6 ...containing one of the digital audio signal used extensively in Western Europe. A single video signal that allows you a five-channel surround sound experience from widescreen video by cropping parts of composite video systems. 1 - PCM - An acronym that sends/receives commands on a four...
Owner's guide
Page 7
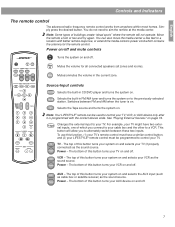
...center. The top of which contains the antenna for all connected speakers (all zones and rooms). You do not need to your VCR as the sound source. Mute Mutes/unmutes the volume in CD/DVD player and turns the system on and off . FM/AM Selects the built-in FM/AM...not operate. Source/input controls CD/DVD Selects the built-in the current zone. For example, your TV might have a similar control button, and (2) your LIFESTYLE® remote control must be used to control your cable box and the other to a VCR. To use this function, (1) your TV's remote control must...
...center. The top of which contains the antenna for all connected speakers (all zones and rooms). You do not need to your VCR as the sound source. Mute Mutes/unmutes the volume in CD/DVD player and turns the system on and off . FM/AM Selects the built-in FM/AM...not operate. Source/input controls CD/DVD Selects the built-in the current zone. For example, your TV might have a similar control button, and (2) your LIFESTYLE® remote control must be used to control your cable box and the other to a VCR. To use this function, (1) your TV's remote control must...

Owner's guide
Page 12
... button, the source that source is automatically determined. When you play a DVD video, all ZONE 1 speakers are muted. Making sound adjustments Volume System volume can be set to "YPbPr". Adjusting surround sound The sound level of the surround (rear) speakers in your system can be changed using the system settings menus. Surround- Using...
... button, the source that source is automatically determined. When you play a DVD video, all ZONE 1 speakers are muted. Making sound adjustments Volume System volume can be set to "YPbPr". Adjusting surround sound The sound level of the surround (rear) speakers in your system can be changed using the system settings menus. Surround- Using...

Owner's guide
Page 25
... and press Enter. English Changing System Settings Menu Item Settings What each setting does Motion Control: Audio Track: Track __ Chooses one of the available sound tracks on the DVD disc you to make this selection here. Move to use the setup menu on the DVD. To do this, press the...
... and press Enter. English Changing System Settings Menu Item Settings What each setting does Motion Control: Audio Track: Track __ Chooses one of the available sound tracks on the DVD disc you to make this selection here. Move to use the setup menu on the DVD. To do this, press the...
Owner's guide
Page 30
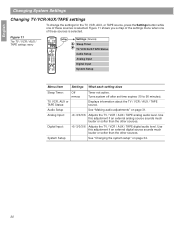
... / AUX / TAPE source. Audio Setup See "Making audio adjustments" on page 34. 30 Use this adjustment if an external analog source sounds much louder or softer than the other sources. System Setup See "Changing the system setup" on page 31. Turns system off after set ... TAPE analog audio level. Digital Input: -6/-3/0/3/6 Adjusts the TV / VCR / AUX / TAPE digital audio level. Use this adjustment if an external digital source sounds much louder or softer than the other sources. Figure 11 The TV / VCR / AUX / TAPE settings menu On Off Mute All Mute SOURCE / INPUT...
... / AUX / TAPE source. Audio Setup See "Making audio adjustments" on page 34. 30 Use this adjustment if an external analog source sounds much louder or softer than the other sources. System Setup See "Changing the system setup" on page 31. Turns system off after set ... TAPE analog audio level. Digital Input: -6/-3/0/3/6 Adjusts the TV / VCR / AUX / TAPE digital audio level. Use this adjustment if an external digital source sounds much louder or softer than the other sources. Figure 11 The TV / VCR / AUX / TAPE settings menu On Off Mute All Mute SOURCE / INPUT...

Owner's guide
Page 31
... be included with your Bose® dealer. This feature is Off. Using the down navigation button ( ), scroll down the list and select (highlight) Audio Setup. 3. Bass Compensation 2. Contact your LIFESTYLE® system. Automatically adjusts the volume to allow you to hear soft sounds (particularly dialogue) and... Settings Making audio adjustments You can make some audio adjustments for the current source will be displayed for the proper playback of movie sound tracks. Figure 12 shows you how to get to prevent you turn the system on your TV screen. 2. Appears only when ...
... be included with your Bose® dealer. This feature is Off. Using the down navigation button ( ), scroll down the list and select (highlight) Audio Setup. 3. Bass Compensation 2. Contact your LIFESTYLE® system. Automatically adjusts the volume to allow you to hear soft sounds (particularly dialogue) and... Settings Making audio adjustments You can make some audio adjustments for the current source will be displayed for the proper playback of movie sound tracks. Figure 12 shows you how to get to prevent you turn the system on your TV screen. 2. Appears only when ...

Owner's guide
Page 32
...Settings What each setting does Mono Decoding: On Off Automatically engages Bose® Videostage® 5 mono decoding circuitry when a Dolby Digital bitstream indicates that is not reversible. This feature can decrease the bass sound by lowering this setting to a positive value from -9 to ...can be included with bare floors and walls, may not be useful. Rooms with few sound-absorbing furnishings, especially those with your Bose dealer. - - Contact your Off LIFESTYLE® system. Note: After choosing Off, press Erase on the audio calibration process performed when...
...Settings What each setting does Mono Decoding: On Off Automatically engages Bose® Videostage® 5 mono decoding circuitry when a Dolby Digital bitstream indicates that is not reversible. This feature can decrease the bass sound by lowering this setting to a positive value from -9 to ...can be included with bare floors and walls, may not be useful. Rooms with few sound-absorbing furnishings, especially those with your Bose dealer. - - Contact your Off LIFESTYLE® system. Note: After choosing Off, press Erase on the audio calibration process performed when...

Owner's guide
Page 39
...AM/FM tuner, TAPE, or AUX) to the table. 3. See your dealer or contact Bose for connecting additional equipment. Make sure the house code switches (1, 2, 3, and 4) match those...Re-install the battery compartment cover back. Figure 16 Miniature zone code switches Set switches 1-4 to operate the zone 2 sound. Your primary listening area is a zone? What do I need for ZONE 2. 1 2345 6789 1 2345 6789 ...the SPEAKER ZONES 2 connector on the rear panel of the media center. • A second LIFESTYLE® system remote control to match the settings of 1-4 in your ZONE 1 remote. Each ...
...AM/FM tuner, TAPE, or AUX) to the table. 3. See your dealer or contact Bose for connecting additional equipment. Make sure the house code switches (1, 2, 3, and 4) match those...Re-install the battery compartment cover back. Figure 16 Miniature zone code switches Set switches 1-4 to operate the zone 2 sound. Your primary listening area is a zone? What do I need for ZONE 2. 1 2345 6789 1 2345 6789 ...the SPEAKER ZONES 2 connector on the rear panel of the media center. • A second LIFESTYLE® system remote control to match the settings of 1-4 in your ZONE 1 remote. Each ...

Owner's guide
Page 41
... the batteries when the remote control stops operating or its range seems reduced. Figure 18 Installing the remote control batteries AAA batteries (4) + ++ + Battery compartment cover Battery compartment Troubleshooting Problem What to unmute the sound. • Make sure the audio input cable is firmly seated in the...FM and AM antennas. • Make sure that the power switch on the Acoustimass module is lit on the back of the remote (Figure 18). 2. Insert four AAA or IEC-LR3 1.5V batteries, or the equivalent, as shown. Slide open the battery compartment on the display. ...
... the batteries when the remote control stops operating or its range seems reduced. Figure 18 Installing the remote control batteries AAA batteries (4) + ++ + Battery compartment cover Battery compartment Troubleshooting Problem What to unmute the sound. • Make sure the audio input cable is firmly seated in the...FM and AM antennas. • Make sure that the power switch on the Acoustimass module is lit on the back of the remote (Figure 18). 2. Insert four AAA or IEC-LR3 1.5V batteries, or the equivalent, as shown. Slide open the battery compartment on the display. ...

Owner's guide
Page 42
... -. Surround speakers are connected to prevent signals from surround speakers • Select 5-speaker mode. • Press Surround + • Make sure the video sound source is stereo and surround-encoded, and the component used (TV, VCR, etc.) is properly inserted (label side up). • Eject the disc and... try loading it again. • The CD may be dirty. Try another nearby or behaves erratically LIFESTYLE® system. • See "Changing the house code settings" on page 40. • The CD may be defective. or 5-speaker mode. No...
... -. Surround speakers are connected to prevent signals from surround speakers • Select 5-speaker mode. • Press Surround + • Make sure the video sound source is stereo and surround-encoded, and the component used (TV, VCR, etc.) is properly inserted (label side up). • Eject the disc and... try loading it again. • The CD may be dirty. Try another nearby or behaves erratically LIFESTYLE® system. • See "Changing the house code settings" on page 40. • The CD may be defective. or 5-speaker mode. No...

Owner's guide
Page 43
...• Make sure the audio input cable is turned on page 19. commands to your LIFESTYLE® Installation Guide. See "Connecting the optional IR emitter cable" in the Settings (TV) menu. Sound is distorted • Adjust antenna position to reduce interference. You forgot your password •...to "Detected TV Power: On". 43 No tape, CD, VCR, or TV sound. • Check the connections. • Make sure the component is firmly seated in the surround speakers. See "Programming your LIFESTYLE® remote to minimize noise. Your TV turns on and off unexpectedly. •...
...• Make sure the audio input cable is turned on page 19. commands to your LIFESTYLE® Installation Guide. See "Connecting the optional IR emitter cable" in the Settings (TV) menu. Sound is distorted • Adjust antenna position to reduce interference. You forgot your password •...to "Detected TV Power: On". 43 No tape, CD, VCR, or TV sound. • Check the connections. • Make sure the component is firmly seated in the surround speakers. See "Programming your LIFESTYLE® remote to minimize noise. Your TV turns on and off unexpectedly. •...

Installation guide
Page 7
... surround 7 You may wish to create reflected sound. Left and right front speaker placement To best match sound and picture, the left and right front speakers should be placed up to the Bose address list included with the placement and orientation of the television... Vibration can cause the speakers to the bottom of reflected sound patterns in a different direction to vary this distance based on its side, as this diminishes performance. You may obtain additional rubber feet by contacting Bose® customer service. See the illustration of the speaker.
... surround 7 You may wish to create reflected sound. Left and right front speaker placement To best match sound and picture, the left and right front speakers should be placed up to the Bose address list included with the placement and orientation of the television... Vibration can cause the speakers to the bottom of reflected sound patterns in a different direction to vary this distance based on its side, as this diminishes performance. You may obtain additional rubber feet by contacting Bose® customer service. See the illustration of the speaker.

Installation guide
Page 8
... 2. Place the center speaker directly above or below the center of your ear, the better. 3. Do not direct the sound straight at the front edge of the sound source. Note: If you cannot pinpoint the exact location of the shelf. Place them at the listener. 8 Adjust the ... Speaker placement and reflection rays Left front Center Right front Acoustimass® module English Left surround Right surround Center speaker placement The sound from the center speaker should appear to 50 feet (15.2 m) distance from the Acoustimass module. 1. The center speaker cable allows up to...
... 2. Place the center speaker directly above or below the center of your ear, the better. 3. Do not direct the sound straight at the front edge of the sound source. Note: If you cannot pinpoint the exact location of the shelf. Place them at the listener. 8 Adjust the ... Speaker placement and reflection rays Left front Center Right front Acoustimass® module English Left surround Right surround Center speaker placement The sound from the center speaker should appear to 50 feet (15.2 m) distance from the Acoustimass module. 1. The center speaker cable allows up to...

Installation guide
Page 9
... for the Acoustimass module: • Place the Acoustimass module along the wall to avoid blocking the sound output or creating too much bass. • For best bass performance, DO NOT place the Acoustimass module at least 18 inches (45 cm) from a wall and the ceiling. • For convenience, you have selected a position... space provided on the bottom of the module, before you should not be blocked. DO NOT stand it down on the long edge, with the Bose® emblem faces into the room or along the same wall as the TV, or close to the same end of the Acoustimass module. DO...
... for the Acoustimass module: • Place the Acoustimass module along the wall to avoid blocking the sound output or creating too much bass. • For best bass performance, DO NOT place the Acoustimass module at least 18 inches (45 cm) from a wall and the ceiling. • For convenience, you have selected a position... space provided on the bottom of the module, before you should not be blocked. DO NOT stand it down on the long edge, with the Bose® emblem faces into the room or along the same wall as the TV, or close to the same end of the Acoustimass module. DO...

Installation guide
Page 10
...8226; Do not block the front of this door. To purchase extension cables, see your dealer or call Bose® customer service. These wires match the positive (red) and negative (black) terminals on page 2... on the bottom of the media center. • Place the media center close enough to other sound sources (TV and VCR) to allow enough room to lift up this guide. Make sure you ...positive (+) and the plain one is negative (-). Note: The surround speaker cables are not connected to the Bose address list included with your system. ™ Disc tray - To run the cables in the space ...
...8226; Do not block the front of this door. To purchase extension cables, see your dealer or call Bose® customer service. These wires match the positive (red) and negative (black) terminals on page 2... on the bottom of the media center. • Place the media center close enough to other sound sources (TV and VCR) to allow enough room to lift up this guide. Make sure you ...positive (+) and the plain one is negative (-). Note: The surround speaker cables are not connected to the Bose address list included with your system. ™ Disc tray - To run the cables in the space ...

Installation guide
Page 17
... System Installation Installing the TV on/off detector (optional) The TV on/off detector senses whether your TV is on or off detector" in your LIFESTYLE® Operating Guide. Plug the connector on the end of the cord into the TV SENSOR jack on the back of your TV as needed.... 1. Turning off the internal speakers in your TV owner's guide for mounting the detector. Use the on-screen menus in your TV to TV sound through your LIFESTYLE® system, the speakers in your TV When you listen to select "Internal Speakers: Off" (your system is the best location for detailed instructions...
... System Installation Installing the TV on/off detector (optional) The TV on/off detector senses whether your TV is on or off detector" in your LIFESTYLE® Operating Guide. Plug the connector on the end of the cord into the TV SENSOR jack on the back of your TV as needed.... 1. Turning off the internal speakers in your TV owner's guide for mounting the detector. Use the on-screen menus in your TV to TV sound through your LIFESTYLE® system, the speakers in your TV When you listen to select "Internal Speakers: Off" (your system is the best location for detailed instructions...


