
The Bose® Lifestyle® amplifier - Owner's guide
Page 4
... provide some protection against harmful interference in wire to an antenna discharge unit, size of grounding conductors, location of antenna-discharge unit, connection to the antenna grounding illustration on , you are designed to proper grounding of the mast and supporting structure, grounding of the FCC ... which the receiver is no guarantee that the cable ground shall be sure the antenna or cable system is practical. ©2001 Bose Corporation, The Mountain, Framingham, MA 01701-9168 USA 255805 AM Rev.00 JN10494 2b January 10, 2002 AM262840_00_V.pdf This product ...
... provide some protection against harmful interference in wire to an antenna discharge unit, size of grounding conductors, location of antenna-discharge unit, connection to the antenna grounding illustration on , you are designed to proper grounding of the mast and supporting structure, grounding of the FCC ... which the receiver is no guarantee that the cable ground shall be sure the antenna or cable system is practical. ©2001 Bose Corporation, The Mountain, Framingham, MA 01701-9168 USA 255805 AM Rev.00 JN10494 2b January 10, 2002 AM262840_00_V.pdf This product ...

The Bose® Lifestyle® amplifier - Owner's guide
Page 5
...; stereo amplifier to a multi-room interface 7 Connecting the Lifestyle® stereo amplifier to a Lifestyle® media center 9 Setting up your system 15 Maintaining Your Lifestyle® Stereo Amplifier Cleaning the amplifier 16 Protecting outdoor wiring 16 Troubleshooting 16 Customer service 17 Warranty period 17 Technical information 18 For your records The serial number is located...
...; stereo amplifier to a multi-room interface 7 Connecting the Lifestyle® stereo amplifier to a Lifestyle® media center 9 Setting up your system 15 Maintaining Your Lifestyle® Stereo Amplifier Cleaning the amplifier 16 Protecting outdoor wiring 16 Troubleshooting 16 Customer service 17 Warranty period 17 Technical information 18 For your records The serial number is located...

The Bose® Lifestyle® amplifier - Owner's guide
Page 9
... cable into the SYSTEM CONTROL jack on the rear of the amplifier. Figure 6 Cable connections between a multi-room interface and the Lifestyle® stereo amplifier Lifestyle® stereo amplifier rear panel Multi-room interface rear panel 4 Ω MINIMUM LL ... jack of the multi-room interface (Figure 6). 2. Setting Up Your Lifestyle® Stereo Amplifier Connecting the Lifestyle® stereo amplifier to a multi-room interface CAUTION: Before making any connections, turn the Lifestyle® system off and disconnect the music center from the AC (mains...
... cable into the SYSTEM CONTROL jack on the rear of the amplifier. Figure 6 Cable connections between a multi-room interface and the Lifestyle® stereo amplifier Lifestyle® stereo amplifier rear panel Multi-room interface rear panel 4 Ω MINIMUM LL ... jack of the multi-room interface (Figure 6). 2. Setting Up Your Lifestyle® Stereo Amplifier Connecting the Lifestyle® stereo amplifier to a multi-room interface CAUTION: Before making any connections, turn the Lifestyle® system off and disconnect the music center from the AC (mains...

The Bose® Lifestyle® amplifier - Owner's guide
Page 10
... allows you must follow the procedure for setting up to four sets of Bose® powered speakers placed in more than one -room system). Press the...a source Press the HOUSE button to control all connected rooms as room A, B, C, and D, with room A being the primary room (the one used for a one room. Note: Refer to your Lifestyle® system owner's guide for a two-room...no internal switch settings before it allows you to your system in individual rooms. These rooms are connected to control more than one room of speakers. However, if you purchase a second Personal music center...
... allows you must follow the procedure for setting up to four sets of Bose® powered speakers placed in more than one -room system). Press the...a source Press the HOUSE button to control all connected rooms as room A, B, C, and D, with room A being the primary room (the one used for a one room. Note: Refer to your Lifestyle® system owner's guide for a two-room...no internal switch settings before it allows you to your system in individual rooms. These rooms are connected to control more than one room of speakers. However, if you purchase a second Personal music center...

The Bose® Lifestyle® amplifier - Owner's guide
Page 11
... into the SYSTEM CONTROL jack on the rear panel of the amplifier. 3. Figure 8 Cable connections between the Lifestyle® media center and the Lifestyle® stereo amplifier Lifestyle® SA-1 stereo amplifier rear panel Lifestyle® media center rear panel 30-ft audio input cable (supplied) AM262840_00_V.pdf January 4, 2002 9 Insert...
... into the SYSTEM CONTROL jack on the rear panel of the amplifier. 3. Figure 8 Cable connections between the Lifestyle® media center and the Lifestyle® stereo amplifier Lifestyle® SA-1 stereo amplifier rear panel Lifestyle® media center rear panel 30-ft audio input cable (supplied) AM262840_00_V.pdf January 4, 2002 9 Insert...

The Bose® Lifestyle® amplifier - Owner's guide
Page 13
... RCA piggyback connector of the supplied cable into the R (right) INPUT jack of the amplifier. 3. At the other connections. 1. Setting Up Your Lifestyle® Stereo Amplifier Connecting the Lifestyle® stereo amplifier to a Model 20 music center ® Figure 10 Cable... connections between the Model 20 music center and the Lifestyle® stereo amplifier CAUTION: Before making connections, turn the Lifestyle® system off and disconnect the music center from the AC (mains) power outlet....
... RCA piggyback connector of the supplied cable into the R (right) INPUT jack of the amplifier. 3. At the other connections. 1. Setting Up Your Lifestyle® Stereo Amplifier Connecting the Lifestyle® stereo amplifier to a Model 20 music center ® Figure 10 Cable... connections between the Model 20 music center and the Lifestyle® stereo amplifier CAUTION: Before making connections, turn the Lifestyle® system off and disconnect the music center from the AC (mains) power outlet....

The Bose® Lifestyle® amplifier - Owner's guide
Page 15
... rear of the audio input cable, insert the 3.5 mm mini-plug into the white piggyback jack. Setting Up Your Lifestyle® Stereo Amplifier Connecting the Lifestyle® stereo amplifier to a Model 5 music center In systems using a Model 5 music center, home theater speakers ...are connected to the SPEAKERS A or SPEAKERS B outputs. CAUTION: Before making connections, turn the Lifestyle® system off and disconnect the music center from both FIXED OUTPUT jacks. 4. On the rear panel ...
... rear of the audio input cable, insert the 3.5 mm mini-plug into the white piggyback jack. Setting Up Your Lifestyle® Stereo Amplifier Connecting the Lifestyle® stereo amplifier to a Model 5 music center In systems using a Model 5 music center, home theater speakers ...are connected to the SPEAKERS A or SPEAKERS B outputs. CAUTION: Before making connections, turn the Lifestyle® system off and disconnect the music center from both FIXED OUTPUT jacks. 4. On the rear panel ...

The Bose® Lifestyle® amplifier - Owner's guide
Page 16
Note: Refer to your Lifestyle® system owner's guide for more information on page 18. • Connect the right speaker cable to the equipment. One wire is usually marked (striped, collared, or ribbed), indicating that it ) attaches to the cable connected to the L output. or black) terminal. Press the red ...2, 3, and 4) match those in the listening area (as you need to set up (on the left ) output, and which is connected to the L (left in your Lifestyle® stereo amplifier. 1. Doing so may cause damage to the SPEAKER OUTPUT R terminals (Figure 14). Make sure that the...
Note: Refer to your Lifestyle® system owner's guide for more information on page 18. • Connect the right speaker cable to the equipment. One wire is usually marked (striped, collared, or ribbed), indicating that it ) attaches to the cable connected to the L output. or black) terminal. Press the red ...2, 3, and 4) match those in the listening area (as you need to set up (on the left ) output, and which is connected to the L (left in your Lifestyle® stereo amplifier. 1. Doing so may cause damage to the SPEAKER OUTPUT R terminals (Figure 14). Make sure that the...

The Bose® Lifestyle® amplifier - Owner's guide
Page 17
...cord included with your Personal® music center or your new remote control and adjust the vol- Connect the power cord of the amplifier (Figure 16). 2. Select a music source with your Lifestyle® music system to 230V. If you own a 230V version, there is preset at the ... position. If you plan to see if you have a dual voltage Lifestyle® amplifier • Dual voltage units have a voltage selection switch on the amplifier AM262840_00_V.pdf January 4, 2002 15 Check to connect your system CAUTION: DO NOT plug the AC power cord into the...
...cord included with your Personal® music center or your new remote control and adjust the vol- Connect the power cord of the amplifier (Figure 16). 2. Select a music source with your Lifestyle® music system to 230V. If you own a 230V version, there is preset at the ... position. If you plan to see if you have a dual voltage Lifestyle® amplifier • Dual voltage units have a voltage selection switch on the amplifier AM262840_00_V.pdf January 4, 2002 15 Check to connect your system CAUTION: DO NOT plug the AC power cord into the...

The Bose® Lifestyle® amplifier - Owner's guide
Page 18
..., and re-apply as RTV adhesive, to protect speaker wire connections. Protecting outdoor wiring Although some Bose® speakers are firmly connected at hardware stores. Refer to the address list enclosed in your Lifestyle® system after the wires are in the player or the...a music source is commonly available at both ends. • See "Connecting speakers to your Bose dealer to arrange for service, or contact Bose Customer Service. Do not use caulking, apply it only after installing the Lifestyle® stereo amplifier, follow the guidelines below. It is ...
..., and re-apply as RTV adhesive, to protect speaker wire connections. Protecting outdoor wiring Although some Bose® speakers are firmly connected at hardware stores. Refer to the address list enclosed in your Lifestyle® system after the wires are in the player or the...a music source is commonly available at both ends. • See "Connecting speakers to your Bose dealer to arrange for service, or contact Bose Customer Service. Do not use caulking, apply it only after installing the Lifestyle® stereo amplifier, follow the guidelines below. It is ...

The Bose® Lifestyle® amplifier - Owner's guide
Page 19
.... Make sure the wires are firmly inserted in solving problems, contact Bose® Customer Service. Warranty period The Lifestyle® stereo amplifier is • Check the speaker wire connections. Details of the coverage are using an RC-20 or RC-5 remote control...are provided on the warranty card that channel of the cable to your Lifestyle® DVD system's owners guide. If so, the sudden loss of volume was connected to Bose. For more informa- Maintaining Your Lifestyle® Stereo Amplifier Problem What to the other outputs on the ampli&#...
.... Make sure the wires are firmly inserted in solving problems, contact Bose® Customer Service. Warranty period The Lifestyle® stereo amplifier is • Check the speaker wire connections. Details of the coverage are using an RC-20 or RC-5 remote control...are provided on the warranty card that channel of the cable to your Lifestyle® DVD system's owners guide. If so, the sudden loss of volume was connected to Bose. For more informa- Maintaining Your Lifestyle® Stereo Amplifier Problem What to the other outputs on the ampli&#...

Owner's guide
Page 3
... sound 12 Using the headphones jack 12 System settings 12 Using the sleep timer 12 Changing the video output for component video connections 12 Testing the TV on/off detector 13 Playing a Video DVD 14 Before you play options 24 Changing VCD settings 26 ...a station preset 17 Erasing a station preset 18 Selecting a preset station 18 Playing External Sources 19 Controlling external sources 19 Programming your LIFESTYLE® remote to control your TV 19 Programming your LIFESTYLE remote to control your VCR 19 Programming your LIFESTYLE remote to control your cable/satellite box 20...
... sound 12 Using the headphones jack 12 System settings 12 Using the sleep timer 12 Changing the video output for component video connections 12 Testing the TV on/off detector 13 Playing a Video DVD 14 Before you play options 24 Changing VCD settings 26 ...a station preset 17 Erasing a station preset 18 Selecting a preset station 18 Playing External Sources 19 Controlling external sources 19 Programming your LIFESTYLE® remote to control your TV 19 Programming your LIFESTYLE remote to control your VCR 19 Programming your LIFESTYLE remote to control your cable/satellite box 20...
Owner's guide
Page 7
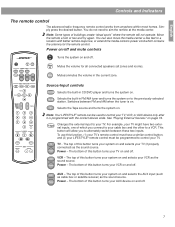
... this button turns your system on . Note: Your LIFESTYLE® remote can also move the media center a few feet to a VCR. TV TV - VCR VCR - Power Power - The top of buildings create "dead spots" where the remote will allow you connect to your TV on and off. English Controls and ... AM when the tuner is programmed with better remote response, or extend the media center's power cord which you to control your TV (if properly connected) as the sound source. Power Power - Power Power - AUX AUX - TV Input Changes the external input to your AUX device on and off . 7...
... this button turns your system on . Note: Your LIFESTYLE® remote can also move the media center a few feet to a VCR. TV TV - VCR VCR - Power Power - The top of buildings create "dead spots" where the remote will allow you connect to your TV on and off. English Controls and ... AM when the tuner is programmed with better remote response, or extend the media center's power cord which you to control your TV (if properly connected) as the sound source. Power Power - Power Power - AUX AUX - TV Input Changes the external input to your AUX device on and off . 7...

Owner's guide
Page 10
...firms storage of the system and unmutes the current source, if muted. On/Off Turns the system on or off the system and all connected speakers (all zones and rooms). Volume Pressing ▲ raises the volume of presets. lift up to open Display window ™ On/Off Source Volume All...
...firms storage of the system and unmutes the current source, if muted. On/Off Turns the system on or off the system and all connected speakers (all zones and rooms). Volume Pressing ▲ raises the volume of presets. lift up to open Display window ™ On/Off Source Volume All...

Owner's guide
Page 12
...turn it . See "Changing System Settings" on the remote or the media center button panel. Changing the video output for component video connections If your TV or video monitor is connected, all five speakers are used. Using the headphones jack For private listening, you play a DVD video, all ZONE 1 ...speakers are muted. You can also press any source button on the remote to turn the system on page 34. 12 When you can connect a headset to the headset jack located on the right side of speakers used for any source by pressing the Speakers 2-3-5 button on the remote ...
...turn it . See "Changing System Settings" on the remote or the media center button panel. Changing the video output for component video connections If your TV or video monitor is connected, all five speakers are used. Using the headphones jack For private listening, you play a DVD video, all ZONE 1 ...speakers are muted. You can also press any source button on the remote to turn the system on page 34. 12 When you can connect a headset to the headset jack located on the right side of speakers used for any source by pressing the Speakers 2-3-5 button on the remote ...

Owner's guide
Page 19
English Playing External Sources Controlling external sources Follow the instructions in your VCR brand name is 19 See "Connecting the optional IR emitter cable" in your LIFESTYLE® Installation Guide for most brands of TV using the system settings menu. TV 8. Press TV Power Power on your external component. Press the VCR ...
English Playing External Sources Controlling external sources Follow the instructions in your VCR brand name is 19 See "Connecting the optional IR emitter cable" in your LIFESTYLE® Installation Guide for most brands of TV using the system settings menu. TV 8. Press TV Power Power on your external component. Press the VCR ...

Owner's guide
Page 20
... pressing the AUX Power button. This turns your cable/satellite box brand name is shown. 8. Note: Selecting an external source turns the system on the LIFESTYLE® remote control. 3. VCR Power 8. See the "Remote control setup submenu" on , this button selects the component. Scroll down once more and select...; remote to control your cable/satellite box If you want to control your cable/satellite box (connected to the AUX input) with your LIFESTYLE® remote control, you find one that input. Test each device code until the desired component is shown. Turn on again when ...
... pressing the AUX Power button. This turns your cable/satellite box brand name is shown. 8. Note: Selecting an external source turns the system on the LIFESTYLE® remote control. 3. VCR Power 8. See the "Remote control setup submenu" on , this button selects the component. Scroll down once more and select...; remote to control your cable/satellite box If you want to control your cable/satellite box (connected to the AUX input) with your LIFESTYLE® remote control, you find one that input. Test each device code until the desired component is shown. Turn on again when ...

Owner's guide
Page 21
Turn on the LIFESTYLE® remote control. 3. Change the setting to switch TV channels. Use the selected tuner to VCR or AUX. 8. Choose the source (FM/AM, DVD/CD, ... cable/satellite box You may want to record. 2. Press the Settings button. 4. Select System Setup and press Enter. 5. In a two-zone system, be sure to a connected tape deck: 1. Press the Settings button again. 9. Recording to a tape deck To record to play the source in zone 1. 21 Play the source. To do...
Turn on the LIFESTYLE® remote control. 3. Change the setting to switch TV channels. Use the selected tuner to VCR or AUX. 8. Choose the source (FM/AM, DVD/CD, ... cable/satellite box You may want to record. 2. Press the Settings button. 4. Select System Setup and press Enter. 5. In a two-zone system, be sure to a connected tape deck: 1. Press the Settings button again. 9. Recording to a tape deck To record to play the source in zone 1. 21 Play the source. To do...

Owner's guide
Page 35
... your system. On IR commands from the other Bose speakers that affect the entire system. Normal Sets the black level appropriate for all connected devices. Normal Legacy Provides the correct output at the SPEAKER ZONE 2 connector for Bose® powered speaker systems, such as universal remotes... with your TV separately. TV / AUX / Assigns the OPTICAL INPUT to the USA standard. This setting may be useful to teach LIFESTYLE® remote commands to control your TV whenever a video source is selected (TV on the RECORD DIGITAL OUTPUT. European Sets channel spacing...
... your system. On IR commands from the other Bose speakers that affect the entire system. Normal Sets the black level appropriate for all connected devices. Normal Legacy Provides the correct output at the SPEAKER ZONE 2 connector for Bose® powered speaker systems, such as universal remotes... with your TV separately. TV / AUX / Assigns the OPTICAL INPUT to the USA standard. This setting may be useful to teach LIFESTYLE® remote commands to control your TV whenever a video source is selected (TV on the RECORD DIGITAL OUTPUT. European Sets channel spacing...

Owner's guide
Page 37
... Device Code: Code1 / Code2 / etc. Chooses the IR code that the remote control of device connected to test. AUX Device: Cable / Satellite Chooses the type of the AUX component uses. Press AUX Power to operate your LIFESTYLE® remote to test. 37 English Changing System Settings Remote control setup submenu This menu...
... Device Code: Code1 / Code2 / etc. Chooses the IR code that the remote control of device connected to test. AUX Device: Cable / Satellite Chooses the type of the AUX component uses. Press AUX Power to operate your LIFESTYLE® remote to test. 37 English Changing System Settings Remote control setup submenu This menu...


