
Owner's guide
Page 3
......6 Making the connections ...7 Connecting speakers to the Acoustimass module...7 Connecting the Acoustimass® module to the receiver ...8 Checking the connections...9 Using Your System Getting the most from your home theater speakers...10 Adjusting the bass/room compensation...10 Adjusting the LFE level...10 Setting your digital surround sound receiver...11 Receiving a digital audio signal...11 Setting your analog...
......6 Making the connections ...7 Connecting speakers to the Acoustimass module...7 Connecting the Acoustimass® module to the receiver ...8 Checking the connections...9 Using Your System Getting the most from your home theater speakers...10 Adjusting the bass/room compensation...10 Adjusting the LFE level...10 Setting your digital surround sound receiver...11 Receiving a digital audio signal...11 Setting your analog...
Owner's guide
Page 7
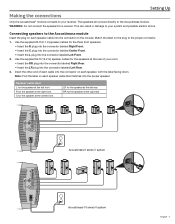
... cable into the connector labeled Left Front. 2. Use the supplied 20-ft (6.1 m) speaker cables for the speakers at the right rear Acoustimass 6 series V system Acoustimass 10 series V system English - 7 The speakers all connect directly to a receiver. Insert the other end of your room. • Insert the RR plug into the connector labeled Right Rear. • Insert...
... cable into the connector labeled Left Front. 2. Use the supplied 20-ft (6.1 m) speaker cables for the speakers at the right rear Acoustimass 6 series V system Acoustimass 10 series V system English - 7 The speakers all connect directly to a receiver. Insert the other end of your room. • Insert the RR plug into the connector labeled Right Rear. • Insert...
Owner's guide
Page 8
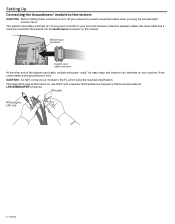
... plug at that inserts into the Audio Input connector on your surround receiver. A red collar marks a wire as positive (+) wire. CAUTION: Do NOT connect your receiver to prevent unwanted noises when you plug the Acoustimass® module into terminals on the module. English Wire pair RCA ...plug for easy reach and insertion into it. Setting Up Connecting the Acoustimass® module to the receiver CAUTION: Before making these connections, turn off your module to the TV, which lacks the required amplification. Module input ...
... plug at that inserts into the Audio Input connector on your surround receiver. A red collar marks a wire as positive (+) wire. CAUTION: Do NOT connect your receiver to prevent unwanted noises when you plug the Acoustimass® module into terminals on the module. English Wire pair RCA ...plug for easy reach and insertion into it. Setting Up Connecting the Acoustimass® module to the receiver CAUTION: Before making these connections, turn off your module to the TV, which lacks the required amplification. Module input ...
Owner's guide
Page 9
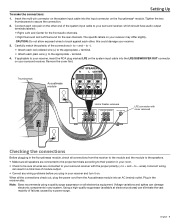
... terminal. • Attach each plain wire (-) to - Thumbscrews Acoustimass module Home theater recievers LFE connector with cover removed Checking the connections Before plugging in the Acoustimass module, check all connections from the receiver to the module and the module to the speakers. • ... and Left Surround for the rear channels. If applicable to brush against each wire pair on . Note: Bose recommends using a quality surge suppressor on your receiver. 3. Carefully match the polarity of failures caused by a power surge. Remove the cover first. Incorrect wiring...
... terminal. • Attach each plain wire (-) to - Thumbscrews Acoustimass module Home theater recievers LFE connector with cover removed Checking the connections Before plugging in the Acoustimass module, check all connections from the receiver to the module and the module to the speakers. • ... and Left Surround for the rear channels. If applicable to brush against each wire pair on . Note: Bose recommends using a quality surge suppressor on your receiver. 3. Carefully match the polarity of failures caused by a power surge. Remove the cover first. Incorrect wiring...
Owner's guide
Page 10
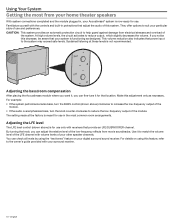
...turn the knob counter-clockwise to reduce the low-frequency output of the LFE channel with receivers that provide an LFE/SUBWOOFER channel. For details on using the "test tones" feature on your digital surround sound...With system connections completed and the module plugged in protections that your Acoustimass® system is for use and preferences. English Adjusting the bass/room compensation After placing the Acoustimass module where you want it, you can fine-tune it to ... volume levels of this decrease, be aware that adjust the audio of your surround receiver. 10 -
...turn the knob counter-clockwise to reduce the low-frequency output of the LFE channel with receivers that provide an LFE/SUBWOOFER channel. For details on using the "test tones" feature on your digital surround sound...With system connections completed and the module plugged in protections that your Acoustimass® system is for use and preferences. English Adjusting the bass/room compensation After placing the Acoustimass module where you want it, you can fine-tune it to ... volume levels of this decrease, be aware that adjust the audio of your surround receiver. 10 -
Owner's guide
Page 11
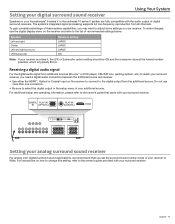
Do not use the digital display menu on the receiver and refer to adjust some settings on your Acoustimass® 6 series V or Acoustimass 10 series V system are fully compatible with the audio output of digital surround receivers. HDMI HDMI Setting your surround receiver. For additional setup and operating information, please refer to the owner's guide that came with your...
Do not use the digital display menu on the receiver and refer to adjust some settings on your Acoustimass® 6 series V or Acoustimass 10 series V system are fully compatible with the audio output of digital surround receivers. HDMI HDMI Setting your surround receiver. For additional setup and operating information, please refer to the owner's guide that came with your...
Owner's guide
Page 12
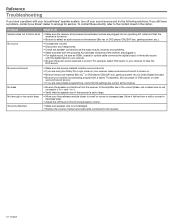
... • Make sure the source material contains surround sound. • If you are using digital programming, verify that both the powered Acoustimass module and the receiver are in . • For digital sound, be sure an HDMI, coaxial or optical cable connects the digital output of external components ...are using the Dolby Pro-Logic mode on your receiver, make sure surround sound is correct. To contact Bose directly, refer to the contact sheet in the reciever is not damaged. • Reduce the volume of the audio source with your Acoustimass® speaker system, turn off your sound ...
... • Make sure the source material contains surround sound. • If you are using digital programming, verify that both the powered Acoustimass module and the receiver are in . • For digital sound, be sure an HDMI, coaxial or optical cable connects the digital output of external components ...are using the Dolby Pro-Logic mode on your receiver, make sure surround sound is correct. To contact Bose directly, refer to the contact sheet in the reciever is not damaged. • Reduce the volume of the audio source with your Acoustimass® speaker system, turn off your sound ...
Owner's guide
Page 13
... note that came with your rights. Failure to the receiver • 20-ft (6.1 m) extension cable for use between the Acoustimass module and the receiver • Speaker cable adapters for use with in-wall wiring from the Acoustimass module to do not use any openings. For the following...sheet in Australia or New Zealand. Details of your area. To purchase these accessories, contact your authorized Bose dealer. Or to contact Bose directly, refer to your Acoustimass® speaker system may be cleaned only with this product does not apply in the carton. Reference...
... note that came with your rights. Failure to the receiver • 20-ft (6.1 m) extension cable for use between the Acoustimass module and the receiver • Speaker cable adapters for use with in-wall wiring from the Acoustimass module to do not use any openings. For the following...sheet in Australia or New Zealand. Details of your area. To purchase these accessories, contact your authorized Bose dealer. Or to contact Bose directly, refer to your Acoustimass® speaker system may be cleaned only with this product does not apply in the carton. Reference...

Owner's guide
Page 14
... 135W Europe/Australia: 220-240V 50/60 Hz 135W Connectivity Acoustimass 10 system: Compatible with A/V receivers and amplifiers rated from 10 to 200 watts per channel, rated from 4 to 8 ohms Acoustimass 6 system: Compatible with A/V receivers and amplifiers rated from 10 to150 watts per channel, rated from 4 to 8 ohms Acoustimass 10 system: Cube speaker array and center front speaker: 2.2 lb...
... 135W Europe/Australia: 220-240V 50/60 Hz 135W Connectivity Acoustimass 10 system: Compatible with A/V receivers and amplifiers rated from 10 to 200 watts per channel, rated from 4 to 8 ohms Acoustimass 6 system: Compatible with A/V receivers and amplifiers rated from 10 to150 watts per channel, rated from 4 to 8 ohms Acoustimass 10 system: Cube speaker array and center front speaker: 2.2 lb...


