User Manual
Page 2
... flash with liquids, such as lighted candles, should be placed on www.bose.com/static/compliance/index.html. Français Español English SAFETY INFORMATION Please read this guide Please take the time to follow the instructions in this work may be reproduced, modified, distributed or otherwise used indoors. It will help you set up and operate your speaker...
... flash with liquids, such as lighted candles, should be placed on www.bose.com/static/compliance/index.html. Français Español English SAFETY INFORMATION Please read this guide Please take the time to follow the instructions in this work may be reproduced, modified, distributed or otherwise used indoors. It will help you set up and operate your speaker...

User Manual
Page 3
... shock, avoid overloading wall outlets, extension cords, or integral convenience receptacles. 16. If the provided plug does not fit in solving problems, contact Bose Customer Service. Protect the power cord from being walked on , you to provide reasonable protection against harmful interference in a particular installation. Refer all instructions. 5. Do not attempt to this product yourself. This equipment generates, uses, and can...
... shock, avoid overloading wall outlets, extension cords, or integral convenience receptacles. 16. If the provided plug does not fit in solving problems, contact Bose Customer Service. Protect the power cord from being walked on , you to provide reasonable protection against harmful interference in a particular installation. Refer all instructions. 5. Do not attempt to this product yourself. This equipment generates, uses, and can...
User Manual
Page 5
... Companion® 5 multimedia speaker system 4 Setup help 4 SYSTEM SETUP 5 Unpacking 5 For your records 5 Placing your Companion® 5 system 6 Positioning the speakers 6 Positioning the Acoustimass® module 7 Making system connections 8 Windows® XP audio setup 9 Mac OS® X audio setup 11 OPERATION 13 System modes 13 Controlling the volume 13 Adjusting the bass 14 CONNECTING OTHER DEVICES 15 Connecting headphones 15 Connecting an audio device 15 CARE AND MAINTENANCE 16 Cleaning your speaker system 16 Limited warranty 16 Troubleshooting...
... Companion® 5 multimedia speaker system 4 Setup help 4 SYSTEM SETUP 5 Unpacking 5 For your records 5 Placing your Companion® 5 system 6 Positioning the speakers 6 Positioning the Acoustimass® module 7 Making system connections 8 Windows® XP audio setup 9 Mac OS® X audio setup 11 OPERATION 13 System modes 13 Controlling the volume 13 Adjusting the bass 14 CONNECTING OTHER DEVICES 15 Connecting headphones 15 Connecting an audio device 15 CARE AND MAINTENANCE 16 Cleaning your speaker system 16 Limited warranty 16 Troubleshooting...
User Manual
Page 6
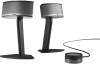
... control system volume and connect headphones or portable audio players. Using TrueSpace® digital surround signal processing technology, the small satellite speakers provide improved spaciousness, bold surround effects, and movie-like realism. Setup help , please visit http://owners.bose.com/Companion5 for purchasing a Bose® Companion® 5 multimedia speaker system, which delivers the superb acoustic performance needed to your computer. INTRODUCTION Français Español English INTRODUCTION Your Companion! 5 multimedia speaker...
... control system volume and connect headphones or portable audio players. Using TrueSpace® digital surround signal processing technology, the small satellite speakers provide improved spaciousness, bold surround effects, and movie-like realism. Setup help , please visit http://owners.bose.com/Companion5 for purchasing a Bose® Companion® 5 multimedia speaker system, which delivers the superb acoustic performance needed to your computer. INTRODUCTION Français Español English INTRODUCTION Your Companion! 5 multimedia speaker...
User Manual
Page 7
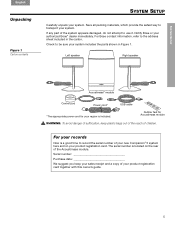
... Español Français SYSTEM SETUP Unpacking Figure 1 Carton contents Carefully unpack your system includes the parts shown in the carton. For Bose contact information, refer to use it. If any part of children. Check to be sure your system. Left speaker Right speaker Acoustimass® module Control pod Power cord* USB cable *The appropriate power cord for Acoustimass module WARNING: To avoid danger...
... Español Français SYSTEM SETUP Unpacking Figure 1 Carton contents Carefully unpack your system includes the parts shown in the carton. For Bose contact information, refer to use it. If any part of children. Check to be sure your system. Left speaker Right speaker Acoustimass® module Control pod Power cord* USB cable *The appropriate power cord for Acoustimass module WARNING: To avoid danger...
User Manual
Page 8
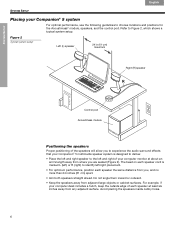
... cabinet surfaces. Figure 2 Typical system setup Left (L) speaker 24 in (61 cm) maximum Right (R) speaker Control pod Acoustimass module Positioning the speakers Proper positioning of the speakers will allow you to experience the audio surround effects that your Companion® 5 multimedia speaker system is marked L (left) or R (right) to the left /right placement. • For optimum performance, position each speaker at about an arm's length away...
... cabinet surfaces. Figure 2 Typical system setup Left (L) speaker 24 in (61 cm) maximum Right (R) speaker Control pod Acoustimass module Positioning the speakers Proper positioning of the speakers will allow you to experience the audio surround effects that your Companion® 5 multimedia speaker system is marked L (left) or R (right) to the left /right placement. • For optimum performance, position each speaker at about an arm's length away...
User Manual
Page 9
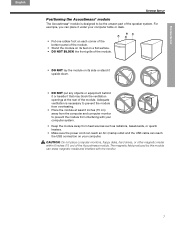
... it that may block the ventilation openings at least 6 inches (15 cm) away from the computer and computer monitor to prevent the module from heat sources such as radiators, baseboards, or quartz heaters. • Make sure the power cord can reach an AC (mains) outlet and the USB cable can erase magnetic media and interfere with your computer...
... it that may block the ventilation openings at least 6 inches (15 cm) away from the computer and computer monitor to prevent the module from heat sources such as radiators, baseboards, or quartz heaters. • Make sure the power cord can reach an AC (mains) outlet and the USB cable can erase magnetic media and interfere with your computer...
User Manual
Page 10
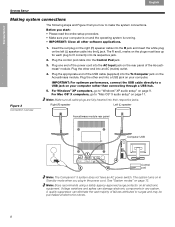
... system connections. Right (R) speaker Left (L) speaker Acoustimass module rear panel Computer USB 1 3 4 2 Control pod Note: The Companion® 5 system does not have an AC power switch. A quality suppressor can damage electronic components in the power cord. Figure 3 Connection overview 1. The system turns on page 13. Plug one end of the USB cable (supplied) into the AC Input jack on page 11. Note: Make sure all cable plugs are fully inserted into its respective jack. 2. Note: Bose recommends using...
... system connections. Right (R) speaker Left (L) speaker Acoustimass module rear panel Computer USB 1 3 4 2 Control pod Note: The Companion® 5 system does not have an AC power switch. A quality suppressor can damage electronic components in the power cord. Figure 3 Connection overview 1. The system turns on page 13. Plug one end of the USB cable (supplied) into the AC Input jack on page 11. Note: Make sure all cable plugs are fully inserted into its respective jack. 2. Note: Bose recommends using...
User Manual
Page 11
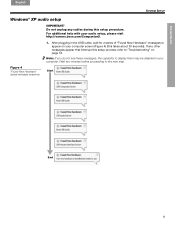
... them may be disabled in the USB cable, wait for a series of "Found New Hardware" messages to "Troubleshooting" on your audio setup, please visit http://owners.bose.com/Companion5. 1. If any cables during this takes about 30 seconds). For additional help with your computer screen (Figure 4) (this setup procedure. Figure 4 "Found New Hardware" typical message sequence Start End 9 !! Do not unplug any...
... them may be disabled in the USB cable, wait for a series of "Found New Hardware" messages to "Troubleshooting" on your audio setup, please visit http://owners.bose.com/Companion5. 1. If any cables during this takes about 30 seconds). For additional help with your computer screen (Figure 4) (this setup procedure. Figure 4 "Found New Hardware" typical message sequence Start End 9 !! Do not unplug any...
User Manual
Page 12
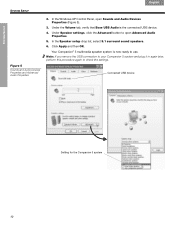
... to use. Click Apply and then OK. Under Speaker settings, click the Advanced button to open Sounds and Audio Devices Properties (Figure 5). 3. Your Companion® 5 multimedia speaker system is the connected USB device. 4. In the Speaker setup drop list, select 5.1 surround sound speakers. 6. SYSTEM SETUP Français Español English SYSTEM SETUP Figure 5 Sounds and Audio Devices Properties and Advanced Audio Properties 2. In the Windows XP Control Panel, open Advanced Audio Properties. 5. Connected USB device Setting for the Companion...
... to use. Click Apply and then OK. Under Speaker settings, click the Advanced button to open Sounds and Audio Devices Properties (Figure 5). 3. Your Companion® 5 multimedia speaker system is the connected USB device. 4. In the Speaker setup drop list, select 5.1 surround sound speakers. 6. SYSTEM SETUP Français Español English SYSTEM SETUP Figure 5 Sounds and Audio Devices Properties and Advanced Audio Properties 2. In the Windows XP Control Panel, open Advanced Audio Properties. 5. Connected USB device Setting for the Companion...
User Manual
Page 13
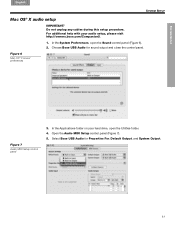
.... 4. Choose Bose USB Audio for Properties For, Default Output, and System Output. 11 !! Figure 6 Mac OS® X sound preferences Figure 7 Audio MIDI Setup control panel 3. For additional help with your hard drive, open the Sound control panel (Figure 6). 2. Open the Audio MIDI Setup control panel (Figure 7). 5. Select Bose USB Audio for sound output and close the control panel. In the Applications folder on your audio setup, please visit http://owners.bose.com/Companion5. 1. Do not unplug any cables during this setup procedure. SYSTEM SETUP English...
.... 4. Choose Bose USB Audio for Properties For, Default Output, and System Output. 11 !! Figure 6 Mac OS® X sound preferences Figure 7 Audio MIDI Setup control panel 3. For additional help with your hard drive, open the Sound control panel (Figure 6). 2. Open the Audio MIDI Setup control panel (Figure 7). 5. Select Bose USB Audio for sound output and close the control panel. In the Applications folder on your audio setup, please visit http://owners.bose.com/Companion5. 1. Do not unplug any cables during this setup procedure. SYSTEM SETUP English...
User Manual
Page 14
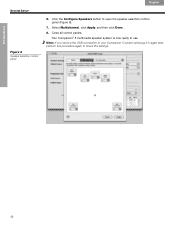
panel (Figure 8). 7. Note: If you remove the USB connection to your Companion 5 system and plug it in again later, perform this procedure again to open the speaker selection control ! Select Multichannel, click Apply, and then click Done. 8. Close all control panels. Click the Configure Speakers button to check the settings. 12 !! Your Companion® 5 multimedia speaker system is now ready to use. SYSTEM SETUP SYSTEM SETUP Figure 8 Speaker selection control panel Français Español English 6.
panel (Figure 8). 7. Note: If you remove the USB connection to your Companion 5 system and plug it in again later, perform this procedure again to open the speaker selection control ! Select Multichannel, click Apply, and then click Done. 8. Close all control panels. Click the Configure Speakers button to check the settings. 12 !! Your Companion® 5 multimedia speaker system is now ready to use. SYSTEM SETUP SYSTEM SETUP Figure 8 Speaker selection control panel Français Español English 6.
User Manual
Page 15
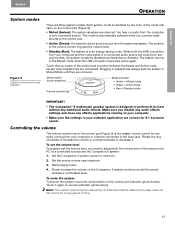
... 5.1 surround sound. Note: The system output may be reduced by the color of a connected audio source are three system modes. Touch the top center of time. 13 01"# Set the Companion 5 system volume to the Muted mode when the USB connection becomes active again. Set the source volume near maximum. 3. Mode switch! (touch-sensitive) Volume control ring Mode indicator • Amber = Muted mode • Green = Active mode • Red = Standby mode IMPORTANT! • The Companion® 5 multimedia speaker system...
... 5.1 surround sound. Note: The system output may be reduced by the color of a connected audio source are three system modes. Touch the top center of time. 13 01"# Set the Companion 5 system volume to the Muted mode when the USB connection becomes active again. Set the source volume near maximum. 3. Mode switch! (touch-sensitive) Volume control ring Mode indicator • Amber = Muted mode • Green = Active mode • Red = Standby mode IMPORTANT! • The Companion® 5 multimedia speaker system...

User Manual
Page 16
compensation control (Figure 10) on the Acoustimass® module. Figure 10 Bass compensation control Acoustimass rear panel Bass compensation: • ! Use the bass ! OPERATION OPERATION Français Español English Adjusting the bass After listening to your speaker system, you may wish to decrease bass (-) 14 01"# to increase bass (+) • " to adjust the sound.
compensation control (Figure 10) on the Acoustimass® module. Figure 10 Bass compensation control Acoustimass rear panel Bass compensation: • ! Use the bass ! OPERATION OPERATION Français Español English Adjusting the bass After listening to your speaker system, you may wish to decrease bass (-) 14 01"# to increase bass (+) • " to adjust the sound.
User Manual
Page 17
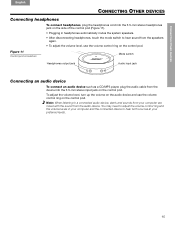
... the mode switch to hear sound from the speakers again. • To adjust the volume level, use the volume control ring on the control pod. To adjust the volume level, turn up the volume on the audio device and use the volume control ring on the control pod. Figure 11 Control pod connectors Mode switch Headphones output jack Audio input jack Connecting an audio device To connect an audio device such as a CD/MP3 player, plug the audio cable from the audio device. Note: When listening to a connected audio device...
... the mode switch to hear sound from the speakers again. • To adjust the volume level, use the volume control ring on the control pod. To adjust the volume level, turn up the volume on the audio device and use the volume control ring on the control pod. Figure 11 Control pod connectors Mode switch Headphones output jack Audio input jack Connecting an audio device To connect an audio device such as a CD/MP3 player, plug the audio cable from the audio device. Note: When listening to a connected audio device...
User Manual
Page 18
... Bose or register your limited warranty rights. Limited warranty The Companion® 5 system is not set in again. • Make sure connections are using a connected audio device, make sure it to do so will not affect your product at the sound source and increase the volume on the control pod. See the address sheet included in any sprays near the speakers. Problem What to a Hi-Speed USB 2.0 port. Setup...
... Bose or register your limited warranty rights. Limited warranty The Companion® 5 system is not set in again. • Make sure connections are using a connected audio device, make sure it to do so will not affect your product at the sound source and increase the volume on the control pod. See the address sheet included in any sprays near the speakers. Problem What to a Hi-Speed USB 2.0 port. Setup...

User Manual
Page 19
....3 cm x 42.5 cm) Control pod 2.46"DIA x 1.12"H ! (6.3 cm x 2.9 cm) Satellite speaker 1.9 lb (0.85 kg)! Disconnect the Companion® 5 system USB cable from speakers is in solving problems, contact Bose® Customer Service. Sound from the hub and plug it into its jack on the Acoustimass module. • To determine if the problem is • Increase the volume on your computer monitor. not loud enough. International...
....3 cm x 42.5 cm) Control pod 2.46"DIA x 1.12"H ! (6.3 cm x 2.9 cm) Satellite speaker 1.9 lb (0.85 kg)! Disconnect the Companion® 5 system USB cable from speakers is in solving problems, contact Bose® Customer Service. Sound from the hub and plug it into its jack on the Acoustimass module. • To determine if the problem is • Increase the volume on your computer monitor. not loud enough. International...


