User Manual
Page 5
Now would be a good time to the module 9 Connecting the power cord 10 Connecting other sources 10 USING YOUR SPEAKER SYSTEM 11 Controlling the system 11 Balancing tone for the sound you keep your sales receipt together with this owner's guide. Serial number Dealer ...;ais CONTENTS GETTING STARTED 6 Congratulations on your choice 6 Unpacking the carton 6 SETUP AND CONNECTIONS 7 Placing your system 7 Positioning the Acoustimass® module 7 Positioning the speakers 8 Making connections 8 Connecting the speakers to register your product online at www.bose.com/register. 5
Now would be a good time to the module 9 Connecting the power cord 10 Connecting other sources 10 USING YOUR SPEAKER SYSTEM 11 Controlling the system 11 Balancing tone for the sound you keep your sales receipt together with this owner's guide. Serial number Dealer ...;ais CONTENTS GETTING STARTED 6 Congratulations on your choice 6 Unpacking the carton 6 SETUP AND CONNECTIONS 7 Placing your system 7 Positioning the Acoustimass® module 7 Positioning the speakers 8 Making connections 8 Connecting the speakers to register your product online at www.bose.com/register. 5
User Manual
Page 6
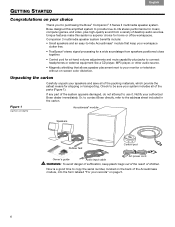
... sound from speakers positioned close together. • Control pod for purchasing the Bose®!Companion® 3 Series II multimedia speaker system. Bose designed this system a superior choice for shipping or transporting. Companion 3 multimedia speaker system benefits include: • Small speakers and an ...any part of the parts (Figure 1). Or, to contact Bose directly, refer to copy the serial number, located on -screen color distortion. Figure 1 Carton contents Acoustimass® module Speakers Rubber feet Control pod AC power cord Owner's guide Audio input...
... sound from speakers positioned close together. • Control pod for purchasing the Bose®!Companion® 3 Series II multimedia speaker system. Bose designed this system a superior choice for shipping or transporting. Companion 3 multimedia speaker system benefits include: • Small speakers and an ...any part of the parts (Figure 1). Or, to contact Bose directly, refer to copy the serial number, located on -screen color distortion. Figure 1 Carton contents Acoustimass® module Speakers Rubber feet Control pod AC power cord Owner's guide Audio input...
User Manual
Page 7
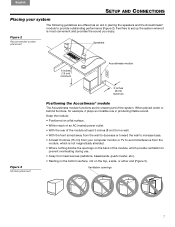
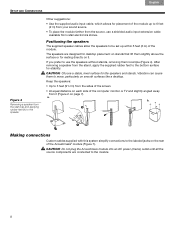
When placed under or behind furniture, for example, it plays an invisible role in placing the speakers and the Acoustimass® module to set up the system where it is not magnetically shielded. • Where nothing blocks the openings on ...TV to prevent overheating during use. • Away from the module, which is most convenient and provides the sound you enjoy. Figure 2 Recommended system placement Speakers Figure 3 Module placement 6 inches (15 cm) minimum Acoustimass module 3 inches (8 cm) minimum Positioning the Acoustimass® module The Acoustimass module functions as...
When placed under or behind furniture, for example, it plays an invisible role in placing the speakers and the Acoustimass® module to set up the system where it is not magnetically shielded. • Where nothing blocks the openings on ...TV to prevent overheating during use. • Away from the module, which is most convenient and provides the sound you enjoy. Figure 2 Recommended system placement Speakers Figure 3 Module placement 6 inches (15 cm) minimum Acoustimass module 3 inches (8 cm) minimum Positioning the Acoustimass® module The Acoustimass module functions as...
User Manual
Page 8
...connections to be set up to 6 feet ! (2 m) from your sound source. • To place the module farther from the source, use the speakers without stands, removing them slightly above the surface or for resting directly on it (Figure 2 on stands that lift them is simple (Figure 4). a.... If you prefer to use a shielded audio input extension cable available from retail electronics stores. Positioning the speakers The supplied speaker cables allow the speakers to the labeled jacks on each side of the computer monitor or TV and slightly angled away from it . Franç...
...connections to be set up to 6 feet ! (2 m) from your sound source. • To place the module farther from the source, use the speakers without stands, removing them slightly above the surface or for resting directly on it (Figure 2 on stands that lift them is simple (Figure 4). a.... If you prefer to use a shielded audio input extension cable available from retail electronics stores. Positioning the speakers The supplied speaker cables allow the speakers to the labeled jacks on each side of the computer monitor or TV and slightly angled away from it . Franç...
User Manual
Page 9
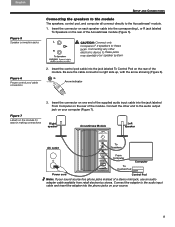
...the corresponding L or R jack labeled! Figure 6 Proper control pod cable connection 2. Right speaker Acoustimass Module Left speaker AC outlet To Speakers From Computer To Control Pod Computer Power cord Control Pod Note: G.#4"'$#,"'1&#,"'$(%#*6,#3*"1"#:6(-,#+1,)%6&#".#6#,)%$%"#5+1+#:6(-0#',%#61#6'&+"# 6&63)%$#(68/%#...2 34!5 module. English Español Français SETUP AND CONNECTIONS Figure 5 Speaker connection jacks Connecting the speakers to the module The speakers, control pod, and computer all connect directly to these jacks. Insert the connector on one...
...the corresponding L or R jack labeled! Figure 6 Proper control pod cable connection 2. Right speaker Acoustimass Module Left speaker AC outlet To Speakers From Computer To Control Pod Computer Power cord Control Pod Note: G.#4"'$#,"'1&#,"'$(%#*6,#3*"1"#:6(-,#+1,)%6&#".#6#,)%$%"#5+1+#:6(-0#',%#61#6'&+"# 6&63)%$#(68/%#...2 34!5 module. English Español Français SETUP AND CONNECTIONS Figure 5 Speaker connection jacks Connecting the speakers to the module The speakers, control pod, and computer all connect directly to these jacks. Insert the connector on one...

User Manual
Page 10
... is the final step before using the system. 1. Insert the small connector end of the Acoustimass module, to your system, plug the cable from the speakers. 10 01&2 2 34!5 Français Español English SETUP AND CONNECTIONS Connecting the power cord Plugging in and turning on the module. 2. Connecting...
... is the final step before using the system. 1. Insert the small connector end of the Acoustimass module, to your system, plug the cable from the speakers. 10 01&2 2 34!5 Français Español English SETUP AND CONNECTIONS Connecting the power cord Plugging in and turning on the module. 2. Connecting...
User Manual
Page 11
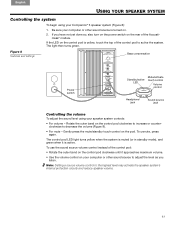
...LED Mute/activate touch control Volume control Headphone jack Sound source jack Controlling the volume To adjust the sound level using your Companion® 3 speaker system (Figure 8): 1. To use the sound source volume control instead of the Acoustimass® module. If you listen. The light then ... control pod clockwise until it is yellow, touch the top of the control pod to the highest level may activate the speaker system's internal protection circuity and reduce speaker volume. 11 01&2 2 34!5 Note: Setting a source volume control to active the system. Rotate the outer band...
...LED Mute/activate touch control Volume control Headphone jack Sound source jack Controlling the volume To adjust the sound level using your Companion® 3 speaker system (Figure 8): 1. To use the sound source volume control instead of the Acoustimass® module. If you listen. The light then ... control pod clockwise until it is yellow, touch the top of the control pod to the highest level may activate the speaker system's internal protection circuity and reduce speaker volume. 11 01&2 2 34!5 Note: Setting a source volume control to active the system. Rotate the outer band...
User Manual
Page 12
...system is usually located in and ! The LED on the rear of the volume control icon. originally unheard speaker, this speaker may be the cause. Contact Bose Customer Service. • Check balance levels on the sound source may be the cause. seems distorted •... in the Options menu of the Acoustimass module. - One speaker does not perform • Check connections from the speakers, control pod, or sounds distorted and computer to decrease bass. • Reposition the module. Contact Bose® Customer Service. - Upholstered furniture, carpets, and drapes...
...system is usually located in and ! The LED on the rear of the volume control icon. originally unheard speaker, this speaker may be the cause. Contact Bose Customer Service. • Check balance levels on the sound source may be the cause. seems distorted •... in the Options menu of the Acoustimass module. - One speaker does not perform • Check connections from the speakers, control pod, or sounds distorted and computer to decrease bass. • Reposition the module. Contact Bose® Customer Service. - Upholstered furniture, carpets, and drapes...
User Manual
Page 13
... Card that came with a dry cloth. • Do not use solvents or chemicals. • Do not allow liquids or objects to Bose. Details of the control pod. Speakers without stand: 21/2"H x 23/4"W x 21/2"D (6.3 cm x 7.1 cm x 6.3 cm)! Control pod: 0.5 lb (0.2 kg) 13...Control pod: 21/2"Dia x 11/8"H (6.3 cm x 2.8 cm) Weight (approximate) One speaker, unpacked: 0.8 lb (0.4 kg)! Failure to the address sheet included in solving problems, contact Bose® Customer Service. Japan: 100V 50/60 Hz Dimensions (approximate) Speakers on stand: 6"H x 33/8"W x 31/4"D (15 cm x 8.6 cm x 8.2...
... Card that came with a dry cloth. • Do not use solvents or chemicals. • Do not allow liquids or objects to Bose. Details of the control pod. Speakers without stand: 21/2"H x 23/4"W x 21/2"D (6.3 cm x 7.1 cm x 6.3 cm)! Control pod: 0.5 lb (0.2 kg) 13...Control pod: 21/2"Dia x 11/8"H (6.3 cm x 2.8 cm) Weight (approximate) One speaker, unpacked: 0.8 lb (0.4 kg)! Failure to the address sheet included in solving problems, contact Bose® Customer Service. Japan: 100V 50/60 Hz Dimensions (approximate) Speakers on stand: 6"H x 33/8"W x 31/4"D (15 cm x 8.6 cm x 8.2...


