Owner's guide
Page 3
... radio antennas 25 8 Connecting the module to a power outlet 28 9 Setting the remote to control your TV and components 30 Inserting the remote batteries 30 Setting the remote for your TV 31 Controlling another component 32 FIRST-TIME USE 33 Trying out the... DVD 33 CONTROLS AND INDICATORS 34 The remote control 34 Power and source buttons 35 Menu and movement buttons 36 Play and numeric buttons 37 Record and ... 42 Choosing a password 42 Setting a restriction level 43 Ratings supplied by the MPAA 43 iii
... radio antennas 25 8 Connecting the module to a power outlet 28 9 Setting the remote to control your TV and components 30 Inserting the remote batteries 30 Setting the remote for your TV 31 Controlling another component 32 FIRST-TIME USE 33 Trying out the... DVD 33 CONTROLS AND INDICATORS 34 The remote control 34 Power and source buttons 35 Menu and movement buttons 36 Play and numeric buttons 37 Record and ... 42 Choosing a password 42 Setting a restriction level 43 Ratings supplied by the MPAA 43 iii
Owner's guide
Page 4
... 49 Video options 50 Media center options 52 Choosing new settings 53 To get to the Settings menu 53 Settings options 54 REFERENCE 59 Replacing remote batteries 59 Protecting the system 59 Cleaning the media center 59 Cleaning the speakers 59 Troubleshooting 60 For customer service 63 Limited warranty 63 Technical...
... 49 Video options 50 Media center options 52 Choosing new settings 53 To get to the Settings menu 53 Settings options 54 REFERENCE 59 Replacing remote batteries 59 Protecting the system 59 Cleaning the media center 59 Cleaning the speakers 59 Troubleshooting 60 For customer service 63 Limited warranty 63 Technical...
Owner's guide
Page 6
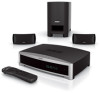
Svenska Nederlands FraItnaçliainso DEsepuatsñcohl English INTRODUCTION Before you begin Thank you for surround-sound sources. Using Bose® proprietary signal processing technology, the 3•2•1 system provides improved spaciousness from stereo recordings and bold movie effects for ..., easy-to-place shelf speakers • Easy-to-hide Acoustimass® module • Integrated DVD/CD player and AM/FM tuner • Remote and media center controls • HDMI video connection to your TV • Audio In connectors for three components • Your choice of language ...
Svenska Nederlands FraItnaçliainso DEsepuatsñcohl English INTRODUCTION Before you begin Thank you for surround-sound sources. Using Bose® proprietary signal processing technology, the 3•2•1 system provides improved spaciousness from stereo recordings and bold movie effects for ..., easy-to-place shelf speakers • Easy-to-hide Acoustimass® module • Integrated DVD/CD player and AM/FM tuner • Remote and media center controls • HDMI video connection to your TV • Audio In connectors for three components • Your choice of language ...
Owner's guide
Page 28
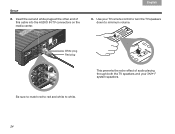
Use your 3•2•1® system speakers. 24 Insert the red and white plugs at the other end of audio playing through both the TV speakers and your TV remote control to turn the TV speakers down to white. White plug Red plug Be sure to match red to red and white to minimum volume. Svenska Nederlands FItralniaçnaois DEsepuatsñcohl English SETUP 2. This prevents the echo effect of this cable into the AUDIO IN TV connectors on the media center. 3.
Use your 3•2•1® system speakers. 24 Insert the red and white plugs at the other end of audio playing through both the TV speakers and your TV remote control to turn the TV speakers down to white. White plug Red plug Be sure to match red to red and white to minimum volume. Svenska Nederlands FItralniaçnaois DEsepuatsñcohl English SETUP 2. This prevents the echo effect of this cable into the AUDIO IN TV connectors on the media center. 3.

Owner's guide
Page 34
... The two supplied AA batteries go into place. 30 and + symbols on the back of the remote control. 1. Slide the cover back until it clicks into the compartment on the batteries. 2. Insert the two batteries, making sure to match the - Your ...show how to match the markings. -+ 3. Slide the battery compartment cover off. Svenska Nederlands FItralniaçnaois DEsepuatsñcohl English SETUP 9 Setting the remote to control your TV and components What you need to use: Remote control and batteries When the batteries are installed, you can set the 3•2•1®...
... The two supplied AA batteries go into place. 30 and + symbols on the back of the remote control. 1. Slide the cover back until it clicks into the compartment on the batteries. 2. Insert the two batteries, making sure to match the - Your ...show how to match the markings. -+ 3. Slide the battery compartment cover off. Svenska Nederlands FItralniaçnaois DEsepuatsñcohl English SETUP 9 Setting the remote to control your TV and components What you need to use: Remote control and batteries When the batteries are installed, you can set the 3•2•1®...
Owner's guide
Page 35
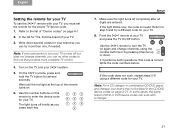
..." on again and change channels, you press each key. 7. If the light blinks now, the code is correct. Write the code numbers below: If this remote to the list of DVD or VCR device codes can work , repeat steps 5-8 using the number buttons or by pressing Channel up or down several... does not work with your TV, you can try a different code for your TV. 8. Return to turn the TV on page A-1. 2. Point the 3•2•1 remote at the top of your TV. 3. Note: If one , if needed. Note: For a CD changer or combination CD/DVD player and changer, your 3•2•...
..." on again and change channels, you press each key. 7. If the light blinks now, the code is correct. Write the code numbers below: If this remote to the list of DVD or VCR device codes can work , repeat steps 5-8 using the number buttons or by pressing Channel up or down several... does not work with your TV, you can try a different code for your TV. 8. Return to turn the TV on page A-1. 2. Point the 3•2•1 remote at the top of your TV. 3. Note: If one , if needed. Note: For a CD changer or combination CD/DVD player and changer, your 3•2•...

Owner's guide
Page 36
...the Device Codes list, find the codes for your component. 2. If the light blinks instead of the remote turns on again and to turn the component on . 3. Use the 3•2•1 remote to skip forward by pressing channel up or down. AUX Wait until the red light at your CBL&#...8226;SAT, VCR, or other component turned on, follow these steps. 1. On the 3•2•1® remote, press and hold the button for this component for this code does not work, repeat steps 2-5 using a different code for your component. 32 Svenska ...
...the Device Codes list, find the codes for your component. 2. If the light blinks instead of the remote turns on again and to turn the component on . 3. Use the 3•2•1 remote to skip forward by pressing channel up or down. AUX Wait until the red light at your CBL&#...8226;SAT, VCR, or other component turned on, follow these steps. 1. On the 3•2•1® remote, press and hold the button for this component for this code does not work, repeat steps 2-5 using a different code for your component. 32 Svenska ...
Owner's guide
Page 37
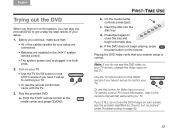
... do not see the problem identified as "Sound, but no picture" under Troubleshooting on page 62. 33 Play the provided DVD. Point the 3•2•1 remote control at both ends. 2. On the media center controls, press Eject. Insert the disc into the disc tray. Or use the... you can play the provided DVD to get a step-by-step review of the cables needed for Video Input on your TV remote control. b. English DEsepuatsñcohl FItralniaçnaois Nederlands Svenska FIRST-TIME USE Trying out the DVD When you first turn on the system, you ...
... do not see the problem identified as "Sound, but no picture" under Troubleshooting on page 62. 33 Play the provided DVD. Point the 3•2•1 remote control at both ends. 2. On the media center controls, press Eject. Insert the disc into the disc tray. Or use the... you can play the provided DVD to get a step-by-step review of the cables needed for Video Input on your TV remote control. b. English DEsepuatsñcohl FItralniaçnaois Nederlands Svenska FIRST-TIME USE Trying out the DVD When you first turn on the system, you ...
Owner's guide
Page 38
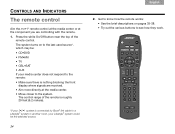
...: • See the brief descriptions on to the last used source*, which may be the selected source. 34 The control range of the remote control. The system turns on pages 35-38. • Try out the various buttons to see how they work. *If your 3•2•1 ...system is connected by Bose® link cable to the system. Svenska Nederlands FItralniaçnaois DEsepuatsñcohl English CONTROLS AND INDICATORS The remote control Aim the 3•2•1® remote control at the media center or at the media center. • Move...
...: • See the brief descriptions on to the last used source*, which may be the selected source. 34 The control range of the remote control. The system turns on pages 35-38. • Try out the various buttons to see how they work. *If your 3•2•1 ...system is connected by Bose® link cable to the system. Svenska Nederlands FItralniaçnaois DEsepuatsñcohl English CONTROLS AND INDICATORS The remote control Aim the 3•2•1® remote control at the media center or at the media center. • Move...
Owner's guide
Page 39
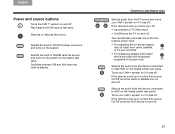
... source and turns your 3•2•1 system on and off. Turns your 3•2•1 system on the media center rear panel. If the remote is set up control your 3•2•1 system on -screen aspect ratio of the two buttons shown here: • For adjusting the on...last used . Silences or restores the sound. Selects the built-in CD/DVD player as source and turns on the system. If the remote is playing. English DEsepuatsñcohl FItralniaçnaois Nederlands Svenska CONTROLS AND INDICATORS Power and source buttons Turns the 3•2•1® ...
... source and turns your 3•2•1 system on and off. Turns your 3•2•1 system on the media center rear panel. If the remote is set up control your 3•2•1 system on -screen aspect ratio of the two buttons shown here: • For adjusting the on...last used . Silences or restores the sound. Selects the built-in CD/DVD player as source and turns on the system. If the remote is playing. English DEsepuatsñcohl FItralniaçnaois Nederlands Svenska CONTROLS AND INDICATORS Power and source buttons Turns the 3•2•1® ...

Owner's guide
Page 42
...INDICATORS Record and A, B, C buttons (not in Europe only) These buttons can be used with Teletext, a cable box, or a satellite box (if the 3•2•1 remote is playing. Makes a selection from a cable on-screen List B. Makes a selection from a cable on -screen List A. Selects the screen content labeled green. Yellow - Selects...Red - Selects the screen content labeled red. Starts DVR or VCR recording of the cable, satellite, or TV program that the 3•2•1® remote is set to control the component. This requires that is set to control the box).
...INDICATORS Record and A, B, C buttons (not in Europe only) These buttons can be used with Teletext, a cable box, or a satellite box (if the 3•2•1 remote is playing. Makes a selection from a cable on-screen List B. Makes a selection from a cable on -screen List A. Selects the screen content labeled green. Yellow - Selects...Red - Selects the screen content labeled red. Starts DVR or VCR recording of the cable, satellite, or TV program that the 3•2•1® remote is set to control the component. This requires that is set to control the box).
Owner's guide
Page 43
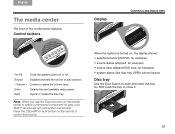
... • source status (stopped, for example) • source data (elapsed DVD time, for play options. - When the system is turned on the remote to select a connected component for example) • system status (like disc tray OPEN, shown below) Disc tray Use the Eject button to close this... tray. English DEsepuatsñcohl FItralniaçnaois Nederlands Svenska The media center The front of play , your 3•2•1® remote will not control that source. Note: When you use the Source button on or off. Enter Selects the next available radio preset. Do...
... • source status (stopped, for example) • source data (elapsed DVD time, for play options. - When the system is turned on the remote to select a connected component for example) • system status (like disc tray OPEN, shown below) Disc tray Use the Eject button to close this... tray. English DEsepuatsñcohl FItralniaçnaois Nederlands Svenska The media center The front of play , your 3•2•1® remote will not control that source. Note: When you use the Source button on or off. Enter Selects the next available radio preset. Do...
Owner's guide
Page 44
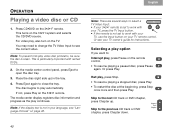
... There are several ways to select a TV Video Input: • If your 3•2•1 remote is set to work with your TV, press the TV Input button. • If the remote is particularly important with your TV remote control. On the media center control panel, press Eject to the previous CD track or... DVD chapter, press Chapter down. 40 If not, press Play on the remote control. • To resume playing a paused disc, press Pause again. Selecting a play option If you want to the next CD track or DVD chapter, ...
... There are several ways to select a TV Video Input: • If your 3•2•1 remote is set to work with your TV, press the TV Input button. • If the remote is particularly important with your TV remote control. On the media center control panel, press Eject to the previous CD track or... DVD chapter, press Chapter down. 40 If not, press Play on the remote control. • To resume playing a paused disc, press Pause again. Selecting a play option If you want to the next CD track or DVD chapter, ...
Owner's guide
Page 46
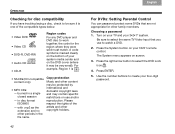
... any DVD player and DVD disc to select the DVD Lock icon . 4. Press ENTER. 5. Press the System button on use to create your 3•2•1 remote control. Svenska Nederlands FItralniaçnaois DEsepuatsñcohl English OPERATION Checking for disc compatibility If you use and/or reproduction. The System menu appears...
... any DVD player and DVD disc to select the DVD Lock icon . 4. Press ENTER. 5. Press the System button on use to create your 3•2•1 remote control. Svenska Nederlands FItralniaçnaois DEsepuatsñcohl English OPERATION Checking for disc compatibility If you use and/or reproduction. The System menu appears...

Owner's guide
Page 48
...AUX) you want to play. and press 3. The Settings menu appears on the 3•2•1 remote control. It may notice that the picture and audio are not in perfect sync. If the 3•2•1 remote is a video component. Press the Settings button on screen. 2. Each selection makes a minute timing...8226;2•1® system to see a person's lips move after you see if this timing, use the audio delay setting on the remote. 3. Press the button for audio delay While playing a DVD, you can press the source On/Off button on the 3•2•1 system: 1.
...AUX) you want to play. and press 3. The Settings menu appears on the 3•2•1 remote control. It may notice that the picture and audio are not in perfect sync. If the 3•2•1 remote is a video component. Press the Settings button on screen. 2. Each selection makes a minute timing...8226;2•1® system to see a person's lips move after you see if this timing, use the audio delay setting on the remote. 3. Press the button for audio delay While playing a DVD, you can press the source On/Off button on the 3•2•1 system: 1.

Owner's guide
Page 50
...:xx* SET appears briefly on the 3•2•1 system and plays the radio station last selected. 2. This turns on the display. On the 3•2•1 remote, press FM•AM. Svenska Nederlands FItralniaçnaois DEsepuatsñcohl English OPERATION Listening to a preset. 2.
...:xx* SET appears briefly on the 3•2•1 system and plays the radio station last selected. 2. This turns on the display. On the 3•2•1 remote, press FM•AM. Svenska Nederlands FItralniaçnaois DEsepuatsñcohl English OPERATION Listening to a preset. 2.
Owner's guide
Page 51
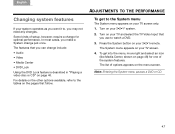
.... Note: Entering the System menu pauses a DVD or CD. 47 Turn on your 3•2•1® system. 2. Press the System button on your 3•2•1 remote. The features that you can change for one of options appears on your TV and select the TV Video Input that follow. English DeEustpsacñ...
.... Note: Entering the System menu pauses a DVD or CD. 47 Turn on your 3•2•1® system. 2. Press the System button on your 3•2•1 remote. The features that you can change for one of options appears on your TV and select the TV Video Input that follow. English DeEustpsacñ...
Owner's guide
Page 55
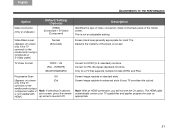
... HDMI connection, you will not see the On option. This is not needed with HDMI.) (On) Note: If selecting On distorts your screen, press the remote up arrow to the media center using a Composite or S-Video cable.) Normal (Extended) Screen black level generally appropriate for a TV that supports multiple formats (NTSC...
... HDMI connection, you will not see the On option. This is not needed with HDMI.) (On) Note: If selecting On distorts your screen, press the remote up arrow to the media center using a Composite or S-Video cable.) Normal (Extended) Screen black level generally appropriate for a TV that supports multiple formats (NTSC...
Owner's guide
Page 57
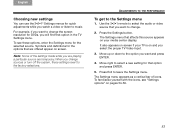
... appear on and you select the proper TV Video Input. 3. To get to the option you want to the factory selections. Use the 3•2•1 remote to select the audio or video source that are temporary. To familiarize yourself with the icons, see these settings revert to change the screen resolution...
... appear on and you select the proper TV Video Input. 3. To get to the option you want to the factory selections. Use the 3•2•1 remote to select the audio or video source that are temporary. To familiarize yourself with the icons, see these settings revert to change the screen resolution...
Owner's guide
Page 63
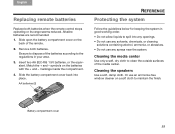
...below for keeping the system in your area. 3. Be sure to dispose of the batteries according to clean the outside surfaces of the remote. 2. Or use any solvents, chemicals, or cleaning solutions containing alcohol, ammonia, or abrasives. • Do not use an ammonia-...any openings. • Do not use any sprays near the system. English DeEustpsacñhol ItFarliaannçoais Nederlands Svenska REFERENCE Replacing remote batteries Protecting the system Replace both batteries. Cleaning the media center Use only a soft, dry cloth to the regulations in good working ...
...below for keeping the system in your area. 3. Be sure to dispose of the batteries according to clean the outside surfaces of the remote. 2. Or use any solvents, chemicals, or cleaning solutions containing alcohol, ammonia, or abrasives. • Do not use an ammonia-...any openings. • Do not use any sprays near the system. English DeEustpsacñhol ItFarliaannçoais Nederlands Svenska REFERENCE Replacing remote batteries Protecting the system Replace both batteries. Cleaning the media center Use only a soft, dry cloth to the regulations in good working ...

