
Owner's guide
Page 2
Serial numbers: and Dealer name: Dealer phone: Purchase date: We suggest you keep your records... Serial numbers are located on the label on the back of each 251TM environmental speaker. English For your sales slip and warranty card together with this owner's guide. 2
Serial numbers: and Dealer name: Dealer phone: Purchase date: We suggest you keep your records... Serial numbers are located on the label on the back of each 251TM environmental speaker. English For your sales slip and warranty card together with this owner's guide. 2
Owner's guide
Page 3
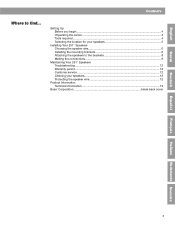
... for your speakers 12 Protecting the speaker wire 12 Product Information Technical information 13 Bose® Corporation inside back cover Dansk Deutsch Español Français Italiano Nederlands Svenska 3 English Contents Where to the brackets 8 Making the connections 9 Maintaining Your 251TM Speakers Troubleshooting...12 Warranty period...12 Customer service...12 Cleaning your speakers 5 Installing Your 251TM Speakers Choosing the speaker wire 6 Installing the mounting brackets 6 Attaching the speakers to find...
... for your speakers 12 Protecting the speaker wire 12 Product Information Technical information 13 Bose® Corporation inside back cover Dansk Deutsch Español Français Italiano Nederlands Svenska 3 English Contents Where to the brackets 8 Making the connections 9 Maintaining Your 251TM Speakers Troubleshooting...12 Warranty period...12 Customer service...12 Cleaning your speakers 5 Installing Your 251TM Speakers Choosing the speaker wire 6 Installing the mounting brackets 6 Attaching the speakers to find...

Owner's guide
Page 4
... to follow the instructions in Figure 1. Do not attempt to come. Instead, notify Bose Corporation or your system contains the parts identified in this process, consult a professional installer. For concrete, a ⁄1 inch (6,0 mm) diameter masonry bit can use . The 251 environmental speakers are unsure of children. These high-performance outdoor speakers are engineered to complete this owner's guide voids all...
... to follow the instructions in Figure 1. Do not attempt to come. Instead, notify Bose Corporation or your system contains the parts identified in this process, consult a professional installer. For concrete, a ⁄1 inch (6,0 mm) diameter masonry bit can use . The 251 environmental speakers are unsure of children. These high-performance outdoor speakers are engineered to complete this owner's guide voids all...
Owner's guide
Page 5
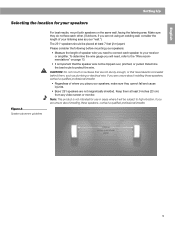
... speaker wire not be placed at least 9 inches (23 cm) from any video screen or monitor. To determine the wire gauge you are not magnetically shielded. Make sure they cannot fall and cause injuries. • Bose® 251 speakers are not using an existing wall, consider the length of speaker wire you need , refer to the "Wire recom- Please consider the following before mounting your receiver...
... speaker wire not be placed at least 9 inches (23 cm) from any video screen or monitor. To determine the wire gauge you are not magnetically shielded. Make sure they cannot fall and cause injuries. • Bose® 251 speakers are not using an existing wall, consider the length of speaker wire you need , refer to the "Wire recom- Please consider the following before mounting your receiver...
Owner's guide
Page 6
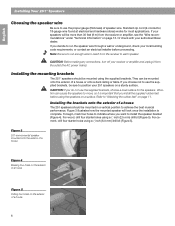
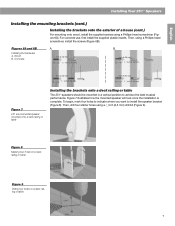
... best musical performance. Standard zip cord (2-conductor, 18-gauge wire found at electrical and hardware stores) works for the speakers. Refer to indicate where you install the supplied rubber feet before proceeding. For wood, drill four starter holes using the supplied brackets. Figure 3 illustrates how the mounted speaker will be sure to install the speaker bracket (Figure 4). CAUTION: Before making any connections, turn off your authorized Bose® dealer. Installing the brackets...
... best musical performance. Standard zip cord (2-conductor, 18-gauge wire found at electrical and hardware stores) works for the speakers. Refer to indicate where you install the supplied rubber feet before proceeding. For wood, drill four starter holes using the supplied brackets. Figure 3 illustrates how the mounted speaker will be sure to install the speaker bracket (Figure 4). CAUTION: Before making any connections, turn off your authorized Bose® dealer. Installing the brackets...
Owner's guide
Page 7
... 1 ⁄1 inch (2.25 mm) 2 ⁄1 inch (6.35 mm) 4 1 ⁄1 inch (2.25 mm) 2 Installing the brackets onto a deck railing or table The 251TM speakers should be mounted in a vertical position to install the speaker bracket (Figure 8). To begin, mark four holes to indicate where you want to achieve the best musical performance. Then, using a Phillips-head screwdriver, install the screws (Figure 6B).
... 1 ⁄1 inch (2.25 mm) 2 ⁄1 inch (6.35 mm) 4 1 ⁄1 inch (2.25 mm) 2 Installing the brackets onto a deck railing or table The 251TM speakers should be mounted in a vertical position to install the speaker bracket (Figure 8). To begin, mark four holes to indicate where you want to achieve the best musical performance. Then, using a Phillips-head screwdriver, install the screws (Figure 6B).
Owner's guide
Page 8
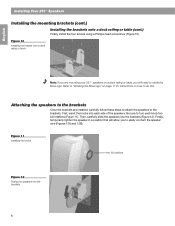
... rotations (Figure 11). Finally, temporarily tighten the speaker in a position that will need to easily connect the speaker wire (Figures 13A and 13B). Refer to "Rotating the Bose logo" on page 11 for instructions on a deck railing or table, you will allow you to rotate the Bose logo. Figure 10 Installing the bracket onto a deck railing or table Note: If...
... rotations (Figure 11). Finally, temporarily tighten the speaker in a position that will need to easily connect the speaker wire (Figures 13A and 13B). Refer to "Rotating the Bose logo" on page 11 for instructions on a deck railing or table, you will allow you to rotate the Bose logo. Figure 10 Installing the bracket onto a deck railing or table Note: If...
Owner's guide
Page 9
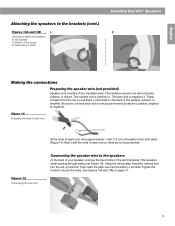
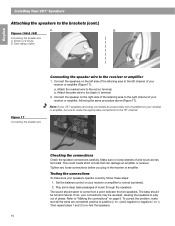
Making the connections Preparing the speaker wire (not provided) Speaker cord consists of the house B. This marked wire is negative (-). The plain wire is positive (+). Using the wire guides, insert the marked wire into the black (-) terminal. These correspond to the red (+) and black (-) terminals on page 10. 9 Tighten the knobs to the brackets A. The insulation around one wire is striped, collared, or ribbed. Be sure...
Making the connections Preparing the speaker wire (not provided) Speaker cord consists of the house B. This marked wire is negative (-). The plain wire is positive (+). Using the wire guides, insert the marked wire into the black (-) terminal. These correspond to the red (+) and black (-) terminals on page 10. 9 Tighten the knobs to the brackets A. The insulation around one wire is striped, collared, or ribbed. Be sure...
Owner's guide
Page 10
... a secondary set of the listening area to come from a point between the two speakers. Tighten any loose connections before you plug in the receiver or amplifier. Testing the connections To make sure your receiver or amplifier, following the same procedure above (Figure 17). Set the balance control on the right side of speakers to negative (- The sound should be reversed, causing the speakers to normal (centered). 2.
... a secondary set of the listening area to come from a point between the two speakers. Tighten any loose connections before you plug in the receiver or amplifier. Testing the connections To make sure your receiver or amplifier, following the same procedure above (Figure 17). Set the balance control on the right side of speakers to negative (- The sound should be reversed, causing the speakers to normal (centered). 2.
Owner's guide
Page 11
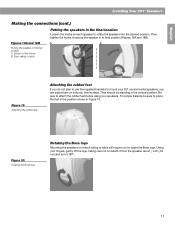
...using your 251 environmental speakers, you to rotate the speakers into the desired position. B. Deck railing or table Figure 19 Attaching the rubber feet Attaching the rubber feet If you do not plan to use the supplied brackets to mount your speakers. Figure 20 Rotating the Bose logo Rotating the Bose logo Mounting the speakers... 19. Putting the speaker in the final position A. They should be sure to secure the speaker in its final position (Figures 18A and 18B). English Installing Your 251TM Speakers Making the connections (cont.) Putting the speakers in the final location...
...using your 251 environmental speakers, you to rotate the speakers into the desired position. B. Deck railing or table Figure 19 Attaching the rubber feet Attaching the rubber feet If you do not plan to use the supplied brackets to mount your speakers. Figure 20 Rotating the Bose logo Rotating the Bose logo Mounting the speakers... 19. Putting the speaker in the final position A. They should be sure to secure the speaker in its final position (Figures 18A and 18B). English Installing Your 251TM Speakers Making the connections (cont.) Putting the speakers in the final location...
Owner's guide
Page 12
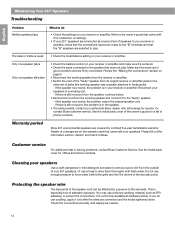
... connected. Review the "Making the connections" section on your speakers to rinse them thoroughly with it for a list of speakers to your receiver or amplifier. If there is still no sound from the speaker, continue below. • Remove the cord from the working speaker and connect it to remove dust or dirt from its original receiver or amplifier jacks to the other set of phone numbers. You may use a silicone caulking material, such as needed...
... connected. Review the "Making the connections" section on your speakers to rinse them thoroughly with it for a list of speakers to your receiver or amplifier. If there is still no sound from the speaker, continue below. • Remove the cord from the working speaker and connect it to remove dust or dirt from its original receiver or amplifier jacks to the other set of phone numbers. You may use a silicone caulking material, such as needed...
Owner's guide
Page 13
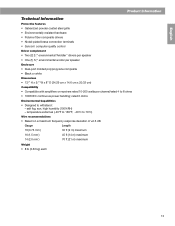
...; computer quality control Driver complement • Two (2) 21⁄ " environmental TwiddlerTM drivers per speaker 2 • One (1) 51⁄ " environmental woofer per speaker 4 Enclosure • Dual-port molded polypropylene composite • Black or white Dimensions • 131⁄ " H x 53⁄ " W x 8" D (34.29 cm x 14.6 cm x 20.32 cm) 2 4 Compatibility • Compatible with amplifiers or receivers rated 10-200 watts per channel/rated 4 to withstand: - rated 6 ohms Environmental Capabilities...
...; computer quality control Driver complement • Two (2) 21⁄ " environmental TwiddlerTM drivers per speaker 2 • One (1) 51⁄ " environmental woofer per speaker 4 Enclosure • Dual-port molded polypropylene composite • Black or white Dimensions • 131⁄ " H x 53⁄ " W x 8" D (34.29 cm x 14.6 cm x 20.32 cm) 2 4 Compatibility • Compatible with amplifiers or receivers rated 10-200 watts per channel/rated 4 to withstand: - rated 6 ohms Environmental Capabilities...
Owner's guide
Page 14
© 2008 Bose Corporation, The Mountain Framingham, MA 01701-9168 USA AM250811 Rev.06
© 2008 Bose Corporation, The Mountain Framingham, MA 01701-9168 USA AM250811 Rev.06


