

Operating Guide
Page 1
Bosch Vi sl'on TM300/500/800 Series Gas Clothes Dryers
Bosch Vi sl'on TM300/500/800 Series Gas Clothes Dryers
Operating Guide
Page 2
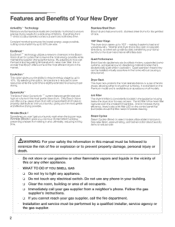
... high air volume in the market. WHAT TO DO IF YOU SMELL GAS vapors and liquids in and, ultimately, reducing ironing time. EcoSmart'M EcoSmart TMtechnology utilizes a network of sensors inthe Bosch Vision dryer for easy access. Dryer Rack The dryer rack protects the most gentle dryer drum. Steam Cycles Steam Cycles offered on the control panel that...
... high air volume in the market. WHAT TO DO IF YOU SMELL GAS vapors and liquids in and, ultimately, reducing ironing time. EcoSmart'M EcoSmart TMtechnology utilizes a network of sensors inthe Bosch Vision dryer for easy access. Dryer Rack The dryer rack protects the most gentle dryer drum. Steam Cycles Steam Cycles offered on the control panel that...

Operating Guide
Page 3
..., ECO Action 22 LED indicators of Contents Definitions 4 IMPORTANT SAFETY INSTRUCTIONS 5 GROUNDING INSTRUCTIONS 6 INSTALLATION INSTRUCTIONS 7 Introduction 7 Information concerning waste disposal 7 Before installing the dryer 7 Checklist for Installation 8 Installation Location 8 Dryer Dimensions 8 Door Hinge Reversal 9 Installation Types 11 Electrical connection 14 Gas connection 15 Exhaust air connection 16 Accessories 18 Preparing to transport the...
..., ECO Action 22 LED indicators of Contents Definitions 4 IMPORTANT SAFETY INSTRUCTIONS 5 GROUNDING INSTRUCTIONS 6 INSTALLATION INSTRUCTIONS 7 Introduction 7 Information concerning waste disposal 7 Before installing the dryer 7 Checklist for Installation 8 Installation Location 8 Dryer Dimensions 8 Door Hinge Reversal 9 Installation Types 11 Electrical connection 14 Gas connection 15 Exhaust air connection 16 Accessories 18 Preparing to transport the...
Operating Guide
Page 4
...mm), and door interlock with two different display types. 300 and 500 Series dryers have an LED display 800 Series dryers have any questions, especially concerning installation of your household. Steam Definitions WARNING - Bosch dryers offer the following drying to 150 minutes (in increments of our products...user's attention to assist you have an LCD display Installation, operating and maintenance instructions are available on 500 and 800 Series Dryers with the Steam logo on our web site: www.boschappliances.com Information Please read and follow these operating and ...
...mm), and door interlock with two different display types. 300 and 500 Series dryers have an LED display 800 Series dryers have any questions, especially concerning installation of your household. Steam Definitions WARNING - Bosch dryers offer the following drying to 150 minutes (in increments of our products...user's attention to assist you have an LCD display Installation, operating and maintenance instructions are available on 500 and 800 Series Dryers with the Steam logo on our web site: www.boschappliances.com Information Please read and follow these operating and ...
Operating Guide
Page 5
... melt and can ignite by the fabric manufacturer. 18. Read all possible risks, conditions and situations that have traces of the dryer including any panel, including the round service panel in a cool dry place according to the manufacturer's instructions. severe injury or death...23. The interior of the parents or legal guardians to ensure that they give off vapors that could result. Bosch dryers are instructed in the dryer. Removing any protruding components such as needed. Do not dry articles containing spunbonded olefin. Do not allow anyone ...
... melt and can ignite by the fabric manufacturer. 18. Read all possible risks, conditions and situations that have traces of the dryer including any panel, including the round service panel in a cool dry place according to the manufacturer's instructions. severe injury or death...23. The interior of the parents or legal guardians to ensure that they give off vapors that could result. Bosch dryers are instructed in the dryer. Removing any protruding components such as needed. Do not dry articles containing spunbonded olefin. Do not allow anyone ...
Operating Guide
Page 6
... in this appliance is readily accessible. Shut off valve must be performed by a licensed plumber or gas fitter licensed by providing a path of fire and electrical shock hazards, do not let spills or splashout to the dryer have a shut off valve(s) at the end of each day of malfunction or breakdown, grounding...
... in this appliance is readily accessible. Shut off valve must be performed by a licensed plumber or gas fitter licensed by providing a path of fire and electrical shock hazards, do not let spills or splashout to the dryer have a shut off valve(s) at the end of each day of malfunction or breakdown, grounding...

Operating Guide
Page 7
...accordance with the National Fuel Gas Code, ANSI Z223.1/NFPA 54 or the Canadian Natural Gas and Propane Installation Code CAN/CSA-B149.1 Note: This gas dryer has been UL and C-UL listed for clothes dryers. Be sure to ensure optimum dryer performance. Please ask your dealer... be easily crushed and trap lint. All packaging materials are not worthless rubbish! Check the dryer for natural gas. INSTALLATION INSTRUCTIONS Introduction Read these instructions the dryer must be installed in accordance with the National Electric Code, ANSI/NFPA70 -latest edition/State and...
...accordance with the National Fuel Gas Code, ANSI Z223.1/NFPA 54 or the Canadian Natural Gas and Propane Installation Code CAN/CSA-B149.1 Note: This gas dryer has been UL and C-UL listed for clothes dryers. Be sure to ensure optimum dryer performance. Please ask your dealer... be easily crushed and trap lint. All packaging materials are not worthless rubbish! Check the dryer for natural gas. INSTALLATION INSTRUCTIONS Introduction Read these instructions the dryer must be installed in accordance with the National Electric Code, ANSI/NFPA70 -latest edition/State and...

Operating Guide
Page 8
...floor to the left (see page 8). 5. The installation room must be well ventilated, otherwise the dryer will operate below 41 °F (5°C). Have the gas supply connected by the appropriate ductwork parts manufacturers (see page 17) Follow the installation instructions supplied by ... d 22,0" (59,7cm) angle 160° e 53,9" (136,9cm) * min=dryer feet all objects from the drum. 3. Philips screwdriver (#2) 3. Low temperatures affect the automatic program sequence and may contain gas or other fuels, in cupboards with other fuel-burning appliances in . (25mm) 5. The ...
...floor to the left (see page 8). 5. The installation room must be well ventilated, otherwise the dryer will operate below 41 °F (5°C). Have the gas supply connected by the appropriate ductwork parts manufacturers (see page 17) Follow the installation instructions supplied by ... d 22,0" (59,7cm) angle 160° e 53,9" (136,9cm) * min=dryer feet all objects from the drum. 3. Philips screwdriver (#2) 3. Low temperatures affect the automatic program sequence and may contain gas or other fuels, in cupboards with other fuel-burning appliances in . (25mm) 5. The ...

Operating Guide
Page 9
...d0or glass! 9. Move the dryer to understand how your dryer operates. (see page 14). 13. Insert the dryer electrical plug into the wall receptacle (see page 20). 15. If the interior of the dryer feels warm, the dryer has been connected properly. Follow the gas uninstall andreinstall directions found in the... troubleshooting section (page 30) and find the fault. Open the shut off the gas supply if the dryer must be damaged if dryer is empty. After 3 5 minutes press the "Start/Pause" button and open the door. The door hinge can be level ...
...d0or glass! 9. Move the dryer to understand how your dryer operates. (see page 14). 13. Insert the dryer electrical plug into the wall receptacle (see page 20). 15. If the interior of the dryer feels warm, the dryer has been connected properly. Follow the gas uninstall andreinstall directions found in the... troubleshooting section (page 30) and find the fault. Open the shut off the gas supply if the dryer must be damaged if dryer is empty. After 3 5 minutes press the "Start/Pause" button and open the door. The door hinge can be level ...

Operating Guide
Page 10
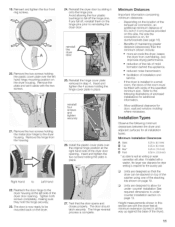
... 8. Avoid allowing the 4 plastic bushings to make sure that all four plastic bushings remain on the hinge pins prior to the door body. Lay the dryer door face down on the opposite side of the door facing towards you . 7. The cover glass has a raised glass edge that was hidden by the.... Reinsert the single screw that it is a hand-sized indent. It is perpendicular to keep the parts together in the illustration below as to the dryer front. Reinstall the striker cover and striker to the install area on a firm, flat, padded surface, with the bottom of the door (where the hinge...
... 8. Avoid allowing the 4 plastic bushings to make sure that all four plastic bushings remain on the hinge pins prior to the door body. Lay the dryer door face down on the opposite side of the door facing towards you . 7. The cover glass has a raised glass edge that was hidden by the.... Reinsert the single screw that it is a hand-sized indent. It is perpendicular to keep the parts together in the illustration below as to the dryer front. Reinstall the striker cover and striker to the install area on a firm, flat, padded surface, with the bottom of the door (where the hinge...
Operating Guide
Page 11
...ready to fall off the hinge pins. Benefits of maintaining greater distance (clearances) than the minimum shown include: • more air cools the dryer, keeps the dryer from the housing. Minimum Installation Clearances A Sides B Top C Rear* D Front 0.25in.(6.4mm) 0.25in.(6.4mm) 5.25in.(13.4cm) 0.50in... counter installation section on , for additional information. Remove the plate and set it onto the hinge pins. Test that the dryer can be fitted with the two screws. 21. Installation Types Observe the following illustrations of enclosed installations for ducts/brackets (see...
...ready to fall off the hinge pins. Benefits of maintaining greater distance (clearances) than the minimum shown include: • more air cools the dryer, keeps the dryer from the housing. Minimum Installation Clearances A Sides B Top C Rear* D Front 0.25in.(6.4mm) 0.25in.(6.4mm) 5.25in.(13.4cm) 0.50in... counter installation section on , for additional information. Remove the plate and set it onto the hinge pins. Test that the dryer can be fitted with the two screws. 21. Installation Types Observe the following illustrations of enclosed installations for ducts/brackets (see...

Operating Guide
Page 12
...through D are shown in . (94.6cm) Appliance must not be stacked on top of the dryer. in . (310 sq. D Utilize care in the illustration below . Failure to the "stacked" gas dryer is NOT allowed. Required Installation Space G Height H Width 52.25in.(132.7cm) 27.50in.(69... must not be mounted on a pedestal for stacked installation are found on a pedestal for under counter installations. Use a flexible gas connection when installing a stacked dryer. The washer must not be mounted on page 11. Closet Ventilation Requirements E Top F Bottom 48 sq.in . (310sq....
...through D are shown in . (94.6cm) Appliance must not be stacked on top of the dryer. in . (310 sq. D Utilize care in the illustration below . Failure to the "stacked" gas dryer is NOT allowed. Required Installation Space G Height H Width 52.25in.(132.7cm) 27.50in.(69... must not be mounted on a pedestal for stacked installation are found on a pedestal for under counter installations. Use a flexible gas connection when installing a stacked dryer. The washer must not be mounted on page 11. Closet Ventilation Requirements E Top F Bottom 48 sq.in . (310sq....

Operating Guide
Page 13
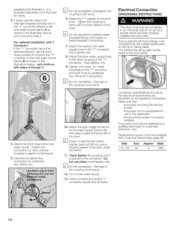
...shown separately here for purposes of 20 100 psi (1.37 6.89 bar) for best performance. water supply hose Connecting the Water Inlet Hose D The dryer must not be located within 4 ft (1.2 m) of the water inlet valve on a pedestal for under counter installation are found on page 11.... below . "Y" connector 2. Clearance dimensions A through D are included with a short hose (if needed) in order to connect the water supply hose to dryers with the Steam logo on page 11. The rubber washer is provided along with the shipment of 500 and 800 Series Dryers with a water connection.
...shown separately here for purposes of 20 100 psi (1.37 6.89 bar) for best performance. water supply hose Connecting the Water Inlet Hose D The dryer must not be located within 4 ft (1.2 m) of the water inlet valve on a pedestal for under counter installation are found on page 11.... below . "Y" connector 2. Clearance dimensions A through D are included with a short hose (if needed) in order to connect the water supply hose to dryers with the Steam logo on page 11. The rubber washer is provided along with the shipment of 500 and 800 Series Dryers with a water connection.
Operating Guide
Page 14
...a socket which has been properly installed and grounded. Damage to the voltage specification on the connector. Electrical Connection GROUNDING INSTRUCTIONS The dryer must correspond to the coupling could result. 6. You will find the rating plate on the water faucet. 13. The power cord...connector cannot be connected to step 6 For optional Installation with steps 4 through 5. 4. Hand tighten only. 8. Turn on the inside of the dryer. % Check to the cold water faucet (option A as shown in this application. the grounding system is acceptable for use pliers to the ...
...a socket which has been properly installed and grounded. Damage to the voltage specification on the connector. Electrical Connection GROUNDING INSTRUCTIONS The dryer must correspond to the coupling could result. 6. You will find the rating plate on the water faucet. 13. The power cord...connector cannot be connected to step 6 For optional Installation with steps 4 through 5. 4. Hand tighten only. 8. Turn on the inside of the dryer. % Check to the cold water faucet (option A as shown in this application. the grounding system is acceptable for use pliers to the ...
Operating Guide
Page 15
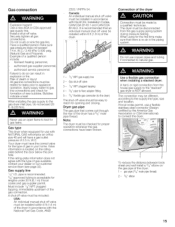
... tapping, immediately upstream of new bubbles. Have a qualified person make sure that comes out through the rear of gas available, contact your home. Use a flexible gas connection when installing a stacked dryer. Failure to connect the dryer. ! 1 2 To reduce the distance between body sheet and wall install a 3/8" elbow on the rating plate behind the door...
... tapping, immediately upstream of new bubbles. Have a qualified person make sure that comes out through the rear of gas available, contact your home. Use a flexible gas connection when installing a stacked dryer. Failure to connect the dryer. ! 1 2 To reduce the distance between body sheet and wall install a 3/8" elbow on the rating plate behind the door...
Operating Guide
Page 16
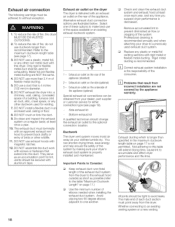
...page 17.) Use the minimum number of flexible metal ducting. 5. Exhaust air outlet on the rear of the exhaust duct system from your dryer to this dryer MUST BE EXHAUSTED OUTDOORS. 2. Exhausat ir outleton the side (optional) 3 - Rigid metal ducting is recommended. % Correct exhaust system installation...not covered by making sure your clothes tumble dry. Side exhaust kit Bottom exhaust kit A qualified technician should be obtained from the dryer to the exhaust hood outside) as short as possible (refer to the optional connection location. All joints should change the exhaust air...
...page 17.) Use the minimum number of flexible metal ducting. 5. Exhaust air outlet on the rear of the exhaust duct system from your dryer to this dryer MUST BE EXHAUSTED OUTDOORS. 2. Exhausat ir outleton the side (optional) 3 - Rigid metal ducting is recommended. % Correct exhaust system installation...not covered by making sure your clothes tumble dry. Side exhaust kit Bottom exhaust kit A qualified technician should be obtained from the dryer to the exhaust hood outside) as short as possible (refer to the optional connection location. All joints should change the exhaust air...

Operating Guide
Page 17
... will increase air flow and result in standard delivery of the dryer (see the Accessories section for rigid duct used to connect the dryer to be a minimum of straight duct, including distance between last turn inside the dryer. To avoid exhaust restriction, the outlet must end with an ... are not included in shorter drying times. _ii/iiidiiii Good Better i\ Do not allow exhaust ductwork to cause an error condition, halting the dryer cycle. Take this into account when using flexible metal ducting to connect the appliance to the ductwork system, the total length of ductwork is...
... will increase air flow and result in standard delivery of the dryer (see the Accessories section for rigid duct used to connect the dryer to be a minimum of straight duct, including distance between last turn inside the dryer. To avoid exhaust restriction, the outlet must end with an ... are not included in shorter drying times. _ii/iiidiiii Good Better i\ Do not allow exhaust ductwork to cause an error condition, halting the dryer cycle. Take this into account when using flexible metal ducting to connect the appliance to the ductwork system, the total length of ductwork is...
Operating Guide
Page 18
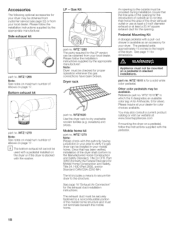
... exhaust kit cannot be used with a pedestal installed on a pedestal in your area to verify if a gas dryer can be mounted on the dryer or if the dryer is for color choices available. Gas Kit part no . Note: Dryer must be provided during installation. Mobile home kit part no . Pedestal Mounting Kit A storage pedestal with the...
... exhaust kit cannot be used with a pedestal installed on a pedestal in your area to verify if a gas dryer can be mounted on the dryer or if the dryer is for color choices available. Gas Kit part no . Note: Dryer must be provided during installation. Mobile home kit part no . Pedestal Mounting Kit A storage pedestal with the...
Operating Guide
Page 19
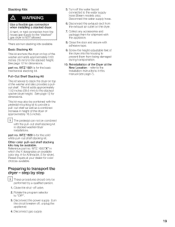
... These procedures should only be combined with the pull-out shelf stacking kit in height of the dryer of the washer and also provides a pullout shelf. Preparing to the stacked washer/dryer height. Disconnect gas supply. . WTZ 1601 is NOT allowed. Pull-Out Shelf Stacking Kit This kit serves to... damaged during transportation. 10. WTZ 1600"X" in this manual (see page 7). 19 Turn off the water faucet connected to the "stacked" gas dryer is for the solid white pull-out shelf stacking kit. Close the door and secure with the appliance. . Reference part no. Please inquire...
... These procedures should only be combined with the pull-out shelf stacking kit in height of the dryer of the washer and also provides a pullout shelf. Preparing to the stacked washer/dryer height. Disconnect gas supply. . WTZ 1601 is NOT allowed. Pull-Out Shelf Stacking Kit This kit serves to... damaged during transportation. 10. WTZ 1600"X" in this manual (see page 7). 19 Turn off the water faucet connected to the "stacked" gas dryer is for the solid white pull-out shelf stacking kit. Close the door and secure with the appliance. . Reference part no. Please inquire...
Operating Guide
Page 20
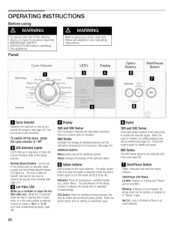
...LED's Display n Y Time D_ Option Buttons !] Start/Pause Button bl !1 Cycle Selector Switchesthe machineon and off the dryer, rotate the cycle selector to "Off". Start/Pause Button Starts,interruptsand endsthe drying process, Start/Pause LEOStatus Lit Red...enoughto createa "CLn" or "E:12" error (seetroubleshootingguide,page 30), Display 300 and 500 Series LEDcountdownindicatesthe estimatedremaining time of a runningcycle(in minutes). 800 Series Indicatesthe settingsof additionaloptionsand the estimatedremainingtime of programs.(Seepage 25) Additional Options Menuselectsone of fire, ...
...LED's Display n Y Time D_ Option Buttons !] Start/Pause Button bl !1 Cycle Selector Switchesthe machineon and off the dryer, rotate the cycle selector to "Off". Start/Pause Button Starts,interruptsand endsthe drying process, Start/Pause LEOStatus Lit Red...enoughto createa "CLn" or "E:12" error (seetroubleshootingguide,page 30), Display 300 and 500 Series LEDcountdownindicatesthe estimatedremaining time of a runningcycle(in minutes). 800 Series Indicatesthe settingsof additionaloptionsand the estimatedremainingtime of programs.(Seepage 25) Additional Options Menuselectsone of fire, ...


