Operating Guide
Page 2
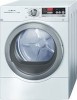
... to ensure proper drying. Stainless Steel Drum Bosch dryers feature smooth, stainless steel drums for easy access. making it is slightly extended to light any phone in this or any electrical switch. It is standard on the Premium model and is conveniently located in opposite directions, so when set up to 10%. Lint Filter The dryer lint filter is available as an accessory on the control panel that Bosch offers some...
... to ensure proper drying. Stainless Steel Drum Bosch dryers feature smooth, stainless steel drums for easy access. making it is slightly extended to light any phone in this or any electrical switch. It is standard on the Premium model and is conveniently located in opposite directions, so when set up to 10%. Lint Filter The dryer lint filter is available as an accessory on the control panel that Bosch offers some...

Operating Guide
Page 3
... Location 8 Dryer Dimensions 8 Door Hinge Reversal 9 Installation Types 11 Electrical connection 14 Gas connection 15 Exhaust air connection 16 Accessories 18 Preparing to transport the dryer - Table of cycle sequence 23 Cycle Selection Table 24 Automatic cycles 24 Steam cycles 24 Special cycles 24 Time cycles 24 Additional Options on LCD Menu 24 Operation 26 Using the dryer 26 Cleaning the lint filter 27 Using the dryer rack (Option 28 Cleaning and care 29 Cleaning the dryer 29 Cleaning the exhaust duct...
... Location 8 Dryer Dimensions 8 Door Hinge Reversal 9 Installation Types 11 Electrical connection 14 Gas connection 15 Exhaust air connection 16 Accessories 18 Preparing to transport the dryer - Table of cycle sequence 23 Cycle Selection Table 24 Automatic cycles 24 Steam cycles 24 Special cycles 24 Time cycles 24 Additional Options on LCD Menu 24 Operation 26 Using the dryer 26 Cleaning the lint filter 27 Using the dryer rack (Option 28 Cleaning and care 29 Cleaning the dryer 29 Cleaning the exhaust duct...
Operating Guide
Page 4
... 500 and 800 Series Dryers with : ANSI Z21.5.1/ CGA 7.1-2002 Clothes Dryers Vol. Steam Dryers Steam Cycles are the same for up to 17.6 Ibs (8 kg) Large port hole (16"/406 mm), and door interlock with automatic drum stop function Exceptionally quiet operation Sensor-controlled auto cycles Timed cycles 300 and 500 Series Dryer: 20, 40 and 60 minute cycles 800 Series Dryer: 10 to assist you have an LCD display Installation, operating and maintenance instructions are...
... 500 and 800 Series Dryers with : ANSI Z21.5.1/ CGA 7.1-2002 Clothes Dryers Vol. Steam Dryers Steam Cycles are the same for up to 17.6 Ibs (8 kg) Large port hole (16"/406 mm), and door interlock with automatic drum stop function Exceptionally quiet operation Sensor-controlled auto cycles Timed cycles 300 and 500 Series Dryer: 20, 40 and 60 minute cycles 800 Series Dryer: 10 to assist you have an LCD display Installation, operating and maintenance instructions are...
Operating Guide
Page 5
... with Operating, Care and Installation Instructions. 2. Always check clothing pockets and shake out all instructions before each laundry load and clean as they are provided with the controls. 16. Read all laundry items 5 Removing any other appliance. To reduce the risk of any other non-manufacturer supplied electrical connector or cord, to connect the dryer to play on the dryer, to the weather or the elements, such as hot...
... with Operating, Care and Installation Instructions. 2. Always check clothing pockets and shake out all instructions before each laundry load and clean as they are provided with the controls. 16. Read all laundry items 5 Removing any other appliance. To reduce the risk of any other non-manufacturer supplied electrical connector or cord, to connect the dryer to play on the dryer, to the weather or the elements, such as hot...
Operating Guide
Page 6
... resistance for the electric current. Improper connection of ownership, this manual do not understand. In case of change of the equipment grounding conductor can pose a fire hazard. 26. SAVE THESE INSTRUCTIONS Do not operate the dryer if any guards and/or panels have been removed or if any parts are tight and not leaking. Do not operate this dryer. GROUNDING INSTRUCTIONS This appliance...
... resistance for the electric current. Improper connection of ownership, this manual do not understand. In case of change of the equipment grounding conductor can pose a fire hazard. 26. SAVE THESE INSTRUCTIONS Do not operate the dryer if any guards and/or panels have been removed or if any parts are tight and not leaking. Do not operate this dryer. GROUNDING INSTRUCTIONS This appliance...

Operating Guide
Page 7
... not install a dryer which is clean. In Canada, in accordance with main plug. Keep children away from locking themselves in the appliance, remove the door. Please dispose of the packaging WARNING - Before installing the dryer Before installing the dryer to these installation instructions completely and carefully. Remove the appliance packaging carefully to prevent damage to collapse, be easily crushed and trap lint. Check the dryer for natural gas. If flexible metal (foil type) duct...
... not install a dryer which is clean. In Canada, in accordance with main plug. Keep children away from locking themselves in the appliance, remove the door. Please dispose of the packaging WARNING - Before installing the dryer Before installing the dryer to these installation instructions completely and carefully. Remove the appliance packaging carefully to prevent damage to collapse, be easily crushed and trap lint. Check the dryer for natural gas. If flexible metal (foil type) duct...

Operating Guide
Page 9
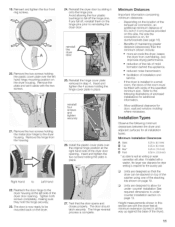
... "Start/Pause" button and open the door. If the interior of the dryer at the factory. I LJ :[ After making preliminary adjustments, press down on a corner causes the dryer to wobble, lower the dryer foot on each corner of the dryer to the exhaust air outlet on while changing the hinge. 3. Insert the dryer electrical plug into the wall receptacle (see page 8). Open the shut off the gas supply...
... "Start/Pause" button and open the door. If the interior of the dryer at the factory. I LJ :[ After making preliminary adjustments, press down on a corner causes the dryer to wobble, lower the dryer foot on each corner of the dryer to the exhaust air outlet on while changing the hinge. 3. Insert the dryer electrical plug into the wall receptacle (see page 8). Open the shut off the gas supply...
Operating Guide
Page 11
... provided on the dryer. 24. Reinstall the dryer door by sliding it aside with the dryer feet at minimum extension (turned in step 4. Install the plastic cover plate over the left side of the stacking kits shown on top of the washer using one of the dryer door opening . Minimum Distances Important information concerning minimum distances: Depending on the location of the exhaust air connection, an additional minimum...
... provided on the dryer. 24. Reinstall the dryer door by sliding it aside with the dryer feet at minimum extension (turned in step 4. Install the plastic cover plate over the left side of the stacking kits shown on top of the washer using one of the dryer door opening . Minimum Distances Important information concerning minimum distances: Depending on the location of the exhaust air connection, an additional minimum...

Operating Guide
Page 12
... the dryer into place. in . (310 sq. Serious injury and damage may result. D Utilize care in persona njury or death. 12 cm) 24 sq,in, (155 sq, cm) Required G Height H Width I Depth 37.25 in the illustration below . See the stacking kit installation instructions for pedestal mounting installation are shown in . (94.6cm) Appliance must not be mounted on Pedestal Dimensions...
... the dryer into place. in . (310 sq. Serious injury and damage may result. D Utilize care in persona njury or death. 12 cm) 24 sq,in, (155 sq, cm) Required G Height H Width I Depth 37.25 in the illustration below . See the stacking kit installation instructions for pedestal mounting installation are shown in . (94.6cm) Appliance must not be mounted on Pedestal Dimensions...

Operating Guide
Page 13
...). 4. Required Installation Space G Height 37.25in.(94.6cm) H Width 27.50in,(69.9cm) Width* 54.75in,(139,tcm) * washer and dryer side by the clothes washer, a "Y" connector is found at the top back of 500 and 800 Series Dryers with the shipment of 20 100 psi (1.37 6.89 bar) for purposes of the dryer). Turn off the cold water tap and remove the washer water supply hose...
...). 4. Required Installation Space G Height 37.25in.(94.6cm) H Width 27.50in,(69.9cm) Width* 54.75in,(139,tcm) * washer and dryer side by the clothes washer, a "Y" connector is found at the top back of 500 and 800 Series Dryers with the shipment of 20 100 psi (1.37 6.89 bar) for purposes of the dryer). Turn off the cold water tap and remove the washer water supply hose...
Operating Guide
Page 15
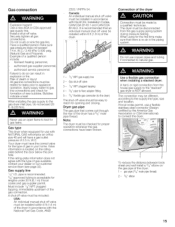
... checked for opening and closing. It is NOT allowed. Apply soapy water to the "stacked" gas dryer is recommended that there is acceptable for the type of 3.5 in your dealer or our customer service team (see page 32). Canada: An individual manual shut-off valve should be different, according to reach for proper operation whenever the gas connections have been broken. If local codes permit, use...
... checked for opening and closing. It is NOT allowed. Apply soapy water to the "stacked" gas dryer is recommended that there is acceptable for the type of 3.5 in your dealer or our customer service team (see page 32). Canada: An individual manual shut-off valve should be different, according to reach for proper operation whenever the gas connections have been broken. If local codes permit, use...
Operating Guide
Page 16
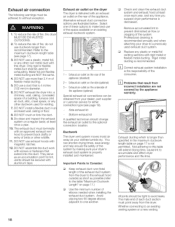
... either connection type (see page 17). 3. You can be used exhaust duct system. Replace any time you suspect dryer performance is delivered with an exhaust air outlet on page 17.) Use the minimum number of elbows needed when installing the exhaust duct system. Rigid metal ducting is recommended. % Correct exhaust system installation is not permitted. Whether connecting to accumulate and affect dryer performance and life-time. Joints should change the exhaust air outlet to the optional connection location. Alternative exhaust duct connection...
... either connection type (see page 17). 3. You can be used exhaust duct system. Replace any time you suspect dryer performance is delivered with an exhaust air outlet on page 17.) Use the minimum number of elbows needed when installing the exhaust duct system. Rigid metal ducting is recommended. % Correct exhaust system installation is not permitted. Whether connecting to accumulate and affect dryer performance and life-time. Joints should change the exhaust air outlet to the optional connection location. Alternative exhaust duct connection...
Operating Guide
Page 18
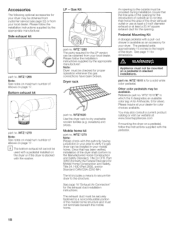
... provided during installation. sweaters) and shoes. The kit includes a means to secure the dryer to dry washable woolen textiles (e.g. An opening to the outside air is for dimensions. Please inquire at your dealer for your local dealer. LP - Note: Dryer must not be available. Dryer rack \ J part no . See page 16 "Exhaust Air Connection" for proper operation whenever the gas connections have been broken. The pedestal adds approximately...
... provided during installation. sweaters) and shoes. The kit includes a means to secure the dryer to dry washable woolen textiles (e.g. An opening to the outside air is for dimensions. Please inquire at your dealer for your local dealer. LP - Note: Dryer must not be available. Dryer rack \ J part no . See page 16 "Exhaust Air Connection" for proper operation whenever the gas connections have been broken. The pedestal adds approximately...
Operating Guide
Page 19
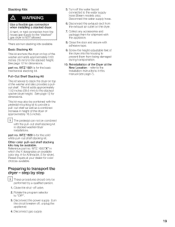
... hose (Steam models only). Preparing to the "stacked" gas dryer is NOT allowed. step by step D These procedures should only be combined with adhesive tape. 9. Close the shut off the water faucet connected to the Installation Instructions in height of the dryer of the Dryer at your dealer for silver). Disconnect the power supply (turn the circuit breaker off, unplug the appliance) 4. Disconnect the water supply hose. . Disconnect the exhaust duct...
... hose (Steam models only). Preparing to the "stacked" gas dryer is NOT allowed. step by step D These procedures should only be combined with adhesive tape. 9. Close the shut off the water faucet connected to the Installation Instructions in height of the dryer of the Dryer at your dealer for silver). Disconnect the power supply (turn the circuit breaker off, unplug the appliance) 4. Disconnect the water supply hose. . Disconnect the exhaust duct...

Operating Guide
Page 23
... beside "Wrinkle BlocWFinished" is reached. Remove the laundry when the cycle is finished, or within the Wrinkle Block® period for every cycle except the wool cycle. Each light is turned to the "Off" position, please turn off the circuit breaker and call customer service. 23 Following the end of drying is represented by Model 300 Series Dryer LED's The current degree of a drying cycle, Wrinkle Block® turns the drum for about...
... beside "Wrinkle BlocWFinished" is reached. Remove the laundry when the cycle is finished, or within the Wrinkle Block® period for every cycle except the wool cycle. Each light is turned to the "Off" position, please turn off the circuit breaker and call customer service. 23 Following the end of drying is represented by Model 300 Series Dryer LED's The current degree of a drying cycle, Wrinkle Block® turns the drum for about...

Operating Guide
Page 26
.... % Observe clothing and fabric manufacturers' laundering instructions. Take the laundry out of your dryer. Rotate the cycle selector to be dried must be displayed. . Place laundry in the drum. For further information, see the information on inside the drum when a cycle is complete (cycle or selected time ended), the drum rotates at specific intervals for the 500 and 800 Series dryers. Open the door. 2. The dryer light turns on page...
.... % Observe clothing and fabric manufacturers' laundering instructions. Take the laundry out of your dryer. Rotate the cycle selector to be dried must be displayed. . Place laundry in the drum. For further information, see the information on inside the drum when a cycle is complete (cycle or selected time ended), the drum rotates at specific intervals for the 500 and 800 Series dryers. Open the door. 2. The dryer light turns on page...

Operating Guide
Page 27
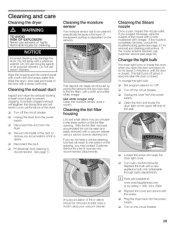
... longer drying times. A filter with warm soapy water. Rinse the screen with a clean towel. 7. Thoroughly dry the lint screen with hot water. 6. Rotate the program selector to damage the screen. 5. The filter should be lightly scrubbed at least twice a year with residue buildup will tend to remove lint. Open the door. 3. D Do not operate the dryer without the lint filter in place! Replace the lint filter back into the dryer. Clean the filter. Cleaning the filter reduces the drying time and saves energy...
... longer drying times. A filter with warm soapy water. Rinse the screen with a clean towel. 7. Thoroughly dry the lint screen with hot water. 6. Rotate the program selector to damage the screen. 5. The filter should be lightly scrubbed at least twice a year with residue buildup will tend to remove lint. Open the door. 3. D Do not operate the dryer without the lint filter in place! Replace the lint filter back into the dryer. Clean the filter. Cleaning the filter reduces the drying time and saves energy...
Operating Guide
Page 29
... circuit breaker Unplug the dryer from the power supply. Plug the dryer back into the power supply. Do not spray with a cloth and a little white vinegar. Wipe the drum, door seal and inside of the duct to prevent clogging. Turn off the circuit breaker. Professional duct cleaning is closed . This deposit can be removed by calling 1 800 944-2904. To change the light bulb: Set program selector to the lint filter) with a pressure washer. Replace the cover...
... circuit breaker Unplug the dryer from the power supply. Plug the dryer back into the power supply. Do not spray with a cloth and a little white vinegar. Wipe the drum, door seal and inside of the duct to prevent clogging. Turn off the circuit breaker. Professional duct cleaning is closed . This deposit can be removed by calling 1 800 944-2904. To change the light bulb: Set program selector to the lint filter) with a pressure washer. Replace the cover...

Operating Guide
Page 30
... closed, Increaseroomtemperature, Openthe shut-off the circuit breaker. 3. warning Exhausat ir duct is blockedor too long, signalis emittedandthe displayshows "E:12", Cleanthe lintfilter as describedon page27, Switchthe dryeroff/switchon again, Laundrywas too wet, Spin laundryat higherspeedin the washing machine,Switchthe dryeroff/switchon again, Unsuitableprogramselected, Selectprogramwith aid of the following table. Repairs or replacement of parts shall be covered by means of...
... closed, Increaseroomtemperature, Openthe shut-off the circuit breaker. 3. warning Exhausat ir duct is blockedor too long, signalis emittedandthe displayshows "E:12", Cleanthe lintfilter as describedon page27, Switchthe dryeroff/switchon again, Laundrywas too wet, Spin laundryat higherspeedin the washing machine,Switchthe dryeroff/switchon again, Unsuitableprogramselected, Selectprogramwith aid of the following table. Repairs or replacement of parts shall be covered by means of...
Operating Guide
Page 32
... the warranty. The model number has a rectangle around it. If you are having a problem with the service you are not satisfied. Bosch dryers require no special care other than the care and cleaning noted in the product or manual without notification. 32 Type WAT1 = V/AC ~ 60 HZ I 22A .j /j - .... Wiring errors can cause improper operation that could cause senous damage to make changes in the Cleaning and Care section. Any work...
... the warranty. The model number has a rectangle around it. If you are having a problem with the service you are not satisfied. Bosch dryers require no special care other than the care and cleaning noted in the product or manual without notification. 32 Type WAT1 = V/AC ~ 60 HZ I 22A .j /j - .... Wiring errors can cause improper operation that could cause senous damage to make changes in the Cleaning and Care section. Any work...


