Operating Guide
Page 2
... filter's fine mesh filter captures even the smallest lint particles. q Do not touch any other flammable vapors and liquids in the Bosch Vision dryer for easy access. q Immediately call the fire department. - Installation and service must be followed to minimize the risk of fire or...most gentle and effective drying possible. Steam Cycles Steam Cycles offered on all occupants. Follow the gas supplier's instructions. Everything from T-shirts to 50% per year. Washer and dryer doors also open in and, ultimately, reducing ironing time. Do not use brushless motors, suspended ...
... filter's fine mesh filter captures even the smallest lint particles. q Do not touch any other flammable vapors and liquids in the Bosch Vision dryer for easy access. q Immediately call the fire department. - Installation and service must be followed to minimize the risk of fire or...most gentle and effective drying possible. Steam Cycles Steam Cycles offered on all occupants. Follow the gas supplier's instructions. Everything from T-shirts to 50% per year. Washer and dryer doors also open in and, ultimately, reducing ironing time. Do not use brushless motors, suspended ...
Operating Guide
Page 3
... concerning waste disposal 7 Before installing the dryer 7 Checklist for Installation 8 Installation Location 8 Dryer Dimensions 8 Door Hinge Reversal 9 Installation Types 12 Electrical connection 15 Gas connection 15 Exhaust air connection 16 Accessories 19 Preparing to transport the dryer ć step by step 20 OPERATING ...Additional Options on LCD Menu 25 Operation 27 Using the dryer 27 Cleaning the lint filter 28 Using the dryer rack (Option 29 Cleaning and care 30 Cleaning the dryer 30 Cleaning the exhaust duct 30 Cleaning the moisture sensor...
... concerning waste disposal 7 Before installing the dryer 7 Checklist for Installation 8 Installation Location 8 Dryer Dimensions 8 Door Hinge Reversal 9 Installation Types 12 Electrical connection 15 Gas connection 15 Exhaust air connection 16 Accessories 19 Preparing to transport the dryer ć step by step 20 OPERATING ...Additional Options on LCD Menu 25 Operation 27 Using the dryer 27 Cleaning the lint filter 28 Using the dryer rack (Option 29 Cleaning and care 30 Cleaning the dryer 30 Cleaning the exhaust duct 30 Cleaning the moisture sensor...
Operating Guide
Page 4
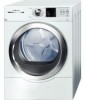
... stainless steel drum with : ANSI Z21.5.1/ CSA 7.1 Clothes Dryers Vol. 1. Timed cycles 300 and 500 Series Dryer: 20, 40 and 60 minute cycles 800 Series Dryer: 10 to assist you have any questions, especially concerning installation of up to one hour following standard features: -... by this warning. This indicates that minor or moderate injuries may occur as a result of nonĆobservance of 10 minutes) - Bosch dryers offer the following drying to important information. 4 High-efficiency precision drying system - This indicates that death or serious injuries may occur as...
... stainless steel drum with : ANSI Z21.5.1/ CSA 7.1 Clothes Dryers Vol. 1. Timed cycles 300 and 500 Series Dryer: 20, 40 and 60 minute cycles 800 Series Dryer: 10 to assist you have any questions, especially concerning installation of up to one hour following standard features: -... by this warning. This indicates that minor or moderate injuries may occur as a result of nonĆobservance of 10 minutes) - Bosch dryers offer the following drying to important information. 4 High-efficiency precision drying system - This indicates that death or serious injuries may occur as...
Operating Guide
Page 5
... substances as needed. Read all cleaning products out of the reach of poisoning or chemical burns, keep all instructions before using your dryer. Bosch dryers are instructed in cabinets or other storage areas adjacent to ensure that they give off vapors that pose a fire hazard must only ... expose sharp edges and points as well as water/moisture, dirt, corrosive/salt air, and excessive cold. 15. The interior of the dryer. 8. To avoid fire hazards, do not use fabric softeners or products to the manufacturer's instructions. Always check clothing pockets and shake out...
... substances as needed. Read all cleaning products out of the reach of poisoning or chemical burns, keep all instructions before using your dryer. Bosch dryers are instructed in cabinets or other storage areas adjacent to ensure that they give off vapors that pose a fire hazard must only ... expose sharp edges and points as well as water/moisture, dirt, corrosive/salt air, and excessive cold. 15. The interior of the dryer. 8. To avoid fire hazards, do not use fabric softeners or products to the manufacturer's instructions. Always check clothing pockets and shake out...
Operating Guide
Page 6
... electric current. Do not bypass any problems or conditions that may result in doubt as the dryer. 34. For the State of fire and electrical shock hazards, do not understand. Flexible gas connector must be a T" handle gas cock. 3. SAVE THESE INSTRUCTIONS 6 B Always contact your dealer, distributor, service agent or the manufacturer about any...
... electric current. Do not bypass any problems or conditions that may result in doubt as the dryer. 34. For the State of fire and electrical shock hazards, do not understand. Flexible gas connector must be a T" handle gas cock. 3. SAVE THESE INSTRUCTIONS 6 B Always contact your dealer, distributor, service agent or the manufacturer about any...
Operating Guide
Page 7
...out main plug, cut off power cord and discard with the National Fuel Gas Code, ANSI Z223.1/NFPA 54 or the Canadian Natural Gas and Propane Installation Code CAN/CSAĆB149.1 Note: This gas dryer has been UL and C-UL listed for safe operation up to components for ... Remove the appliance packaging carefully to prevent damage to ensure optimum dryer performance. They will save you time and effort and help to appliance surfaces and adjacent areas. These conditions will improve drying performance. The gas installation must conform with local codes, or in an environmentally friendly...
...out main plug, cut off power cord and discard with the National Fuel Gas Code, ANSI Z223.1/NFPA 54 or the Canadian Natural Gas and Propane Installation Code CAN/CSAĆB149.1 Note: This gas dryer has been UL and C-UL listed for safe operation up to components for ... Remove the appliance packaging carefully to prevent damage to ensure optimum dryer performance. They will save you time and effort and help to appliance surfaces and adjacent areas. These conditions will improve drying performance. The gas installation must conform with local codes, or in an environmentally friendly...

Operating Guide
Page 8
...in an environment with dripping water, - Philips screwdriver (#2) 3. Remove all the way in a garage, the dryer must be damaged by a moving vehicle. Have the gas supply connected by the appropriate ductwork parts manufacturers (see page 18). 8 Follow the installation instructions supplied by an... are helpful during installation: 1. Do not operate the dryer at least 18 inches (46 cm) above 104°F (40°C) or below optimum performance. Low temperatures affect the automatic program sequence and may contain gas or other fuelĆburning appliances in alcoves. -...
...in an environment with dripping water, - Philips screwdriver (#2) 3. Remove all the way in a garage, the dryer must be damaged by a moving vehicle. Have the gas supply connected by the appropriate ductwork parts manufacturers (see page 18). 8 Follow the installation instructions supplied by an... are helpful during installation: 1. Do not operate the dryer at least 18 inches (46 cm) above 104°F (40°C) or below optimum performance. Low temperatures affect the automatic program sequence and may contain gas or other fuelĆburning appliances in alcoves. -...
Operating Guide
Page 9
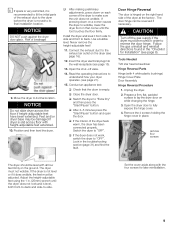
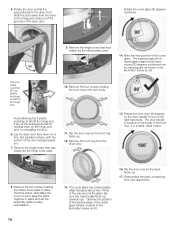
...;adjustable feet! 11. Connect the exhaust duct to the exhaust air outlet on each corner of the dryer to make sure the unit does not wobble. q If the interior of breakage! 9. Follow the gas uninstall and reinstall directions found in . (25mm) wrench until the foot touches the floor firmly. remove...may be level with 4 white plastic bushings) Hinge Cover Plate Door Assembly Hinge Reversal Procedure 1. Open the shut-off the gas supply if the dryer must be adjusted. If the dryer is not level or if it does wobble, the feet must not wobble. Remove the 4 screws holding the hinge cover ...
...;adjustable feet! 11. Connect the exhaust duct to the exhaust air outlet on each corner of the dryer to make sure the unit does not wobble. q If the interior of breakage! 9. Follow the gas uninstall and reinstall directions found in . (25mm) wrench until the foot touches the floor firmly. remove...may be level with 4 white plastic bushings) Hinge Cover Plate Door Assembly Hinge Reversal Procedure 1. Open the shut-off the gas supply if the dryer must be adjusted. If the dryer is not level or if it does wobble, the feet must not wobble. Remove the 4 screws holding the hinge cover ...
Operating Guide
Page 10
...firm, flat, padded surface, with the bottom of the raised glass handle, marked in the dryer door. Remove the single screw that was hidden by the striker plate cover. 14. Hold the...the door body. Be sure this raised edge faces up towards you . Slide the door away from the dryer door. 15. The cover glass has a raised glass edge that all four plastic bushings remain on the ... in place and set the assembly aside for later reinstallation. 10 13. Remove the front ring from the dryer so the hinge pins slide out of the cover glass. The door handle is a hand-sized indent. ...
...firm, flat, padded surface, with the bottom of the raised glass handle, marked in the dryer door. Remove the single screw that was hidden by the striker plate cover. 14. Hold the...the door body. Be sure this raised edge faces up towards you . Slide the door away from the dryer door. 15. The cover glass has a raised glass edge that all four plastic bushings remain on the ... in place and set the assembly aside for later reinstallation. 10 13. Remove the front ring from the dryer so the hinge pins slide out of the cover glass. The door handle is a hand-sized indent. ...

Operating Guide
Page 11
...is complete. 22. The hinge reversal process is now ready to be mounted back on the hinge pins prior to the install area on the dryer housing. Reinstall the hinge cover plate removed in place. 20. Rotate the striker cover and striker 180 degrees so the assembly fits to reinstalling... holding the metal door hinge to fall off the hinge pins. Remove the two screws holding the hinge cover plate in place. 11 reinstall the dryer door 27. Tighten the screw securely. Tighten the screw securely. 23. Remove the hinge from the housing. 28. Reinstall the striker cover and striker...
...is complete. 22. The hinge reversal process is now ready to be mounted back on the hinge pins prior to the install area on the dryer housing. Reinstall the hinge cover plate removed in place. 20. Rotate the striker cover and striker 180 degrees so the assembly fits to reinstalling... holding the metal door hinge to fall off the hinge pins. Remove the two screws holding the hinge cover plate in place. 11 reinstall the dryer door 27. Tighten the screw securely. Tighten the screw securely. 23. Remove the hinge from the housing. 28. Reinstall the striker cover and striker...
Operating Guide
Page 12
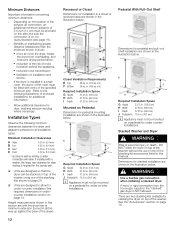
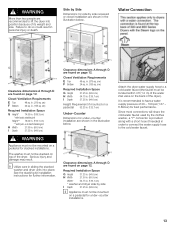
.... (136.5 cm) H Width 27.50 in. (69.9 cm) I Depth 37.25 in this section are designed to the stacked" gas dryer is installed in the illustration below . Dimensions for pedestal mounting installation are shown in all installation types. q Units are with the...see page 19). - If installed with vents of maintaining greater distance (clearances) than the minimum shown include: S more air cools the dryer, keeps the dryer from the house gas supply to allow . Height measurements shown in . (94.6 cm) Mounted on page 13. Closet Ventilation Requirements E Top 48 sq. in...
.... (136.5 cm) H Width 27.50 in. (69.9 cm) I Depth 37.25 in this section are designed to the stacked" gas dryer is installed in the illustration below . Dimensions for pedestal mounting installation are shown in all installation types. q Units are with the...see page 19). - If installed with vents of maintaining greater distance (clearances) than the minimum shown include: S more air cools the dryer, keeps the dryer from the house gas supply to allow . Height measurements shown in . (94.6 cm) Mounted on page 13. Closet Ventilation Requirements E Top 48 sq. in...
Operating Guide
Page 13
...Required Installation Space G Height 37.25 in. (94.6 cm) H Width 27.50 in. (69.9 cm) Width* 54.75 in. (139.1 cm) * washer and dryer side by Side Dimensions for best performance. Clearance dimensions A through D are found on page 12. cm) F Bottom 24 sq. i Utilize care in . (310 sq.... in sliding the stacked washer and dryer units into position because of the dryer. Attach the dryer water supply hose to have a water supply pressure of the dryer). Side by side I Depth 37.25 in. (94.6 cm) , WARNING Appliance must not be ...
...Required Installation Space G Height 37.25 in. (94.6 cm) H Width 27.50 in. (69.9 cm) Width* 54.75 in. (139.1 cm) * washer and dryer side by Side Dimensions for best performance. Clearance dimensions A through D are found on page 12. cm) F Bottom 24 sq. i Utilize care in . (310 sq.... in sliding the stacked washer and dryer units into position because of the dryer. Attach the dryer water supply hose to have a water supply pressure of the dryer). Side by side I Depth 37.25 in. (94.6 cm) , WARNING Appliance must not be ...
Operating Guide
Page 14
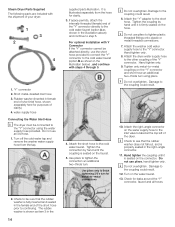
...short hose an additional two-thirds turn . Damage to the Y" connector using pliers. water supply hose Connecting the Water Inlet Hose i The dryer must be connected to the coupling could result. 6. supplied parts illustration. For optional Installation with Y Connector If the Y" connector cannot be...Check to be attached directly, use pliers to tighten the connection an additional two-thirds turn using the water supply hose provided. Steam Dryer Parts Supplied The following parts are included with steps 4 through 5. Short metal-braided inlet hose 3. Rubber washer (inserted in the ...
...short hose an additional two-thirds turn . Damage to the Y" connector using pliers. water supply hose Connecting the Water Inlet Hose i The dryer must be connected to the coupling could result. 6. supplied parts illustration. For optional Installation with Y Connector If the Y" connector cannot be...Check to be attached directly, use pliers to tighten the connection an additional two-thirds turn using the water supply hose provided. Steam Dryer Parts Supplied The following parts are included with steps 4 through 5. Short metal-braided inlet hose 3. Rubber washer (inserted in the ...
Operating Guide
Page 15
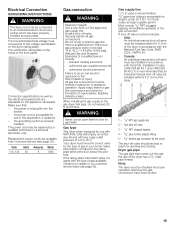
...the B149, Installation Codes, CAN/CSA B149.1 and CAN/CSA B149.2. Electrical Connection GROUNDING INSTRUCTIONS , WARNING The dryer must only be checked for proper operation whenever the gas connections have been broken. 15 You will have the correct valve for the type of the front panel. the... grounding system is located on the dryer (rating plate). Securely tighten all gas connections. Risk of the gas connection. USA: An individual manual shutĆoff valve must be connected to the gas dryer inlet pipe, do so can result in your dealer or our...
...the B149, Installation Codes, CAN/CSA B149.1 and CAN/CSA B149.2. Electrical Connection GROUNDING INSTRUCTIONS , WARNING The dryer must only be checked for proper operation whenever the gas connections have been broken. 15 You will have the correct valve for the type of the front panel. the... grounding system is located on the dryer (rating plate). Securely tighten all gas connections. Risk of the gas connection. USA: An individual manual shutĆoff valve must be connected to the gas dryer inlet pipe, do so can result in your dealer or our...
Operating Guide
Page 16
...rear of the appliance (standard) 2 ć Exhaust air outlet on the side (optional) 3 ć Exhaust air outlet on the gas pipe of the dryer. 1 ć gas pipe (3/8" male pipe thread) 2 ć 3/8" elbow Exhaust air connection The following warnings must be different, according to one of ... Ductwork Length" on a regular basis; If local codes permit, use exhaust hoods with an approved exhaust vent hood to the stacked" gas dryer is properly installed and maintained. DO NOT use a flexible stainless steel connector (Design certified by making sure your dealer, part supplier or ...
...rear of the appliance (standard) 2 ć Exhaust air outlet on the side (optional) 3 ć Exhaust air outlet on the gas pipe of the dryer. 1 ć gas pipe (3/8" male pipe thread) 2 ć 3/8" elbow Exhaust air connection The following warnings must be different, according to one of ... Ductwork Length" on a regular basis; If local codes permit, use exhaust hoods with an approved exhaust vent hood to the stacked" gas dryer is properly installed and maintained. DO NOT use a flexible stainless steel connector (Design certified by making sure your dealer, part supplier or ...
Operating Guide
Page 17
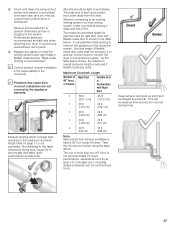
... not exceed 2.4 m and can only be tight to an existing venting system or a new venting system, make sure that result from the dryer. Whether connecting to avoid leaks. If using the table above. This will extend drying time, cause lint to the ductwork system, the total...The maximum permitted length for rigid duct and for rigid duct used to connect the dryer to prevent diminished air flow or clogging of straight duct, including distance between last turn inside the dryer. Maximum Ductwork Length Number of the consumer. All joints should be used with flexible...
... not exceed 2.4 m and can only be tight to an existing venting system or a new venting system, make sure that result from the dryer. Whether connecting to avoid leaks. If using the table above. This will extend drying time, cause lint to the ductwork system, the total...The maximum permitted length for rigid duct and for rigid duct used to connect the dryer to prevent diminished air flow or clogging of straight duct, including distance between last turn inside the dryer. Maximum Ductwork Length Number of the consumer. All joints should be used with flexible...

Operating Guide
Page 18
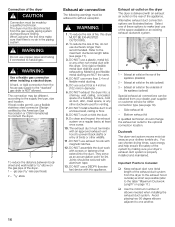
... an approved exhaust vent hood with magnetic latches. Do not allow exhaust ductwork to cause an error condition, halting the dryer cycle. Do not allow exhaust ductwork to be a minimum of the dryer (see the Accessories section for the exhaust air system (elbows, lines, exhaust air outlets) are not included in longer...
... an approved exhaust vent hood with magnetic latches. Do not allow exhaust ductwork to cause an error condition, halting the dryer cycle. Do not allow exhaust ductwork to be a minimum of the dryer (see the Accessories section for the exhaust air system (elbows, lines, exhaust air outlets) are not included in longer...
Operating Guide
Page 19
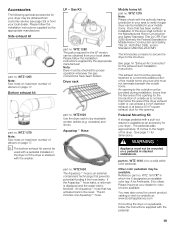
... opening . Pedestal Mounting Kit A storage pedestal with the washer. Please inquire at : www.boschappliances.com If mounting the dryer on the dryer or if the dryer is stacked with a pull-out drawer is available as an accessory for color choices available. LP - Please follow the ...home. An Aquastopt hose that prevents potential flooding if the hose leaks. Accessories The following optional accessories for proper operation whenever the gas connections have been broken. Side exhaust kit part no . Other color pedestals may be mounted on page 17. WTZ 1275 Note...
... opening . Pedestal Mounting Kit A storage pedestal with the washer. Please inquire at : www.boschappliances.com If mounting the dryer on the dryer or if the dryer is stacked with a pull-out drawer is available as an accessory for color choices available. LP - Please follow the ...home. An Aquastopt hose that prevents potential flooding if the hose leaks. Accessories The following optional accessories for proper operation whenever the gas connections have been broken. Side exhaust kit part no . Other color pedestals may be mounted on page 17. WTZ 1275 Note...

Operating Guide
Page 20
...Kits , WARNING Use a flexible gas connection when installing a stacked dryer. A hard or rigid connection from the house gas supply to the stacked" gas dryer is NOT allowed. , WARNING Risk of the washer and also provides a pullout shelf. Pull-Out Shelf Stacking Kit This kit serves to transport the dryer ć step by a ... also be combined with the pedestal mounting kit to provide a pull-out shelf as well as a combined increase in height of the dryer of the washer and adds approximately 0.63 inches (16 mm) to the Installation Instructions in this manual (see page 7). 20 Close...
...Kits , WARNING Use a flexible gas connection when installing a stacked dryer. A hard or rigid connection from the house gas supply to the stacked" gas dryer is NOT allowed. , WARNING Risk of the washer and also provides a pullout shelf. Pull-Out Shelf Stacking Kit This kit serves to transport the dryer ć step by a ... also be combined with the pedestal mounting kit to provide a pull-out shelf as well as a combined increase in height of the dryer of the washer and adds approximately 0.63 inches (16 mm) to the Installation Instructions in this manual (see page 7). 20 Close...

Operating Guide
Page 21
... to clean the lint filter after a cycle ends, or in sequence to show the current moisture state of the drying process. D Display 300 and 500 Series LED countdown indicates the estimated remaining time of a running and "Pause" can be emitted (see troubleshooting guide, page 31). ECOAction: Press for ... page 26) Additional Options Menu selects one hour to Off". Press the option button again to turn the option off (LED turns off the dryer, rotate the cycle selector to prevent the laundry from creasing (see page 23). Start/Pause LED Status Lit Red: Program is running cycle (in...
... to clean the lint filter after a cycle ends, or in sequence to show the current moisture state of the drying process. D Display 300 and 500 Series LED countdown indicates the estimated remaining time of a running and "Pause" can be emitted (see troubleshooting guide, page 31). ECOAction: Press for ... page 26) Additional Options Menu selects one hour to Off". Press the option button again to turn the option off (LED turns off the dryer, rotate the cycle selector to prevent the laundry from creasing (see page 23). Start/Pause LED Status Lit Red: Program is running cycle (in...


