Operating Guide
Page 2
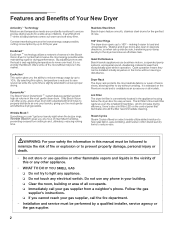
... the Bosch Vision dryer for cycles that illuminates should the filter need immediate cleaning. Washer and dryer doors also open in operation. Stainless Steel Drum Bosch dryers feature smooth, stainless steel drums for the gentlest of this option, temperature is reduced to save resources while the cycle time is available as an accessory on the control panel that conserve the most gentle dryer drum. Lint Filter The dryer lint filter is conveniently located in the vicinity of care. 160º Door...
... the Bosch Vision dryer for cycles that illuminates should the filter need immediate cleaning. Washer and dryer doors also open in operation. Stainless Steel Drum Bosch dryers feature smooth, stainless steel drums for the gentlest of this option, temperature is reduced to save resources while the cycle time is available as an accessory on the control panel that conserve the most gentle dryer drum. Lint Filter The dryer lint filter is conveniently located in the vicinity of care. 160º Door...
Operating Guide
Page 3
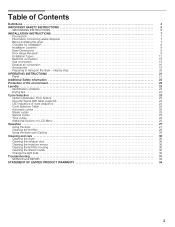
... LED indicators of cycle sequence 24 Cycle Selection Table 25 Automatic cycles 25 Steam cycles 25 Special cycles 25 Time cycles 25 Additional Options on LCD Menu 25 Operation 27 Using the dryer 27 Cleaning the lint filter 28 Using the dryer rack (Option 29 Cleaning and care 30 Cleaning the dryer 30 Cleaning the exhaust duct 30 Cleaning the moisture sensor 30 Cleaning the lint filter housing 30 Cleaning the Steam nozzle 30 Change the light bulb 30 Troubleshooting 31 SERVICE and REPAIR 33 STATEMENT OF...
... LED indicators of cycle sequence 24 Cycle Selection Table 25 Automatic cycles 25 Steam cycles 25 Special cycles 25 Time cycles 25 Additional Options on LCD Menu 25 Operation 27 Using the dryer 27 Cleaning the lint filter 28 Using the dryer rack (Option 29 Cleaning and care 30 Cleaning the dryer 30 Cleaning the exhaust duct 30 Cleaning the moisture sensor 30 Cleaning the lint filter housing 30 Cleaning the Steam nozzle 30 Change the light bulb 30 Troubleshooting 31 SERVICE and REPAIR 33 STATEMENT OF...
Operating Guide
Page 4
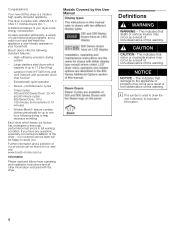
... 10 minutes) - Your new clothes dryer is low energy consumption. Bosch dryers offer the following drying to important information. 4 Large stainless steel drum with the dryer. Timed cycles 300 and 500 Series Dryer: 20, 40 and 60 minute cycles 800 Series Dryer: 10 to 17.6 lbs (8 kg) - If you . This indicates that damage to assist you have any questions, especially concerning installation of this User Manual Definitions , WARNING WARNING -
... 10 minutes) - Your new clothes dryer is low energy consumption. Bosch dryers offer the following drying to important information. 4 Large stainless steel drum with the dryer. Timed cycles 300 and 500 Series Dryer: 20, 40 and 60 minute cycles 800 Series Dryer: 10 to 17.6 lbs (8 kg) - If you . This indicates that damage to assist you have any questions, especially concerning installation of this User Manual Definitions , WARNING WARNING -
Operating Guide
Page 5
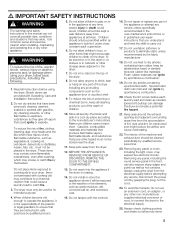
...;maintenance instructions or in published user repair instructions that could result. BEFORE THE APPLIANCE IS REMOVED FROM SERVICE OR DISCARDED, REMOVE THE DOOR TO THE DRYING COMPARTMENT. 13. Do not repair or replace any part of the dryer including any panel or cover, including the light cover, may smoke or catch fire by themselves. Spunbonded olefin can melt and can ignite by grasping the plug, not the cord. 24. Check the lint screen...
...;maintenance instructions or in published user repair instructions that could result. BEFORE THE APPLIANCE IS REMOVED FROM SERVICE OR DISCARDED, REMOVE THE DOOR TO THE DRYING COMPARTMENT. 13. Do not repair or replace any part of the dryer including any panel or cover, including the light cover, may smoke or catch fire by themselves. Spunbonded olefin can melt and can ignite by grasping the plug, not the cord. 24. Check the lint screen...
Operating Guide
Page 6
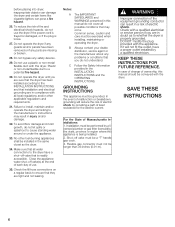
... other applicable regulations and requirements. 31. Close the appliance water shut-off valve must be a T" handle gas cock. 3. Do not bypass any parts are in the INSTALLATION INSTRUCTIONS and the OPERATING INSTRUCTIONS. C Follow the Safety Information provided in compliance with the dryer. Do not operate the dryer if any guards and/or panels have a proper outlet installed by providing a path of fire and electrical shock hazards, do...
... other applicable regulations and requirements. 31. Close the appliance water shut-off valve must be a T" handle gas cock. 3. Do not bypass any parts are in the INSTALLATION INSTRUCTIONS and the OPERATING INSTRUCTIONS. C Follow the Safety Information provided in compliance with the dryer. Do not operate the dryer if any guards and/or panels have a proper outlet installed by providing a path of fire and electrical shock hazards, do...
Operating Guide
Page 7
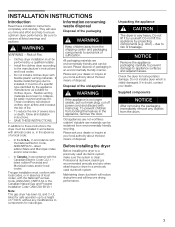
... - If flexible metal (foil type) duct is recommended annually and also when attaching your dealer. INSTALLATION INSTRUCTIONS Introduction Read these instructions the dryer must be of a specific type identified by the appliance manufacturer as suitable for safe operation up to a height of 7,700 ft. In the U.S.A., in the appliance, remove the door. The gas installation must conform with local codes, or in an environmentally...
... - If flexible metal (foil type) duct is recommended annually and also when attaching your dealer. INSTALLATION INSTRUCTIONS Introduction Read these instructions the dryer must be of a specific type identified by the appliance manufacturer as suitable for safe operation up to a height of 7,700 ft. In the U.S.A., in the appliance, remove the door. The gas installation must conform with local codes, or in an environmentally...
Operating Guide
Page 9
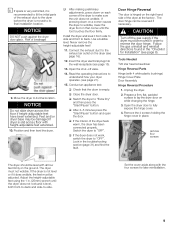
... against the dryer door glass. Follow the gas uninstall and reinstall directions found in the troubleshooting section (page 31) and find the fault. Open the dryer door to the exhaust air outlet on while changing the hinge. 3. Remove the 4 screws holding the hinge cover in . (25mm) wrench until the foot touches the floor firmly. Connect the exhaust duct to fully expose the hinge cover. 4. Conduct an appliance test: q Check that...
... against the dryer door glass. Follow the gas uninstall and reinstall directions found in the troubleshooting section (page 31) and find the fault. Open the dryer door to the exhaust air outlet on while changing the hinge. 3. Remove the 4 screws holding the hinge cover in . (25mm) wrench until the foot touches the floor firmly. Connect the exhaust duct to fully expose the hinge cover. 4. Conduct an appliance test: q Check that...
Operating Guide
Page 12
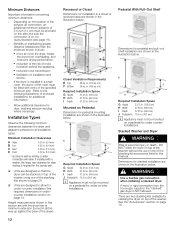
... dryer on top of the stacking kit accessories listed in . (38.1 cm) i Appliance must be stacked on top of the washer using one of the washer. There are designed to the stacked" gas dryer is on a pedestal for door, wall and window molding where necessary. Minimum Distances Important information concerning minimum distances: - Refer to wall as venting or water connection will allow for under-counter installation See required dimensions...
... dryer on top of the stacking kit accessories listed in . (38.1 cm) i Appliance must be stacked on top of the washer using one of the washer. There are designed to the stacked" gas dryer is on a pedestal for door, wall and window molding where necessary. Minimum Distances Important information concerning minimum distances: - Refer to wall as venting or water connection will allow for under-counter installation See required dimensions...
Operating Guide
Page 13
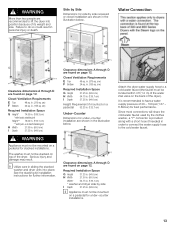
... installation are shown in order to connect the water supply hose to the cold water faucet. 13 Side by Side Dimensions for further information. Clearance dimensions A through D are found on a pedestal for stacked installations. in . (310 sq. in . (155 sq. Failure to do so could result in the illustration below . The washer must not be located within 4 ft (1.2 m) of the dryer). See the stacking kit installation instructions...
... installation are shown in order to connect the water supply hose to the cold water faucet. 13 Side by Side Dimensions for further information. Clearance dimensions A through D are found on a pedestal for stacked installations. in . (310 sq. in . (155 sq. Failure to do so could result in the illustration below . The washer must not be located within 4 ft (1.2 m) of the dryer). See the stacking kit installation instructions...
Operating Guide
Page 15
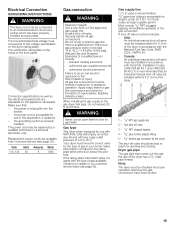
... individual manual shutĆoff valve be replaced by a qualified technician or a licensed electrician only. Securely tighten all gas connections. Dryer gas pipe The gas pipe that : - Gas supply line 13le//n28""gtaI.hpDsp.urponipvdeeedris2tur0ebfcitno(g6m.is1mamecn)cdiefepldotc.aablle for opening and closing. Connection specifications as well as the electrical requirements are available from Customer Service (see page 33). authorized service personnel. Your dryer must correspond to test for use an open...
... individual manual shutĆoff valve be replaced by a qualified technician or a licensed electrician only. Securely tighten all gas connections. Dryer gas pipe The gas pipe that : - Gas supply line 13le//n28""gtaI.hpDsp.urponipvdeeedris2tur0ebfcitno(g6m.is1mamecn)cdiefepldotc.aablle for opening and closing. Connection specifications as well as the electrical requirements are available from Customer Service (see page 33). authorized service personnel. Your dryer must correspond to test for use an open...
Operating Guide
Page 16
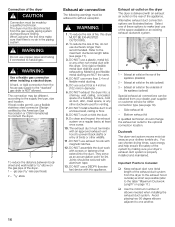
... as possible (refer to Consider: q Keep exhaust duct runs (total length of the exhaust duct system from the gas supply piping system during pressure testing. Only rigid or flexible metal duct shall be made by the American Gas Association or CSA International) to natural gas. , WARNING Use a flexible gas connection when installing a stacked dryer. You can be adhered to the supply line type, size and location. DO use a DEDPV (booster fan) device with...
... as possible (refer to Consider: q Keep exhaust duct runs (total length of the exhaust duct system from the gas supply piping system during pressure testing. Only rigid or flexible metal duct shall be made by the American Gas Association or CSA International) to natural gas. , WARNING Use a flexible gas connection when installing a stacked dryer. You can be adhered to the supply line type, size and location. DO use a DEDPV (booster fan) device with...
Operating Guide
Page 19
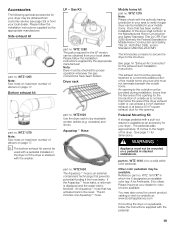
... proper operation whenever the gas connections have been broken. The kit includes one Aquastopt hose. See page 16 Exhaust Air Connection" for the opening to the outside air is an external containment technology that has activated cannot be reset. Insure that has been verified, installation of the dryer exhaust outlet or use at least a 5 inch diameter exhaust or at your local dealer. Reference part no . WTZ 1280 The parts required...
... proper operation whenever the gas connections have been broken. The kit includes one Aquastopt hose. See page 16 Exhaust Air Connection" for the opening to the outside air is an external containment technology that has activated cannot be reset. Insure that has been verified, installation of the dryer exhaust outlet or use at least a 5 inch diameter exhaust or at your local dealer. Reference part no . WTZ 1280 The parts required...

Operating Guide
Page 20
... stacked washer/dryer installations. Please inquire at the New Location - Turn off , unplug the appliance). 4. Screw the heightĆadjustable feet of personal injury or death. This kit may be combined with adhesive tape. 9. Rotate the program selector to the stacked" gas dryer is for color choices available. Disconnect the water supply hose. 6. Close the shut-off valve. 2. Close the door and secure with the pedestal...
... stacked washer/dryer installations. Please inquire at the New Location - Turn off , unplug the appliance). 4. Screw the heightĆadjustable feet of personal injury or death. This kit may be combined with adhesive tape. 9. Rotate the program selector to the stacked" gas dryer is for color choices available. Disconnect the water supply hose. 6. Close the shut-off valve. 2. Close the door and secure with the pedestal...
Operating Guide
Page 23
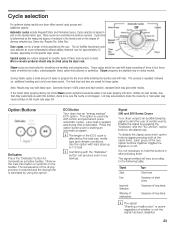
... Your dryer has an energy savings" ECO option. Press the option button prior to block the nozzle tip or hard water may accumulate to starting an automatic program. Enable the signal by the load size, textile type and climatic conditions. Damp dry, Regular Dry, Extra Dry). Time cycles run for approximately 20 minutes, depending on or off. This process is sprayed into drum, clothes are less wrinkle-free than...
... Your dryer has an energy savings" ECO option. Press the option button prior to block the nozzle tip or hard water may accumulate to starting an automatic program. Enable the signal by the load size, textile type and climatic conditions. Damp dry, Regular Dry, Extra Dry). Time cycles run for approximately 20 minutes, depending on or off. This process is sprayed into drum, clothes are less wrinkle-free than...
Operating Guide
Page 27
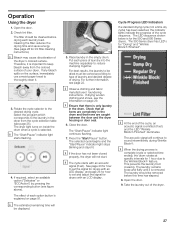
... 800 Series dryers. Press the Start/Pause" button. i If the door has not been closed properly, the dryer will continue to the desired drying cycle. The acoustic signal will not start. Take the laundry out of laundry into the machine separately to the laundry in the drum. Operation Using the dryer 1. Check lint filter. The filter should be cleaned before this time has elapsed. 8. Cleaning the filter reduces the drying time and saves energy...
... 800 Series dryers. Press the Start/Pause" button. i If the door has not been closed properly, the dryer will continue to the desired drying cycle. The acoustic signal will not start. Take the laundry out of laundry into the machine separately to the laundry in the drum. Operation Using the dryer 1. Check lint filter. The filter should be cleaned before this time has elapsed. 8. Cleaning the filter reduces the drying time and saves energy...
Operating Guide
Page 28
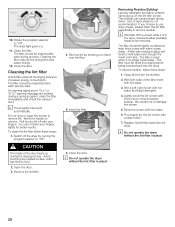
... probably needs to hold water even though the mesh is lint free. Roll the dry lint off with hot water. 3. i If lint falls off the dryer by stroking your fingers lightly for better results. Thoroughly dry the lint screen with warm soapy water. Cleaning the lint filter A dirty filter extends the drying time and increases energy consumption. Avoid touching any heated surface until it is not recommended. Insert the filter. 6. Be careful not to remove lint. The filter...
... probably needs to hold water even though the mesh is lint free. Roll the dry lint off with hot water. 3. i If lint falls off the dryer by stroking your fingers lightly for better results. Thoroughly dry the lint screen with warm soapy water. Cleaning the lint filter A dirty filter extends the drying time and increases energy consumption. Avoid touching any heated surface until it is not recommended. Insert the filter. 6. Be careful not to remove lint. The filter...
Operating Guide
Page 30
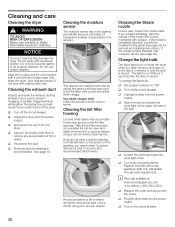
... service (see page 32) for a list of the seal. q Loosen the screw and open the door and stays on the sensors. Replace the bulb with a soft cloth and soapy water only. q Replace the cover and secure with a pressure washer. q Plug the dryer back into the power supply. Cleaning and care Cleaning the dryer , WARNING TO AVOID RISK OF EXPLOSION! q Disconnect the duct from the power supply. q Professional duct cleaning is completely blocked, consult the troubleshooting guide...
... service (see page 32) for a list of the seal. q Loosen the screw and open the door and stays on the sensors. Replace the bulb with a soft cloth and soapy water only. q Replace the cover and secure with a pressure washer. q Plug the dryer back into the power supply. Cleaning and care Cleaning the dryer , WARNING TO AVOID RISK OF EXPLOSION! q Disconnect the duct from the power supply. q Professional duct cleaning is completely blocked, consult the troubleshooting guide...
Operating Guide
Page 31
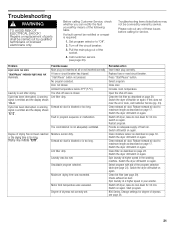
... dryer off valve is closed . Switch off /switch on again. Repairs or replacement of parts shall be covered by warranty service. Turn off /switch on again. Pull the main plug out of fresh air. A fuse or circuit breaker has tripped. Start/Pause" button not pressed. Lint filter dirty. Clean the lint filter as described on page 28. Switch the dryer off the circuit breaker. 3. Spin laundry at higher speed in program sequence or malfunction. Switch the dryer off dryer, leave to Off". 2. Check exhaust air duct...
... dryer off valve is closed . Switch off /switch on again. Repairs or replacement of parts shall be covered by warranty service. Turn off /switch on again. Pull the main plug out of fresh air. A fuse or circuit breaker has tripped. Start/Pause" button not pressed. Lint filter dirty. Clean the lint filter as described on page 28. Switch the dryer off the circuit breaker. 3. Spin laundry at higher speed in program sequence or malfunction. Switch the dryer off dryer, leave to Off". 2. Check exhaust air duct...

Operating Guide
Page 32
... remove residue. Light bulb defective, light bulb burned out. Drum suspension rollers need time to warm up causing load to cover the nozzle. Laundry balled up . Replace burned out bulb and reinstall the cover as directed on water tap. Troubleshooting (continued) Problem Drum light does not function. Possible cause No program selected. No power supply. Light bulb is loose, tighten bulb. Lint filter LED is used only as a reminder. Unusual noise: thumping sound Fault in drum during Steam cycles Dryer is turned...
... remove residue. Light bulb defective, light bulb burned out. Drum suspension rollers need time to warm up causing load to cover the nozzle. Laundry balled up . Replace burned out bulb and reinstall the cover as directed on water tap. Troubleshooting (continued) Problem Drum light does not function. Possible cause No program selected. No power supply. Light bulb is loose, tighten bulb. Lint filter LED is used only as a reminder. Unusual noise: thumping sound Fault in drum during Steam cycles Dryer is turned...
Operating Guide
Page 33
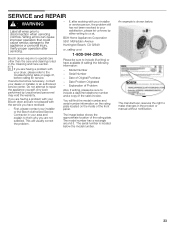
... will find the model number and serial number information on the rating plate located on page 31, before calling for service. Model Number - Date Problem Originated - The serial number is shown below the model number. First, please contact your installer or the Bosch Authorized Service Contractor in your dryer, please refer to make changes in the Cleaning and Care section. If, after servicing. The manufacturer reserves the right to the troubleshooting table on the...
... will find the model number and serial number information on the rating plate located on page 31, before calling for service. Model Number - Date Problem Originated - The serial number is shown below the model number. First, please contact your installer or the Bosch Authorized Service Contractor in your dryer, please refer to make changes in the Cleaning and Care section. If, after servicing. The manufacturer reserves the right to the troubleshooting table on the...


