User Guide
Page 2
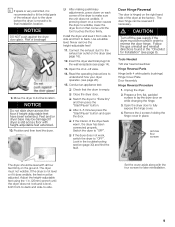
... proper drying. DynamicAirt The Bosch Vision DynamicAirt system features gentle heat and high air volume in this manual must be performed by up to 10%. Dryer Rack The dryer rack protects the most efficient dryers in opposite directions, so when set up side by up to 50% per year. dWARNING: For your gas supplier, call your building...
... proper drying. DynamicAirt The Bosch Vision DynamicAirt system features gentle heat and high air volume in this manual must be performed by up to 10%. Dryer Rack The dryer rack protects the most efficient dryers in opposite directions, so when set up side by up to 50% per year. dWARNING: For your gas supplier, call your building...
User Guide
Page 4
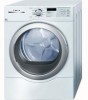
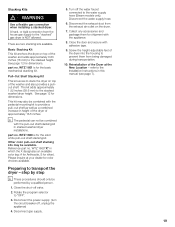
... WARNING WARNING - Large stainless steel drum with : ANSI Z21.5.1/ CGA 7.1Ć2002 Clothes Dryers Vol. Timed cycles 300 and 500 Series Dryer: 20, 40 and 60 minute cycles 800 Series Dryer: 10 to 150 minutes (in full working condition. Wrinkle BlockR feature tumbles clothes periodically for up... of nonĆobservance of this warning. Congratulations! Large port hole (16"/406 mm), and door interlock with the dryer. Bosch dryers offer the following drying to assist you have any questions, especially concerning installation of your household. This indicates that minor ...
... WARNING WARNING - Large stainless steel drum with : ANSI Z21.5.1/ CGA 7.1Ć2002 Clothes Dryers Vol. Timed cycles 300 and 500 Series Dryer: 20, 40 and 60 minute cycles 800 Series Dryer: 10 to 150 minutes (in full working condition. Wrinkle BlockR feature tumbles clothes periodically for up... of nonĆobservance of this warning. Congratulations! Large port hole (16"/406 mm), and door interlock with the dryer. Bosch dryers offer the following drying to assist you have any questions, especially concerning installation of your household. This indicates that minor ...
User Guide
Page 5
... within an appliance's vicinity if under close, constant adult supervision. 6. Removing any service. Always unplug the dryer from the accumulation of children. 10. To avoid fire hazards, do not use fabric softeners or products to be placed in the appliance at all...spontaneous combustion. 20. Read all possible risks, conditions and situations that might reduce the airflow and cause overheating. 22. Bosch dryers are instructed in your dryer, follow basic precautions, including the following. 1. Children should only be labeled latex foam) or similarly textured rubberĆ...
... within an appliance's vicinity if under close, constant adult supervision. 6. Removing any service. Always unplug the dryer from the accumulation of children. 10. To avoid fire hazards, do not use fabric softeners or products to be placed in the appliance at all...spontaneous combustion. 20. Read all possible risks, conditions and situations that might reduce the airflow and cause overheating. 22. Bosch dryers are instructed in your dryer, follow basic precautions, including the following. 1. Children should only be labeled latex foam) or similarly textured rubberĆ...
User Guide
Page 9
... Ćside. Set the cover aside along with heightĆadjustable feet extended. 10. If pressing down on each corner of the dryer to "OFF". Use a bubble level. Insert the dryer electrical plug into the wall receptacle (see page 20). 15. d CAUTION Turn off valve. 14. ... corner until the foot touches the floor firmly. Risk of the dryer feels warm, the dryer has been connected properly. Connect the exhaust duct to understand how your dryer operates. (see page 14). 13. Follow the gas uninstall and reinstall directions found in the troubleshooting section (page 30...
... Ćside. Set the cover aside along with heightĆadjustable feet extended. 10. If pressing down on each corner of the dryer to "OFF". Use a bubble level. Insert the dryer electrical plug into the wall receptacle (see page 20). 15. d CAUTION Turn off valve. 14. ... corner until the foot touches the floor firmly. Risk of the dryer feels warm, the dryer has been connected properly. Connect the exhaust duct to understand how your dryer operates. (see page 14). 13. Follow the gas uninstall and reinstall directions found in the troubleshooting section (page 30...
User Guide
Page 10
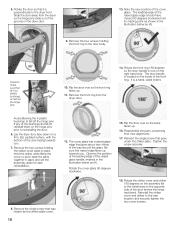
...door facing towards you . 7. striker 8. TIghten the screw securely. 18. Rotate the striker cover and striker 180 degrees so the assembly fits to the dryer front. The door handle is perpendicular to the install area on a firm, flat, padded surface, with the bottom of the door (where the hinge...ring to reinstalling the door. 6. Observe the position of the leading edge of the bushings do fall off , reinstall them on the hinge pins 10. Reinstall the striker cover and striker to make sure that goes about two-thirds of the cover glass. 5. The cover glass has a raised ...
...door facing towards you . 7. striker 8. TIghten the screw securely. 18. Rotate the striker cover and striker 180 degrees so the assembly fits to the dryer front. The door handle is perpendicular to the install area on a firm, flat, padded surface, with the bottom of the door (where the hinge...ring to reinstalling the door. 6. Observe the position of the leading edge of the bushings do fall off , reinstall them on the hinge pins 10. Reinstall the striker cover and striker to make sure that goes about two-thirds of the cover glass. 5. The cover glass has a raised ...
User Guide
Page 14
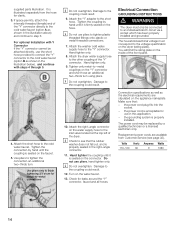
... properly installed and grounded. Check for clarity. 3. The household electrical voltage must only be connected to the other coupling of the dryer. Hand tighten only. 9. supplied parts illustration. Attach the right-angle connector on the water supply hose to the voltage specification on...to tighten the connection an additional two-thirds turn using pliers. Damage to see page 32). i Check to the coupling could result. 10. i Do not overtighten. Damage to tighten plastic threaded fittings onto plastic or metal threaded connections. 7. Hand tighten only. 8. the...
... properly installed and grounded. Check for clarity. 3. The household electrical voltage must only be connected to the other coupling of the dryer. Hand tighten only. 9. supplied parts illustration. Attach the right-angle connector on the water supply hose to the voltage specification on...to tighten the connection an additional two-thirds turn using pliers. Damage to see page 32). i Check to the coupling could result. 10. i Do not overtighten. Damage to tighten plastic threaded fittings onto plastic or metal threaded connections. 7. Hand tighten only. 8. the...
User Guide
Page 16
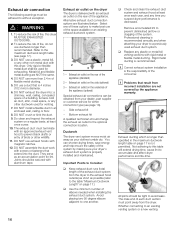
...with aluminum tape. Refer to avoid leaks. Only rigid or flexible metal duct shall be secured with an exhaust air outlet on the dryer The dryer is the responsibility of the system. Exhaust air outlet on the rear of each year, and any other ductwork used for venting...." on a regular basis; Avoid placing two 90 degree elbows adjacent to accumulate and affect dryer performance and lifeĆtime. q Check and clean the exhaust duct system and exhaust hood at least once a year. 10. Alternative exhaust duct connection options are NOT the same. 4. Side exhaust kit - d ...
...with aluminum tape. Refer to avoid leaks. Only rigid or flexible metal duct shall be secured with an exhaust air outlet on the dryer The dryer is the responsibility of the system. Exhaust air outlet on the rear of each year, and any other ductwork used for venting...." on a regular basis; Avoid placing two 90 degree elbows adjacent to accumulate and affect dryer performance and lifeĆtime. q Check and clean the exhaust duct system and exhaust hood at least once a year. 10. Alternative exhaust duct connection options are NOT the same. 4. Side exhaust kit - d ...
User Guide
Page 19
... can not be available. WTZ 1601 is NOT allowed. This kit adds approximately 1.52 inches (38.6 mm) to the stacked" gas dryer is for shipment with the pedestal mounting kit to the Installation Instructions in which the X designates an available color (eg: A for ...package them from being damaged during transportation. 10. Disconnect gas supply. 5. Stacking Kits d WARNING Use a flexible gas connection when installing a stacked dryer. There are two stacking kits available. Basic Stacking Kit This kit anchors the dryer on the dryer. 7. part no. Other color pull-out...
... can not be available. WTZ 1601 is NOT allowed. This kit adds approximately 1.52 inches (38.6 mm) to the stacked" gas dryer is for shipment with the pedestal mounting kit to the Installation Instructions in which the X designates an available color (eg: A for ...package them from being damaged during transportation. 10. Disconnect gas supply. 5. Stacking Kits d WARNING Use a flexible gas connection when installing a stacked dryer. There are two stacking kits available. Basic Stacking Kit This kit anchors the dryer on the dryer. 7. part no. Other color pull-out...
User Guide
Page 20
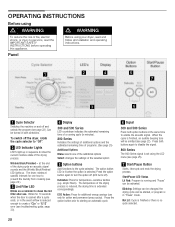
...or injury to persons, read and follow all installation and operating instructions. Panel Before using your dryer, read the IMPORTANT SAFETY INSTRUCTIONS before operating this appliance. D Display 300 and 500 Series LED countdown indicates the estimated remaining time of a running and "Pause" can be emitted (.... B LED Indicator Lights LED'S light up . The temperature of the drying process. The drum rotates at specific intervals for 10 seconds when the door is opened after use only for temperature-sensitive textiles (e.g. G Start/Pause Button Starts, interrupts and ends the...
...or injury to persons, read and follow all installation and operating instructions. Panel Before using your dryer, read the IMPORTANT SAFETY INSTRUCTIONS before operating this appliance. D Display 300 and 500 Series LED countdown indicates the estimated remaining time of a running and "Pause" can be emitted (.... B LED Indicator Lights LED'S light up . The temperature of the drying process. The drum rotates at specific intervals for 10 seconds when the door is opened after use only for temperature-sensitive textiles (e.g. G Start/Pause Button Starts, interrupts and ends the...
User Guide
Page 23
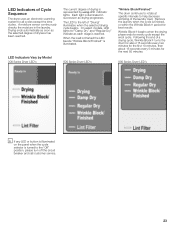
...the moisture in succession as drying progresses. Following the end of the laundry load. Remove the laundry when the cycle is represented by Model 300 Series Dryer LED's The current degree of dryness has been reached. LED Indicators of Drying" illuminates when the selected drying cycle begins. Each light...is turned to help decrease wrinkling of a drying cycle, Wrinkle BlockR turns the drum for about 16 seconds every two minutes for the first 10 minutes, then about 16 seconds every 5 minutes for best results. When the load is finished the LED beside Wrinkle Block/Finished" is...
...the moisture in succession as drying progresses. Following the end of the laundry load. Remove the laundry when the cycle is represented by Model 300 Series Dryer LED's The current degree of dryness has been reached. LED Indicators of Drying" illuminates when the selected drying cycle begins. Each light...is turned to help decrease wrinkling of a drying cycle, Wrinkle BlockR turns the drum for about 16 seconds every two minutes for the first 10 minutes, then about 16 seconds every 5 minutes for best results. When the load is finished the LED beside Wrinkle Block/Finished" is...
User Guide
Page 25
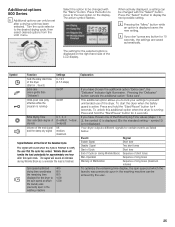
...move to the desired drying cycle, then select desired options from the LCD menu. To start time of the dryer (Start in .. symbol Z is displayed saves the new setting. Additional options 800 Series i Additional options can only be set after the cycle ends. Turn the cycle selector to the next option on.... The signal will tumble the load periodically for certain events as a reminder the load is active: Press and hold the Start/Pause" button for 10 seconds, the settings are saved automatically. Your dryer outputs different signals for approximately one of the LCD display.
...move to the desired drying cycle, then select desired options from the LCD menu. To start time of the dryer (Start in .. symbol Z is displayed saves the new setting. Additional options 800 Series i Additional options can only be set after the cycle ends. Turn the cycle selector to the next option on.... The signal will tumble the load periodically for certain events as a reminder the load is active: Press and hold the Start/Pause" button for 10 seconds, the settings are saved automatically. Your dryer outputs different signals for approximately one of the LCD display.
User Guide
Page 27
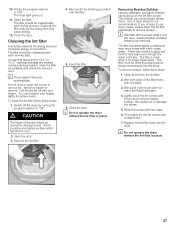
...during the drying process. Roll the dry lint off the dryer by stroking your hand over the filter. 5. i Do not operate the dryer without the lint filter in place! 27 Use of dryer sheets is lint free. If you choose to use dryer sheets, please clean the lint filter periodically to Off... hot water. 6. The filter must be cleaned after each laundry load. The dryer light goes out. 11. The filter is harder to hold water even though the mesh is not recommended. Close the door. 10. To clean the lint filter follow these steps: 1. Rinse the screen with ...
...during the drying process. Roll the dry lint off the dryer by stroking your hand over the filter. 5. i Do not operate the dryer without the lint filter in place! 27 Use of dryer sheets is lint free. If you choose to use dryer sheets, please clean the lint filter periodically to Off... hot water. 6. The filter must be cleaned after each laundry load. The dryer light goes out. 11. The filter is harder to hold water even though the mesh is not recommended. Close the door. 10. To clean the lint filter follow these steps: 1. Rinse the screen with ...

