Bosch WTMC8320US Support Question
Bosch WTMC8320US Support Question
Find answers below for this question about Bosch WTMC8320US - 800 Series Nexxt Electric Clothes Dryer.Need a Bosch WTMC8320US manual? We have 3 online manuals for this item!
Question posted by gbmcdonald14 on September 16th, 2016
Why Does My Dryer Stop After About 10 Min. And Then Start Again If I Hit The Res
ct button.
Current Answers
Answer #1: Posted by Odin on September 16th, 2016 6:15 AM
Odin

Member since:
April 10th, 2010 Points: 41,236,690

Member since:
April 10th, 2010 Points: 41,236,690
See http://www.repairclinic.com/RepairHelp/Dryer-Repair/8-129--V1RNQzgzMjBVUyA=/Bosch-Dryer-Troubleshooting. Follow the link or links that best reflect your experience.
Hope this is useful. Please don't forget to click the Accept This Answer button if you do accept it. My aim is to provide reliable helpful answers, not just a lot of them. See https://www.helpowl.com/profile/Odin.
Related Bosch WTMC8320US Manual Pages
Pedestal Installation Instructions - Page 2

... or serious injuries may occur as a result of nonĆobservance of the following parts and tools in injury. Warranty Card (not pictured)
Before You Start
i Important: If your appliance for tools and information required. Failure to move and uninstall the appliance.
d CAUTION
CAUTION-
Tools and Parts
Confirm receipt of this...
Pedestal Installation Instructions - Page 3

...Make sure the washer transportation bolts are installing the pedestal on a new washer or dryer, proceed to the washer drum. The washer installation instructions required these bolts to be ...assemblies originally shipped with your washer (see Figure 3). Figure 3 q Insert the bolt assemblies. Start with the lower left of the bolts until the plastic bushing is necessary to push against the...
Pedestal Installation Instructions - Page 5

... end wrench, tighten only the two rear feet locknuts against the appliance housing. For dryers go directly to the appliance and adjacent surfaces, all the way from the unit.... it to 1/2 turn (see Figure 11). Figure 9 4. Do not use of 10 ftĆlb (14 N-m) to HAND TIGHTEN all four bolts. Insert the square spacer... started into their threads. Retain the bolts for all screws (see Figure...
Pedestal Installation Instructions - Page 6

... reinstalling your appliance to do not come out properly. Follow the Installation Instructions
that direction. Figure 15 q Insert the covers until the unit is leveled.
Start with it clockwise. q After leveling the unit from front to one end, it unlevel again.) Each foot of the unit. Use the wrench provided (or...
Pedestal Installation Instructions - Page 7

... foot in (counter-clockwise) will change the height of laundry in the machine, starting it in place by placing a small load of the ... corner of the appliance to securely tighten both locknuts for 10 seconds. For Washers: Fine tune the leveling by turning ...the test spin cycle is required to all feet) is manually
stopped before its completion, then the door may be tightened firmly ...
Pedestal Installation Instructions - Page 8

... Pedestal is subject to other than those listed in Canada. If retailer is not available, please refer to the instructions provided in the washer or dryer Operating, Care and Installation Instructions", supplier will repair or replace any other rights which the pedestal is installed. This warranty gives you specific rights and...
Installation and Use & Care (all languages) - Page 2
...; step by step
9
OPERATING INSTRUCTIONS 10 Your new dryer 10
Panel 11
Summary of instructions 12
Safety information 13 Before switching on the dryer 13 Using the dryer 13 Protecting the dryer 13
Protection of the environment 13
Before using the dryer for the first time 13
Temporary disconnection of the dryer 13
Laundry 13 Identification of fabrics 13...
Installation and Use & Care (all languages) - Page 3
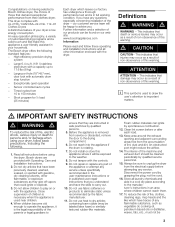
... Do not tamper with automatic drum stop function
- Do not use fabric ...clothes, cleaning rags, mop heads and the like materials. Timed cycles from the electrical supply before attempting any questions especially concerning installation of the dryer...10. The interior of the machine and exhaust duct should be
3 An obstructed port might reduce the airflow. 14. Read all laundry...
Installation and Use & Care (all languages) - Page 6
...the angle bracket. Tighten the nut.
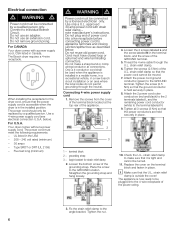
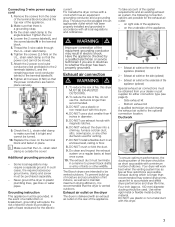
6 Electrical connection
d WARNING d
Power cord must have closed loop or upturned end wire terminating connectors. For CANADA Your dryer comes with strain relief clamp note manufacturer's ... Straighten the grounding strap and hang loosely.
10. Check the U.L. i Make sure that the power cord cannot be connected by a qualified person.
Installation and Use & Care (all languages) - Page 7
... you are possible for the electric
current. Fix the strain relief clamp to the terminal labeled N.
8. Additional grounding procedure -
Bottom exhaust kit A qualified technician should be turned.
10. Tighten all local regulations and ordinances. Never ground the dryer to accumulate and affect dryer performance and dryer lifeĆtime. Your dryer will reduce the risk...
Installation and Use & Care (all languages) - Page 9
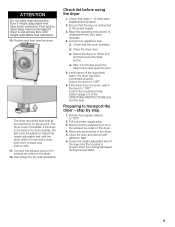
... to Extra Dry" and then press the Start button. Insert plug into the housing to OFF".
6.
q Switch the dryer to the power supply.
3. q After 3Ć5 minutes press the Stop button and open the door.
5. If the interior of the dryer feels warm, the dryer has been connected properly. Switch the dryer to prevent them from
the exhaust air...
Installation and Use & Care (all languages) - Page 10

Lint filter
10 OPERATING INSTRUCTIONS
Your new dryer
0pen the door....(colored marking)
....and close the door.
Installation and Use & Care (all languages) - Page 11
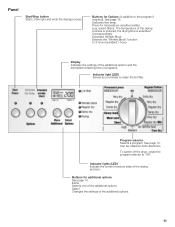
...). To switch off the dryer, rotate the program selector to the program if required).
Indicator lights (LED) Indicate the current moisture state of the additional options.
Delicates/low temp. See page 15. Menu Selects one of the drying process. The temperature of the additional options.
11 Panel
Start/Stop button Starts, interrupts and ends the...
Installation and Use & Care (all languages) - Page 12
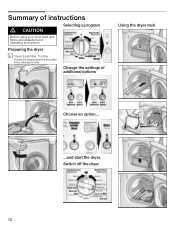
Switch off the dryer
12 Summary of additional options
Using the dryer rack
Choose an option...
...and start the dryer. The filter
should be cleaned before and after every drying process. Change the settings of instructions
d CAUTION
Selecting a program
Before using your dryer read and follow all installation and operating instructions.
Preparing the dryer
i Check the lint...
Installation and Use & Care (all languages) - Page 14
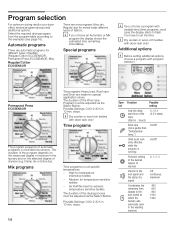
... sensors. Possible Settings: 0:00ć2:30 h in 10 min. Medium for temperature
insensitive textiles - i If you choose a program with dryer rack only! Special programs
i If you choose an Automatic or Mix
program the display shows the estimated time remaining immediately. The duration of the dryer (Start in the laundry and on the measured degree of moisture...
Installation and Use & Care (all languages) - Page 15
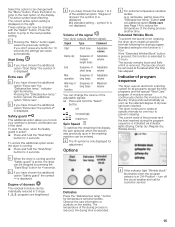
... to reduce the temperature of program sequence
The dryer uses an electronic scanning system for 4 seconds. The laundry should be removed at specific intervals for this additional option when the dryer is running and the
Safety guard" is active, the dryer can be stopped by pressing the Start/Stop" button for all programs except the time programs and...
Installation and Use & Care (all languages) - Page 17
... surface of your dryer. i The estimated remaining time will not start .
2. For further information see Extended Wrinkle Block", page 15).
17 If drying woolen clothing and shoes, see page 16).
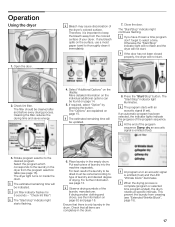
If required, select Option" by pressing the button. The Options" are completely in the drum. Press the Start/Stop" button. Put each piece of the
laundry manufacturer. Check...
Installation and Use & Care (all languages) - Page 18

...of clothing or one pair of the dryer.
3. Follow directions for approx. 15 min.
18 Select the drying time from the following table according to dry washable woolen textiles (e.g. Place laundry loosely....
The laundry must be damaged. Place the dryer rack so that the drum is empty.
4. Drying shoes without a rack could jam and be inserted flush with the Select" button. The ...
Installation and Use & Care (all languages) - Page 19
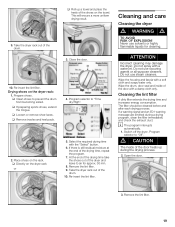
...with a soft cloth and soapy water only.
i The program interrupts
automatically. 1. Switch off the dryer. d CAUTION
The... use solvents or highly flammable liquids for approx. 30 min.
8.
Do not use scouring agents or allĆ...button.
6. Prepare shoes. At the end of the drying time take the shoes out of the drum.
10. Wipe the housing and fascia with a water jet.
q Directly on the dryer...
Installation and Use & Care (all languages) - Page 21
...No power supply. Moisture sensor dirty. Laundry was exceeded.
It is required:
1. Press Start/Stop" button.
Remove and reinstall the cover as ...min. A warning signal is loose. Drum light does not function.
Start/Stop" indicator light does not illuminate. Wrinkle block" indicator lights. Fault in your washer. Switch off /switch on page 8. Switch off dryer...
Similar Questions

Check Drain
i have the Bosch dryer for about a year and it keeps on blinking the check drain indicature and the ...
i have the Bosch dryer for about a year and it keeps on blinking the check drain indicature and the ...
(Posted by jacobgoldberger0 8 years ago)

When I Try To Start My Dryer It Just Gives A Low Click
I think I put to heavy of a load in the dryer. It did not dry the clothes an now it just gives me a ...
I think I put to heavy of a load in the dryer. It did not dry the clothes an now it just gives me a ...
(Posted by wellsangel 8 years ago)

Wiring Diagram
Need Wiring diagram for Bosch Dryer Wtvc3300us/10
Need Wiring diagram for Bosch Dryer Wtvc3300us/10
(Posted by lgjewelrydesigns 9 years ago)

Bosch 800 Series Dryer Reset Button
Where is the reset button located in the back. Do you have to remove the entire panel to access it? ...
Where is the reset button located in the back. Do you have to remove the entire panel to access it? ...
(Posted by billhorne1360 11 years ago)

Dryer Will Not Run. All Displays Say 20.
When setting the dryer on extra dry which usually displays 117 in displays 20. The dryer will try to...
When setting the dryer on extra dry which usually displays 117 in displays 20. The dryer will try to...
(Posted by french 13 years ago)