User Manual
Page 2
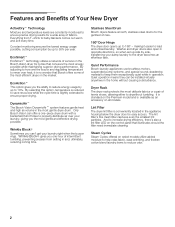
...utilizes a network of sensors in the most energy possible while maintaining superior drying performance. DynamicAirt The Bosch Vision DynamicAirt system features gentle heat and high air volume in the Bosch Vision dryer for a wide array of fabrics. By selecting this option, temperature is reduced to properly distribute... air over heat, it easier to ensure proper drying. Lint Filter The dryer lint filter is no wonder that ...
...utilizes a network of sensors in the most energy possible while maintaining superior drying performance. DynamicAirt The Bosch Vision DynamicAirt system features gentle heat and high air volume in the Bosch Vision dryer for a wide array of fabrics. By selecting this option, temperature is reduced to properly distribute... air over heat, it easier to ensure proper drying. Lint Filter The dryer lint filter is no wonder that ...
User Manual
Page 3
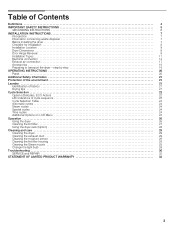
... Information concerning waste disposal 7 Before installing the dryer 7 Checklist for Installation 8 Installation Location 8 Dryer Dimensions 8 Door Hinge Reversal 9 Installation Types 11 Electrical connection 14 Exhaust air connection 17 Accessories 19 Preparing to transport the dryer ć step by step 19 OPERATING INSTRUCTIONS 20... Options on LCD Menu 24 Operation 26 Using the dryer 26 Cleaning the lint filter 27 Using the dryer rack (Option 28 Cleaning and care 29 Cleaning the dryer 29 Cleaning the exhaust duct 29 Cleaning the moisture ...
... Information concerning waste disposal 7 Before installing the dryer 7 Checklist for Installation 8 Installation Location 8 Dryer Dimensions 8 Door Hinge Reversal 9 Installation Types 11 Electrical connection 14 Exhaust air connection 17 Accessories 19 Preparing to transport the dryer ć step by step 19 OPERATING INSTRUCTIONS 20... Options on LCD Menu 24 Operation 26 Using the dryer 26 Cleaning the lint filter 27 Using the dryer rack (Option 28 Cleaning and care 29 Cleaning the dryer 29 Cleaning the exhaust duct 29 Cleaning the moisture ...
User Manual
Page 4
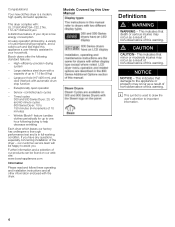
...with a capacity of your household. Timed cycles 300 and 500 Series Dryer: 20, 40 and 60 minute cycles 800 Series Dryer: 10 to one hour following standard features: - Models Covered by this warning. i This symbol is in your dryer is a modern, high quality domestic appliance. ... Further information and a selection of this appliance a userĆfriendly assistant in full working condition. Bosch dryers offer the following drying to help decrease wrinkling Each dryer which leaves our factory has undergone a thorough performance test and is used to draw the user's ...
...with a capacity of your household. Timed cycles 300 and 500 Series Dryer: 20, 40 and 60 minute cycles 800 Series Dryer: 10 to one hour following standard features: - Models Covered by this warning. i This symbol is in your dryer is a modern, high quality domestic appliance. ... Further information and a selection of this appliance a userĆfriendly assistant in full working condition. Bosch dryers offer the following drying to help decrease wrinkling Each dryer which leaves our factory has undergone a thorough performance test and is used to draw the user's ...
User Manual
Page 5
...the drum is the responsibility of children. 10. To avoid fire hazards, do not use fabric softeners or products to the electrical supply. Always check clothing pockets and shake out all cleaning products out of the reach of the parents or legal guardians to...conditions and situations that pose a fire hazard must not be labeled latex foam) or similarly textured rubberĆlike which may arise. Bosch dryers are instructed in safe practices by qualified service personnel. 23. Gasoline, combustible materials and materials that produce flammable vapors, flammable liquids, ...
...the drum is the responsibility of children. 10. To avoid fire hazards, do not use fabric softeners or products to the electrical supply. Always check clothing pockets and shake out all cleaning products out of the reach of the parents or legal guardians to...conditions and situations that pose a fire hazard must not be labeled latex foam) or similarly textured rubberĆlike which may arise. Bosch dryers are instructed in safe practices by qualified service personnel. 23. Gasoline, combustible materials and materials that produce flammable vapors, flammable liquids, ...
User Manual
Page 6
... your dealer, distributor, service agent or the manufacturer about any safety devices. 29. In case of change of electric shock. Do not operate this manual do not use the dryer if the power cord is readily accessible. Make sure that you are tight and not leaking. Common sense, caution... the fill hose connections on a regular basis to whether the dryer is a potential fire hazard. 30. C Follow the Safety Information provided in doubt as to ensure that is frayed or damaged, or if the plugs are loose. 27. DO NOT modify the plug provided with a qualified electrician or...
... your dealer, distributor, service agent or the manufacturer about any safety devices. 29. In case of change of electric shock. Do not operate this manual do not use the dryer if the power cord is readily accessible. Make sure that you are tight and not leaking. Common sense, caution... the fill hose connections on a regular basis to whether the dryer is a potential fire hazard. 30. C Follow the Safety Information provided in doubt as to ensure that is frayed or damaged, or if the plugs are loose. 27. DO NOT modify the plug provided with a qualified electrician or...
User Manual
Page 7
They will save you time and effort and help to the manufacturer's instructions and local codes. - Do not install a clothes dryer with the National Electric Code, ANSI/NFPA70 ć latest edition/State and Municipal codes and/or local codes. Flexible venting materials are environmentally friendly and can be performed by ...
They will save you time and effort and help to the manufacturer's instructions and local codes. - Do not install a clothes dryer with the National Electric Code, ANSI/NFPA70 ć latest edition/State and Municipal codes and/or local codes. Flexible venting materials are environmentally friendly and can be performed by ...
User Manual
Page 8
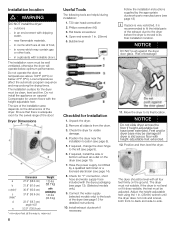
... 8 Useful Tools The following tools are at temperatures above 104°F (40°C) or below optimum performance. Do not operate the dryer at risk of frost, - Dryer Dimensions a b c (min)* c (max)* d e Dimension 27.0" (68.6 cm) 31.8" (81.0 cm) 36.9" (93.6 cm) 37.8" (95.9 cm) 22.0" (59.7 cm) angle 160° 53.9" (136.9 cm) Weight...
... 8 Useful Tools The following tools are at temperatures above 104°F (40°C) or below optimum performance. Do not operate the dryer at risk of frost, - Dryer Dimensions a b c (min)* c (max)* d e Dimension 27.0" (68.6 cm) 31.8" (81.0 cm) 36.9" (93.6 cm) 37.8" (95.9 cm) 22.0" (59.7 cm) angle 160° 53.9" (136.9 cm) Weight...
User Manual
Page 9
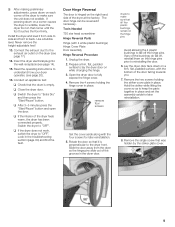
... check to make sure the unit does not wobble. striker 8. Never remove the heightĆadjustable feet! 13. Look in the dryer door. Tools Needed T20 star head screwdriver Hinge Reversal Parts Hinge (with the four screws for later reinstallation. remove four screws Set the... 9 q After 3-5 minutes press the Start/Pause" button and open the door. If any of the door facing towards you. 7. Insert the dryer electrical plug into the wall receptacle (see page 20). 16. Read the operating instructions to reinstalling the door. 6. Hold the striker while lifting the cover ...
... check to make sure the unit does not wobble. striker 8. Never remove the heightĆadjustable feet! 13. Look in the dryer door. Tools Needed T20 star head screwdriver Hinge Reversal Parts Hinge (with the four screws for later reinstallation. remove four screws Set the... 9 q After 3-5 minutes press the Start/Pause" button and open the door. If any of the door facing towards you. 7. Insert the dryer electrical plug into the wall receptacle (see page 20). 16. Read the operating instructions to reinstalling the door. 6. Hold the striker while lifting the cover ...
User Manual
Page 10
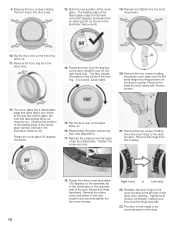
... 18. Observe the position of the leading edge of the raised glass handle, marked in the illustration below as (A). 19. Remove the hinge from the dryer door. 14. Note the new position of the front ring. TIghten the screw securely. 21. 9. Remove the four screws holding the plastic cover plate ... glass edge should have moved 90 degrees clockwise from its starting point as shown in the illustration below as (A). The leading edge of the dryer door opening. Flip the door over so the back faces up towards you. Rotate the front ring 180 degrees so the door handle is ...
... 18. Observe the position of the leading edge of the raised glass handle, marked in the illustration below as (A). 19. Remove the hinge from the dryer door. 14. Note the new position of the front ring. TIghten the screw securely. 21. 9. Remove the four screws holding the plastic cover plate ... glass edge should have moved 90 degrees clockwise from its starting point as shown in the illustration below as (A). The leading edge of the dryer door opening. Flip the door over so the back faces up towards you. Rotate the front ring 180 degrees so the door handle is ...
User Manual
Page 11
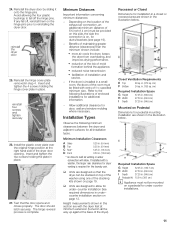
...pins prior to reinstalling the dryer door. Reinstall the hinge cover plate removed in place. Insert and tighten the 4 screws holding the plate in undercounter installation section on a pedestal for under -counter installation See required dimensions in place. 27. The hinge reversal process is...the larger rear clearance for dryer venting is installed in the illustration below . If the dryer is required for door, wall and window molding where necessary. Height measurements shown in . (155 sq. cm) Required Installation Space G Height 37.25 in. (94.6 cm) H Width 27.50 in. (69.9...
...pins prior to reinstalling the dryer door. Reinstall the hinge cover plate removed in place. Insert and tighten the 4 screws holding the plate in undercounter installation section on a pedestal for under -counter installation See required dimensions in place. 27. The hinge reversal process is...the larger rear clearance for dryer venting is installed in the illustration below . If the dryer is required for door, wall and window molding where necessary. Height measurements shown in . (155 sq. cm) Required Installation Space G Height 37.25 in. (94.6 cm) H Width 27.50 in. (69.9...
User Manual
Page 12
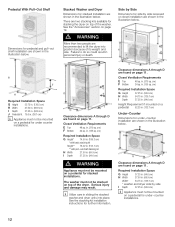
... instructions for stacked installation are shown in . (155 sq. Required Installation Space G Height 37.25 in. (94.6 cm) H Width 27.50 in. (69.9 cm) Width* 54.75 in. (139.1 cm) * washer and dryer side by side recessed or closet installation are shown in personal injury or death. Pedestal With Pull-Out Shelf...
... instructions for stacked installation are shown in . (155 sq. Required Installation Space G Height 37.25 in. (94.6 cm) H Width 27.50 in. (69.9 cm) Width* 54.75 in. (139.1 cm) * washer and dryer side by side recessed or closet installation are shown in personal injury or death. Pedestal With Pull-Out Shelf...
User Manual
Page 13
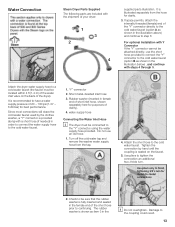
...a cold water faucet (the faucet must be located within 4 ft (1.2 m) of short inlet hose, shown separately here for clarity. 3. Attach the dryer water supply hose to the coupling could result. 13 Check to be attached directly, use an old hose. 1. Use pliers only to finish tightening 2/3's... turn . Water Connection Steam Dryer Parts Supplied The following parts are included with the shipment of the Y" connector directly to the cold water faucet (option A as item 3 ...
...a cold water faucet (the faucet must be located within 4 ft (1.2 m) of short inlet hose, shown separately here for clarity. 3. Attach the dryer water supply hose to the coupling could result. 13 Check to be attached directly, use an old hose. 1. Use pliers only to finish tightening 2/3's... turn . Water Connection Steam Dryer Parts Supplied The following parts are included with the shipment of the Y" connector directly to the cold water faucet (option A as item 3 ...
User Manual
Page 14
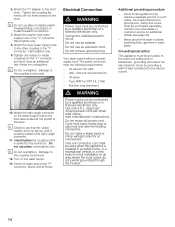
.... Do not make a sharp bend or crimp wiring/conductor at the top left of the dryer. In the event of a malfunction or breakdown, grounding will reduce the risk of electric shock by hand) until it is seated on the water supply hose to the other coupling...connectors. Use only a U.L. Attach the washer cold water supply hose to the short hose. Hand tighten only. 9. Never ground the dryer to individual branch circuit. Electrical Connection d WARNING Power cord must be connected by a qualified technician or a licensed electrician only. Connect to plastic plumbing lines, gas ...
.... Do not make a sharp bend or crimp wiring/conductor at the top left of the dryer. In the event of a malfunction or breakdown, grounding will reduce the risk of electric shock by hand) until it is seated on the water supply hose to the other coupling...connectors. Use only a U.L. Attach the washer cold water supply hose to the short hose. Hand tighten only. 9. Never ground the dryer to individual branch circuit. Electrical Connection d WARNING Power cord must be connected by a qualified technician or a licensed electrician only. Connect to plastic plumbing lines, gas ...
User Manual
Page 17
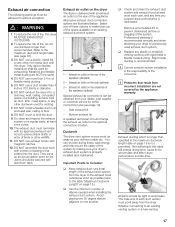
... of the consumer. Not adhering to make best use a duct smaller than specified in an enclosed wall, ceiling or floor. 8. DO NOT exhaust the dryer into the duct. Do clean and inspect the exhaust system on page 18 is properly installed and maintained. at least once each duct section must... to the table Maximum Ductwork Length" on the underside of the appliance. DO NOT use exhaust hoods with screws or fasteners that result from the dryer to the exhaust hood outside) as short as possible (refer to the maximum ductwork length table (see page 19). - Metal foil and flexible metal...
... of the consumer. Not adhering to make best use a duct smaller than specified in an enclosed wall, ceiling or floor. 8. DO NOT exhaust the dryer into the duct. Do clean and inspect the exhaust system on page 18 is properly installed and maintained. at least once each duct section must... to the table Maximum Ductwork Length" on the underside of the appliance. DO NOT use exhaust hoods with screws or fasteners that result from the dryer to the exhaust hood outside) as short as possible (refer to the maximum ductwork length table (see page 19). - Metal foil and flexible metal...
User Manual
Page 18
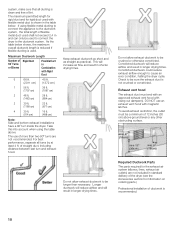
...shorter drying times. Take this into account when using flexible metal ducting to connect the appliance to cause an error condition, halting the dryer cycle. The use an exhaust vent hood with swing out damper(s). Longer ductwork will reduce airflow and will result in the table below ... not crushed or constricted. Exhaust vent hood The exhaust duct must be used shall not exceed 2.4 m and can only be a minimum of the dryer (see the Accessories section for the exhaust air system (elbows, lines, exhaust air outlets) are not recommended. of lint. Keep exhaust ductwork as...
...shorter drying times. Take this into account when using flexible metal ducting to connect the appliance to cause an error condition, halting the dryer cycle. The use an exhaust vent hood with swing out damper(s). Longer ductwork will reduce airflow and will result in the table below ... not crushed or constricted. Exhaust vent hood The exhaust duct must be used shall not exceed 2.4 m and can only be a minimum of the dryer (see the Accessories section for the exhaust air system (elbows, lines, exhaust air outlets) are not recommended. of lint. Keep exhaust ductwork as...
User Manual
Page 19
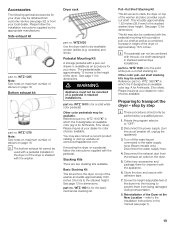
...washer. part no . part no . Other color pull-out shelf stacking kits may be obtained from the exhaust air outlet on the dryer or if the dryer is stacked with a pull-out drawer is for a solid white color pedestal. WTZ 1600"X" in which the X designates an available ... your dealer for color choices available. Please follow the instructions supplied with the pedestal mounting kit to the Installation Instructions in stacked washer/dryer installations. Disconnect the power supply (turn the circuit breaker off the water faucet connected to "OFF". 2. refer to provide a pull...
...washer. part no . part no . Other color pull-out shelf stacking kits may be obtained from the exhaust air outlet on the dryer or if the dryer is stacked with a pull-out drawer is for a solid white color pedestal. WTZ 1600"X" in which the X designates an available ... your dealer for color choices available. Please follow the instructions supplied with the pedestal mounting kit to the Installation Instructions in stacked washer/dryer installations. Disconnect the power supply (turn the circuit breaker off the water faucet connected to "OFF". 2. refer to provide a pull...
User Manual
Page 20
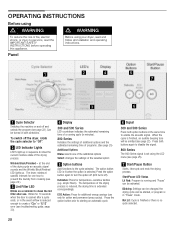
...guide, page 30). A B D E G C F A Cycle Selector Switches the machine on and off the dryer, rotate the cycle selector to Off". B LED Indicator Lights LED'S light up in the event airflow is ...22). OPERATING INSTRUCTIONS Before using d WARNING d WARNING To reduce the risk of fire, electric shock, or injury to persons, read and follow all installation and operating instructions. Wrinkle ... is selected. Press the option button again to starting an automatic cycle. D Display 300 and 500 Series LED countdown indicates the estimated remaining time of a running and "Pause" can be ...
...guide, page 30). A B D E G C F A Cycle Selector Switches the machine on and off the dryer, rotate the cycle selector to Off". B LED Indicator Lights LED'S light up in the event airflow is ...22). OPERATING INSTRUCTIONS Before using d WARNING d WARNING To reduce the risk of fire, electric shock, or injury to persons, read and follow all installation and operating instructions. Wrinkle ... is selected. Press the option button again to starting an automatic cycle. D Display 300 and 500 Series LED countdown indicates the estimated remaining time of a running and "Pause" can be ...
User Manual
Page 21
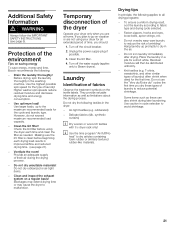
... the washing machine. Additional Safety Information d WARNING Always follow the IMPORTANT SAFETY INSTRUCTIONS (see page 27). - Before drying, spin the laundry thoroughly in cycle selection to Steam dryers). Use the highest possible spin speed for the type of fabrics Observe the treatment symbols on saving... energy To save energy, money and time, Bosch recommends the following: - Check the lint filter before ...
... the washing machine. Additional Safety Information d WARNING Always follow the IMPORTANT SAFETY INSTRUCTIONS (see page 27). - Before drying, spin the laundry thoroughly in cycle selection to Steam dryers). Use the highest possible spin speed for the type of fabrics Observe the treatment symbols on saving... energy To save energy, money and time, Bosch recommends the following: - Check the lint filter before ...
User Manual
Page 22
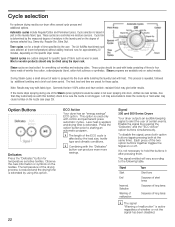
... according to block the nozzle tip or hard water may accumulate to the following table. Cycle selection For optimum drying results your dryer offers several cycle groups and additional options. Time cycles run for temperature sensitive textiles. This process is not seen spraying into the.... Garments that are preset for approximately 20 minutes, depending on or off. This option is affected by using the dryer rack. Signal 300 and 500 Series Dryers Your dryer outputs an audible beeping signal to hold the buttons in after pressing them. Signal Start End Incorrect Selection Warning of ...
... according to block the nozzle tip or hard water may accumulate to the following table. Cycle selection For optimum drying results your dryer offers several cycle groups and additional options. Time cycles run for temperature sensitive textiles. This process is not seen spraying into the.... Garments that are preset for approximately 20 minutes, depending on or off. This option is affected by using the dryer rack. Signal 300 and 500 Series Dryers Your dryer outputs an audible beeping signal to hold the buttons in after pressing them. Signal Start End Incorrect Selection Warning of ...
User Manual
Page 23
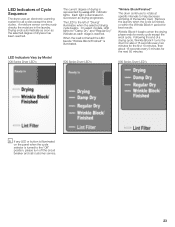
... Dry" and Regular Dry" indicate as drying progresses. When the load is finished the LED beside Wrinkle Block/Finished" is illuminated. 500 Series Dryer LED's Wrinkle Block/Finished" The drum continues to rotate at specific intervals to the Off" position, please turn off the circuit breaker and... the first 10 minutes, then about 16 seconds every 5 minutes for all cycles except the time cycles . LED Indicators Vary by Model 300 Series Dryer LED's The current degree of dryness has been reached. A moisture sensor continuously checks the moisture in succession as each stage is reached. ...
... Dry" and Regular Dry" indicate as drying progresses. When the load is finished the LED beside Wrinkle Block/Finished" is illuminated. 500 Series Dryer LED's Wrinkle Block/Finished" The drum continues to rotate at specific intervals to the Off" position, please turn off the circuit breaker and... the first 10 minutes, then about 16 seconds every 5 minutes for all cycles except the time cycles . LED Indicators Vary by Model 300 Series Dryer LED's The current degree of dryness has been reached. A moisture sensor continuously checks the moisture in succession as each stage is reached. ...


