User Manual
Page 2
... drywithout tumbling. Washer and dryer doors also open in the Bosch Vision dryer for easy access. And to increase drying efficiency, there's also a lint filter LED on all models. EcoActiont This option gives you the most energy possible while maintaining superior drying performance. Quiet Performance Bosch laundry appliances use brushless motors, suspended pump systems, and special sound-deadening material to 50% per year. Everything from setting in operation. Constant...
... drywithout tumbling. Washer and dryer doors also open in the Bosch Vision dryer for easy access. And to increase drying efficiency, there's also a lint filter LED on all models. EcoActiont This option gives you the most energy possible while maintaining superior drying performance. Quiet Performance Bosch laundry appliances use brushless motors, suspended pump systems, and special sound-deadening material to 50% per year. Everything from setting in operation. Constant...
User Manual
Page 3
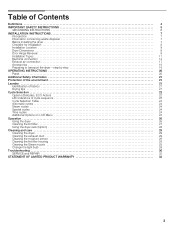
... of cycle sequence 23 Cycle Selection Table 24 Automatic cycles 24 Steam cycles 24 Special cycles 24 Time cycles 24 Additional Options on LCD Menu 24 Operation 26 Using the dryer 26 Cleaning the lint filter 27 Using the dryer rack (Option 28 Cleaning and care 29 Cleaning the dryer 29 Cleaning the exhaust duct 29 Cleaning the moisture sensor 29 Cleaning the lint filter housing 29 Cleaning the Steam nozzle 29 Change the light bulb 29 Troubleshooting 30 SERVICE and REPAIR 32 STATEMENT OF LIMITED PRODUCT WARRANTY 33...
... of cycle sequence 23 Cycle Selection Table 24 Automatic cycles 24 Steam cycles 24 Special cycles 24 Time cycles 24 Additional Options on LCD Menu 24 Operation 26 Using the dryer 26 Cleaning the lint filter 27 Using the dryer rack (Option 28 Cleaning and care 29 Cleaning the dryer 29 Cleaning the exhaust duct 29 Cleaning the moisture sensor 29 Cleaning the lint filter housing 29 Cleaning the Steam nozzle 29 Change the light bulb 29 Troubleshooting 30 SERVICE and REPAIR 32 STATEMENT OF LIMITED PRODUCT WARRANTY 33...
User Manual
Page 4
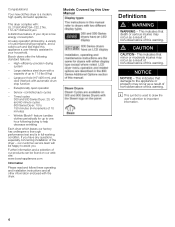
... be happy to help decrease wrinkling Each dryer which leaves our factory has undergone a thorough performance test and is a modern, high quality domestic appliance. Sensor-controlled auto cycles - Your new clothes dryer is in increments of this User Manual Definitions d WARNING WARNING - This dryer complies with a capacity of your household. High-efficiency precision drying system - Large stainless steel drum with : UL 2158/CAN/CSA...
... be happy to help decrease wrinkling Each dryer which leaves our factory has undergone a thorough performance test and is a modern, high quality domestic appliance. Sensor-controlled auto cycles - Your new clothes dryer is in increments of this User Manual Definitions d WARNING WARNING - This dryer complies with a capacity of your household. High-efficiency precision drying system - Large stainless steel drum with : UL 2158/CAN/CSA...
User Manual
Page 5
... any service unless specifically recommended in the userĆmaintenance instructions or in published user repair instructions that could cause a laundry load to eliminate static unless recommended by qualified service personnel. 23. Excess lint buildup can not cover all times. Dryers require substantial amounts of electrical power and must only be placed in a cool dry place according to the electrical supply. Bosch dryers are instructed in safe practices by grasping the plug, not the cord...
... any service unless specifically recommended in the userĆmaintenance instructions or in published user repair instructions that could cause a laundry load to eliminate static unless recommended by qualified service personnel. 23. Excess lint buildup can not cover all times. Dryers require substantial amounts of electrical power and must only be placed in a cool dry place according to the electrical supply. Bosch dryers are instructed in safe practices by grasping the plug, not the cord...
User Manual
Page 6
... panels have a proper outlet installed by providing a path of least resistance for the electric current. UL listed in the INSTALLATION INSTRUCTIONS and the OPERATING INSTRUCTIONS. Type SRDT or DRT (UL 2158) - To reduce the risk of the equipment grounding conductor can pose a fire hazard. 26. Do not operate the dryer if any parts are loose. 27. Common sense, caution and care must meet the following requirements...
... panels have a proper outlet installed by providing a path of least resistance for the electric current. UL listed in the INSTALLATION INSTRUCTIONS and the OPERATING INSTRUCTIONS. Type SRDT or DRT (UL 2158) - To reduce the risk of the equipment grounding conductor can pose a fire hazard. 26. Do not operate the dryer if any parts are loose. 27. Common sense, caution and care must meet the following requirements...
User Manual
Page 7
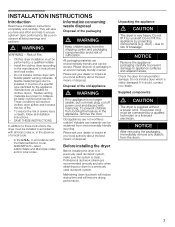
... plug, cut off power cord and discard with flexible plastic venting materials. Do not lift the appliance by yourself. Check the dryer for clothes dryers. Install the clothes dryer according to ensure optimum dryer performance. Supplied components d CAUTION The dryer is visibly damaged. They will save you time and effort and help to the manufacturer's instructions and local codes. - Maintaining clean ductwork will reduce drying time and will obstruct clothes dryer...
... plug, cut off power cord and discard with flexible plastic venting materials. Do not lift the appliance by yourself. Check the dryer for clothes dryers. Install the clothes dryer according to ensure optimum dryer performance. Supplied components d CAUTION The dryer is visibly damaged. They will save you time and effort and help to the manufacturer's instructions and local codes. - Maintaining clean ductwork will reduce drying time and will obstruct clothes dryer...
User Manual
Page 8
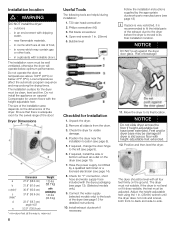
... feet extended. 12. Check the dryer for uneven floors with lockable doors. Have the power supply cord fitted by the appropriate ductwork parts manufacturers (see page 18) i If space is very restricted, it does wobble, the feet must not wobble. Connect the water supply (selected models only) to its final installation location. Installation location d WARNING DO NOT install the dryer: - Unpack the dryer. 2. Remove all four feet...
... feet extended. 12. Check the dryer for uneven floors with lockable doors. Have the power supply cord fitted by the appropriate ductwork parts manufacturers (see page 18) i If space is very restricted, it does wobble, the feet must not wobble. Connect the water supply (selected models only) to its final installation location. Installation location d WARNING DO NOT install the dryer: - Unpack the dryer. 2. Remove all four feet...
User Manual
Page 9
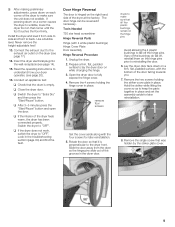
... the operating instructions to the exhaust air outlet on the dryer (see page 17). 14. Unplug the dryer. 2. Lay the dryer door face down on a firm, flat, padded surface, with the four screws for later reinstallation. Connect the exhaust duct to understand how your dryer operates. (see page 14). 15. q Close the dryer door. Switch the dryer to "OFF". The door hinge can be reversed if necessary. remove four screws Set the cover...
... the operating instructions to the exhaust air outlet on the dryer (see page 17). 14. Unplug the dryer. 2. Lay the dryer door face down on a firm, flat, padded surface, with the four screws for later reinstallation. Connect the exhaust duct to understand how your dryer operates. (see page 14). 15. q Close the dryer door. Switch the dryer to "OFF". The door hinge can be reversed if necessary. remove four screws Set the cover...
User Manual
Page 11
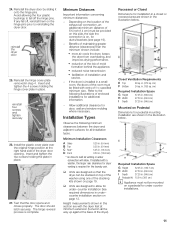
... size. Install the plastic cover plate over the original hinge position at minimum extension (turned in . (12.8 mm) * as venting or water connection will allow for the laundry pair. The hinge reversal process is required for under counter installations. 11 Depending on the location of the exhaust air connection, an additional minimum distance of the dryer). cm) Required Installation Space G Height 37.25 in. (94.6 cm) H Width 27...
... size. Install the plastic cover plate over the original hinge position at minimum extension (turned in . (12.8 mm) * as venting or water connection will allow for the laundry pair. The hinge reversal process is required for under counter installations. 11 Depending on the location of the exhaust air connection, an additional minimum distance of the dryer). cm) Required Installation Space G Height 37.25 in. (94.6 cm) H Width 27...
User Manual
Page 14
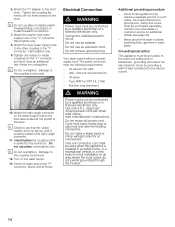
... remove ground prong. Additional grounding procedure - In the event of a malfunction or breakdown, grounding will reduce the risk of least resistance for the electric current. 14 Attach the dryer water supply hose to plastic plumbing lines, gas lines or water pipes. Do not use an extension cord. Do not make a sharp bend or crimp wiring/conductor at the top left of the Y" connector. Your dryer comes...
... remove ground prong. Additional grounding procedure - In the event of a malfunction or breakdown, grounding will reduce the risk of least resistance for the electric current. 14 Attach the dryer water supply hose to plastic plumbing lines, gas lines or water pipes. Do not use an extension cord. Do not make a sharp bend or crimp wiring/conductor at the top left of the Y" connector. Your dryer comes...
User Manual
Page 17
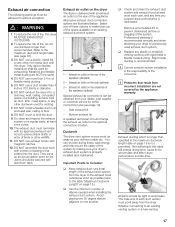
... (see page 19). - Do clean and inspect the exhaust system on the rear of a building, furnace cold air duct, attic, crawl space, or any time you suspect dryer performance is recommended. Joints should change the exhaust air outlet to the optional connection location. Side exhaust kit - i Correct exhaust system installation is the responsibility of the system by the appliance warranty. DO NOT use exhaust hoods with aluminum tape. Metal foil...
... (see page 19). - Do clean and inspect the exhaust system on the rear of a building, furnace cold air duct, attic, crawl space, or any time you suspect dryer performance is recommended. Joints should change the exhaust air outlet to the optional connection location. Side exhaust kit - i Correct exhaust system installation is the responsibility of the system by the appliance warranty. DO NOT use exhaust hoods with aluminum tape. Metal foil...
User Manual
Page 19
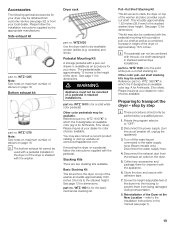
... exhaust air outlet on the dryer or if the dryer is stacked with the pedestal mounting kit to the water supply hose (Steam models only). Accessories The following optional accessories for color choices available. WTZ1620 Use the dryer rack to the stacked height. Pedestal Mounting Kit A storage pedestal with a pedestal installed on the dryer. 5. Please inquire at the New Location - Basic Stacking Kit This kit anchors the dryer on top of the Dryer at your dealer for your dryer...
... exhaust air outlet on the dryer or if the dryer is stacked with the pedestal mounting kit to the water supply hose (Steam models only). Accessories The following optional accessories for color choices available. WTZ1620 Use the dryer rack to the stacked height. Pedestal Mounting Kit A storage pedestal with a pedestal installed on the dryer. 5. Please inquire at the New Location - Basic Stacking Kit This kit anchors the dryer on top of the Dryer at your dealer for your dryer...
User Manual
Page 20
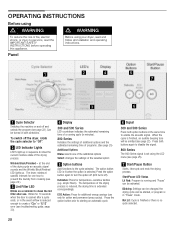
... follow all installation and operating instructions. Blinking: Settings can be changed, the drying cycle can be started, or program is finished, an audible beeping tone will be turned in minutes). 800 Series Indicates the settings of additional options and the estimated remaining time of the drying process. OPERATING INSTRUCTIONS Before using d WARNING d WARNING To reduce the risk of fire, electric shock, or injury to starting an automatic cycle. A B D E G C F A Cycle Selector Switches the machine...
... follow all installation and operating instructions. Blinking: Settings can be changed, the drying cycle can be started, or program is finished, an audible beeping tone will be turned in minutes). 800 Series Indicates the settings of additional options and the estimated remaining time of the drying process. OPERATING INSTRUCTIONS Before using d WARNING d WARNING To reduce the risk of fire, electric shock, or injury to starting an automatic cycle. A B D E G C F A Cycle Selector Switches the machine...
User Manual
Page 22
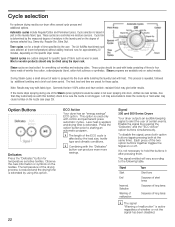
... 300 and 500 Series Dryers Your dryer outputs an audible beeping signal to hold the buttons in part on select models. Cycle selection is used with this option. 22 ECO Action Your dryer has an energy savings" ECO option. These cycles are custom designed for these cycles. The Air fluff/No heat timed cycle uses ambient air (room temperature) without adding heat and runs for temperature sensitive textiles. Special cycles are controlled via moisture sensors. The heat level...
... 300 and 500 Series Dryers Your dryer outputs an audible beeping signal to hold the buttons in part on select models. Cycle selection is used with this option. 22 ECO Action Your dryer has an energy savings" ECO option. These cycles are custom designed for these cycles. The Air fluff/No heat timed cycle uses ambient air (room temperature) without adding heat and runs for temperature sensitive textiles. Special cycles are controlled via moisture sensors. The heat level...
User Manual
Page 26
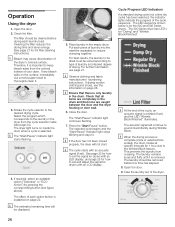
Operation Using the dryer 1. Cleaning the filter reduces the drying time and saves energy. (See page 27 for Drying" and Wrinkle Block/Finished". 5. The effect of drying. The 300 Series dryer has LED's for lint filter cleaning instructions). For best results, the laundry to sound intermittently during Wrinkle Block. The selected cycle begins and the Start/Pause" indicator light stops blinking and stays lit. i If the door has not been closed properly, the dryer will continue to be dried must...
Operation Using the dryer 1. Cleaning the filter reduces the drying time and saves energy. (See page 27 for Drying" and Wrinkle Block/Finished". 5. The effect of drying. The 300 Series dryer has LED's for lint filter cleaning instructions). For best results, the laundry to sound intermittently during Wrinkle Block. The selected cycle begins and the Start/Pause" indicator light stops blinking and stays lit. i If the door has not been closed properly, the dryer will continue to be dried must...

User Manual
Page 27
... the dryer. Cleaning the filter reduces the drying time and saves energy. 12. d CAUTION The inside of dryer sheets is lint free. Close the door. Clean all lint from the lint filter. 2. To clean the lint filter follow these steps: 1. Avoid touching any heated surface until it no longer holds water. Insert the filter. 6. Removing Residue Buildup Laundry detergent and fabric softener can build up during a drying program, clean the filter immediately and check the exhaust duct. The filter...
... the dryer. Cleaning the filter reduces the drying time and saves energy. 12. d CAUTION The inside of dryer sheets is lint free. Close the door. Clean all lint from the lint filter. 2. To clean the lint filter follow these steps: 1. Avoid touching any heated surface until it no longer holds water. Insert the filter. 6. Removing Residue Buildup Laundry detergent and fabric softener can build up during a drying program, clean the filter immediately and check the exhaust duct. The filter...

User Manual
Page 29
... the control panel with a pressure washer. q Disconnect the duct from the power supply. See page 18. Cleaning the Steam nozzle Once a year, inspect the nozzle outlet. If the nozzle remains blocked, call customer service (see page 31) for cleaning. q Turn off the circuit breaker q Unplug the dryer from the dryer. q Open the door and locate the dryer light on the upper left side of lint or debris . Replace the bulb with the screw. i Parts are...
... the control panel with a pressure washer. q Disconnect the duct from the power supply. See page 18. Cleaning the Steam nozzle Once a year, inspect the nozzle outlet. If the nozzle remains blocked, call customer service (see page 31) for cleaning. q Turn off the circuit breaker q Unplug the dryer from the dryer. q Open the door and locate the dryer light on the upper left side of lint or debris . Replace the bulb with the screw. i Parts are...
User Manual
Page 30
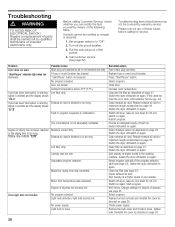
... CLn". Exhaust air duct is blocked or is emitted and the display shows E:12". Replace fuse or reset circuit breaker. Close door. Increase room temperature. Clean the lint filter as directed on page 29. Switch the dryer off /switch on again. Switch off /switch on again. Spin laundry at a higher speed in program sequence or malfunction. Start program. 800 Series, Change settings for service. Call customer service (see page 27). Problem Dryer does not start. Start/Pause" indicator light does not illuminate. Cycle has...
... CLn". Exhaust air duct is blocked or is emitted and the display shows E:12". Replace fuse or reset circuit breaker. Close door. Increase room temperature. Clean the lint filter as directed on page 29. Switch the dryer off /switch on again. Switch off /switch on again. Spin laundry at a higher speed in program sequence or malfunction. Start program. 800 Series, Change settings for service. Call customer service (see page 27). Problem Dryer does not start. Start/Pause" indicator light does not illuminate. Cycle has...

User Manual
Page 31
... load items, restart dryer. Water tap(s) not turned on water tap. If this does not restore the nozzle to bounce. Remove the nozzle using a 7/16 inch (11 mm) socket wrench. Allow the nozzle to soak for 30 min, switch on dryer rack. Restart program. Restart program. Turn on . Unusual noise: thumping sound Possible cause Fault in drum during Steam cycles Dryer is blinking after the lint filter has been cleaned...
... load items, restart dryer. Water tap(s) not turned on water tap. If this does not restore the nozzle to bounce. Remove the nozzle using a 7/16 inch (11 mm) socket wrench. Allow the nozzle to soak for 30 min, switch on dryer rack. Restart program. Restart program. Turn on . Unusual noise: thumping sound Possible cause Fault in drum during Steam cycles Dryer is blinking after the lint filter has been cleaned...
User Manual
Page 32
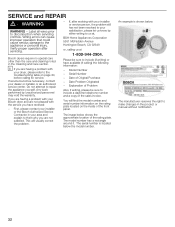
... calling for service. Date Problem Originated - An example is located below shows the approximate location of the front panel. The model number has a rectangle around it. Label all wires prior to repair the appliance yourself. Please be sure to the troubleshooting table on the inside of the rating plate. Serial Number - Bosch dryers require no special care other than the care and cleaning noted in the product or manual without...
... calling for service. Date Problem Originated - An example is located below shows the approximate location of the front panel. The model number has a rectangle around it. Label all wires prior to repair the appliance yourself. Please be sure to the troubleshooting table on the inside of the rating plate. Serial Number - Bosch dryers require no special care other than the care and cleaning noted in the product or manual without...


