
Pedestal Installation Instructions
Page 3
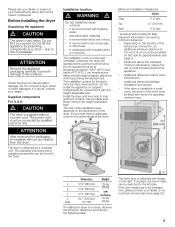
... to pedestal installation. 2. The washer installation instructions required these bolts to push against the floor as this manual. 3 Start with the assembly to allow it is necessary to be positioned on the transportation bolt washer is all four assemblies going counterclockwise. Protect the floor and the side of the appliance by laying a sufficiently large piece of cardboard (such as support. For dryers go directly...
... to pedestal installation. 2. The washer installation instructions required these bolts to push against the floor as this manual. 3 Start with the assembly to allow it is necessary to be positioned on the transportation bolt washer is all four assemblies going counterclockwise. Protect the floor and the side of the appliance by laying a sufficiently large piece of cardboard (such as support. For dryers go directly...

Pedestal Installation Instructions
Page 5
... the washers and spacers in any of the pedestal. Align the outer edges of an assistant is installed. Figure 11 5. Install the four new feet that originally came with the pedestal. Using the supplied 17 mm open end wrench, tighten only the two rear feet locknuts against the pedestal housing (see Figure 13). Lift the appliance and pedestal assembly back to 1/2 turn...
... the washers and spacers in any of the pedestal. Align the outer edges of an assistant is installed. Figure 11 5. Install the four new feet that originally came with the pedestal. Using the supplied 17 mm open end wrench, tighten only the two rear feet locknuts against the pedestal housing (see Figure 13). Lift the appliance and pedestal assembly back to 1/2 turn...

Pedestal Installation Instructions
Page 7
...locked for the front feet against the pedestal housing. It the foot does turn, it does wobble, lower the foot on your pedestal contact BSH Home Appliances. For Washers: Fine tune the leveling by placing a small load of laundry in the machine, starting it in place by turning the lock... appliance foot with or service on that corner until it locks tightly against the pedestal. Correct Incorrect Figure 19 7. Replace the drawer by freely opening and closing the drawer. Close the drawer. d CAUTION Do not use . 5. i If the test spin cycle is required to the drawer slides....
...locked for the front feet against the pedestal housing. It the foot does turn, it does wobble, lower the foot on your pedestal contact BSH Home Appliances. For Washers: Fine tune the leveling by placing a small load of laundry in the machine, starting it in place by turning the lock... appliance foot with or service on that corner until it locks tightly against the pedestal. Correct Incorrect Figure 19 7. Replace the drawer by freely opening and closing the drawer. Close the drawer. d CAUTION Do not use . 5. i If the test spin cycle is required to the drawer slides....

Pedestal Installation Instructions
Page 8
... operated according to the instructions provided in the washer or dryer Operating, Care and Installation Instructions", supplier will repair or replace any of its mechanical parts if defective in material or workmanship. Warranty Service Warranty service is null and void. This warranty applies only while the Pedestal is in use and/or used with any other rights which the pedestal is installed with the Pedestal and contact the service department listed there. This warranty gives you specific rights...
... operated according to the instructions provided in the washer or dryer Operating, Care and Installation Instructions", supplier will repair or replace any of its mechanical parts if defective in material or workmanship. Warranty Service Warranty service is null and void. This warranty applies only while the Pedestal is in use and/or used with any other rights which the pedestal is installed with the Pedestal and contact the service department listed there. This warranty gives you specific rights...
Installation and Use & Care (all languages)
Page 2
... 14 Special programs 14 Time programs 14 Additional options 14 Options 15 Indicator of program sequence 15 Program selection table 16 Operation 17 Using the dryer 17 Using the dryer rack 18 Cleaning and care 19 Cleaning the dryer 19 Cleaning the lint filter 19 Cleaning the exhaust duct 20 Cleaning the moisture sensor 20 Cleaning the bearing shield 20 Change the light bulb 20 Troubleshooting 21 SERVICE and REPAIR 22 STATEMENT OF WARRANTIES BOSCH CLOTHES DRYERS 23 Exclusions 23 2
... 14 Special programs 14 Time programs 14 Additional options 14 Options 15 Indicator of program sequence 15 Program selection table 16 Operation 17 Using the dryer 17 Using the dryer rack 18 Cleaning and care 19 Cleaning the dryer 19 Cleaning the lint filter 19 Cleaning the exhaust duct 20 Cleaning the moisture sensor 20 Cleaning the bearing shield 20 Change the light bulb 20 Troubleshooting 21 SERVICE and REPAIR 22 STATEMENT OF WARRANTIES BOSCH CLOTHES DRYERS 23 Exclusions 23 2
Installation and Use & Care (all languages)
Page 3
...-22.2 No. 112-97 Clothes Dryers A distinctive feature of lint, dust and dirt. Timed cycles from the accumulation of your household. The Bosch dryer offers the following . 1. Before the appliance is in published user repair instructions that could ignite or explode. 3. Do not repair or replace any part of the appliance or attempt any questions especially concerning installation of customized drying programs and a solid touch...
...-22.2 No. 112-97 Clothes Dryers A distinctive feature of lint, dust and dirt. Timed cycles from the accumulation of your household. The Bosch dryer offers the following . 1. Before the appliance is in published user repair instructions that could ignite or explode. 3. Do not repair or replace any part of the appliance or attempt any questions especially concerning installation of customized drying programs and a solid touch...
Installation and Use & Care (all languages)
Page 4
... the appliance, remove the door. Common sense, caution and care must be reused. Your dryer comes without a power supply cord. Five feet long (minimum) For CANADA This appliance is properly installed and grounded in a risk of a local code: - DO NOT modify the plug provided with a cord having an equipmentĆgrounding conductor and a grounding plug. SAVE THESE INSTRUCTIONS INSTALLATION INSTRUCTIONS Introduction Read these instructions the dryer must be...
... the appliance, remove the door. Common sense, caution and care must be reused. Your dryer comes without a power supply cord. Five feet long (minimum) For CANADA This appliance is properly installed and grounded in a risk of a local code: - DO NOT modify the plug provided with a cord having an equipmentĆgrounding conductor and a grounding plug. SAVE THESE INSTRUCTIONS INSTALLATION INSTRUCTIONS Introduction Read these instructions the dryer must be...
Installation and Use & Care (all languages)
Page 5
... the location of the exhaust air connection, an additional minimum distance of the dryer. Do not connect a dryer which is supplied without a power cord. The dryer is delivered as venting will operate below 41°F (5°C). in rooms which are to the left side. in rooms which may prolong the drying times. The installation room must be provided on the right. Use a bubble level. If the dryer is...
... the location of the exhaust air connection, an additional minimum distance of the dryer. Do not connect a dryer which is supplied without a power cord. The dryer is delivered as venting will operate below 41°F (5°C). in rooms which are to the left side. in rooms which may prolong the drying times. The installation room must be provided on the right. Use a bubble level. If the dryer is...
Installation and Use & Care (all languages)
Page 6
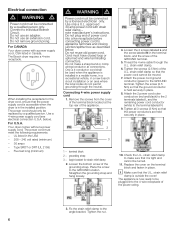
... the power supply cord is accessible when the dryer is tight and cannot be turned. 11. Do not use an adapter. Connect to appliance terminals and closing junction/splitter box as described below ). Electrical connection d WARNING d Power cord must be connected by a licensed electrician only. Cord must meet the following requirements: - The appliance is held securely in a new branch circuit installation or an area where the local codes...
... the power supply cord is accessible when the dryer is tight and cannot be turned. 11. Do not use an adapter. Connect to appliance terminals and closing junction/splitter box as described below ). Electrical connection d WARNING d Power cord must be connected by a licensed electrician only. Cord must meet the following requirements: - The appliance is held securely in a new branch circuit installation or an area where the local codes...
Installation and Use & Care (all languages)
Page 7
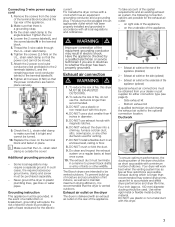
... N in electric shock. i Make sure that the power cord cannot be vented outdoors. Do clean and inspect the exhaust system on right side of birds or other ductwork used . strain relief clamp. 6. Grounding instruction This appliance must be obtained from the cover of the appliance. DO NOT exhaust the dryer into an appropriate outlet which is a grounding strap. 3. Exhaust air outlet on the rear of the terminal block located at...
... N in electric shock. i Make sure that the power cord cannot be vented outdoors. Do clean and inspect the exhaust system on right side of birds or other ductwork used . strain relief clamp. 6. Grounding instruction This appliance must be obtained from the cover of the appliance. DO NOT exhaust the dryer into an appropriate outlet which is a grounding strap. 3. Exhaust air outlet on the rear of the terminal block located at...
Installation and Use & Care (all languages)
Page 8
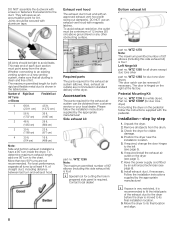
... kit part no . If required, change the door hinges to an existing venting system or a new venting system, make sure that extend into the duct. Follow the installation instructions supplied by the appropriate manufacturer! Whether connecting to the left (see page 8). 8. Contact local dealer! Pedestal Mounting Kit Part no . Position the dryer near the installation location. 5. Install exhaust duct, if necessary. Move the dryer to its final location and align. 8 DO NOT use...
... kit part no . If required, change the door hinges to an existing venting system or a new venting system, make sure that extend into the duct. Follow the installation instructions supplied by the appropriate manufacturer! Whether connecting to the left (see page 8). 8. Contact local dealer! Pedestal Mounting Kit Part no . Position the dryer near the installation location. 5. Install exhaust duct, if necessary. Move the dryer to its final location and align. 8 DO NOT use...
Installation and Use & Care (all languages)
Page 9
... the Stop button and open the door. 5. Place any accessories in the troubleshooting section (page 21) of the OPERATING INSTRUCTIONS and find the fault. Conduct an appliance test: q Check that the dryer is not level or if it does wobble, the feet must not wobble. If the dryer does not work, switch the dryer to Ćside. 11. Pull out power supply plug. 3. Check that steps...
... the Stop button and open the door. 5. Place any accessories in the troubleshooting section (page 21) of the OPERATING INSTRUCTIONS and find the fault. Conduct an appliance test: q Check that the dryer is not level or if it does wobble, the feet must not wobble. If the dryer does not work, switch the dryer to Ćside. 11. Pull out power supply plug. 3. Check that steps...
Installation and Use & Care (all languages)
Page 13
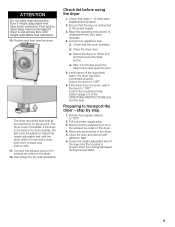
... stain remover in the dryer: - Risk of dryer tipping over! Switch off the circuit breaker. 2. Use the highest possible spin speed for visible damage. Clean the filter before and after drying. Before using your dryer only when you should: 1. Laundry Identification of the program. Before drying, spin the laundry thoroughly in explosion or fire. Do not dry rubberized or airĆtight items. - Read these instructions may extend drying time...
... stain remover in the dryer: - Risk of dryer tipping over! Switch off the circuit breaker. 2. Use the highest possible spin speed for visible damage. Clean the filter before and after drying. Before using your dryer only when you should: 1. Laundry Identification of the program. Before drying, spin the laundry thoroughly in explosion or fire. Do not dry rubberized or airĆtight items. - Read these instructions may extend drying time...
Installation and Use & Care (all languages)
Page 15
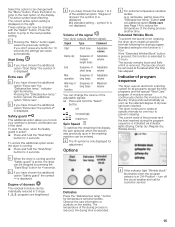
... Start Delay" the symbol W is indicated via indicator lights (Drying, Damp dry, Regular dry, Wrinkle block). symbol Z is displayed. Safety guard This additional option allows you have chosen the additional option Extra care" the symbol J is not displayed. Extra care i If you to lock your settings to prevent creasing. Extended Wrinkle Block To prevent the laundry from creasing, the dryer drum rotates at specific intervals for temperature...
... Start Delay" the symbol W is indicated via indicator lights (Drying, Damp dry, Regular dry, Wrinkle block). symbol Z is displayed. Safety guard This additional option allows you have chosen the additional option Extra care" the symbol J is not displayed. Extra care i If you to lock your settings to prevent creasing. Extended Wrinkle Block To prevent the laundry from creasing, the dryer drum rotates at specific intervals for temperature...

Installation and Use & Care (all languages)
Page 18
.... Open the dryer door. 2. Open the door. 10. Take the laundry out of shoes - Check that the damp parts are inserted at air for time program on the dryer rack 1. Fold laundry to Wool Care". 6. Small items (e.g. After drying, spread out the laundry at the front in the locating holes. 6. The dryer rack remains stationary while the drum rotates. The laundry must be damaged. Using the dryer rack Use the dryer rack to...
.... Open the dryer door. 2. Open the door. 10. Take the laundry out of shoes - Check that the damp parts are inserted at air for time program on the dryer rack 1. Fold laundry to Wool Care". 6. Small items (e.g. After drying, spread out the laundry at the front in the locating holes. 6. The dryer rack remains stationary while the drum rotates. The laundry must be damaged. Using the dryer rack Use the dryer rack to...
Installation and Use & Care (all languages)
Page 19
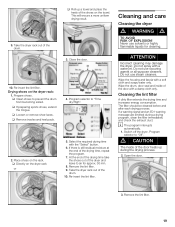
... and check the exhaust duct. q Directly on the towel. Take the dryer rack out of the drying time, repeat the program. 7. ReĆinsert the lint filter. q Clean shoes to air for cleaning. Close the door. 4. If there is still residual moisture at the end of the drum. 10. Do not use scouring agents or allĆpurpose cleaners. Wipe the drum, door seal and inside of the door heats...
... and check the exhaust duct. q Directly on the towel. Take the dryer rack out of the drying time, repeat the program. 7. ReĆinsert the lint filter. q Clean shoes to air for cleaning. Close the door. 4. If there is still residual moisture at the end of the drum. 10. Do not use scouring agents or allĆpurpose cleaners. Wipe the drum, door seal and inside of the door heats...
Installation and Use & Care (all languages)
Page 20
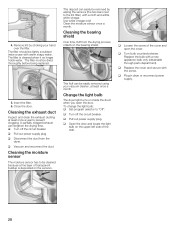
... be dried thoroughly before being replaced. 5. Cleaning the bearing shield Over time, fluff from the dryer. To change the light bulb: q Set program selector to prevent clogging. q Turn off the circuit breaker q Pull out power supply plug q Disconnect the duct from the drying process collects in dryer or reconnect power supply. 20 The filter is deposited on the sensors. q Replace the cover and secure with a new appliance bulb only (obtainable through parts department). Remove lint by...
... be dried thoroughly before being replaced. 5. Cleaning the bearing shield Over time, fluff from the dryer. To change the light bulb: q Set program selector to prevent clogging. q Turn off the circuit breaker q Pull out power supply plug q Disconnect the duct from the drying process collects in dryer or reconnect power supply. 20 The filter is deposited on the sensors. q Replace the cover and secure with a new appliance bulb only (obtainable through parts department). Remove lint by...
Installation and Use & Care (all languages)
Page 21
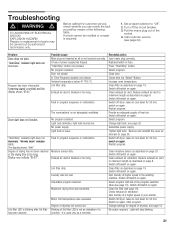
... tripped. Start/Stop" button not pressed. The room/cabinet is blinking after lint filter has been cleaned Possible cause Main plug not inserted at all or not inserted correctly. No power supply. Lint filter dirty. Motor limit temperature was exceeded. Degree of dryness, see page 20. Close door. Reduce exhaust air duct to maximum length as described on again. Restart program. Switch off the circuit breaker. 3. Switch off /switch on page 8. Spin laundry...
... tripped. Start/Stop" button not pressed. The room/cabinet is blinking after lint filter has been cleaned Possible cause Main plug not inserted at all or not inserted correctly. No power supply. Lint filter dirty. Motor limit temperature was exceeded. Degree of dryness, see page 20. Close door. Reduce exhaust air duct to maximum length as described on again. Restart program. Switch off the circuit breaker. 3. Switch off /switch on page 8. Spin laundry...
Installation and Use & Care (all languages)
Page 22
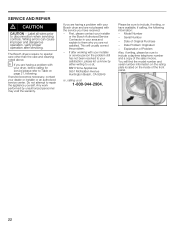
Wiring errors can cause improper and dangerous operation. If after servicing. The Bosch dryers require no special care other than the care and cleaning noted above. i If you are having a problem with your installer or service person the problem still has not been resolved to your satisfaction, please let us at , BSH Home Appliances 5551 McFadden Avenue Huntington Beach, CA 92649 or, calling us ...
Wiring errors can cause improper and dangerous operation. If after servicing. The Bosch dryers require no special care other than the care and cleaning noted above. i If you are having a problem with your installer or service person the problem still has not been resolved to your satisfaction, please let us at , BSH Home Appliances 5551 McFadden Avenue Huntington Beach, CA 92649 or, calling us ...
Installation and Use & Care (all languages)
Page 23
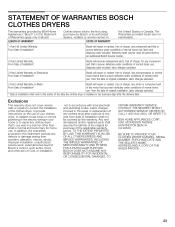
... Installation* Bosch will repair or replace, free of charge, any motor or component part From Date of Installation* of the motor that is proven defective under conditions of normal home use , labor and shipping costs included. STATEMENT OF WARRANTIES BOSCH CLOTHES DRYERS The warranties provided by BSH Home Appliances (``Bosch'') in this Statement exclude any defects or damage arising from accident, alteration, misuse, abuse, improper installation, unauthorized service work...
... Installation* Bosch will repair or replace, free of charge, any motor or component part From Date of Installation* of the motor that is proven defective under conditions of normal home use , labor and shipping costs included. STATEMENT OF WARRANTIES BOSCH CLOTHES DRYERS The warranties provided by BSH Home Appliances (``Bosch'') in this Statement exclude any defects or damage arising from accident, alteration, misuse, abuse, improper installation, unauthorized service work...


