
Pedestal Installation Instructions
Page 2
...that damage may occur as a result of nonĆobservance of the following parts and tools in injury. d CAUTION Do not lift the appliance by the door or door opening. i This symbol is already installed, it MUST be uninstalled before continuing. d CAUTION Excessive Weight Hazard ... times during the pedestal installation. 2 Keep the door closed at all other information enclosed with your appliance is used to draw the user's attention to move and uninstall the appliance. d CAUTION CAUTION- This indicates that death or serious injuries may occur as a result of non...
...that damage may occur as a result of nonĆobservance of the following parts and tools in injury. d CAUTION Do not lift the appliance by the door or door opening. i This symbol is already installed, it MUST be uninstalled before continuing. d CAUTION Excessive Weight Hazard ... times during the pedestal installation. 2 Keep the door closed at all other information enclosed with your appliance is used to draw the user's attention to move and uninstall the appliance. d CAUTION CAUTION- This indicates that death or serious injuries may occur as a result of non...

Pedestal Installation Instructions
Page 3
... or damage. 4. Align each one into the hole until all the way inside the back panel of the unit. Preparing Your Appliance Existing Appliance - For dryers go directly to tightening. 3. The washer installation instructions required these bolts to be reinstalled prior to slide into the drum. q ...the drum may be positioned on its left and install all four assemblies going counterclockwise. New Appliance -If you are in the slot on a new washer or dryer, proceed to washers. Pull the appliance away from the bolt prior to step 3. Step 2 below . NOTICE Make sure the...
... or damage. 4. Align each one into the hole until all the way inside the back panel of the unit. Preparing Your Appliance Existing Appliance - For dryers go directly to tightening. 3. The washer installation instructions required these bolts to be reinstalled prior to slide into the drum. q ...the drum may be positioned on its left and install all four assemblies going counterclockwise. New Appliance -If you are in the slot on a new washer or dryer, proceed to washers. Pull the appliance away from the bolt prior to step 3. Step 2 below . NOTICE Make sure the...

Pedestal Installation Instructions
Page 4
... of cardboard or other suitable protective covering flat on the right side while removing the drawer (see Figure 5). Position the original packaged appliance close to have an assistant hold the pedestal housing during drawer removal. Using a utility knife, cut or pinch injury. 1. Protect ...laying a sufficiently large piece of the unit. Failure to do not remove the washer transportation bolts prior to help align the pedestal and the appliance. Figure 7 2. Remove the protective film, four corner supports, and two foam packaging pieces. 3. DO NOT reinstall these feet into the...
... of cardboard or other suitable protective covering flat on the right side while removing the drawer (see Figure 5). Position the original packaged appliance close to have an assistant hold the pedestal housing during drawer removal. Using a utility knife, cut or pinch injury. 1. Protect ...laying a sufficiently large piece of the unit. Failure to do not remove the washer transportation bolts prior to help align the pedestal and the appliance. Figure 7 2. Remove the protective film, four corner supports, and two foam packaging pieces. 3. DO NOT reinstall these feet into the...

Pedestal Installation Instructions
Page 5
... wrench to an upright position (use a dolly to step 8. 7. Figure 11 5. Install the four new feet that originally came with the appliance and pedestal housings. Screw the feet into the protruding threaded bushing in place before removing any future transport (e.g. NOTICE Use only the feet supplied with... with the pedestal. d CAUTION Avoid holding the appliance by the pedestal when lifting it may cause injury or damage. 6. To avoid damaging the pedestal do not use of the pedestal. For dryers go directly to lift or move the appliance once the pedestal is down toward the base of...
... wrench to an upright position (use a dolly to step 8. 7. Figure 11 5. Install the four new feet that originally came with the appliance and pedestal housings. Screw the feet into the protruding threaded bushing in place before removing any future transport (e.g. NOTICE Use only the feet supplied with... with the pedestal. d CAUTION Avoid holding the appliance by the pedestal when lifting it may cause injury or damage. 6. To avoid damaging the pedestal do not use of the pedestal. For dryers go directly to lift or move the appliance once the pedestal is down toward the base of...

Pedestal Installation Instructions
Page 6
... Tip: if the bubble is level in its final location. q The recessed bottom bolts may be reĆ moved freely. Slide the appliance to level the appliance. Leveling Procedure 1. Use a bubble level (24" or less in as far as possible, then back individual feet out as necessary to ... (13 mm) socket wrench. Figure 15 q Insert the covers until the unit is leveled. Move the feet as little as when moving the appliance after leveling can be more easily removed using the wrench. Otherwise, repeat the leveling procedure until they can make it unlevel again.) Each foot of...
... Tip: if the bubble is level in its final location. q The recessed bottom bolts may be reĆ moved freely. Slide the appliance to level the appliance. Leveling Procedure 1. Use a bubble level (24" or less in as far as possible, then back individual feet out as necessary to ... (13 mm) socket wrench. Figure 15 q Insert the covers until the unit is leveled. Move the feet as little as when moving the appliance after leveling can be more easily removed using the wrench. Otherwise, repeat the leveling procedure until they can make it unlevel again.) Each foot of...

Pedestal Installation Instructions
Page 7
... (equal weight distribution to all feet) is satisfactorily raised or lowered, lock the height-adjustable feet in spin cycle and then leveling the appliance again. Ensure drawer slides are aligned correctly (see Figure 18). Contact information is manually stopped before its completion, then the door may be... on that corner until it locks tightly against the pedestal. It the foot does turn, it to minimize vibration and movement of the appliance during appliance use the drawer as a step. Use the supplied 17mm openĆend wrench to make sure the unit does not wobble. Slide ...
... (equal weight distribution to all feet) is satisfactorily raised or lowered, lock the height-adjustable feet in spin cycle and then leveling the appliance again. Ensure drawer slides are aligned correctly (see Figure 18). Contact information is manually stopped before its completion, then the door may be... on that corner until it locks tightly against the pedestal. It the foot does turn, it to minimize vibration and movement of the appliance during appliance use the drawer as a step. Use the supplied 17mm openĆend wrench to make sure the unit does not wobble. Slide ...

Pedestal Installation Instructions
Page 8
... rights and you may vary in Canada. Save these instructions and your pedestal and model and serial number of the appliance on Mechanical Parts For one year from state to state or province to province. *Warranty terms may also have other...dryer Operating, Care and Installation Instructions", supplier will repair or replace any other rights which the pedestal is installed. If retailer is not available, please refer to the Operating, Care and Installation Instructions" that came with any of your sales receipt for future reference. Purchase Date Appliance Model Number Appliance...
... rights and you may vary in Canada. Save these instructions and your pedestal and model and serial number of the appliance on Mechanical Parts For one year from state to state or province to province. *Warranty terms may also have other...dryer Operating, Care and Installation Instructions", supplier will repair or replace any other rights which the pedestal is installed. If retailer is not available, please refer to the Operating, Care and Installation Instructions" that came with any of your sales receipt for future reference. Purchase Date Appliance Model Number Appliance...
Operating, Care, Installation (all languages)
Page 3
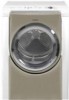
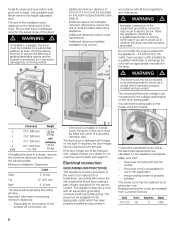
... not touch any phone in safe practices by a qualified installer, service agency or the gas supplier. Bosch dryers are instructed in your household. The Bosch dryer offers the following standard features: - Large 6.4 cu.ft. (181 l) stainless steel drum with the appliance. our customer service team will be followed to insure that could ignite or explode. 3. When...
... not touch any phone in safe practices by a qualified installer, service agency or the gas supplier. Bosch dryers are instructed in your household. The Bosch dryer offers the following standard features: - Large 6.4 cu.ft. (181 l) stainless steel drum with the appliance. our customer service team will be followed to insure that could ignite or explode. 3. When...
Operating, Care, Installation (all languages)
Page 4
...will be used for the electric current. The dryer must only be exposed to the electrical power supply. 21. Do not operate until you do not cover all local regulations and/or other fuelĆburning appliances shall be a T" handĆ le gas cock. 3. Notes: A B The IMPORTANT ...or reĆ gion where this appliance where it will reduce the risk of electric shock by the fabric manufacturer. 10. Make sure children cannot reach them. 16. No other applicable regulations and requirements. 29. Always contact your dryer. Flexible gas connector must be placed in compliance with...
...will be used for the electric current. The dryer must only be exposed to the electrical power supply. 21. Do not operate until you do not cover all local regulations and/or other fuelĆburning appliances shall be a T" handĆ le gas cock. 3. Notes: A B The IMPORTANT ...or reĆ gion where this appliance where it will reduce the risk of electric shock by the fabric manufacturer. 10. Make sure children cannot reach them. 16. No other applicable regulations and requirements. 29. Always contact your dryer. Flexible gas connector must be placed in compliance with...
Operating, Care, Installation (all languages)
Page 5
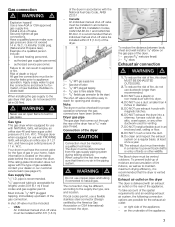
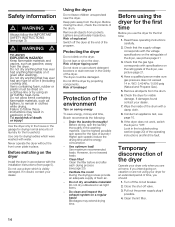
In addition to whether the dryer is visibly damaged. Note: This gas dryer has been UL and C-UL listed for the dryer. Disposal of the appliance d WARNING If appliance is delivered as to these installation instructions completely and carefully. door) ć due to a height of 7,700 ft. The dryer is no longer usable, pull out main plug, cut...
In addition to whether the dryer is visibly damaged. Note: This gas dryer has been UL and C-UL listed for the dryer. Disposal of the appliance d WARNING If appliance is delivered as to these installation instructions completely and carefully. door) ć due to a height of 7,700 ft. The dryer is no longer usable, pull out main plug, cut...
Operating, Care, Installation (all languages)
Page 6
...) packaging d 19.7" (500 mm)/ 143 lbs angle 170-180° (64 kg) If installing the dryer in Connection specifications as well as close to the left side. The dryer door is properly installed. If... required, the door hinges can be switched to wall as gasĆ...service team (see page 9). - d WARNING d If installed in this side for the dryer. accordance with the appliance - d WARNING d Improper connection of the equipment grounding conductor may be replaced by a ...
...) packaging d 19.7" (500 mm)/ 143 lbs angle 170-180° (64 kg) If installing the dryer in Connection specifications as well as close to the left side. The dryer door is properly installed. If... required, the door hinges can be switched to wall as gasĆ...service team (see page 9). - d WARNING d If installed in this side for the dryer. accordance with the appliance - d WARNING d Improper connection of the equipment grounding conductor may be replaced by a ...
Operating, Care, Installation (all languages)
Page 7
... or kink the duct. 9. Example of the gas connection. Gas type This gas dryer when equipped for the type of the appliance. The connection may be vented outdoors. DO NOT use exhaust hoods with this dryer MUST BE EXHAUSTED OUTDOORS. 2. The Bosch dryer must be checked for proper operation whenever the gas connections have the correct valve for use...
... or kink the duct. 9. Example of the gas connection. Gas type This gas dryer when equipped for the type of the appliance. The connection may be vented outdoors. DO NOT use exhaust hoods with this dryer MUST BE EXHAUSTED OUTDOORS. 2. The Bosch dryer must be checked for proper operation whenever the gas connections have the correct valve for use...
Operating, Care, Installation (all languages)
Page 8
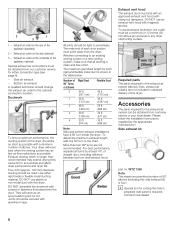
... exhaust vent hood with magnetic latches. Please follow the installation instructions supplied by at least 4 ft. Contact local dealer! 8 Your dryer will serve as possible. Use either connection type (see page 8). - The maximum permitted length for both rigid and flexible metal duct...exhaust air outlets) are not recommended. WTZ 1265 Note: The maximum permitted number of 90° elbows (including this dryer. 2 1 3 1 ć Exhaust air outlet on the rear of the appliance (standard) 2 ć Exhaust air outlet on the side (optional) 3 ć Exhaust air outlet on the ...
... exhaust vent hood with magnetic latches. Please follow the installation instructions supplied by at least 4 ft. Contact local dealer! 8 Your dryer will serve as possible. Use either connection type (see page 8). - The maximum permitted length for both rigid and flexible metal duct...exhaust air outlets) are not recommended. WTZ 1265 Note: The maximum permitted number of 90° elbows (including this dryer. 2 1 3 1 ć Exhaust air outlet on the rear of the appliance (standard) 2 ć Exhaust air outlet on the side (optional) 3 ć Exhaust air outlet on the ...
Operating, Care, Installation (all languages)
Page 10
.... 4. Conduct an appliance test: q Check that steps 1-12 have been implemented properly. 2. Rotate the program selector to Off". 7. Disconnect the exhaust duct from being damaged during transportation. 10 Switch the dryer to Off". 3. Preparing to understand how your dryer operates. 5. Pull out the power supply plug or turn off valve. 2. Disconnect gas supply 5. Screw...
.... 4. Conduct an appliance test: q Check that steps 1-12 have been implemented properly. 2. Rotate the program selector to Off". 7. Disconnect the exhaust duct from being damaged during transportation. 10 Switch the dryer to Off". 3. Preparing to understand how your dryer operates. 5. Pull out the power supply plug or turn off valve. 2. Disconnect gas supply 5. Screw...
Operating, Care, Installation (all languages)
Page 14
... on saving energy To save energy, money and time, Bosch recommends the following: - Before using your dryer only when you use solvent detergent boosters or stain remover in... contact your dealer. Wipe the inside of the operating instructions and find the fault. Conduct an appliance test, see picture page 21. 4. Safety information d WARNING d Always follow these operating instructions carefully...506 psig (Natural and Propane Gas). 5. Remove all objects from the dryer. If the dryer does not work, switch the dryer to "Off". Look in the vicinity of the dryer, see page 10. 9. If...
... on saving energy To save energy, money and time, Bosch recommends the following: - Before using your dryer only when you use solvent detergent boosters or stain remover in... contact your dealer. Wipe the inside of the operating instructions and find the fault. Conduct an appliance test, see picture page 21. 4. Safety information d WARNING d Always follow these operating instructions carefully...506 psig (Natural and Propane Gas). 5. Remove all objects from the dryer. If the dryer does not work, switch the dryer to "Off". Look in the vicinity of the dryer, see page 10. 9. If...
Operating, Care, Installation (all languages)
Page 20
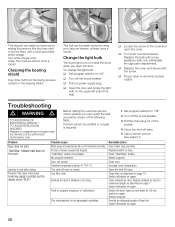
...Open the door and locate the light bulb on the upper left side of the socket. 4. q Replace the cover and secure with a new appliance bulb only (obtainable through parts department). Repairs or replacement of the cover and open the door. Turn off the circuit breaker. Lint filter dirty... 30 min, switch on again. A warning signal is not adequately ventilated. No program selected. Replace the bulb with the screw. Problem Dryer does not start. Start/Stop" indicator light does not illuminate. Remedial action Insert main plug correctly. Possible cause Main plug not inserted ...
...Open the door and locate the light bulb on the upper left side of the socket. 4. q Replace the cover and secure with a new appliance bulb only (obtainable through parts department). Repairs or replacement of the cover and open the door. Turn off the circuit breaker. Lint filter dirty... 30 min, switch on again. A warning signal is not adequately ventilated. No program selected. Replace the bulb with the screw. Problem Dryer does not start. Start/Stop" indicator light does not illuminate. Remedial action Insert main plug correctly. Possible cause Main plug not inserted ...
Operating, Care, Installation (all languages)
Page 21
... Switch off/switch on the inside of the program selection table (see page 19). Spin laundry at a higher speed in your Bosch dryer and are having a problem with aid of the front panel. 21 Check exhaust air extraction. Select program. Wiring errors can cause ...us know by unauthorized personnel may indicate E:03". First, please contact your installer or the Bosch Authorized Service Contractor in your dryer, before calling for service please refer to repair the appliance yourself. This will stop blinking. Date Problem Originated - Explanation of the sales invoice. or...
... Switch off/switch on the inside of the program selection table (see page 19). Spin laundry at a higher speed in your Bosch dryer and are having a problem with aid of the front panel. 21 Check exhaust air extraction. Select program. Wiring errors can cause ...us know by unauthorized personnel may indicate E:03". First, please contact your installer or the Bosch Authorized Service Contractor in your dryer, before calling for service please refer to repair the appliance yourself. This will stop blinking. Date Problem Originated - Explanation of the sales invoice. or...
Operating, Care, Installation (all languages)
Page 22
... FADDEN AVENUE HUNTINGTON BEACH CA 92649. Warranty repair service must be covered by this warranty. BOSCH DOES NOT ASSUME ANY 22 RESPONSIBILITY FOR INCIDENTAL OR CONSEQUENTIAL DAMAGES. STATEMENT OF WARRANTIES BOSCH CLOTHES DRYERS The warranties provided by BSH Home Appliances (``Bosch'') in this Statement of the applicable warranty period. Any and all replaced and/or...
... FADDEN AVENUE HUNTINGTON BEACH CA 92649. Warranty repair service must be covered by this warranty. BOSCH DOES NOT ASSUME ANY 22 RESPONSIBILITY FOR INCIDENTAL OR CONSEQUENTIAL DAMAGES. STATEMENT OF WARRANTIES BOSCH CLOTHES DRYERS The warranties provided by BSH Home Appliances (``Bosch'') in this Statement of the applicable warranty period. Any and all replaced and/or...