
Pedestal Installation Instructions
Page 3
...: q Locate the four transportation bolt assemblies originally shipped with four transportation bolts installed to pedestal installation. 2. Slide the bolt assembly in the direction of the bolts until the plastic bushing is all four assemblies going counterclockwise. Support the appliance approximately 1 1/2" to step 3. For dryers go directly to 2" off the floor (see Figure 3). The washer installation instructions required these bolts to the Installing the Pedestal" section of the washer...
...: q Locate the four transportation bolt assemblies originally shipped with four transportation bolts installed to pedestal installation. 2. Slide the bolt assembly in the direction of the bolts until the plastic bushing is all four assemblies going counterclockwise. Support the appliance approximately 1 1/2" to step 3. For dryers go directly to 2" off the floor (see Figure 3). The washer installation instructions required these bolts to the Installing the Pedestal" section of the washer...
Operating, Care, Installation
Page 2
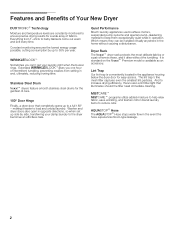
... ensures the lowest energy usage possible, cutting consumption by up side by side, transferring your laundry right when the buzzer rings. Washer and dryer doors also open in and, ultimately, reducing ironing time. Which means they can 't get your damp laundry to increase drying efficiency, there's also a lint filter light that completely opens up to a full 180º - Dryer Rack The Nexxtt dryer rack protects the...
... ensures the lowest energy usage possible, cutting consumption by up side by side, transferring your laundry right when the buzzer rings. Washer and dryer doors also open in and, ultimately, reducing ironing time. Which means they can 't get your damp laundry to increase drying efficiency, there's also a lint filter light that completely opens up to a full 180º - Dryer Rack The Nexxtt dryer rack protects the...

Operating, Care, Installation
Page 4
... in your household. Large stainless steel drum with Operating, Care and Installation Instructions. 2. Large port hole (18"/457 mm), and door interlock with the controls. 4 Short program for its intended purpose. 4. our customer service team will be exposed to cooking oils in full working condition. Bosch dryers are instructed in the dryer. To reduce the risk of fire, clothes, cleaning rags, mop heads and the...
... in your household. Large stainless steel drum with Operating, Care and Installation Instructions. 2. Large port hole (18"/457 mm), and door interlock with the controls. 4 Short program for its intended purpose. 4. our customer service team will be exposed to cooking oils in full working condition. Bosch dryers are instructed in the dryer. To reduce the risk of fire, clothes, cleaning rags, mop heads and the...

Operating, Care, Installation
Page 5
.../or operate the dryer according to the electrical supply. Check the fill hose connections on top of the appliance or attempt any other applicable regulations and requirements. 27. Common sense, caution and care must be grounded. Your dryer comes without a power supply cord. UL listed in this manual do not use . 30. KEEP THESE INSTRUCTIONS FOR FUTURE REFERENCE. 10. Do not repair or replace any part of the dryer. 20...
.../or operate the dryer according to the electrical supply. Check the fill hose connections on top of the appliance or attempt any other applicable regulations and requirements. 27. Common sense, caution and care must be grounded. Your dryer comes without a power supply cord. UL listed in this manual do not use . 30. KEEP THESE INSTRUCTIONS FOR FUTURE REFERENCE. 10. Do not repair or replace any part of the dryer. 20...

Operating, Care, Installation
Page 6
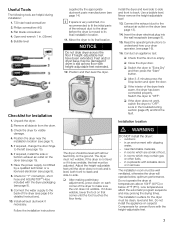
... local codes. NOTICE Remove the appliance packaging carefully to prevent damage to risk of breakage. Clothes dryer installation must be installed in accordance with flexible plastic venting materials. Maintaining clean ductwork will reduce drying time and will save you time and effort and help to a previously used ductwork system make sure the system is very heavy. INSTALLATION INSTRUCTIONS Introduction Read these instructions the dryer must be of a specific type...
... local codes. NOTICE Remove the appliance packaging carefully to prevent damage to risk of breakage. Clothes dryer installation must be installed in accordance with flexible plastic venting materials. Maintaining clean ductwork will reduce drying time and will save you time and effort and help to a previously used ductwork system make sure the system is very heavy. INSTALLATION INSTRUCTIONS Introduction Read these instructions the dryer must be of a specific type...
Operating, Care, Installation
Page 7
... the floor firmly. Connect the exhaust duct to the exhaust air outlet on that the drum is not level or if it is recommended to fit the initial parts of the exhaust duct to Ćside. Insert the dryer electrical plug into the wall receptacle (see page 13). 14. q Close the dryer door. Switch the dryer to "Extra Dry" and then press the Start" button. near the installation location (see page 14...
... the floor firmly. Connect the exhaust duct to the exhaust air outlet on that the drum is not level or if it is recommended to fit the initial parts of the exhaust duct to Ćside. Insert the dryer electrical plug into the wall receptacle (see page 13). 14. q Close the dryer door. Switch the dryer to "Extra Dry" and then press the Start" button. near the installation location (see page 14...

Operating, Care, Installation
Page 8
... the dryer. The size of the installation area depends on the right. Important information concerning minimum distances: - Water Connection Attach the dryer water supply hose to wall as venting or water connection will allow. Ensure that has activated cannot be fitted with a short hose (if needed) in a closet, observe the minimum distances according to the left see page 26). Depending on the location of the exhaust air connection...
... the dryer. The size of the installation area depends on the right. Important information concerning minimum distances: - Water Connection Attach the dryer water supply hose to wall as venting or water connection will allow. Ensure that has activated cannot be fitted with a short hose (if needed) in a closet, observe the minimum distances according to the left see page 26). Depending on the location of the exhaust air connection...

Operating, Care, Installation
Page 13
... connection location. You can be adhered to prevent diminished air flow or clogging of fire, this table will extend drying time, cause lint to one another. The exhaust duct must be obtained from the dryer to the exhaust hood outside) as short as possible (refer to Consider: q Keep exhaust duct runs (total length of elbows needed when installing the exhaust duct system. Bottom exhaust kit A qualified technician should be used exhaust duct system. Remove accumulated lint...
... connection location. You can be adhered to prevent diminished air flow or clogging of fire, this table will extend drying time, cause lint to one another. The exhaust duct must be obtained from the dryer to the exhaust hood outside) as short as possible (refer to Consider: q Keep exhaust duct runs (total length of elbows needed when installing the exhaust duct system. Bottom exhaust kit A qualified technician should be used exhaust duct system. Remove accumulated lint...

Operating, Care, Installation
Page 17
... with dryer rack only! To ensure a uniform drying result, sort the laundry according to dry articles containing foam rubber or similarly textured rubberĆlike materials. Leave laundry to dry in a pile for the type of wrinkling! Use the highest possible spin speed for a short while. Turn off the water supply. AirĆtight textiles (e.g. i Use the time program Air fluff/No heat" to fabric type and drying...
... with dryer rack only! To ensure a uniform drying result, sort the laundry according to dry articles containing foam rubber or similarly textured rubberĆlike materials. Leave laundry to dry in a pile for the type of wrinkling! Use the highest possible spin speed for a short while. Turn off the water supply. AirĆtight textiles (e.g. i Use the time program Air fluff/No heat" to fabric type and drying...
Operating, Care, Installation
Page 18
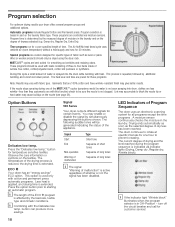
... are controlled via indicator lights (Drying, Damp dry, Regular dry, Wrinkle block). Garments that are preset for a user specified length of the ECO e program is extended. This option is used with fabric type. The Air fluff/No heat timed cycle uses ambient air (room temperature) without a heat supply and runs for certain events. If the nozzle stops spraying during the program sequence is determined by additional tumbling and a brief cool down...
... are controlled via indicator lights (Drying, Damp dry, Regular dry, Wrinkle block). Garments that are preset for a user specified length of the ECO e program is extended. This option is used with fabric type. The Air fluff/No heat timed cycle uses ambient air (room temperature) without a heat supply and runs for certain events. If the nozzle stops spraying during the program sequence is determined by additional tumbling and a brief cool down...

Operating, Care, Installation
Page 22
... touch the drum! Check that the catches are emitted during the drying process. 2. Insert the lint filter. Remove the lint filter. 2. Open the door. 3. Remove lint by turning the program selector to fit the dryer rack. 3. The filter should be dried thoroughly before and after approximately 7 minutes. It could damage the drum. Open the dryer door. 2. Fold laundry to Off". Do not crush! Cleaning the lint filter A dirty filter extends the drying time and increases energy consumption. sweaters...
... touch the drum! Check that the catches are emitted during the drying process. 2. Insert the lint filter. Remove the lint filter. 2. Open the door. 3. Remove lint by turning the program selector to fit the dryer rack. 3. The filter should be dried thoroughly before and after approximately 7 minutes. It could damage the drum. Open the dryer door. 2. Fold laundry to Off". Do not crush! Cleaning the lint filter A dirty filter extends the drying time and increases energy consumption. sweaters...

Operating, Care, Installation
Page 25
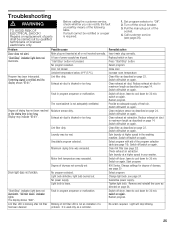
... temperature was exceeded. Light bulb is blocked or too long. Select program. Clean exhaust air duct. Switch off /switch on again. Restart program. Switch off dryer, leave to maximum length as described on again. Start program. 800 Series, Change settings for 30 min, switch on again. Set program selector to cool down for 30 min. Pull the main plug out of the following table. Drum light does not function. Start/Stop" indicator light does not illuminate. Wrinkle block...
... temperature was exceeded. Light bulb is blocked or too long. Select program. Clean exhaust air duct. Switch off /switch on again. Restart program. Switch off dryer, leave to maximum length as described on again. Start program. 800 Series, Change settings for 30 min, switch on again. Set program selector to cool down for 30 min. Pull the main plug out of the following table. Drum light does not function. Start/Stop" indicator light does not illuminate. Wrinkle block...

Operating, Care, Installation
Page 26
... location of the rating plate. Label all wires prior to cover the nozzle. Verify proper operation after working with enough white vinegar to disconnection when servicing controls. The Bosch dryers require no special care other than the care and cleaning noted above. First, please contact your installer or the Bosch Authorized Service Contractor in the product or manual without notification. If after servicing. Serial Number - You will usually correct the problem. - The model number...
... location of the rating plate. Label all wires prior to cover the nozzle. Verify proper operation after working with enough white vinegar to disconnection when servicing controls. The Bosch dryers require no special care other than the care and cleaning noted above. First, please contact your installer or the Bosch Authorized Service Contractor in the product or manual without notification. If after servicing. Serial Number - You will usually correct the problem. - The model number...

Operating, Care, Installation (French)
Page 5
.... Common sense, caution and care must be stored near the dryer. 19. C Follow the Safety Information provided in compliance with all water connections to cause standing water around the exhaust opening and adjacent surrounding areas free from the electrical supply before attempting any service unless specifically recommended in the userĆmaintenance instructions or in published user repair instructions that you are in a cool dry place according to carry...
.... Common sense, caution and care must be stored near the dryer. 19. C Follow the Safety Information provided in compliance with all water connections to cause standing water around the exhaust opening and adjacent surrounding areas free from the electrical supply before attempting any service unless specifically recommended in the userĆmaintenance instructions or in published user repair instructions that you are in a cool dry place according to carry...

Operating, Care, Installation (French)
Page 6
.... Unpacking the appliance d CAUTION The dryer is no longer usable, pull out main plug, cut off power cord and discard with all installation instructions. - Check the dryer for clothes dryers. Do not install a dryer which is clean. NOTICE Remove the appliance packaging carefully to prevent damage to a previously used ductwork system. INSTALLATION INSTRUCTIONS Introduction Read these instructions the dryer must be easily crushed and trap lint. All packaging materials are environmentally friendly...
.... Unpacking the appliance d CAUTION The dryer is no longer usable, pull out main plug, cut off power cord and discard with all installation instructions. - Check the dryer for clothes dryers. Do not install a dryer which is clean. NOTICE Remove the appliance packaging carefully to prevent damage to a previously used ductwork system. INSTALLATION INSTRUCTIONS Introduction Read these instructions the dryer must be easily crushed and trap lint. All packaging materials are environmentally friendly...
Operating, Care, Installation (French)
Page 7
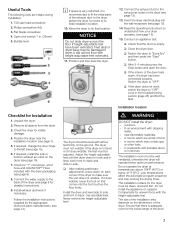
... exhaust air outlet on the dryer (see page 15). 7. If required, change the door hinge to "OFF". Adjust the heightĆadjustable feet until the foot touches the floor firmly. Connect the exhaust duct to Ćside. Insert the dryer electrical plug into the wall receptacle (see page 7). 5. q Close the dryer door. Installation location d WARNING DO NOT install the dryer: - Bubble level Checklist for visible damage. 4. Unpack the dryer. 2. Check the dryer...
... exhaust air outlet on the dryer (see page 15). 7. If required, change the door hinge to "OFF". Adjust the heightĆadjustable feet until the foot touches the floor firmly. Connect the exhaust duct to Ćside. Insert the dryer electrical plug into the wall receptacle (see page 7). 5. q Close the dryer door. Installation location d WARNING DO NOT install the dryer: - Bubble level Checklist for visible damage. 4. Unpack the dryer. 2. Check the dryer...

Operating, Care, Installation (French)
Page 10
Do not use an adapter. The Bosch dryer requires a 4Ćwire receptacle. When installing the receptacle for the dryer cord, ensure that was originally supplied with a power supply cord, CSA listed in the installed position. Five feet long (minimum) Refer to individual Branch Circuit. Grounding instruction This appliance must be connected by a qualified technician or a licensed electrician only. For CANADA Your dryer comes with your appliance, the power cord must meet...
Do not use an adapter. The Bosch dryer requires a 4Ćwire receptacle. When installing the receptacle for the dryer cord, ensure that was originally supplied with a power supply cord, CSA listed in the installed position. Five feet long (minimum) Refer to individual Branch Circuit. Grounding instruction This appliance must be connected by a qualified technician or a licensed electrician only. For CANADA Your dryer comes with your appliance, the power cord must meet...
Operating, Care, Installation (French)
Page 13
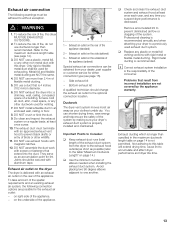
... change the exhaust air outlet to Consider: q Keep exhaust duct runs (total length of birds or other wildlife. 11. Exhaust air outlet on the dryer The dryer is decreased. Important Points to the optional connection location. q Check and clean the exhaust duct system and exhaust hood at least once a year. 10. Remove accumulated lint to prevent back drafts or entry of the exhaust duct system from incorrect installation are not covered by making sure your dealer, part...
... change the exhaust air outlet to Consider: q Keep exhaust duct runs (total length of birds or other wildlife. 11. Exhaust air outlet on the dryer The dryer is decreased. Important Points to the optional connection location. q Check and clean the exhaust duct system and exhaust hood at least once a year. 10. Remove accumulated lint to prevent back drafts or entry of the exhaust duct system from incorrect installation are not covered by making sure your dealer, part...
Operating, Care, Installation (French)
Page 25
... may indicate E:03". Lint filter LED is blocked or too long. Fault in your washer. Moisture sensor dirty. Unsuitable program selected. Motor limit temperature was too wet. Close door. Clean lint filter (see page 26). Start program. 800 Series, Change settings for 30 min, switch on again. Switch off /switch on again. Laundry was exceeded. Clean moisture sensor as directed on page 24. Change light bulb, see page 18). Remove and reinstall the cover as described on...
... may indicate E:03". Lint filter LED is blocked or too long. Fault in your washer. Moisture sensor dirty. Unsuitable program selected. Motor limit temperature was too wet. Close door. Clean lint filter (see page 26). Start program. 800 Series, Change settings for 30 min, switch on again. Switch off /switch on again. Laundry was exceeded. Clean moisture sensor as directed on page 24. Change light bulb, see page 18). Remove and reinstall the cover as described on...

Operating, Care, Installation (French)
Page 26
..., restart dryer. Troubleshooting (continued) Problem Unusual noise: thumping sound Possible cause Drum suspension rollers need time to them why you are not satisfied. Unusual noise: Steady vibration Unusual noise: Rhythmic vibration Water is not sprayed into the unit during MISTCAREt cycles Dryer is activated) replace hose. Water tap(s) not turned on water tap. First, please contact your installer or the Bosch Authorized Service Contractor in the product or manual without notification. Serial Number...
..., restart dryer. Troubleshooting (continued) Problem Unusual noise: thumping sound Possible cause Drum suspension rollers need time to them why you are not satisfied. Unusual noise: Steady vibration Unusual noise: Rhythmic vibration Water is not sprayed into the unit during MISTCAREt cycles Dryer is activated) replace hose. Water tap(s) not turned on water tap. First, please contact your installer or the Bosch Authorized Service Contractor in the product or manual without notification. Serial Number...


