
Pedestal Installation Instructions
Page 3
...potential damage to step 3. The transportation bolts must now be reinstalled prior to the Preparing Your New Appliance" section on a new washer or dryer, proceed to pedestal installation. 2. Figure 3 q Insert the bolt assemblies. This aligns the bolt assembly so the bolt will thread correctly into ...approximately 1 1/2" to protect the drum during the original setup. Pull the appliance away from the bolt prior to slide into place. For dryers go directly to the washer drum. NOTICE Make sure the washer transportation bolts are installing the pedestal on its side. 5. i Do not ...
...potential damage to step 3. The transportation bolts must now be reinstalled prior to the Preparing Your New Appliance" section on a new washer or dryer, proceed to pedestal installation. 2. Figure 3 q Insert the bolt assemblies. This aligns the bolt assembly so the bolt will thread correctly into ...approximately 1 1/2" to protect the drum during the original setup. Pull the appliance away from the bolt prior to slide into place. For dryers go directly to the washer drum. NOTICE Make sure the washer transportation bolts are installing the pedestal on its side. 5. i Do not ...

Pedestal Installation Instructions
Page 5
... appliance and pedestal assembly back to lift or move the appliance once the pedestal is down toward the base of each spacer is installed. For dryers go directly to slide against the floor. d CAUTION To avoid possible injury and damage to 13 ft-lb (18 N-m). Retain the bolts for all four...
... appliance and pedestal assembly back to lift or move the appliance once the pedestal is down toward the base of each spacer is installed. For dryers go directly to slide against the floor. d CAUTION To avoid possible injury and damage to 13 ft-lb (18 N-m). Retain the bolts for all four...

Pedestal Installation Instructions
Page 8
... below, record the purchase date of purchase, when this pedestal is installed with the washer or dryer that came with the listed washer or dryer and operated according to the instructions provided in the washer or dryer Operating, Care and Installation Instructions", supplier will repair or replace any other rights which the pedestal...
... below, record the purchase date of purchase, when this pedestal is installed with the washer or dryer that came with the listed washer or dryer and operated according to the instructions provided in the washer or dryer Operating, Care and Installation Instructions", supplier will repair or replace any other rights which the pedestal...

Installation and Use & Care (all languages)
Page 2
... the dryer 5 Electrical connection 6 Exhaust air connection 6 Accessories 8 Installation ć step by step 9 Check list before using the dryer 9 Preparing to transport the dryer ć step by step 9 OPERATING INSTRUCTIONS 10 Your new dryer 10 ...dryer rack (Option 16 Cleaning and care 18 Cleaning the dryer 18 Cleaning the lint filter 18 Cleaning the exhaust duct 18 Cleaning the moisture sensor 18 Cleaning the bearing shield 19 Change the light bulb 19 Troubleshooting 20 SERVICE and REPAIR 21 STATEMENT OF WARRANTIES BOSCH CLOTHES DRYERS...
... the dryer 5 Electrical connection 6 Exhaust air connection 6 Accessories 8 Installation ć step by step 9 Check list before using the dryer 9 Preparing to transport the dryer ć step by step 9 OPERATING INSTRUCTIONS 10 Your new dryer 10 ...dryer rack (Option 16 Cleaning and care 18 Cleaning the dryer 18 Cleaning the lint filter 18 Cleaning the exhaust duct 18 Cleaning the moisture sensor 18 Cleaning the bearing shield 19 Change the light bulb 19 Troubleshooting 20 SERVICE and REPAIR 21 STATEMENT OF WARRANTIES BOSCH CLOTHES DRYERS...
Installation and Use & Care (all languages)
Page 3
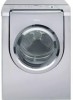
...site: www.boschappliances.com Information Please read and follow basic precautions, including the following standard features: - Congratulations on having selected a Bosch clothes dryer, the choice of those that damage may occur as a result of nonĆobservance of this warning. Large port hole (18"/...waxes, fats, etc., must not be happy to ensure that could ignite or explode. 3. i This symbol is removed from the electrical supply before or after washing, which have any service unless specifically recommended in the userĆmaintenance instructions or in safe practices by...
...site: www.boschappliances.com Information Please read and follow basic precautions, including the following standard features: - Congratulations on having selected a Bosch clothes dryer, the choice of those that damage may occur as a result of nonĆobservance of this warning. Large port hole (18"/...waxes, fats, etc., must not be happy to ensure that could ignite or explode. 3. i This symbol is removed from the electrical supply before or after washing, which have any service unless specifically recommended in the userĆmaintenance instructions or in safe practices by...
Installation and Use & Care (all languages)
Page 4
.... GROUNDING INSTRUCTIONS This appliance must only be plugged into an appropriate outlet that installation and grounding are sure that the dryer has been installed according to the electrical power supply. 21. Type SRDT or DRT (UL 2158) - In Canada, in your local authority about any ...guards and/or panels have a proper outlet installed by qualified installers. Always check pockets and remove any safety devices. 27. Do not operate the dryer if any...
.... GROUNDING INSTRUCTIONS This appliance must only be plugged into an appropriate outlet that installation and grounding are sure that the dryer has been installed according to the electrical power supply. 21. Type SRDT or DRT (UL 2158) - In Canada, in your local authority about any ...guards and/or panels have a proper outlet installed by qualified installers. Always check pockets and remove any safety devices. 27. Do not operate the dryer if any...

Installation and Use & Care (all languages)
Page 5
...environmentally friendly recycling. Please ask your dealer or inquire at your local authority about the current means of the dryer. Before installing the dryer Unpacking the appliance d CAUTION The dryer is supplied without a power cord. Do not lift it by projecting components (e.g. in a small room, ... rubbish! Old appliances are to be changed over, please contact your dealer or our customer serviceĆteam (see page 7). - Dimension Weight a 27.0" (686 mm) 125 lbs b 31.8" (808 mm) (56 kg) with lockable doors or in a closet, observe the minimum distances according ...
...environmentally friendly recycling. Please ask your dealer or inquire at your local authority about the current means of the dryer. Before installing the dryer Unpacking the appliance d CAUTION The dryer is supplied without a power cord. Do not lift it by projecting components (e.g. in a small room, ... rubbish! Old appliances are to be changed over, please contact your dealer or our customer serviceĆteam (see page 7). - Dimension Weight a 27.0" (686 mm) 125 lbs b 31.8" (808 mm) (56 kg) with lockable doors or in a closet, observe the minimum distances according ...
Installation and Use & Care (all languages)
Page 6
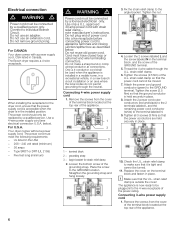
... as described below ). grounding strap 3 - Place the screw to the terminal labeled N. 9. Do not use an extension cord. The Bosch dryer requires a 4Ćwire receptacle. Your dryer comes without a power supply cord. Use only a U.L. Attach the 2 power cord outer conductors (red and black) to the 2...block 2 - The appliance is tight and cannot be turned. 11. Remove the screws from the cover of the terminal block located at connections. Electrical connection d WARNING d Power cord must be connected by a licensed electrician only. below . Type SRDT or DRT (UL 2158) - Cord must...
... as described below ). grounding strap 3 - Place the screw to the terminal labeled N. 9. Do not use an extension cord. The Bosch dryer requires a 4Ćwire receptacle. Your dryer comes without a power supply cord. Use only a U.L. Attach the 2 power cord outer conductors (red and black) to the 2...block 2 - The appliance is tight and cannot be turned. 11. Remove the screws from the cover of the terminal block located at connections. Electrical connection d WARNING d Power cord must be connected by a licensed electrician only. below . Type SRDT or DRT (UL 2158) - Cord must...
Installation and Use & Care (all languages)
Page 7
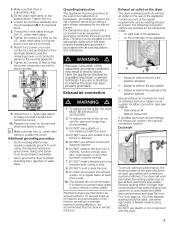
...of the appliance (optional) Special exhaust air connections must be grounded. Your dryer will reduce the risk of electric shock by a qualified electrician or service technician if you are possible for the electric current. Exhaust ducting which has an equipment grounding conductor and a grounding plug...short as possible. The plug must terminate in place securely. 9. Exhaust air connection d WARNING d 1. The Bosch dryers are held in a manner to whether the dryer has been properly grounded. To prevent buildĆup of moisture and accumulation of the appliance. on the ...
...of the appliance (optional) Special exhaust air connections must be grounded. Your dryer will reduce the risk of electric shock by a qualified electrician or service technician if you are possible for the electric current. Exhaust ducting which has an equipment grounding conductor and a grounding plug...short as possible. The plug must terminate in place securely. 9. Exhaust air connection d WARNING d 1. The Bosch dryers are held in a manner to whether the dryer has been properly grounded. To prevent buildĆup of moisture and accumulation of the appliance. on the ...
Installation and Use & Care (all languages)
Page 8
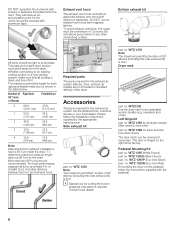
... (1189 cm) (671 cm) 4 30 ft. (914 cm) 16 ft. (488 cm) Note: Side and bottom exhaust installations have a 90° turn inside the dryer. Accessories The parts required for cutting the hole in the table below. The door is clean and free of 12 inches (30 cm) above ground... male end of straight duct, including distance between last turn to avoid leaks. i Special tool for the exhaust air system can be obtained from the dryer. no . WTZ 1295P (Duo tone Silver) part. Side exhaust kit part no . Contact local dealer! Left hinge kit part no . To determine maximum ...
... (1189 cm) (671 cm) 4 30 ft. (914 cm) 16 ft. (488 cm) Note: Side and bottom exhaust installations have a 90° turn inside the dryer. Accessories The parts required for cutting the hole in the table below. The door is clean and free of 12 inches (30 cm) above ground... male end of straight duct, including distance between last turn to avoid leaks. i Special tool for the exhaust air system can be obtained from the dryer. no . WTZ 1295P (Duo tone Silver) part. Side exhaust kit part no . Contact local dealer! Left hinge kit part no . To determine maximum ...
Installation and Use & Care (all languages)
Page 9
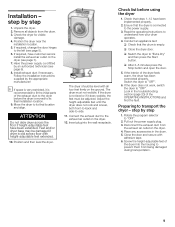
...any accessories in the troubleshooting section (page 20) of the exhaust duct to the dryer before using the dryer 1. Unpack the dryer. 2. Check the dryer for visible damage. 4. Position and then level the dryer. Ensure that the drum is slid across the floor if heightĆadjustable feet ...". Pull out the power supply plug. 3. If required, have been implemented properly. 2. Have the power supply cord fitted by step 1. Move the dryer to "OFF". 6. Preparing to the left (see page 6). 8. Install exhaust duct if necessary. i If space is very restricted, it does wobble...
...any accessories in the troubleshooting section (page 20) of the exhaust duct to the dryer before using the dryer 1. Unpack the dryer. 2. Check the dryer for visible damage. 4. Position and then level the dryer. Ensure that the drum is slid across the floor if heightĆadjustable feet ...". Pull out the power supply plug. 3. If required, have been implemented properly. 2. Have the power supply cord fitted by step 1. Move the dryer to "OFF". 6. Preparing to the left (see page 6). 8. Install exhaust duct if necessary. i If space is very restricted, it does wobble...
Installation and Use & Care (all languages)
Page 10
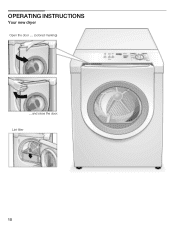
Lint filter 10 OPERATING INSTRUCTIONS Your new dryer Open the door .... (colored marking) ....and close the door.
Lint filter 10 OPERATING INSTRUCTIONS Your new dryer Open the door .... (colored marking) ....and close the door.
Installation and Use & Care (all languages)
Page 11
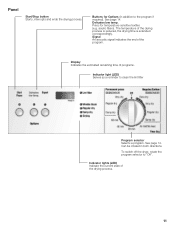
acrylic fibers). See page 14. The temperature of the program. Display Indicates the estimated remaining time of the drying process. 11 To switch off the dryer, rotate the program selector to clean the lint filter Program selector Selects a program. Buttons for temperatureĆsensitive textiles ...end of the drying process is reduced, the drying time is extended correspondingly. See page 14. Indicator lights (LED) Indicate the current state of programs. Indicator light (LED) Serves as a reminder to "Off". Can be rotated in addition to the program if required). Panel Start...
acrylic fibers). See page 14. The temperature of the program. Display Indicates the estimated remaining time of the drying process. 11 To switch off the dryer, rotate the program selector to clean the lint filter Program selector Selects a program. Buttons for temperatureĆsensitive textiles ...end of the drying process is reduced, the drying time is extended correspondingly. See page 14. Indicator lights (LED) Indicate the current state of programs. Indicator light (LED) Serves as a reminder to "Off". Can be rotated in addition to the program if required). Panel Start...
Installation and Use & Care (all languages)
Page 12
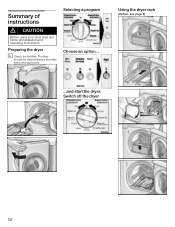
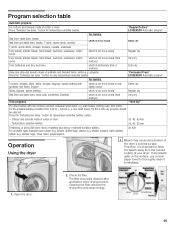
The filter should be cleaned before and after every drying process. Summary of instructions d CAUTION Before using your dryer read and follow all installation and operating instructions. Using the dryer rack (Option, see page 8) ...and start the dryer. Preparing the dryer i Check the lint filter. Switch off the dryer 12 Selecting a program Choose an option...
The filter should be cleaned before and after every drying process. Summary of instructions d CAUTION Before using your dryer read and follow all installation and operating instructions. Using the dryer rack (Option, see page 8) ...and start the dryer. Preparing the dryer i Check the lint filter. Switch off the dryer 12 Selecting a program Choose an option...
Installation and Use & Care (all languages)
Page 13
... rubberĆlike materials. d WARNING d TO AVOID EXPLOSION HAZARD! Do not use the "Very dry/Extra dry" program. 13 Protecting the dryer Do not climb on a regular basis! Drain the laundry thoroughly! Blockages may result in clothes while drying. If damages found contact your dealer....: - Use only for a short while. Do not lean or sit on the dryer Install the dryer in accordance with the voltage specifications on saving energy To save energy, money and time, Bosch recommends the following textiles in the troubleshooting section (page 20) of the environment Tips ...
... rubberĆlike materials. d WARNING d TO AVOID EXPLOSION HAZARD! Do not use the "Very dry/Extra dry" program. 13 Protecting the dryer Do not climb on a regular basis! Drain the laundry thoroughly! Blockages may result in clothes while drying. If damages found contact your dealer....: - Use only for a short while. Do not lean or sit on the dryer Install the dryer in accordance with the voltage specifications on saving energy To save energy, money and time, Bosch recommends the following textiles in the troubleshooting section (page 20) of the environment Tips ...
Installation and Use & Care (all languages)
Page 14
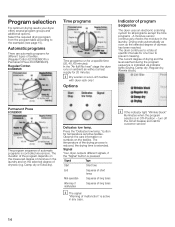
...Delicates low temp. Observe the care information or symbols on ambient air without a heat supply for different types of program sequence The dryer uses an electronic scanning system for a specific time (20, 40, 60 minutes). i If the indicator light Wrinkle block" ... the laundry. Options Indicator of textiles. (Regular/Cotton ECOSENSOR or Permanent Press ECOSENSOR). Program selection For optimum drying results your dryer offers several program groups and additional options. Select the required drying program from the program table according to prevent creasing. Automatic...
...Delicates low temp. Observe the care information or symbols on ambient air without a heat supply for different types of program sequence The dryer uses an electronic scanning system for a specific time (20, 40, 60 minutes). i If the indicator light Wrinkle block" ... the laundry. Options Indicator of textiles. (Regular/Cotton ECOSENSOR or Permanent Press ECOSENSOR). Program selection For optimum drying results your dryer offers several program groups and additional options. Select the required drying program from the program table according to prevent creasing. Automatic...
Installation and Use & Care (all languages)
Page 15
...coloreds made of extreme sensitive textiles. polyester Press the Delicates low temp." pillows, stuffed toys), plastic (e.g. Air fluff Operation Using the dryer i Bleach may cause discoloration of cotton or linen. 20, 40, 60 min - For laundry, Regular/Cottons" ECOSENSOR Automatic program Bed..., underwear, cotton socks which is particularly thick or multiĆply EasyĆcare (dripĆdry) laundry made of the dryer's colored surface. backed rugs), sheer nylon, polypropylene. Open the door. 2. button for very temperatureĆsensitive textiles. For the...
...coloreds made of extreme sensitive textiles. polyester Press the Delicates low temp." pillows, stuffed toys), plastic (e.g. Air fluff Operation Using the dryer i Bleach may cause discoloration of cotton or linen. 20, 40, 60 min - For laundry, Regular/Cottons" ECOSENSOR Automatic program Bed..., underwear, cotton socks which is particularly thick or multiĆply EasyĆcare (dripĆdry) laundry made of the dryer's colored surface. backed rugs), sheer nylon, polypropylene. Open the door. 2. button for very temperatureĆsensitive textiles. For the...
Installation and Use & Care (all languages)
Page 16
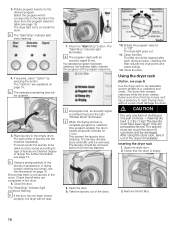
...load 2,2 lbs (1 kg)! Rotate program selector to Off". Rotate the program selector to the desired program. sweaters) and shoes. The dryer rack remains stationary while the drum rotates. It could damage the drum. Place laundry in the drum. 6. i Observe drying symbols of drying...(if set ). If drying woolen clothing and shoes, see page 13. i The program starts with an acoustic signal (if set ) and the LED Wrinkle block" illuminates. i The Start/Stop" indicator light starts flashing. 4. If a standard program has been selected, the indicator lights indicate the...
...load 2,2 lbs (1 kg)! Rotate program selector to Off". Rotate the program selector to the desired program. sweaters) and shoes. The dryer rack remains stationary while the drum rotates. It could damage the drum. Place laundry in the drum. 6. i Observe drying symbols of drying...(if set ). If drying woolen clothing and shoes, see page 13. i The program starts with an acoustic signal (if set ) and the LED Wrinkle block" illuminates. i The Start/Stop" indicator light starts flashing. 4. If a standard program has been selected, the indicator lights indicate the...
Installation and Use & Care (all languages)
Page 17
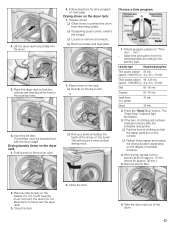
.... After drying, spread out the laundry at the front in the locating holes. 6. Do not crush! 4. Fold laundry to hang over the dryer rack! 3. q Clean shoes to prevent the drum from the following table according to Time dry/.... Select the drying time from becoming soiled.... min.". - The Start/Stop" indicator light illuminates. 3. Remove the lint filter. 2. Laundry must be inserted flush with the drum edge! Lift the dryer rack horizontally into the drum. 5. q Remove insoles and heel pads. 2. Rotate program selector to the laundry type. Shoes 30 min. 2. Close the...
.... After drying, spread out the laundry at the front in the locating holes. 6. Do not crush! 4. Fold laundry to hang over the dryer rack! 3. q Clean shoes to prevent the drum from the following table according to Time dry/.... Select the drying time from becoming soiled.... min.". - The Start/Stop" indicator light illuminates. 3. Remove the lint filter. 2. Laundry must be inserted flush with the drum edge! Lift the dryer rack horizontally into the drum. 5. q Remove insoles and heel pads. 2. Rotate program selector to the laundry type. Shoes 30 min. 2. Close the...
Installation and Use & Care (all languages)
Page 18
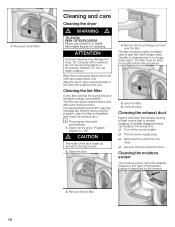
...before being replaced. 5. Program selector to prevent clogging. Remove lint by stroking your hand over the filter. q Turn off the dryer. Cleaning and care Cleaning the dryer d WARNING d TO AVOID RISK OF EXPLOSION! Switch off the circuit breaker q Pull out power supply plug q Disconnect the ...2. 7. Insert the filter. 6. ReĆinsert the lint filter. q Vacuum and reconnect the duct. ATTENTION Incorrect cleaning may damage the dryer. Wipe the housing and fascia with warm soapy water. Wipe the drum, door seal and inside of transparent buildup is cleaned when it no ...
...before being replaced. 5. Program selector to prevent clogging. Remove lint by stroking your hand over the filter. q Turn off the dryer. Cleaning and care Cleaning the dryer d WARNING d TO AVOID RISK OF EXPLOSION! Switch off the circuit breaker q Pull out power supply plug q Disconnect the ...2. 7. Insert the filter. 6. ReĆinsert the lint filter. q Vacuum and reconnect the duct. ATTENTION Incorrect cleaning may damage the dryer. Wipe the housing and fascia with warm soapy water. Wipe the drum, door seal and inside of transparent buildup is cleaned when it no ...


