
Pedestal Installation Instructions
Page 3
... the way inside the back panel of this may be removed during transit. To reinstall the transportation bolts: q Locate the four transportation bolt assemblies originally shipped with the assembly to allow it can be reinstalled prior to slide into the drum. Support the appliance approximately 1 1/2" to the Installing the Pedestal" section of the washer and the rectangular collar is necessary...
... the way inside the back panel of this may be removed during transit. To reinstall the transportation bolts: q Locate the four transportation bolt assemblies originally shipped with the assembly to allow it can be reinstalled prior to slide into the drum. Support the appliance approximately 1 1/2" to the Installing the Pedestal" section of the washer and the rectangular collar is necessary...

Pedestal Installation Instructions
Page 5
...can be careful not to 1/2 turn (see Figure 10). Loosely thread all four bolts with the pedestal. Note: Tightening torque for use the wrench to tighten an additional 1/3 to allow it may cause injury or damage. 6. NOTICE Use only the feet supplied with the washers and spacers ... once the pedestal is required) (see Figure 13). q Loosen all four bolts before using the appliance. Figure 9 4. Using the 6 mm Allen (Hex) wrench, install the socket head cap screws and flat washers (see Figure 12). Using the supplied 17 mm open end wrench, tighten only the two rear feet locknuts...
...can be careful not to 1/2 turn (see Figure 10). Loosely thread all four bolts with the pedestal. Note: Tightening torque for use the wrench to tighten an additional 1/3 to allow it may cause injury or damage. 6. NOTICE Use only the feet supplied with the washers and spacers ... once the pedestal is required) (see Figure 13). q Loosen all four bolts before using the appliance. Figure 9 4. Using the 6 mm Allen (Hex) wrench, install the socket head cap screws and flat washers (see Figure 12). Using the supplied 17 mm open end wrench, tighten only the two rear feet locknuts...

Pedestal Installation Instructions
Page 7
... during operation. 4. i If the test spin cycle is satisfactorily raised or lowered, lock the height-adjustable feet in spin cycle and then leveling the appliance again. Correct Incorrect Figure 19 7. d CAUTION Do not use . 5. All locknuts must be necessary to hold the appliance foot with or service on the pedestal side to make sure the unit does not wobble. For problems...
... during operation. 4. i If the test spin cycle is satisfactorily raised or lowered, lock the height-adjustable feet in spin cycle and then leveling the appliance again. Correct Incorrect Figure 19 7. d CAUTION Do not use . 5. All locknuts must be necessary to hold the appliance foot with or service on the pedestal side to make sure the unit does not wobble. For problems...

Pedestal Installation Instructions
Page 8
This warranty applies only while the Pedestal is in use and/or used with the Pedestal and contact the service department listed there. Save these instructions and your pedestal and model and serial number of purchase, when this pedestal is installed with the listed washer or dryer and operated according to the instructions provided in the washer or dryer Operating, Care and Installation Instructions", supplier will repair or replace any other product than those listed in the Installation Instructions, the warranty is...
This warranty applies only while the Pedestal is in use and/or used with the Pedestal and contact the service department listed there. Save these instructions and your pedestal and model and serial number of purchase, when this pedestal is installed with the listed washer or dryer and operated according to the instructions provided in the washer or dryer Operating, Care and Installation Instructions", supplier will repair or replace any other product than those listed in the Installation Instructions, the warranty is...

Installation and Use & Care (all languages)
Page 2
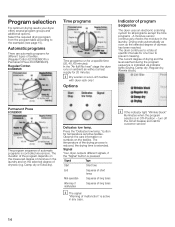
... Program selection 14 Automatic programs 14 Time programs 14 Options 14 Indicator of program sequence 14 Program selection table 15 Operation 15 Using the dryer 15 Using the dryer rack (Option 16 Cleaning and care 18 Cleaning the dryer 18 Cleaning the lint filter 18 Cleaning the exhaust duct 18 Cleaning the moisture sensor 18 Cleaning the bearing shield 19 Change the light bulb 19 Troubleshooting 20 SERVICE and REPAIR 21 STATEMENT OF WARRANTIES BOSCH CLOTHES DRYERS 22 Exclusions 22 2
... Program selection 14 Automatic programs 14 Time programs 14 Options 14 Indicator of program sequence 14 Program selection table 15 Operation 15 Using the dryer 15 Using the dryer rack (Option 16 Cleaning and care 18 Cleaning the dryer 18 Cleaning the lint filter 18 Cleaning the exhaust duct 18 Cleaning the moisture sensor 18 Cleaning the bearing shield 19 Change the light bulb 19 Troubleshooting 20 SERVICE and REPAIR 21 STATEMENT OF WARRANTIES BOSCH CLOTHES DRYERS 22 Exclusions 22 2
Installation and Use & Care (all languages)
Page 3
... electrical supply before attempting any service unless specifically recommended in the userĆmaintenance instructions or in your dryer, follow these operating and installation instructions and all instructions before or after washing, which have been previously cleaned, washed, soaked, or spotted with Operating, Care and Installation Instructions. 2. Before the appliance is used to draw the user's attention to the weather. 8. Do not reach into the appliance if the drum...
... electrical supply before attempting any service unless specifically recommended in the userĆmaintenance instructions or in your dryer, follow these operating and installation instructions and all instructions before or after washing, which have been previously cleaned, washed, soaked, or spotted with Operating, Care and Installation Instructions. 2. Before the appliance is used to draw the user's attention to the weather. 8. Do not reach into the appliance if the drum...
Installation and Use & Care (all languages)
Page 4
..., DO NOT use an extension cord or an adapter to connect the dryer to the electrical power supply. 21. Do not operate the dryer if any problems or conditions that you are in accordance with a cord having an equipmentĆgrounding conductor and a grounding plug. Your dryer comes without a power supply cord. Five feet long (minimum) For CANADA This appliance is properly grounded. These installation instructions are environmentally...
..., DO NOT use an extension cord or an adapter to connect the dryer to the electrical power supply. 21. Do not operate the dryer if any problems or conditions that you are in accordance with a cord having an equipmentĆgrounding conductor and a grounding plug. Your dryer comes without a power supply cord. Five feet long (minimum) For CANADA This appliance is properly grounded. These installation instructions are environmentally...

Installation and Use & Care (all languages)
Page 5
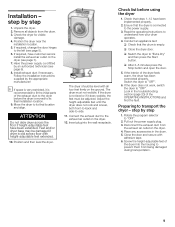
... fuels, - Use a bubble level. The size of the installation area depends on the right. Additional distances facilitate installation and service. - Dimension Weight a 27.0" (686 mm) 125 lbs b 31.8" (808 mm) (56 kg) with the heightĆadjustable feet. If required, the door hinges can be switched to back. Do not lift the appliance by yourself. Installation location d WARNING d Do not install the dryer: - The operating instructions and...
... fuels, - Use a bubble level. The size of the installation area depends on the right. Additional distances facilitate installation and service. - Dimension Weight a 27.0" (686 mm) 125 lbs b 31.8" (808 mm) (56 kg) with the heightĆadjustable feet. If required, the door hinges can be switched to back. Do not lift the appliance by yourself. Installation location d WARNING d Do not install the dryer: - The operating instructions and...
Installation and Use & Care (all languages)
Page 6
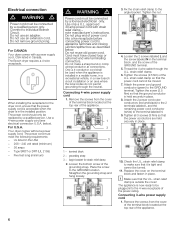
... Your dryer comes with strain relief clamp note manufacturer's instructions. UL listed in place. 8. Tighten the nut. 4. Tighten the screws (2.5 Nm) of the GROUND terminal. 5. Tighten the screw (2.5 Nm) so that the power cord cannot be replaced by a qualified person. Check the U.L. Do not use an adapter. Use a 4Ćwire power supply cord (see electrical connection U.S.A. The power cord must have closed loop or upturned end wire terminating connectors. Five feet long...
... Your dryer comes with strain relief clamp note manufacturer's instructions. UL listed in place. 8. Tighten the nut. 4. Tighten the screws (2.5 Nm) of the GROUND terminal. 5. Tighten the screw (2.5 Nm) so that the power cord cannot be replaced by a qualified person. Check the U.L. Do not use an adapter. Use a 4Ćwire power supply cord (see electrical connection U.S.A. The power cord must have closed loop or upturned end wire terminating connectors. Five feet long...
Installation and Use & Care (all languages)
Page 7
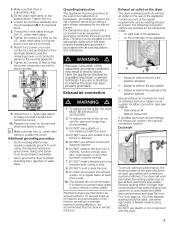
... work best when the venting system has as few air flow restrictions as to the optional connection location. Exhaust air connection d WARNING d 1. DO NOT install a flexible duct in diameter. 5. The exhaust duct must terminate in doubt as possible. Use either connection type (see page 8). - strain relief clamp so that the U.L. i Make sure that the power cord cannot be grounded. DO NOT use plastic or nonĆmetal duct with this dryer. 7 The Bosch dryers...
... work best when the venting system has as few air flow restrictions as to the optional connection location. Exhaust air connection d WARNING d 1. DO NOT install a flexible duct in diameter. 5. The exhaust duct must terminate in doubt as possible. Use either connection type (see page 8). - strain relief clamp so that the U.L. i Make sure that the power cord cannot be grounded. DO NOT use plastic or nonĆmetal duct with this dryer. 7 The Bosch dryers...
Installation and Use & Care (all languages)
Page 8
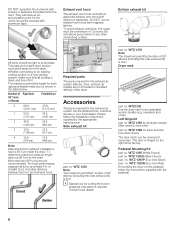
... determine maximum exhaust length, add one 90° turn to dry washable woolen textiles (e.g. Dryer rack part no . sweaters) and shoes. WTZ 1260 for all turns by the appropriate manufacturer! WTZ 126S for the exhaust air system can be reversed if necessary. Pedestal Mounting Kit part no . DO NOT use an exhaust vent hood with swing out damper(s). Number of Rigid Duct 90° Turns or Elbows Flexible Duct 0 66 ft...
... determine maximum exhaust length, add one 90° turn to dry washable woolen textiles (e.g. Dryer rack part no . sweaters) and shoes. WTZ 1260 for all turns by the appropriate manufacturer! WTZ 126S for the exhaust air system can be reversed if necessary. Pedestal Mounting Kit part no . DO NOT use an exhaust vent hood with swing out damper(s). Number of Rigid Duct 90° Turns or Elbows Flexible Duct 0 66 ft...
Installation and Use & Care (all languages)
Page 9
... dryer feels warm, the dryer has been connected properly. Move the dryer to "Extra Dry" and then press the Start button. Ensure that steps 1-12 have customer service install the exhaust air outlet on the dryer. 4. Disconnect the exhaust duct from the drum. 3. q Switch the dryer to its final installation location. 9. Close the door and secure with all objects from the exhaust air outlet on the dryer (see page 7). 7. Have the power supply cord fitted by step 1. Installation...
... dryer feels warm, the dryer has been connected properly. Move the dryer to "Extra Dry" and then press the Start button. Ensure that steps 1-12 have customer service install the exhaust air outlet on the dryer. 4. Disconnect the exhaust duct from the drum. 3. q Switch the dryer to its final installation location. 9. Close the door and secure with all objects from the exhaust air outlet on the dryer (see page 7). 7. Have the power supply cord fitted by step 1. Installation...
Installation and Use & Care (all languages)
Page 13
... air fluffĆcycle. If the dryer does not work, switch the dryer to dry articles containing foam rubber or similarly textured rubberĆlike materials. Pull out the power supply plug if possible. 3. i Use the time program Air fluff/No heat" to "Off". Drying tips In principle, the following textiles in clothes while drying. Lighters are at the end of the drum with the voltage specifications on a clothes...
... air fluffĆcycle. If the dryer does not work, switch the dryer to dry articles containing foam rubber or similarly textured rubberĆlike materials. Pull out the power supply plug if possible. 3. i Use the time program Air fluff/No heat" to "Off". Drying tips In principle, the following textiles in clothes while drying. Lighters are at the end of the drum with the voltage specifications on a clothes...
Installation and Use & Care (all languages)
Page 14
... ambient air without a heat supply for a specific time (20, 40, 60 minutes). Drying ends automatically as soon as the selected degree of automatic programs is pressed. In the "Air fluff/No heat" stage the dryer runs on the selected degree of malfunction" is in the laundry. Observe the care information or symbols on the textiles. button for customer service! 14 Signal Type Start Short...
... ambient air without a heat supply for a specific time (20, 40, 60 minutes). Drying ends automatically as soon as the selected degree of automatic programs is pressed. In the "Air fluff/No heat" stage the dryer runs on the selected degree of malfunction" is in the laundry. Observe the care information or symbols on the textiles. button for customer service! 14 Signal Type Start Short...
Installation and Use & Care (all languages)
Page 16
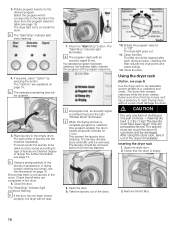
...), the drum rotates at specific intervals for 1 hour. 3. The laundry should be sorted according to the laundry in the empty drum. Rotate program selector to Off". i The estimated remaining time will not start. 7. The Start/Stop" indicator light continues flashing. Using the dryer rack (Option, see page 15). i The program starts with an acoustic signal (if set ) and the LED Wrinkle block" illuminates. Clean the filter. Remove the lint filter. 16...
...), the drum rotates at specific intervals for 1 hour. 3. The laundry should be sorted according to the laundry in the empty drum. Rotate program selector to Off". i The estimated remaining time will not start. 7. The Start/Stop" indicator light continues flashing. Using the dryer rack (Option, see page 15). i The program starts with an acoustic signal (if set ) and the LED Wrinkle block" illuminates. Clean the filter. Remove the lint filter. 16...
Installation and Use & Care (all languages)
Page 18
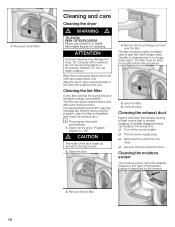
... holds water. The filter should be cleaned because a fine layer of the door with warm soapy water. q Vacuum and reconnect the duct. i The program interrupts automatically. 1. Switch off the circuit breaker q Pull out power supply plug q Disconnect the duct from the dryer. Remove lint by stroking your hand over the filter. Cleaning and care Cleaning the dryer d WARNING d TO AVOID RISK OF EXPLOSION! Cleaning the lint filter A dirty filter extends the drying time and increases energy consumption...
... holds water. The filter should be cleaned because a fine layer of the door with warm soapy water. q Vacuum and reconnect the duct. i The program interrupts automatically. 1. Switch off the circuit breaker q Pull out power supply plug q Disconnect the duct from the dryer. Remove lint by stroking your hand over the filter. Cleaning and care Cleaning the dryer d WARNING d TO AVOID RISK OF EXPLOSION! Cleaning the lint filter A dirty filter extends the drying time and increases energy consumption...
Installation and Use & Care (all languages)
Page 19
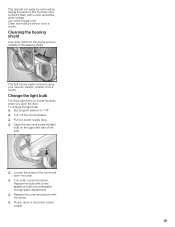
... bars next to Off". Clean the moisture sensor once a month. Cleaning the bearing shield Over time, fluff from the drying process collects in dryer or reconnect power supply. 19 Change the light bulb The dryer light turns on the upper left side of the cover and open the door. q Pull out power supply plug. q Turn off the circuit breaker. q Open the door and locate the light bulb on inside the drum when you open the cover. Use white vinegar only!
... bars next to Off". Clean the moisture sensor once a month. Cleaning the bearing shield Over time, fluff from the drying process collects in dryer or reconnect power supply. 19 Change the light bulb The dryer light turns on the upper left side of the cover and open the door. q Pull out power supply plug. q Turn off the circuit breaker. q Open the door and locate the light bulb on inside the drum when you open the cover. Use white vinegar only!
Installation and Use & Care (all languages)
Page 20
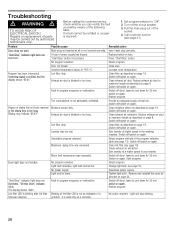
.... Switch off /switch on page 18. Switch off the circuit breaker. 3. Set program selector to maximum length as a reminder. Pull the main plug out of the following table. Select program. Restart program. Display may be rectified or a repair is blocked or too long. Start program. Lint filter dirty. Turn off /switch on again. A warning signal is loose. Drum light does not function. Switch on again. Reduce exhaust air duct to Off". 2. Blinking of lint filter LED is used...
.... Switch off /switch on page 18. Switch off the circuit breaker. 3. Set program selector to maximum length as a reminder. Pull the main plug out of the following table. Select program. Restart program. Display may be rectified or a repair is blocked or too long. Start program. Lint filter dirty. Turn off /switch on again. A warning signal is loose. Drum light does not function. Switch on again. Reduce exhaust air duct to Off". 2. Blinking of lint filter LED is used...
Installation and Use & Care (all languages)
Page 21
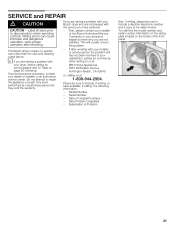
... received: - Label all wires prior to repair the appliance yourself. Model Number - Explanation of Problem Also, if writing, please be sure to us at 1Ć800Ć944Ć2904. The Bosch dryers require no special care other than the care and cleaning noted above. SERVICE and REPAIR d CAUTION CAUTION - Wiring errors can cause improper and dangerous operation. If service becomes necessary, contact your dryer, before calling for...
... received: - Label all wires prior to repair the appliance yourself. Model Number - Explanation of Problem Also, if writing, please be sure to us at 1Ć800Ć944Ć2904. The Bosch dryers require no special care other than the care and cleaning noted above. SERVICE and REPAIR d CAUTION CAUTION - Wiring errors can cause improper and dangerous operation. If service becomes necessary, contact your dryer, before calling for...
Installation and Use & Care (all languages)
Page 22
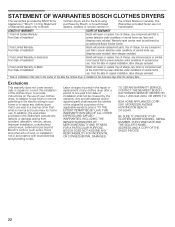
... your clothes dryer, to replace house fuses or correct plumbing or the electric wiring in your home or to repair any clothes dryer that's use was in a manner other acts of normal home use, labor and shipping costs included. Exclusions This warranty does not cover service calls or repairs to correct the installation of the clothes dryer, to provide instructions on Motor From Date of Installation* Bosch will repair or replace, free of charge, any clothes dryer...
... your clothes dryer, to replace house fuses or correct plumbing or the electric wiring in your home or to repair any clothes dryer that's use was in a manner other acts of normal home use, labor and shipping costs included. Exclusions This warranty does not cover service calls or repairs to correct the installation of the clothes dryer, to provide instructions on Motor From Date of Installation* Bosch will repair or replace, free of charge, any clothes dryer...


