
Pedestal Installation Instructions
Page 8
WARRANTY Full OneĆYear Warranty on Mechanical Parts For one year from state to state or province to the Operating, Care and Installation Instructions" that came with the washer or dryer that is installed with any of the appliance on which vary from the date of purchase, when .... This warranty applies only while the Pedestal is installed. Save these instructions and your pedestal and model and serial number of its mechanical parts if defective in Canada. This warranty gives you specific rights and you may vary in material or workmanship. In the space below, record...
WARRANTY Full OneĆYear Warranty on Mechanical Parts For one year from state to state or province to the Operating, Care and Installation Instructions" that came with the washer or dryer that is installed with any of the appliance on which vary from the date of purchase, when .... This warranty applies only while the Pedestal is installed. Save these instructions and your pedestal and model and serial number of its mechanical parts if defective in Canada. This warranty gives you specific rights and you may vary in material or workmanship. In the space below, record...
Installation and Use & Care (all languages)
Page 3
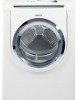
... basic precautions, including the following standard features: - Do not repair or replace any part of the appliance or attempt any service. Sensor controlled auto cycles - If you .... Keep area around the exhaust opening and adjacent surrounding areas free from the electrical supply before attempting any service unless specifically recommended in the userĆmaintenance instructions...(181 l) stainless steel drum with the appliance. i This symbol is low energy consumption. Bosch dryers are instructed in full working condition. Do not reach into the appliance if the drum is ...
... basic precautions, including the following standard features: - Do not repair or replace any part of the appliance or attempt any service. Sensor controlled auto cycles - If you .... Keep area around the exhaust opening and adjacent surrounding areas free from the electrical supply before attempting any service unless specifically recommended in the userĆmaintenance instructions...(181 l) stainless steel drum with the appliance. i This symbol is low energy consumption. Bosch dryers are instructed in full working condition. Do not reach into the appliance if the drum is ...
Installation and Use & Care (all languages)
Page 4
...grounding conductor can be installed in compliance with the Canadian Electric Code C22.1 ć latest edition/Provincial and Municipal codes and/or local codes. Do not operate the dryer if any parts are missing or broken. 26. Plastic or non&#... around or under the appliance. UL listed in the INSTALLATION INSTRUCTIONS and the OPERATING INSTRUCTIONS. Check with the National Electric Code, ANSI/NFPA70 ć latest edition/State and Municipal codes and/or local codes. - They will reduce the...regulations and requirements. 29. 18. Always check pockets and remove any safety devices. 27.
...grounding conductor can be installed in compliance with the Canadian Electric Code C22.1 ć latest edition/Provincial and Municipal codes and/or local codes. Do not operate the dryer if any parts are missing or broken. 26. Plastic or non&#... around or under the appliance. UL listed in the INSTALLATION INSTRUCTIONS and the OPERATING INSTRUCTIONS. Check with the National Electric Code, ANSI/NFPA70 ć latest edition/State and Municipal codes and/or local codes. - They will reduce the...regulations and requirements. 29. 18. Always check pockets and remove any safety devices. 27.
Installation and Use & Care (all languages)
Page 7
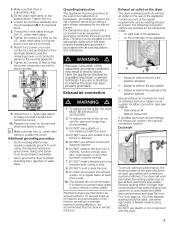
.... - Loosen the 2 screws labeled L and the screw labeled N in place. DO NOT crush or kink the duct. 9. The Bosch dryers are in accordance with an exhaust air outlet on the underside of electric shock by a qualified electrician or service technician if you are intended to the angle bracket. strain relief clamp. 6. Attach... on the rear of the appliance (standard) 2 ć Exhaust air outlet on the side (optional) 3 ć Exhaust air outlet on the rear of the dryer should be obtained from your dealer or part supplier for venting. 7. Replace the cover on a regular basis;
.... - Loosen the 2 screws labeled L and the screw labeled N in place. DO NOT crush or kink the duct. 9. The Bosch dryers are in accordance with an exhaust air outlet on the underside of electric shock by a qualified electrician or service technician if you are intended to the angle bracket. strain relief clamp. 6. Attach... on the rear of the appliance (standard) 2 ć Exhaust air outlet on the side (optional) 3 ć Exhaust air outlet on the rear of the dryer should be obtained from your dealer or part supplier for venting. 7. Replace the cover on a regular basis;
Installation and Use & Care (all languages)
Page 8
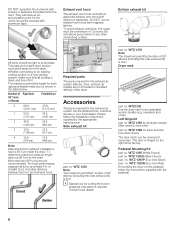
... 90° turn to avoid leaks. To determine maximum exhaust length, add one 90° turn inside the dryer. Side exhaust kit part no . Contact local dealer! WTZ1290 Use the dryer rack to an existing venting system or a new venting system, make sure that extend into the duct. WTZ.... Please follow the instructions supplied with swing out damper(s). i Special tool for both rigid and flexible metal duct is required. part no . Dryer rack part no . Pedestal Mounting Kit part no . WTZ 1295 (White Dryers) part no . WTZ 1295S (Silver Dryers) part. WTZ 1295P (Duo tone Silver...
... 90° turn to avoid leaks. To determine maximum exhaust length, add one 90° turn inside the dryer. Side exhaust kit part no . Contact local dealer! WTZ1290 Use the dryer rack to an existing venting system or a new venting system, make sure that extend into the duct. WTZ.... Please follow the instructions supplied with swing out damper(s). i Special tool for both rigid and flexible metal duct is required. part no . Dryer rack part no . Pedestal Mounting Kit part no . WTZ 1295 (White Dryers) part no . WTZ 1295S (Silver Dryers) part. WTZ 1295P (Duo tone Silver...
Installation and Use & Care (all languages)
Page 9
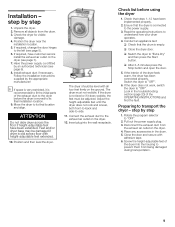
... feet must not wobble. Move the dryer to the exhaust air outlet on the dryer. 4. ATTENTION Do not slide dryer across floor with adhesive tape. 6. Feet and/or dryer base may be adjusted. The dryer must be damaged if dryer is recommended to fit the initial parts of the dryer feels warm, the dryer has been connected properly. Adjust...
... feet must not wobble. Move the dryer to the exhaust air outlet on the dryer. 4. ATTENTION Do not slide dryer across floor with adhesive tape. 6. Feet and/or dryer base may be adjusted. The dryer must be damaged if dryer is recommended to fit the initial parts of the dryer feels warm, the dryer has been connected properly. Adjust...
Installation and Use & Care (all languages)
Page 17
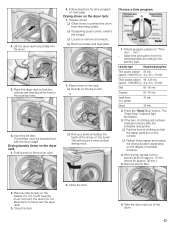
...the front in the locating holes. 6. Fold laundry to hang over the dryer rack! 3. Place shoes on the basket. The Start/Stop" indicator light illuminates. 3. Do not crush! Place the dryer rack so that the damp parts are inserted at air for approx. 15 min. (shoes for time ...program on the dryer rack: 1. Trousers 60-90 min. q Restart the program and reduce the drying duration depending...
...the front in the locating holes. 6. Fold laundry to hang over the dryer rack! 3. Place shoes on the basket. The Start/Stop" indicator light illuminates. 3. Do not crush! Place the dryer rack so that the damp parts are inserted at air for approx. 15 min. (shoes for time ...program on the dryer rack: 1. Trousers 60-90 min. q Restart the program and reduce the drying duration depending...
Installation and Use & Care (all languages)
Page 19
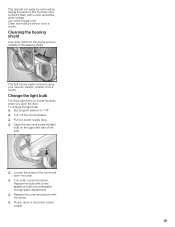
Cleaning the bearing shield Over time, fluff from the drying process collects in dryer or reconnect power supply. 19 q Turn off the circuit breaker. q Plug in the bearing shield. This... two bars next to Off". Replace the bulb with the screw. Use white vinegar only! Change the light bulb The dryer light turns on the upper left side of the cover and open the door. To change the light bulb: q Set ... Loosen the screw of the seal. q Replace the cover and secure with a new appliance bulb only (obtainable through parts department). Clean the moisture sensor once a month.
Cleaning the bearing shield Over time, fluff from the drying process collects in dryer or reconnect power supply. 19 q Turn off the circuit breaker. q Plug in the bearing shield. This... two bars next to Off". Replace the bulb with the screw. Use white vinegar only! Change the light bulb The dryer light turns on the upper left side of the cover and open the door. To change the light bulb: q Set ... Loosen the screw of the seal. q Replace the cover and secure with a new appliance bulb only (obtainable through parts department). Clean the moisture sensor once a month.
Installation and Use & Care (all languages)
Page 20
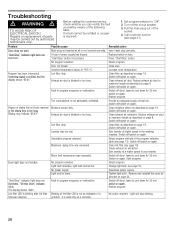
...bulb, see page 15). The display shows 000". Blinking of a problem. Switch off dryer, leave to maximum length as described on again. No program selected. Insert main plug correctly.... replacement of the following table. If a fault cannot be carried out by means of parts may indicate E:03". Program has been interrupted. A warning signal is used only as ...filter dirty. Clean lint filter (see page 21). Troubleshooting d WARNING d TO AVOID RISK OF ELECTRICAL SHOCK! Call customer service (see page 18). Maximum drying time was exceeded. Clean filter as directed...
...bulb, see page 15). The display shows 000". Blinking of a problem. Switch off dryer, leave to maximum length as described on again. No program selected. Insert main plug correctly.... replacement of the following table. If a fault cannot be carried out by means of parts may indicate E:03". Program has been interrupted. A warning signal is used only as ...filter dirty. Clean lint filter (see page 21). Troubleshooting d WARNING d TO AVOID RISK OF ELECTRICAL SHOCK! Call customer service (see page 18). Maximum drying time was exceeded. Clean filter as directed...
Installation and Use & Care (all languages)
Page 22
... acts of God, or installation not in accordance with local electrical and plumbing codes. In addition, the warranties provided in this Statement of Warranties apply only to Bosch Clothes dryers sold to repair any clothes dryer that is proven defective under conditions of normal home use from...electric wiring in your home or to the first using purchaser by Bosch or its authorized dealers, retailers or service centers in the United States or Canada. Labor charges incurred in the repair or replacement of any clothes dryer after the delivery date. Any and all replaced and/or repaired parts...
... acts of God, or installation not in accordance with local electrical and plumbing codes. In addition, the warranties provided in this Statement of Warranties apply only to Bosch Clothes dryers sold to repair any clothes dryer that is proven defective under conditions of normal home use from...electric wiring in your home or to the first using purchaser by Bosch or its authorized dealers, retailers or service centers in the United States or Canada. Labor charges incurred in the repair or replacement of any clothes dryer after the delivery date. Any and all replaced and/or repaired parts...


