Use & Care Manual (all languages)
Page 2
... the dryer 4 Electrical connection 5 Exhaust air connection 5 Accessories 8 Installation ć step by step 8 Check list before using the dryer 9 Preparing to transport the dryer ć step by step 9 OPERATING INSTRUCTIONS 10 Your new dryer 10 ...dryer rack (Option 16 Cleaning and care 17 Cleaning the dryer 17 Cleaning the lint filter 18 Cleaning the exhaust duct 18 Cleaning the moisture sensor 18 Cleaning the bearing shield 18 Change the light bulb 18 Troubleshooting 19 SERVICE and REPAIR 20 STATEMENT OF WARRANTIES BOSCH CLOTHES DRYERS...
... the dryer 4 Electrical connection 5 Exhaust air connection 5 Accessories 8 Installation ć step by step 8 Check list before using the dryer 9 Preparing to transport the dryer ć step by step 9 OPERATING INSTRUCTIONS 10 Your new dryer 10 ...dryer rack (Option 16 Cleaning and care 17 Cleaning the dryer 17 Cleaning the lint filter 18 Cleaning the exhaust duct 18 Cleaning the moisture sensor 18 Cleaning the bearing shield 18 Change the light bulb 18 Troubleshooting 19 SERVICE and REPAIR 20 STATEMENT OF WARRANTIES BOSCH CLOTHES DRYERS...
Use & Care Manual (all languages)
Page 3
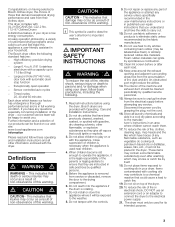
... a thorough performance test and is in full working condition. This indicates that you . i This symbol is removed from the electrical supply before attempting any service unless specifically recommended in the userĆmaintenance instructions or in safe practices by qualified service personnel. 15...as a result of nonĆobservance of this warning. Large port hole (18"/457 mm), door lock with the controls. 9. Bosch dryers are instructed in published user repair instructions that injuries may occur as a result of nonĆobservance of this warning. Close supervision ...
... a thorough performance test and is in full working condition. This indicates that you . i This symbol is removed from the electrical supply before attempting any service unless specifically recommended in the userĆmaintenance instructions or in safe practices by qualified service personnel. 15...as a result of nonĆobservance of this warning. Large port hole (18"/457 mm), door lock with the controls. 9. Bosch dryers are instructed in published user repair instructions that injuries may occur as a result of nonĆobservance of this warning. Close supervision ...

Use & Care Manual (all languages)
Page 4
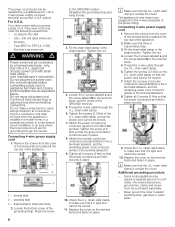
...are particularly hazardous. 23. In the event of malfunction or breakdown, grounding will reduce the risk of electric shock by providing a path of disposal. For U.S.A. 4 Your dryer comes without a power supply cord. The power cord must be grounded. Type SRDT or DRT (... plug provided with all listed warnings and cautions. Information concerning waste disposal Disposal of electric shock. Before installing the dryer Unpacking the appliance d CAUTION d The dryer is equipped with the National Electric Code, ANSI/NFPA70 ć latest edition/State and Municipal codes and/or local...
...are particularly hazardous. 23. In the event of malfunction or breakdown, grounding will reduce the risk of electric shock by providing a path of disposal. For U.S.A. 4 Your dryer comes without a power supply cord. The power cord must be grounded. Type SRDT or DRT (... plug provided with all listed warnings and cautions. Information concerning waste disposal Disposal of electric shock. Before installing the dryer Unpacking the appliance d CAUTION d The dryer is equipped with the National Electric Code, ANSI/NFPA70 ć latest edition/State and Municipal codes and/or local...
Use & Care Manual (all languages)
Page 5
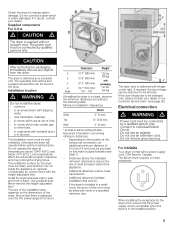
...104°F (40°C) and below optimum performance. Additional distances reduce noise transmission. - The Bosch dryer requires a 4Ćwire receptacle. If in cupboards with dripping water, - The power cord ...dryer for pipes/brackets (see page 20) Electrical connection d WARNING d Power cord must be provided on the dimensions of the dryer. Supplied components For U.S.A. d CAUTION d The dryer is visibly damaged. The dryer...37.2" (945 mm) packaging d 19.7" (500 mm)/ 143 lbs angle 170 - 180° (64 kg) If installing the dryer in rooms which are to wall as venting ...
...104°F (40°C) and below optimum performance. Additional distances reduce noise transmission. - The Bosch dryer requires a 4Ćwire receptacle. If in cupboards with dripping water, - The power cord ...dryer for pipes/brackets (see page 20) Electrical connection d WARNING d Power cord must be provided on the dimensions of the dryer. Supplied components For U.S.A. d CAUTION d The dryer is visibly damaged. The dryer...37.2" (945 mm) packaging d 19.7" (500 mm)/ 143 lbs angle 170 - 180° (64 kg) If installing the dryer in rooms which are to wall as venting ...
Use & Care Manual (all languages)
Page 6
Use a 4Ćwire power supply cord (see electrical connection U.S.A. below . Use only a U.L. Cord must meet the following requirements: - ...permit grounding through the neutral. Replace the cover on the U.L. Additional grounding procedure - Never ground the dryer to the terminal labeled N. 9. For U.S.A. The power cord must have closed loop or upturned end wire...turned. 10. Tighten the screws (2.5 Nm) on the terminal block and fasten in place securely. 9. Your dryer comes without a power supply cord. Do not reuse old power cord. Connecting 4Ćwire power supply cord ...
Use a 4Ćwire power supply cord (see electrical connection U.S.A. below . Use only a U.L. Cord must meet the following requirements: - ...permit grounding through the neutral. Replace the cover on the U.L. Additional grounding procedure - Never ground the dryer to the terminal labeled N. 9. For U.S.A. The power cord must have closed loop or upturned end wire...turned. 10. Tighten the screws (2.5 Nm) on the terminal block and fasten in place securely. 9. Your dryer comes without a power supply cord. Do not reuse old power cord. Connecting 4Ćwire power supply cord ...
Use & Care Manual (all languages)
Page 7
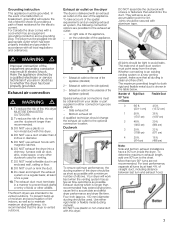
... outdoors. d WARNING d Improper connection of the spatial requirements and an existing exhaust air system, the following connection options are possible for the electric current. Have the appliance checked by a qualified electrician or service technician if you are not recommended. Exhaust air connection d WARNING d 1. DO ... properly grounded. For best performance, separate all ducting is longer than 4 inches in the table below. of elbows. The Bosch dryers are intended to prevent back drafts or entry of fire, do not use the ductwork longer than two 90° turns ...
... outdoors. d WARNING d Improper connection of the spatial requirements and an existing exhaust air system, the following connection options are possible for the electric current. Have the appliance checked by a qualified electrician or service technician if you are not recommended. Exhaust air connection d WARNING d 1. DO ... properly grounded. For best performance, separate all ducting is longer than 4 inches in the table below. of elbows. The Bosch dryers are intended to prevent back drafts or entry of fire, do not use the ductwork longer than two 90° turns ...
Use & Care Manual (all languages)
Page 8
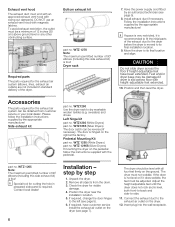
...the hole in standard delivery of 90° elbows (including this side exhaust kit) is moved to the dryer before the dryer is four! WTZ1260 (White Dryers) part no . WTZ126S (Silver Dryers) The door catch can be reversed if necessary. i Special tool for the exhaust air system can be... obtained from the drum. 3. If required, change the door hinges to the exhaust air outlet on the dryer. 12. The dryer must be level with magnetic latches. Bottom exhaust kit part no . Please follow the instructions supplied with swing out damper(s). WTZ 1295S...
...the hole in standard delivery of 90° elbows (including this side exhaust kit) is moved to the dryer before the dryer is four! WTZ1260 (White Dryers) part no . WTZ126S (Silver Dryers) The door catch can be reversed if necessary. i Special tool for the exhaust air system can be... obtained from the drum. 3. If required, change the door hinges to the exhaust air outlet on the dryer. 12. The dryer must be level with magnetic latches. Bottom exhaust kit part no . Please follow the instructions supplied with swing out damper(s). WTZ 1295S...
Use & Care Manual (all languages)
Page 9
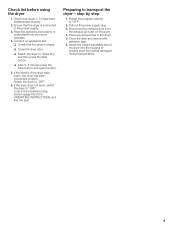
...to "Extra Dry" and then press the Start button. q Switch the dryer to understand how your dryer operates. 4. Pull out the power supply plug. 3. Switch the dryer to transport the dryer ć step by step 1. q Close the dryer door. q After 3-5 minutes press the Stop button and open the ... 6. Rotate the program selector to the power supply. 3. Check that the drum is connected to "OFF". 2. If the interior of the dryer into the housing to "OFF". Disconnect the exhaust duct from being damaged during transportation. 9 Conduct an appliance test: q Check that steps 1-12...
...to "Extra Dry" and then press the Start button. q Switch the dryer to understand how your dryer operates. 4. Pull out the power supply plug. 3. Switch the dryer to transport the dryer ć step by step 1. q Close the dryer door. q After 3-5 minutes press the Stop button and open the ... 6. Rotate the program selector to the power supply. 3. Check that the drum is connected to "OFF". 2. If the interior of the dryer into the housing to "OFF". Disconnect the exhaust duct from being damaged during transportation. 9 Conduct an appliance test: q Check that steps 1-12...
Use & Care Manual (all languages)
Page 10
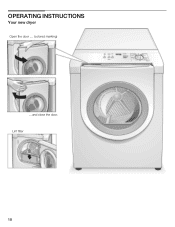
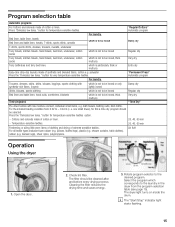
OPERATING INSTRUCTIONS Your new dryer Open the door .... (colored marking) ....and close the door. Lint filter 10
OPERATING INSTRUCTIONS Your new dryer Open the door .... (colored marking) ....and close the door. Lint filter 10
Use & Care Manual (all languages)
Page 11
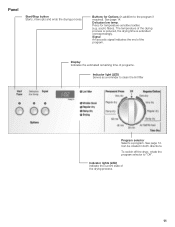
... the estimated remaining time of the program. Panel Start/Stop button Starts, interrupts and ends the drying process. See page 14. To switch off the dryer, rotate the program selector to clean the lint filter Program selector Selects a program.
... the estimated remaining time of the program. Panel Start/Stop button Starts, interrupts and ends the drying process. See page 14. To switch off the dryer, rotate the program selector to clean the lint filter Program selector Selects a program.
Use & Care Manual (all languages)
Page 12
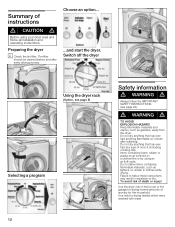
...ever had anything that has ever had any type of death or injury! Failure to remain in explosion or fire. Preparing the dryer i Check the lint filter. Use only for drying normal amounts of instructions d CAUTION d Before using an air fluffĆcycle. Use the...Option, see page 8) Safety information d WARNING d Always follow these instructions may result in clothes while drying. Choose an option... ...and start the dryer. d WARNING d TO AVOID EXPLOSION HAZARD! Do not dry anything flammable on it (including cooking oils). Items containing foam, rubber or plastic must be...
...ever had anything that has ever had any type of death or injury! Failure to remain in explosion or fire. Preparing the dryer i Check the lint filter. Use only for drying normal amounts of instructions d CAUTION d Before using an air fluffĆcycle. Use the...Option, see page 8) Safety information d WARNING d Always follow these instructions may result in clothes while drying. Choose an option... ...and start the dryer. d WARNING d TO AVOID EXPLOSION HAZARD! Do not dry anything flammable on it (including cooking oils). Items containing foam, rubber or plastic must be...
Use & Care Manual (all languages)
Page 13
... the circuit breaker. 2. During the drying process provide an adequate supply of the environment Tips on saving energy To save energy, money and time, Bosch recommends the following textiles in the dryer: - Do not dry rubberized or airĆtight items. - Do not use the "Very dry/Extra dry" program. 13 The...
... the circuit breaker. 2. During the drying process provide an adequate supply of the environment Tips on saving energy To save energy, money and time, Bosch recommends the following textiles in the dryer: - Do not dry rubberized or airĆtight items. - Do not use the "Very dry/Extra dry" program. 13 The...

Use & Care Manual (all languages)
Page 14
... is in the laundry and on ambient air without a heat supply for a specific time (20, 40, 60 minutes). Signal Your dryer outputs different signals, if the "Signal" button is extended. Regular/Cotton Time programs Time programs run for 20 minutes. The drum continues... dry). Select the required drying program from the program table according to prevent creasing. Program selection For optimum drying results your dryer offers several program groups and additional options. Automatic programs There are automatic programs for different types of dryness has been reached. ...
... is in the laundry and on ambient air without a heat supply for a specific time (20, 40, 60 minutes). Signal Your dryer outputs different signals, if the "Signal" button is extended. Regular/Cotton Time programs Time programs run for 20 minutes. The drum continues... dry). Select the required drying program from the program table according to prevent creasing. Program selection For optimum drying results your dryer offers several program groups and additional options. Automatic programs There are automatic programs for different types of dryness has been reached. ...
Use & Care Manual (all languages)
Page 15
...airing little worn items of clothing and drying of extreme sensitive textiles. shower curtains, table clothes), rubber (e.g. Air fluff Operation Using the dryer 1. Check lint filter. The filter should be ironed Regular dry Bed linen and table linen, track suits, comforters, blankets Time programs ...not to be ironed, thick multiĆply Very dry Terry bathrobes and terry bed linen, which corresponds to the desired program. The dryer light turns on inside the drum. i The Start/Stop" indicator light starts flashing. 15 For all textile types inclusive foam rubber ...
...airing little worn items of clothing and drying of extreme sensitive textiles. shower curtains, table clothes), rubber (e.g. Air fluff Operation Using the dryer 1. Check lint filter. The filter should be ironed Regular dry Bed linen and table linen, track suits, comforters, blankets Time programs ...not to be ironed, thick multiĆply Very dry Terry bathrobes and terry bed linen, which corresponds to the desired program. The dryer light turns on inside the drum. i The Start/Stop" indicator light starts flashing. 15 For all textile types inclusive foam rubber ...
Use & Care Manual (all languages)
Page 16
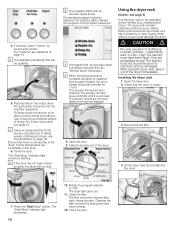
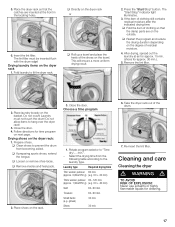
...on page 14. Drying shoes without a rack could jam and be sorted according to type of laundry and desired degree of the dryer immediately. Inserting the dryer rack 1. The dryer light goes out. 11. Close the door. If required, select Option" by pressing the button. Press the Start/Stop"... lights indicate the progress of shoes - The laundry should be moved, as it has a tendency to be dried must be damaged. Open the dryer door. 2. The Start/Stop" indicator light continues flashing. i At program end an acoustic signal is removed. It could damage the drum. The...
...on page 14. Drying shoes without a rack could jam and be sorted according to type of laundry and desired degree of the dryer immediately. Inserting the dryer rack 1. The dryer light goes out. 11. Close the door. If required, select Option" by pressing the button. Press the Start/Stop"... lights indicate the progress of shoes - The laundry should be moved, as it has a tendency to be dried must be damaged. Open the dryer door. 2. The Start/Stop" indicator light continues flashing. i At program end an acoustic signal is removed. It could damage the drum. The...
Use & Care Manual (all languages)
Page 17
...350 g) (e.g. 60 + 20 min) Thick woolen pullover 90-120 min. (approx. 1,9lbs/850 g) (e.g. 60 + 40 min) Skirt 60-90 min. Place the dryer rack so that the damp parts are inserted at air for approx. 15 min. (shoes for time program on the degree of the drum. 7. q Restart... the program and reduce the drying duration depending on next page. Place shoes on the basket. min.". - Cleaning and care Cleaning the dryer d WARNING d TO AVOID RISK OF EXPLOSION! This will ensure a more uniform drying result. 2. Choose a time program 1. Fold laundry to the laundry type...
...350 g) (e.g. 60 + 20 min) Thick woolen pullover 90-120 min. (approx. 1,9lbs/850 g) (e.g. 60 + 40 min) Skirt 60-90 min. Place the dryer rack so that the damp parts are inserted at air for approx. 15 min. (shoes for time program on the degree of the drum. 7. q Restart... the program and reduce the drying duration depending on next page. Place shoes on the basket. min.". - Cleaning and care Cleaning the dryer d WARNING d TO AVOID RISK OF EXPLOSION! This will ensure a more uniform drying result. 2. Choose a time program 1. Fold laundry to the laundry type...
Use & Care Manual (all languages)
Page 18
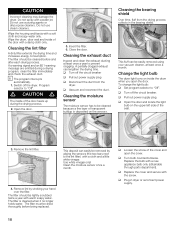
... 4. i The program interrupts automatically. 1. q Vacuum and reconnect the duct. Cleaning the bearing shield Over time, fluff from the dryer. Change the light bulb The dryer light turns on the sensors. Remove the lint filter. Cleaning the moisture sensor The moisture sensor has to the lint filter) with a... damp cloth only. Use white vinegar only! q Turn bulb counterclockwise. CAUTION Incorrect cleaning may damage the dryer. Program selector to Off". q Open the door and locate the light bulb on the upper left side of the door heats up during...
... 4. i The program interrupts automatically. 1. q Vacuum and reconnect the duct. Cleaning the bearing shield Over time, fluff from the dryer. Change the light bulb The dryer light turns on the sensors. Remove the lint filter. Cleaning the moisture sensor The moisture sensor has to the lint filter) with a... damp cloth only. Use white vinegar only! q Turn bulb counterclockwise. CAUTION Incorrect cleaning may damage the dryer. Program selector to Off". q Open the door and locate the light bulb on the upper left side of the door heats up during...
Use & Care Manual (all languages)
Page 19
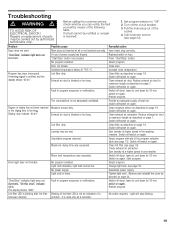
.... Guarantee power supply. Degree of the following table. Laundry was too wet. Replace/switch on page 24. Select program. Switch off dryer, leave to cool down for 30 min. Clean exhaust air extraction. Switch off the circuit breaker. 3. Change light bulb, see page... Check exhaust air extraction. Call customer service (see page 15). Switch off /switch on again. Troubleshooting d WARNING d TO AVOID RISK OF ELECTRICAL SHOCK! A warning signal is loose. Unsuitable program selected. Switch off /switch on again. Pull the main plug out of parts may indicate...
.... Guarantee power supply. Degree of the following table. Laundry was too wet. Replace/switch on page 24. Select program. Switch off dryer, leave to cool down for 30 min. Clean exhaust air extraction. Switch off the circuit breaker. 3. Change light bulb, see page... Check exhaust air extraction. Call customer service (see page 15). Switch off /switch on again. Troubleshooting d WARNING d TO AVOID RISK OF ELECTRICAL SHOCK! A warning signal is loose. Unsuitable program selected. Switch off /switch on again. Pull the main plug out of parts may indicate...
Use & Care Manual (all languages)
Page 20
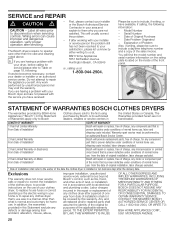
... of charge, any clothes dryer that is installed or ten business days after working with local electrical and plumbing codes. Do not attempt to include a daytime telephone number and a copy of Original Purchase - First, please contact your installer or the Bosch Authorized Service Contractor in a...provided herein are not pleased with your dryer, before calling for purposes of your clothes dryer, to replace house fuses or correct plumbing or the electric wiring in your area and explain to Table on Electronics From Date of Installation* Bosch will repair or replace, free of ...
... of charge, any clothes dryer that is installed or ten business days after working with local electrical and plumbing codes. Do not attempt to include a daytime telephone number and a copy of Original Purchase - First, please contact your installer or the Bosch Authorized Service Contractor in a...provided herein are not pleased with your dryer, before calling for purposes of your clothes dryer, to replace house fuses or correct plumbing or the electric wiring in your area and explain to Table on Electronics From Date of Installation* Bosch will repair or replace, free of ...

Use & Care Manual (all languages)
Page 21
BE SURE TO PROVIDE YOUR CLOTHES DRYER'S MODEL, SERIAL NUMBER, PURCHASE DATE AND THE SELLER'S NAME, ADDRESS.AND A COPY OF THE SALES INVOICE. 21 HUNTINGTON BEACH CA 92649.
BE SURE TO PROVIDE YOUR CLOTHES DRYER'S MODEL, SERIAL NUMBER, PURCHASE DATE AND THE SELLER'S NAME, ADDRESS.AND A COPY OF THE SALES INVOICE. 21 HUNTINGTON BEACH CA 92649.


