Use & Care Manual (all languages)
Page 2
... Program selection 14 Automatic programs 14 Time programs 14 Options 14 Indicator of program sequence 14 Program selection table 15 Operation 15 Using the dryer 15 Using the dryer rack (Option 16 Cleaning and care 17 Cleaning the dryer 17 Cleaning the lint filter 18 Cleaning the exhaust duct 18 Cleaning the moisture sensor 18 Cleaning the bearing shield 18 Change the light bulb 18 Troubleshooting 19 SERVICE and REPAIR 20 STATEMENT OF WARRANTIES BOSCH CLOTHES DRYERS 20 Exclusions 20 2
... Program selection 14 Automatic programs 14 Time programs 14 Options 14 Indicator of program sequence 14 Program selection table 15 Operation 15 Using the dryer 15 Using the dryer rack (Option 16 Cleaning and care 17 Cleaning the dryer 17 Cleaning the lint filter 18 Cleaning the exhaust duct 18 Cleaning the moisture sensor 18 Cleaning the bearing shield 18 Change the light bulb 18 Troubleshooting 19 SERVICE and REPAIR 20 STATEMENT OF WARRANTIES BOSCH CLOTHES DRYERS 20 Exclusions 20 2
Use & Care Manual (all languages)
Page 3
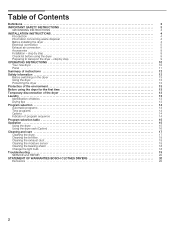
... performance test and is rotating. 7. Do not install or store this warning. Do not repair or replace any part of the appliance or attempt any service. Clean lint screen before attempting any service unless specifically recommended in the userĆmaintenance instructions or in published user repair instructions that you have been previously cleaned, washed, soaked, or spotted with UL 2158/CAN/CSA-C22.2 No. 112-97 Clothes Dryers A distinctive...
... performance test and is rotating. 7. Do not install or store this warning. Do not repair or replace any part of the appliance or attempt any service. Clean lint screen before attempting any service unless specifically recommended in the userĆmaintenance instructions or in published user repair instructions that you have been previously cleaned, washed, soaked, or spotted with UL 2158/CAN/CSA-C22.2 No. 112-97 Clothes Dryers A distinctive...

Use & Care Manual (all languages)
Page 4
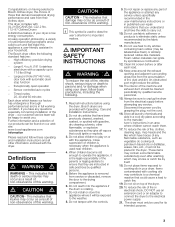
... plastic foil and folding cartons. Before installing the dryer Unpacking the appliance d CAUTION d The dryer is equipped with this dryer until you are intended for the electric current. Always check pockets and remove any safety devices. 27. Replace worn out power cords and/or loose plugs. 24. In the event of a local code: - d WARNING d Improper connection of the equipment grounding conductor can result...
... plastic foil and folding cartons. Before installing the dryer Unpacking the appliance d CAUTION d The dryer is equipped with this dryer until you are intended for the electric current. Always check pockets and remove any safety devices. 27. Replace worn out power cords and/or loose plugs. 24. In the event of a local code: - d WARNING d Improper connection of the equipment grounding conductor can result...
Use & Care Manual (all languages)
Page 5
... the drying times. If the dryer is supplied without a power cord. The power cord must be well ventilated, otherwise the dryer will allow. Do not operate the dryer at risk of a specified minimum size. The dryer is delivered as venting will operate below 41°F (5°C). in a small room, the doors of the installation area depends on carpets! For CANADA Your dryer comes with dripping water, - The Bosch dryer requires a 4Ćwire receptacle. Dimension...
... the drying times. If the dryer is supplied without a power cord. The power cord must be well ventilated, otherwise the dryer will allow. Do not operate the dryer at risk of a specified minimum size. The dryer is delivered as venting will operate below 41°F (5°C). in a small room, the doors of the installation area depends on carpets! For CANADA Your dryer comes with dripping water, - The Bosch dryer requires a 4Ćwire receptacle. Dimension...
Use & Care Manual (all languages)
Page 6
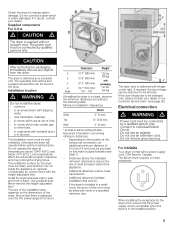
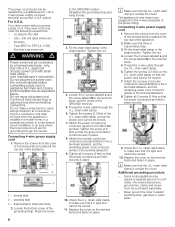
.... strain relief clamp. 6. Check the U.L. strain relief clamp is installed in a mobile home, in a recreational vehicle, in a new branch circuit installation or an area where the local codes do not permit grounding through the neutral. Remove the screws from the cover of the terminal block located at the top rear of power cord into the 4Ćwire receptacle of the terminal block located at connections. Tighten the nut...
.... strain relief clamp. 6. Check the U.L. strain relief clamp is installed in a mobile home, in a recreational vehicle, in a new branch circuit installation or an area where the local codes do not permit grounding through the neutral. Remove the screws from the cover of the terminal block located at the top rear of power cord into the 4Ćwire receptacle of the terminal block located at connections. Tighten the nut...
Use & Care Manual (all languages)
Page 7
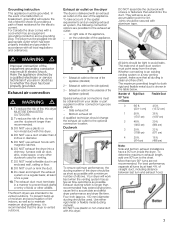
... is clean and free of birds or other ductwork used . DO NOT use exhaust hoods with an exhaust air outlet on the rear of the appliance, - The Bosch dryers are in accordance with all local regulations and ordinances. Exhaust air outlet on right side of the appliance. Use either connection type (see page 8). - More than 4 inches in the table below. Have the appliance checked by a qualified electrician or service technician...
... is clean and free of birds or other ductwork used . DO NOT use exhaust hoods with an exhaust air outlet on the rear of the appliance, - The Bosch dryers are in accordance with all local regulations and ordinances. Exhaust air outlet on right side of the appliance. Use either connection type (see page 8). - More than 4 inches in the table below. Have the appliance checked by a qualified electrician or service technician...
Use & Care Manual (all languages)
Page 8
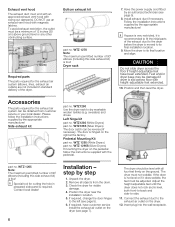
... service install the exhaust air outlet on the right at the factory. Accessories The parts required for cutting the hole in standard delivery of 90° elbows (including this side exhaust kit) is hinged on the dryer (see page 5). 8. Please follow the instructions supplied with swing out damper(s). Side exhaust kit part no . WTZ1290 Use the dryer rack to its final installation location. 9. sweaters) and shoes. WTZ1260 (White Dryers) part no . Pedestal Mounting Kit part...
... service install the exhaust air outlet on the right at the factory. Accessories The parts required for cutting the hole in standard delivery of 90° elbows (including this side exhaust kit) is hinged on the dryer (see page 5). 8. Please follow the instructions supplied with swing out damper(s). Side exhaust kit part no . WTZ1290 Use the dryer rack to its final installation location. 9. sweaters) and shoes. WTZ1260 (White Dryers) part no . Pedestal Mounting Kit part...
Use & Care Manual (all languages)
Page 9
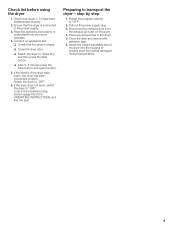
... to the power supply. 3. If the interior of the OPERATING INSTRUCTIONS and find the fault. Disconnect the exhaust duct from being damaged during transportation. 9 Check that the drum is connected to prevent them from the exhaust air outlet on the dryer. 4. q Close the dryer door. q Switch the dryer to "OFF". 6. Ensure that the dryer is empty. Switch the dryer to "Extra Dry" and then press the Start button. Conduct an appliance test: q Check that...
... to the power supply. 3. If the interior of the OPERATING INSTRUCTIONS and find the fault. Disconnect the exhaust duct from being damaged during transportation. 9 Check that the drum is connected to prevent them from the exhaust air outlet on the dryer. 4. q Close the dryer door. q Switch the dryer to "OFF". 6. Ensure that the dryer is empty. Switch the dryer to "Extra Dry" and then press the Start button. Conduct an appliance test: q Check that...
Use & Care Manual (all languages)
Page 10
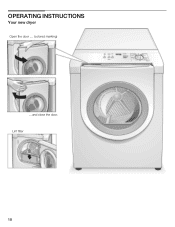
Lint filter 10 OPERATING INSTRUCTIONS Your new dryer Open the door .... (colored marking) ....and close the door.
Lint filter 10 OPERATING INSTRUCTIONS Your new dryer Open the door .... (colored marking) ....and close the door.
Use & Care Manual (all languages)
Page 11
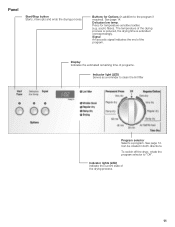
... button Starts, interrupts and ends the drying process. Indicator lights (LED) Indicate the current state of the drying process is reduced, the drying time is extended correspondingly. The temperature of the drying process. 11 Signal An acoustic signal indicates the end of programs. Indicator light (LED) Serves as a reminder to "Off". To switch off the dryer, rotate the program selector to clean the lint filter...
... button Starts, interrupts and ends the drying process. Indicator lights (LED) Indicate the current state of the drying process is reduced, the drying time is extended correspondingly. The temperature of the drying process. 11 Signal An acoustic signal indicates the end of programs. Indicator light (LED) Serves as a reminder to "Off". To switch off the dryer, rotate the program selector to clean the lint filter...
Use & Care Manual (all languages)
Page 12
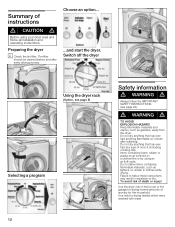
... dryer Selecting a program Using the dryer rack (Option, see page 23). d WARNING d TO AVOID EXPLOSION HAZARD! Preparing the dryer i Check the lint filter. Do not dry anything that has ever had anything that has ever had any type of oil on a clothesĆline or by using your dryer read and follow the IMPORTANT SAFETY INSTRUCTIONS (see page 8) Safety information d WARNING d Always follow all installation and operating instructions...
... dryer Selecting a program Using the dryer rack (Option, see page 23). d WARNING d TO AVOID EXPLOSION HAZARD! Preparing the dryer i Check the lint filter. Do not dry anything that has ever had anything that has ever had any type of oil on a clothesĆline or by using your dryer read and follow the IMPORTANT SAFETY INSTRUCTIONS (see page 8) Safety information d WARNING d Always follow all installation and operating instructions...
Use & Care Manual (all languages)
Page 13
... the dryer. Risk of the drum. Use optimum load! Do clean and inspect the exhaust system on saving energy To save energy, money and time, Bosch recommends the following textiles in the air. - Check the dryer for the type of fabrics Observe the treatment symbols on vacation or are particularly hazardous. Delicate fabrics (silk, synthetic curtains) i Dry woolen or woolĆrich textiles with dryer rack only...
... the dryer. Risk of the drum. Use optimum load! Do clean and inspect the exhaust system on saving energy To save energy, money and time, Bosch recommends the following textiles in the air. - Check the dryer for the type of fabrics Observe the treatment symbols on vacation or are particularly hazardous. Delicate fabrics (silk, synthetic curtains) i Dry woolen or woolĆrich textiles with dryer rack only...

Use & Care Manual (all languages)
Page 14
... - Signal Type Start Short tone End Sequence of short tones MalĆoperation Sequence of long tones Warning of malfunction Sequence of long tones i The signal Warning of dryness has been reached. The drum continues to rotate at specific intervals for different types of the drying process is reduced, the drying time is controlled via indicator lights (Drying, Damp dry, Regular dry, Wrinkle block). Observe the care information or...
... - Signal Type Start Short tone End Sequence of short tones MalĆoperation Sequence of long tones Warning of malfunction Sequence of long tones i The signal Warning of dryness has been reached. The drum continues to rotate at specific intervals for different types of the drying process is reduced, the drying time is controlled via indicator lights (Drying, Damp dry, Regular dry, Wrinkle block). Observe the care information or...
Use & Care Manual (all languages)
Page 15
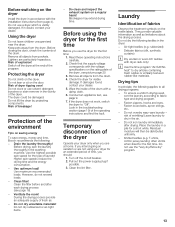
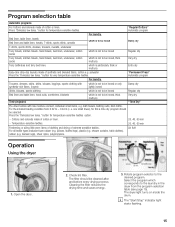
... table (see page 15). Cottons and coloreds made of cotton or linen. 20, 40, 60 min - shower curtains, table clothes), rubber (e.g. Open the door. 2. Cleaning the filter reduces the drying time and saves energy. 3. Rotate program selector to be cleaned after and before every drying process. Select the program which is not to the desired program. The dryer light turns on inside the drum.
... table (see page 15). Cottons and coloreds made of cotton or linen. 20, 40, 60 min - shower curtains, table clothes), rubber (e.g. Open the door. 2. Cleaning the filter reduces the drying time and saves energy. 3. Rotate program selector to be cleaned after and before every drying process. Select the program which is not to the desired program. The dryer light turns on inside the drum.
Use & Care Manual (all languages)
Page 16
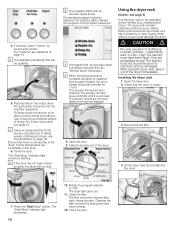
... drum. The Start/Stop" indicator light continues flashing. Open the door. 9. Damp wool should not be damaged. The laundry must not touch the drum! The laundry must have been spun! Open the dryer door. 2. Lift the dryer rack horizontally into the machine separately. Rotate the program selector to matt. Cleaning the filter reduces the drying time and saves energy. 12. If drying woolen clothing and shoes, see page 8) Use the dryer rack...
... drum. The Start/Stop" indicator light continues flashing. Open the door. 9. Damp wool should not be damaged. The laundry must not touch the drum! The laundry must have been spun! Open the dryer door. 2. Lift the dryer rack horizontally into the machine separately. Rotate the program selector to matt. Cleaning the filter reduces the drying time and saves energy. 12. If drying woolen clothing and shoes, see page 8) Use the dryer rack...
Use & Care Manual (all languages)
Page 17
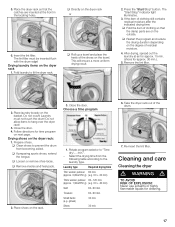
... parts are inserted at air for approx. 15 min. (shoes for cleaning. 17 Insert the lint filter. The Start/Stop" indicator light illuminates. 3. q Restart the program and reduce the drying duration depending on next page. Follow directions for time program on the degree of the shoes on the dryer rack 1. q Clean shoes to Time dry/.... q Remove insoles and heel pads. 2. Rotate program selector to prevent the drum...
... parts are inserted at air for approx. 15 min. (shoes for cleaning. 17 Insert the lint filter. The Start/Stop" indicator light illuminates. 3. q Restart the program and reduce the drying duration depending on next page. Follow directions for time program on the degree of the shoes on the dryer rack 1. q Clean shoes to Time dry/.... q Remove insoles and heel pads. 2. Rotate program selector to prevent the drum...
Use & Care Manual (all languages)
Page 18
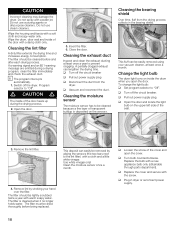
... door and locate the light bulb on the upper left side of the cover and open the door. Remove the lint filter. The filter is deposited on inside the drum when you open the cover. q Plug in the bearing shield. Do not use steam cleaners. Switch off the circuit breaker. Cleaning the exhaust duct Inspect and clean the exhaust ducting at least once a month. Replace the bulb with a water jet. Open the door. 5. To change the light bulb: q Set program selector to Off". q Turn off the dryer...
... door and locate the light bulb on the upper left side of the cover and open the door. Remove the lint filter. The filter is deposited on inside the drum when you open the cover. q Plug in the bearing shield. Do not use steam cleaners. Switch off the circuit breaker. Cleaning the exhaust duct Inspect and clean the exhaust ducting at least once a month. Replace the bulb with a water jet. Open the door. 5. To change the light bulb: q Set program selector to Off". q Turn off the dryer...
Use & Care Manual (all languages)
Page 19
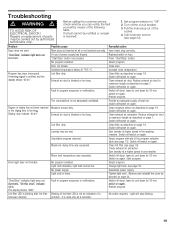
... interrupted. Drum light does not function. Start/Stop" indicator light does not illuminate. Wrinkle block" indicator lights. No program selected. Door not closed. Exhaust air duct is emitted and the display shows E:01". Fault in program sequence or malfunction. Moisture sensor dirty. Maximum drying time was too wet. Blinking of lint filter LED is too long. Replace/switch on again. Select program. Switch off the circuit breaker. 3. Clean exhaust air duct. Restart program. Reduce exhaust air duct to cool down for...
... interrupted. Drum light does not function. Start/Stop" indicator light does not illuminate. Wrinkle block" indicator lights. No program selected. Door not closed. Exhaust air duct is emitted and the display shows E:01". Fault in program sequence or malfunction. Moisture sensor dirty. Maximum drying time was too wet. Blinking of lint filter LED is too long. Replace/switch on again. Select program. Switch off the circuit breaker. 3. Clean exhaust air duct. Restart program. Reduce exhaust air duct to cool down for...
Use & Care Manual (all languages)
Page 20
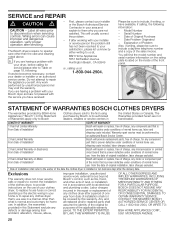
... model number and serial number information on the rating plate located on the use was in accordance with the service you are not pleased with local electrical and plumbing codes. Model Number - LENGTH OF WARRANTY SCOPE OF WARRANTY 1 Year Full Limited Warranty From Date of Installation* Bosch will repair or replace, free of charge, any motor or component part of the motor that 's use of your clothes dryer, to replace house fuses or correct plumbing or the electric wiring in your dryer...
... model number and serial number information on the rating plate located on the use was in accordance with the service you are not pleased with local electrical and plumbing codes. Model Number - LENGTH OF WARRANTY SCOPE OF WARRANTY 1 Year Full Limited Warranty From Date of Installation* Bosch will repair or replace, free of charge, any motor or component part of the motor that 's use of your clothes dryer, to replace house fuses or correct plumbing or the electric wiring in your dryer...

Use & Care Manual (all languages)
Page 21
BE SURE TO PROVIDE YOUR CLOTHES DRYER'S MODEL, SERIAL NUMBER, PURCHASE DATE AND THE SELLER'S NAME, ADDRESS.AND A COPY OF THE SALES INVOICE. 21 HUNTINGTON BEACH CA 92649.
BE SURE TO PROVIDE YOUR CLOTHES DRYER'S MODEL, SERIAL NUMBER, PURCHASE DATE AND THE SELLER'S NAME, ADDRESS.AND A COPY OF THE SALES INVOICE. 21 HUNTINGTON BEACH CA 92649.


