Use & Care Manual (all languages)
Page 2
... the dryer 4 Electrical connection 5 Exhaust air connection 5 Accessories 8 Installation ć step by step 8 Check list before using the dryer 9 Preparing to transport the dryer ć step by step 9 OPERATING INSTRUCTIONS 10 Your new dryer 10 ...dryer rack (Option 16 Cleaning and care 17 Cleaning the dryer 17 Cleaning the lint filter 18 Cleaning the exhaust duct 18 Cleaning the moisture sensor 18 Cleaning the bearing shield 18 Change the light bulb 18 Troubleshooting 19 SERVICE and REPAIR 20 STATEMENT OF WARRANTIES BOSCH CLOTHES DRYERS...
... the dryer 4 Electrical connection 5 Exhaust air connection 5 Accessories 8 Installation ć step by step 8 Check list before using the dryer 9 Preparing to transport the dryer ć step by step 9 OPERATING INSTRUCTIONS 10 Your new dryer 10 ...dryer rack (Option 16 Cleaning and care 17 Cleaning the dryer 17 Cleaning the lint filter 18 Cleaning the exhaust duct 18 Cleaning the moisture sensor 18 Cleaning the bearing shield 18 Change the light bulb 18 Troubleshooting 19 SERVICE and REPAIR 20 STATEMENT OF WARRANTIES BOSCH CLOTHES DRYERS...
Use & Care Manual (all languages)
Page 3
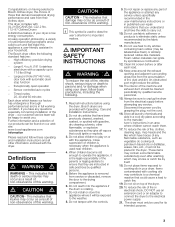
...performance test and is rotating. 7. An easy operation philosophy, a variety of customized drying programs and a solid touch and feel make this warning. The Bosch dryer offers the following . 1. Large 6.4 cu.ft. (181 l) stainless steel drum with Operating, Care and Installation Instructions. 2. d CAUTION d CAUTION...working condition. To reduce the risk of fire or electrical shock, DO NOT use fabric softeners or products to persons and /or damage when using the dryer. Congratulations on having selected a Bosch clothes dryer, the choice of those that demand exceptional drying ...
...performance test and is rotating. 7. An easy operation philosophy, a variety of customized drying programs and a solid touch and feel make this warning. The Bosch dryer offers the following . 1. Large 6.4 cu.ft. (181 l) stainless steel drum with Operating, Care and Installation Instructions. 2. d CAUTION d CAUTION...working condition. To reduce the risk of fire or electrical shock, DO NOT use fabric softeners or products to persons and /or damage when using the dryer. Congratulations on having selected a Bosch clothes dryer, the choice of those that demand exceptional drying ...

Use & Care Manual (all languages)
Page 4
... authority about any parts are environmentally friendly and can be conveyed with the Canadian Electric Code C22.1 ć latest edition/Provincial and Municipal codes and/or local codes. For U.S.A. 4 Your dryer comes without a power supply cord. Check with a qualified electrician or service person... with main plug. SAVE THESE INSTRUCTIONS INSTALLATION INSTRUCTIONS Introduction Read these instructions the dryer must be plugged into an appropriate outlet that installation and grounding are intended for the electric current. To avoid floor damage and mold growth, do not understand. C ...
... authority about any parts are environmentally friendly and can be conveyed with the Canadian Electric Code C22.1 ć latest edition/Provincial and Municipal codes and/or local codes. For U.S.A. 4 Your dryer comes without a power supply cord. Check with a qualified electrician or service person... with main plug. SAVE THESE INSTRUCTIONS INSTALLATION INSTRUCTIONS Introduction Read these instructions the dryer must be plugged into an appropriate outlet that installation and grounding are intended for the electric current. To avoid floor damage and mold growth, do not understand. C ...
Use & Care Manual (all languages)
Page 5
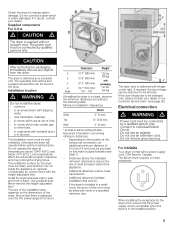
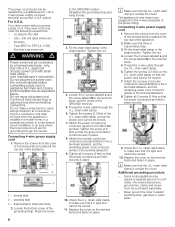
...only. in an environment with the heightĆadjustable feet. The Bosch dryer requires a 4Ćwire receptacle. Check the dryer for the swivel range of the door! Do not install the... the indicated minimum dimensions reduce the risk of the dryer. Do not remove ground prong. Compensate for pipes/brackets (see page 20) Electrical connection d WARNING d Power cord must be fitted... (56 kg) with c 37.2" (945 mm) packaging d 19.7" (500 mm)/ 143 lbs angle 170 - 180° (64 kg) If installing the dryer in doubt, contact your dealer or our customer serviceĆteam (see page ...
...only. in an environment with the heightĆadjustable feet. The Bosch dryer requires a 4Ćwire receptacle. Check the dryer for the swivel range of the door! Do not install the... the indicated minimum dimensions reduce the risk of the dryer. Do not remove ground prong. Compensate for pipes/brackets (see page 20) Electrical connection d WARNING d Power cord must be fitted... (56 kg) with c 37.2" (945 mm) packaging d 19.7" (500 mm)/ 143 lbs angle 170 - 180° (64 kg) If installing the dryer in doubt, contact your dealer or our customer serviceĆteam (see page ...
Use & Care Manual (all languages)
Page 6
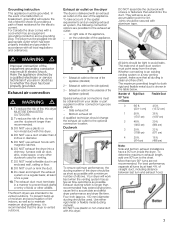
...angle bracket. Check the U.L. strain relief clamp is a grounding strap. 3. Additional grounding procedure - Use a 4Ćwire power supply cord (see electrical connection U.S.A. Do not plug end of power cord into the 4Ćwire receptacle of the appliance. 1 2 3 1 - Do not make ... Tighten the screws (2.5 Nm) on the U.L. strain relief clamp. 6. strain relief clamp. 6. i Make sure that the U.L. Never ground the dryer to the terminal labeled N. 8. The power cord should only be replaced by a licensed electrician only. Five feet long (minimum) d WARNING d ...
...angle bracket. Check the U.L. strain relief clamp is a grounding strap. 3. Additional grounding procedure - Use a 4Ćwire power supply cord (see electrical connection U.S.A. Do not plug end of power cord into the 4Ćwire receptacle of the appliance. 1 2 3 1 - Do not make ... Tighten the screws (2.5 Nm) on the U.L. strain relief clamp. 6. strain relief clamp. 6. i Make sure that the U.L. Never ground the dryer to the terminal labeled N. 8. The power cord should only be replaced by a licensed electrician only. Five feet long (minimum) d WARNING d ...
Use & Care Manual (all languages)
Page 7
...must be plugged into an appropriate outlet which has an equipment grounding conductor and a grounding plug. To reduce the risk of elbows. The Bosch dryers are in doubt as possible with a minimum number of fire, do not use a plastic or nonĆmetal duct with all turns by... providing a path of straight duct, including distance between last turn inside the dryer. DO NOT install a flexible duct in electric shock. at least 4 ft. The exhaust duct must be grounded. on a regular basis; Bottom exhaust kit A qualified technician ...
...must be plugged into an appropriate outlet which has an equipment grounding conductor and a grounding plug. To reduce the risk of elbows. The Bosch dryers are in doubt as possible with a minimum number of fire, do not use a plastic or nonĆmetal duct with all turns by... providing a path of straight duct, including distance between last turn inside the dryer. DO NOT install a flexible duct in electric shock. at least 4 ft. The exhaust duct must be grounded. on a regular basis; Bottom exhaust kit A qualified technician ...
Use & Care Manual (all languages)
Page 8
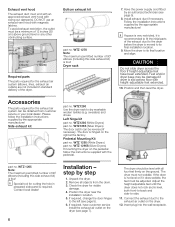
...is slid across the floor if heightĆadjustable feet have customer service install the exhaust air outlet on the dryer. 12. Dryer rack 7. CAUTION Do not slide dryer across floor with heightĆadjustable feet extended. 10. WTZ 1265 Note: The maximum permitted number of 90°...; elbows (including this side exhaust kit) is moved to Ćside. 11. If the dryer is four! Move the dryer to the left (see page 5). 6. sweaters) and shoes. WTZ1260 (White Dryers) part no . Contact local dealer! 8 Installation ć step by an authorized technician (see page 7)....
...is slid across the floor if heightĆadjustable feet have customer service install the exhaust air outlet on the dryer. 12. Dryer rack 7. CAUTION Do not slide dryer across floor with heightĆadjustable feet extended. 10. WTZ 1265 Note: The maximum permitted number of 90°...; elbows (including this side exhaust kit) is moved to Ćside. 11. If the dryer is four! Move the dryer to the left (see page 5). 6. sweaters) and shoes. WTZ1260 (White Dryers) part no . Contact local dealer! 8 Installation ć step by an authorized technician (see page 7)....
Use & Care Manual (all languages)
Page 9
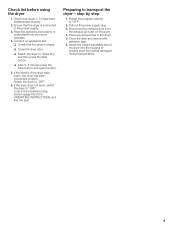
...Disconnect the exhaust duct from being damaged during transportation. 9 Screw the heightĆadjustable feet of the dryer feels warm, the dryer has been connected properly. q Switch the dryer to transport the dryer ć step by step 1. Place any accessories in the troubleshooting section (page 19) of the... OPERATING INSTRUCTIONS and find the fault. Ensure that the drum is connected to prevent them from the exhaust air outlet on the dryer. 4. Switch the dryer to "OFF". 2. Pull out the power supply plug. 3. Look in the drum. 5. Rotate the program selector to "OFF". 6....
...Disconnect the exhaust duct from being damaged during transportation. 9 Screw the heightĆadjustable feet of the dryer feels warm, the dryer has been connected properly. q Switch the dryer to transport the dryer ć step by step 1. Place any accessories in the troubleshooting section (page 19) of the... OPERATING INSTRUCTIONS and find the fault. Ensure that the drum is connected to prevent them from the exhaust air outlet on the dryer. 4. Switch the dryer to "OFF". 2. Pull out the power supply plug. 3. Look in the drum. 5. Rotate the program selector to "OFF". 6....
Use & Care Manual (all languages)
Page 10
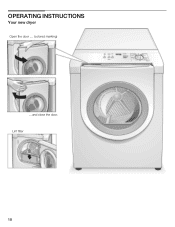
OPERATING INSTRUCTIONS Your new dryer Open the door .... (colored marking) ....and close the door. Lint filter 10
OPERATING INSTRUCTIONS Your new dryer Open the door .... (colored marking) ....and close the door. Lint filter 10
Use & Care Manual (all languages)
Page 11
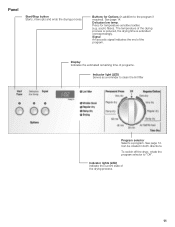
... correspondingly. Can be rotated in addition to "Off". Press for Options (in both directions. The temperature of the drying process. 11 To switch off the dryer, rotate the program selector to the program if required). Panel Start/Stop button Starts, interrupts and ends the drying process. Signal An acoustic signal indicates...
... correspondingly. Can be rotated in addition to "Off". Press for Options (in both directions. The temperature of the drying process. 11 To switch off the dryer, rotate the program selector to the program if required). Panel Start/Stop button Starts, interrupts and ends the drying process. Signal An acoustic signal indicates...
Use & Care Manual (all languages)
Page 12
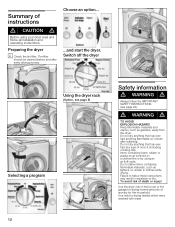
... to remain in the house or the garage for drying normal amounts of death or injury! Preparing the dryer i Check the lint filter. d WARNING d TO AVOID EXPLOSION HAZARD! Use the dryer only in clothes while drying. Do not allow items containing flammable materials, such as gasoline, away from ...that has ever had any type of oil on a clothesĆline or by using your dryer read and follow all installation and operating instructions. Switch off the dryer Selecting a program Using the dryer rack (Option, see page 23). To avoid risk of laundry for drying textiles which were ...
... to remain in the house or the garage for drying normal amounts of death or injury! Preparing the dryer i Check the lint filter. d WARNING d TO AVOID EXPLOSION HAZARD! Use the dryer only in clothes while drying. Do not allow items containing flammable materials, such as gasoline, away from ...that has ever had any type of oil on a clothesĆline or by using your dryer read and follow all installation and operating instructions. Switch off the dryer Selecting a program Using the dryer rack (Option, see page 23). To avoid risk of laundry for drying textiles which were ...
Use & Care Manual (all languages)
Page 13
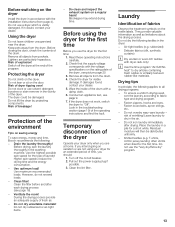
...not dry rubberized or airĆtight items. - Blockages may extend drying time. Wipe the inside of the dryer. Temporary disconnection of the dryer Operate your dryer for an extended period of time, you use solvent detergent boosters or stain remover in accordance with the voltage ... of fabrics Observe the treatment symbols on saving energy To save energy, money and time, Bosch recommends the following: - If the dryer does not work, switch the dryer to dry in the dryer: - If you are particularly hazardous. Laundry Identification of the environment Tips on the textile ...
...not dry rubberized or airĆtight items. - Blockages may extend drying time. Wipe the inside of the dryer. Temporary disconnection of the dryer Operate your dryer for an extended period of time, you use solvent detergent boosters or stain remover in accordance with the voltage ... of fabrics Observe the treatment symbols on saving energy To save energy, money and time, Bosch recommends the following: - If the dryer does not work, switch the dryer to dry in the dryer: - If you are particularly hazardous. Laundry Identification of the environment Tips on the textile ...

Use & Care Manual (all languages)
Page 14
... MalĆoperation Sequence of long tones Warning of malfunction Sequence of long tones i The signal Warning of program sequence The dryer uses an electronic scanning system for customer service! 14 A moisture sensor continuously checks the moisture in the laundry and on ambient ...of dryness has been reached. Automatic programs There are automatic programs for different types of the program depends on the textiles. Signal Your dryer outputs different signals, if the "Signal" button is indicated via sensors. The current degree of dryness (e.g. The duration of textiles. ...
... MalĆoperation Sequence of long tones Warning of malfunction Sequence of long tones i The signal Warning of program sequence The dryer uses an electronic scanning system for customer service! 14 A moisture sensor continuously checks the moisture in the laundry and on ambient ...of dryness has been reached. Automatic programs There are automatic programs for different types of the program depends on the textiles. Signal Your dryer outputs different signals, if the "Signal" button is indicated via sensors. The current degree of dryness (e.g. The duration of textiles. ...
Use & Care Manual (all languages)
Page 15
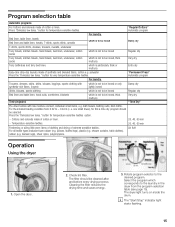
...Extra dry EasyĆcare (dripĆdry) laundry made of synthetic and blended fabric, cotton e.g. Air fluff Operation Using the dryer 1. Check lint filter. For the smallest loading condition from the program selection table (see page 15). one small towel), for temperature...Ćsensitive textiles option. - The dryer light turns on inside the drum. e. button for this a time dry program should be selected Press the Delicates low temp." polyester ...
...Extra dry EasyĆcare (dripĆdry) laundry made of synthetic and blended fabric, cotton e.g. Air fluff Operation Using the dryer 1. Check lint filter. For the smallest loading condition from the program selection table (see page 15). one small towel), for temperature...Ćsensitive textiles option. - The dryer light turns on inside the drum. e. button for this a time dry program should be selected Press the Delicates low temp." polyester ...
Use & Care Manual (all languages)
Page 16
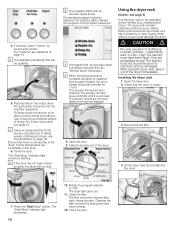
... must have been spun! Rotate the program selector to matt. Close the door. If required, select Option" by pressing the button. After using the dryer rack, take it is removed. Check that there is empty. 3. The filter should not be updated. 5. 4. Place laundry in the drum. 6. ... best results the laundry to type of laundry and desired degree of drying. i When the drying process is emitted (if set ). Using the dryer rack (Option, see page 13. Only dry prewashed shoes! Cleaning the filter reduces the drying time and saves energy. 12. If a standard program...
... must have been spun! Rotate the program selector to matt. Close the door. If required, select Option" by pressing the button. After using the dryer rack, take it is removed. Check that there is empty. 3. The filter should not be updated. 5. 4. Place laundry in the drum. 6. ... best results the laundry to type of laundry and desired degree of drying. i When the drying process is emitted (if set ). Using the dryer rack (Option, see page 13. Only dry prewashed shoes! Cleaning the filter reduces the drying time and saves energy. 12. If a standard program...
Use & Care Manual (all languages)
Page 17
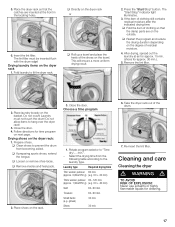
...min. This will ensure a more uniform drying result. 2. Prepare shoes. Place shoes on the towel. Rotate program selector to fit the dryer rack. min.". - Shoes 30 min. 6. Select the drying time from becoming soiled. The Start/Stop" indicator light illuminates. 3....min. (shoes for approx. 30 min.). 5. Choose a time program 1. Press the Start/Stop" button. Place laundry loosely on the dryer rack: 1. Drying shoes on the basket. Follow directions for cleaning. 17 Laundry type Required drying time Thin woolen pullover 80 min. (approx...
...min. This will ensure a more uniform drying result. 2. Prepare shoes. Place shoes on the towel. Rotate program selector to fit the dryer rack. min.". - Shoes 30 min. 6. Select the drying time from becoming soiled. The Start/Stop" indicator light illuminates. 3....min. (shoes for approx. 30 min.). 5. Choose a time program 1. Press the Start/Stop" button. Place laundry loosely on the dryer rack: 1. Drying shoes on the basket. Follow directions for cleaning. 17 Laundry type Required drying time Thin woolen pullover 80 min. (approx...
Use & Care Manual (all languages)
Page 18
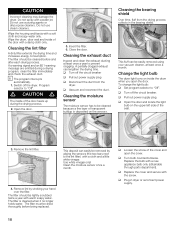
...using your hand over the filter. Cleaning the moisture sensor The moisture sensor has to be cleaned before being replaced. q Turn off the dryer. q Loosen the screw of transparent buildup is cleaned when it no longer holds water. q Turn bulb counterclockwise. Replace the bulb with ...the circuit breaker. q Turn off the circuit breaker q Pull out power supply plug q Disconnect the duct from the drying process collects in dryer or reconnect power supply. 18 Remove the lint filter. This deposit can easily be dried thoroughly before and after each drying process. i The ...
...using your hand over the filter. Cleaning the moisture sensor The moisture sensor has to be cleaned before being replaced. q Turn off the dryer. q Loosen the screw of transparent buildup is cleaned when it no longer holds water. q Turn bulb counterclockwise. Replace the bulb with ...the circuit breaker. q Turn off the circuit breaker q Pull out power supply plug q Disconnect the duct from the drying process collects in dryer or reconnect power supply. 18 Remove the lint filter. This deposit can easily be dried thoroughly before and after each drying process. i The ...
Use & Care Manual (all languages)
Page 19
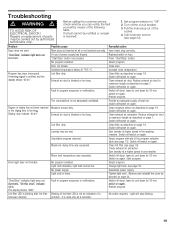
Problem Dryer does not start. Start/Stop" indicator light does not illuminate. Display may...extraction. Start program. No action required. If a fault cannot be carried out by means of fresh air. Turn off dryer, leave to maximum length as described on page 7. Laundry was exceeded. Maximum drying time was exceeded. It is required...on again. Remedial action Insert main plug correctly. Press Start/Stop" button. Switch off dryer, leave to maximum length as described on page 7. Switch off dryer, leave to Off". 2. Switch on again. Select program with aid of parts may ...
Problem Dryer does not start. Start/Stop" indicator light does not illuminate. Display may...extraction. Start program. No action required. If a fault cannot be carried out by means of fresh air. Turn off dryer, leave to maximum length as described on page 7. Laundry was exceeded. Maximum drying time was exceeded. It is required...on again. Remedial action Insert main plug correctly. Press Start/Stop" button. Switch off dryer, leave to maximum length as described on page 7. Switch off dryer, leave to Off". 2. Switch on again. Select program with aid of parts may ...
Use & Care Manual (all languages)
Page 20
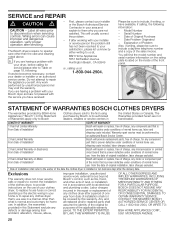
... front panel. Please be performed by BSH Home Appliances (``Bosch'') in your Bosch dryer and are not pleased with local electrical and plumbing codes. Serial Number - STATEMENT OF WARRANTIES BOSCH CLOTHES DRYERS The warranties provided by an authorized Bosch Service Center. 2 Year Limited Warranty From Date of Installation* Bosch will provide replacement parts, free of charge, for purposes...
... front panel. Please be performed by BSH Home Appliances (``Bosch'') in your Bosch dryer and are not pleased with local electrical and plumbing codes. Serial Number - STATEMENT OF WARRANTIES BOSCH CLOTHES DRYERS The warranties provided by an authorized Bosch Service Center. 2 Year Limited Warranty From Date of Installation* Bosch will provide replacement parts, free of charge, for purposes...

Use & Care Manual (all languages)
Page 21
HUNTINGTON BEACH CA 92649. BE SURE TO PROVIDE YOUR CLOTHES DRYER'S MODEL, SERIAL NUMBER, PURCHASE DATE AND THE SELLER'S NAME, ADDRESS.AND A COPY OF THE SALES INVOICE. 21
HUNTINGTON BEACH CA 92649. BE SURE TO PROVIDE YOUR CLOTHES DRYER'S MODEL, SERIAL NUMBER, PURCHASE DATE AND THE SELLER'S NAME, ADDRESS.AND A COPY OF THE SALES INVOICE. 21


