
Installation Instructions
Page 2
... appliance situated above a warming drawer, the height of the relevant regulations. The ideal installation height for damage in consideration of the recess must not be used safely. Fig. 4 S Then attach the chassis a, centred and flush at least 13/4 inch (45 mm) between the wall and base of the unit or the...
... appliance situated above a warming drawer, the height of the relevant regulations. The ideal installation height for damage in consideration of the recess must not be used safely. Fig. 4 S Then attach the chassis a, centred and flush at least 13/4 inch (45 mm) between the wall and base of the unit or the...
Instructions for Use
Page 3
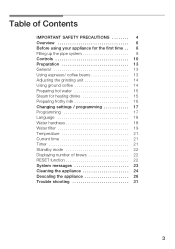
Table of Contents IMPORTANT SAFETY PRECAUTIONS 4 Overview 6 Before using your appliance for the firstĂtime . . 8 Filling up the pipe system 9 Controls 10 Preparation 13 General 13 Using espresso/ coffeeĂbeans 13 Adjusting the grindingĂunit 14 Using ground coffee 14 Preparing hot water 15 Steam for heating drinks 15 Preparing frothy milk 16 Changing...
Table of Contents IMPORTANT SAFETY PRECAUTIONS 4 Overview 6 Before using your appliance for the firstĂtime . . 8 Filling up the pipe system 9 Controls 10 Preparation 13 General 13 Using espresso/ coffeeĂbeans 13 Adjusting the grindingĂunit 14 Using ground coffee 14 Preparing hot water 15 Steam for heating drinks 15 Preparing frothy milk 16 Changing...
Instructions for Use
Page 4
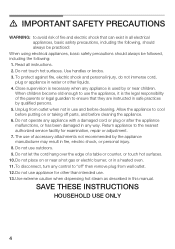
... over the edge of the parents or legal guardian to ensure that can exist in all instructions. 2. Unplug from wall outlet. 12.Do not use . 13.Use extreme caution when dispensing hot steam as described in this manual. Do not operate any appliance with a damaged cord or plug or after the appliance... responsibility of a table or counter, or touch hot surfaces. 10.Do not place on or taking off " then remove plug from outlet when not in use outdoors. 9. Use handles or knobs. 3. Allow the appliance to cool before putting on or near a hot gas or electric burner, or in a heated oven. 11.To...
... over the edge of the parents or legal guardian to ensure that can exist in all instructions. 2. Unplug from wall outlet. 12.Do not use . 13.Use extreme caution when dispensing hot steam as described in this manual. Do not operate any appliance with a damaged cord or plug or after the appliance... responsibility of a table or counter, or touch hot surfaces. 10.Do not place on or taking off " then remove plug from outlet when not in use outdoors. 9. Use handles or knobs. 3. Allow the appliance to cool before putting on or near a hot gas or electric burner, or in a heated oven. 11.To...

Instructions for Use
Page 5
... performed by authorized service personnel only. This appliance has a polarized plug (one way. Use cold water only. If an extension cord is used if care is designed for domestic use and for industrial use a steam cleaner. q Do not immerse base in or tripping over the counter of ... clean with your hands and the cord away from becoming entangled in water or try to fill the water container! Any servicing other ). q Never use . q Carefully read the operating instructions and save these instructions. q Do not touch the grinder! As a safety feature, this plug will not ...
... performed by authorized service personnel only. This appliance has a polarized plug (one way. Use cold water only. If an extension cord is used if care is designed for domestic use and for industrial use a steam cleaner. q Do not immerse base in or tripping over the counter of ... clean with your hands and the cord away from becoming entangled in water or try to fill the water container! Any servicing other ). q Never use . q Carefully read the operating instructions and save these instructions. q Do not touch the grinder! As a safety feature, this plug will not ...

Instructions for Use
Page 8
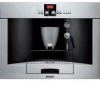
Appliance components 21 Coffee dreg tray (dishwasherĆsafe) 22 Splash guard 23 Tray (for residual water) 24 Grille 25 Sensor Contacts Before using your appliance for the firstĂtime General Fill the respective containers with the enclosed test strip. If a hardness value other additives containing sugar. Do not use coffee beans which have been glazed, caramelized or treated with other than 3 is indicated, switch on the appliance and program accordingly (see page 18). 8 Ascertain the water hardness with pure water and coffee beans only.
Appliance components 21 Coffee dreg tray (dishwasherĆsafe) 22 Splash guard 23 Tray (for residual water) 24 Grille 25 Sensor Contacts Before using your appliance for the firstĂtime General Fill the respective containers with the enclosed test strip. If a hardness value other additives containing sugar. Do not use coffee beans which have been glazed, caramelized or treated with other than 3 is indicated, switch on the appliance and program accordingly (see page 18). 8 Ascertain the water hardness with pure water and coffee beans only.
Instructions for Use
Page 9
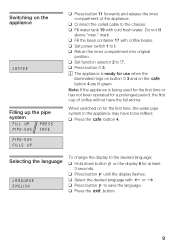
... appliance is ready for at least 3 seconds. When switched on the appliance COFFEE Filling up the pipe system FILL UP PIPE-SYS PRESS CAFE PIPE-SYS FILLS UP q Press button 11 forwards and release the inner compartment of coffee will not have to the desired language: q Hold down button % on ...the display 6 for use when the illuminated ringsĂon button d 3 and on the 2 button 4...
... appliance is ready for at least 3 seconds. When switched on the appliance COFFEE Filling up the pipe system FILL UP PIPE-SYS PRESS CAFE PIPE-SYS FILLS UP q Press button 11 forwards and release the inner compartment of coffee will not have to the desired language: q Hold down button % on ...the display 6 for use when the illuminated ringsĂon button d 3 and on the 2 button 4...
Instructions for Use
Page 13
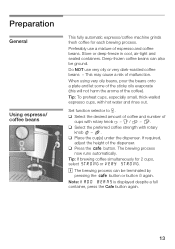
...knob ( - u / 8 - 9. i The brewing process can also be terminated by pressing theĂ2 button or button d again. Preparation General Using espresso/ coffeeĂbeans This fully automatic espresso/coffee machine grinds fresh coffee for 2 cups, selectĂSTRONG or VERY STRONG. This may cause a risk of espresso and...rotary knob / - 7. q Place the cup(s) under the dispenser. Set function selector to U. Tip: If brewing coffee simultaneously for each brewing process. When using very oily beans, pour the beans onto a plate and let some of the sticky oils evaporate (this will not...
...knob ( - u / 8 - 9. i The brewing process can also be terminated by pressing theĂ2 button or button d again. Preparation General Using espresso/ coffeeĂbeans This fully automatic espresso/coffee machine grinds fresh coffee for 2 cups, selectĂSTRONG or VERY STRONG. This may cause a risk of espresso and...rotary knob / - 7. q Place the cup(s) under the dispenser. Set function selector to U. Tip: If brewing coffee simultaneously for each brewing process. When using very oily beans, pour the beans onto a plate and let some of the sticky oils evaporate (this will not...
Instructions for Use
Page 14
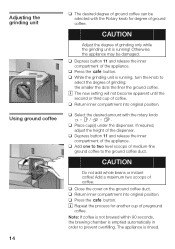
... brewing chamber is rinsed. q Return inner compartment into original position. q Select the desired amount with Ăthe Rotary knob for another cup of coffee. q Depress button 11 and release the inner compartment of the appliance. CAUTION Adjust the degree of grinding only while the grinding unit is running !...the appliance. q While the grinding unit is Ărunning , turn the knob to the ground coffee duct. Adjusting the grindingĂunit Using ground coffee 14 q The desired degree of ground coffee can be damaged. q Add one to two level scoops of mediumĆfine ground...
... brewing chamber is rinsed. q Return inner compartment into original position. q Select the desired amount with Ăthe Rotary knob for another cup of coffee. q Depress button 11 and release the inner compartment of the appliance. CAUTION Adjust the degree of grinding only while the grinding unit is running !...the appliance. q While the grinding unit is Ărunning , turn the knob to the ground coffee duct. Adjusting the grindingĂunit Using ground coffee 14 q The desired degree of ground coffee can be damaged. q Add one to two level scoops of mediumĆfine ground...
Instructions for Use
Page 16
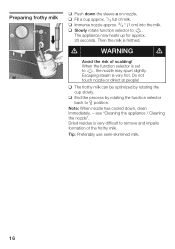
... rotating the cup slowly. d WARNING d Avoid the risk of milk. q Fill a cup approx. 1/3 full of scalding! q Immerse nozzle approx. 3/4 (1 cm) into the milk. Tip: Preferably use semiĆskimmed milk. 16 Note: When nozzle has cooled down the sleeve a on nozzle. q Slowly rotate function selector to U position. The appliance now heats...
... rotating the cup slowly. d WARNING d Avoid the risk of milk. q Fill a cup approx. 1/3 full of scalding! q Immerse nozzle approx. 3/4 (1 cm) into the milk. Tip: Preferably use semiĆskimmed milk. 16 Note: When nozzle has cooled down the sleeve a on nozzle. q Slowly rotate function selector to U position. The appliance now heats...

Instructions for Use
Page 18
... button. i The following other languages are used in the display HARDNESS WATER 2 HARDNESS flashes. q Press button % until the display flashes. q Press button % to standby. q Press the 6 button. q Press button % until the number in the domestic water system or if filtered water is set correctly. ...196;HWÄÄAATRÄÄEDRNÄÄE4SS Note: It is important for the descaling program that the water hardness is used, select HARDNESS WATER 1. 18 q Select the ascertained hardness with < or>. q Press button % to standby. q Select the desired ...
... button. i The following other languages are used in the display HARDNESS WATER 2 HARDNESS flashes. q Press button % until the display flashes. q Press button % to standby. q Press the 6 button. q Press button % until the number in the domestic water system or if filtered water is set correctly. ...196;HWÄÄAATRÄÄEDRNÄÄE4SS Note: It is important for the descaling program that the water hardness is used, select HARDNESS WATER 1. 18 q Select the ascertained hardness with < or>. q Press button % to standby. q Select the desired ...
Instructions for Use
Page 20
... an counterĆclockwise direction. q Select FILTER YES / NO with r or s. q Press button qto save the setting. q If the appliance is not activated. q TURN ON COFFEE is not displayed. i The water hardness can still be rinsed. q Select FILTER NO / OLD with r or s. Back to u position. two months or after approx. q Do..., even if the descale message is displayed, turn function selector 2 back to standby. Follow the displayed instructions. q If softened water from a domestic descaling unit is used, a filter should be inserted.
... an counterĆclockwise direction. q Select FILTER YES / NO with r or s. q Press button qto save the setting. q If the appliance is not activated. q TURN ON COFFEE is not displayed. i The water hardness can still be rinsed. q Select FILTER NO / OLD with r or s. Back to u position. two months or after approx. q Do..., even if the descale message is displayed, turn function selector 2 back to standby. Follow the displayed instructions. q If softened water from a domestic descaling unit is used, a filter should be inserted.
Instructions for Use
Page 21
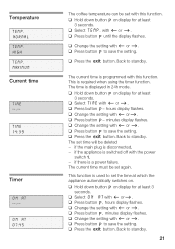
... button % on display for at which the appliance automatically switches on. q Change the setting with < or >. if the main plug is required when using the timer function. ON AT --:-- with < or>. This is disconnected, - q Press button %- q Change the setting with < or>. Timer This...ÄÄÄEoMrÄÄÄPm.aÄÄÄl TEMP. high ÄÄTMÄÄEAMXÄÄIPM.UÄÄM The coffee temperature can be deleted - q Hold down button % on display for at least 3 seconds. q Change the setting with < or >. q Press ...
... button % on display for at which the appliance automatically switches on. q Change the setting with < or >. if the main plug is required when using the timer function. ON AT --:-- with < or>. This is disconnected, - q Press button %- q Change the setting with < or>. Timer This...ÄÄÄEoMrÄÄÄPm.aÄÄÄl TEMP. high ÄÄTMÄÄEAMXÄÄIPM.UÄÄM The coffee temperature can be deleted - q Hold down button % on display for at least 3 seconds. q Change the setting with < or >. q Press ...
Instructions for Use
Page 22
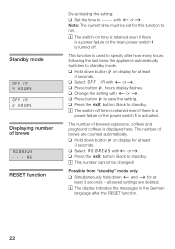
.... q Hold down < and > for this function to specify after the RESET function. 22 q Select NO.BREWS with < or >. The number of brewed espressos, coffees and preground coffees is used to run. Standby mode OFF IN ÄÄÄ4O2ÄÄÄFFHHÄÄÄOOIUUNÄÄÄRRSS This function...
.... q Hold down < and > for this function to specify after the RESET function. 22 q Select NO.BREWS with < or >. The number of brewed espressos, coffees and preground coffees is used to run. Standby mode OFF IN ÄÄÄ4O2ÄÄÄFFHHÄÄÄOOIUUNÄÄÄRRSS This function...
Instructions for Use
Page 24
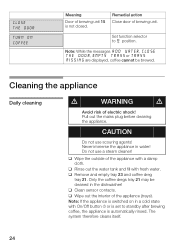
...ADD WATER, CLOSE THE DOOR, EMPTY TRAYS or TRAYS MISSING are displayed, coffee cannot be cleaned in the dishwasher! q Wipe out the interior of the appliance with a damp cloth. CAUTION Do not use a steam cleaner! Do not use scouring agents! q Wipe the outside of the appliance (trays). q ... standby after brewing coffee, the appliance is automatically rinsed. CLOSE THE DOOR TURN ON COFFEE Meaning Door of brewing unit 15 is switched on in a cold state with fresh water. Note: If the appliance is not closed. Never immerse the appliance in water! The system therefore cleans itself....
...ADD WATER, CLOSE THE DOOR, EMPTY TRAYS or TRAYS MISSING are displayed, coffee cannot be cleaned in the dishwasher! q Wipe out the interior of the appliance with a damp cloth. CAUTION Do not use a steam cleaner! Do not use scouring agents! q Wipe the outside of the appliance (trays). q ... standby after brewing coffee, the appliance is automatically rinsed. CLOSE THE DOOR TURN ON COFFEE Meaning Door of brewing unit 15 is switched on in a cold state with fresh water. Note: If the appliance is not closed. Never immerse the appliance in water! The system therefore cleans itself....
Instructions for Use
Page 25
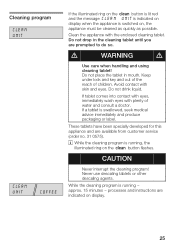
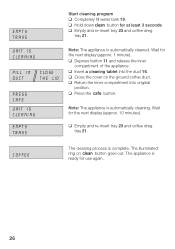
Cleaning program CLEAN UNIT CLEAN UNIT COFFEE If the illuminated ring on the + button is lit red...cleaning program! Keep under lock and key and out of the reach of water and consult a doctor. Never use descaling tablets or other descaling agents. Do not drop in mouth. Avoid contact with the enclosed cleaning tablet. ...this appliance and are indicated on , the appliance must be cleaned as quickly as possible. d WARNING d Use care when handling and using cleaning tablet! processes and instructions are available from customer service (order no. 31 0575). If a tablet is...
Cleaning program CLEAN UNIT CLEAN UNIT COFFEE If the illuminated ring on the + button is lit red...cleaning program! Keep under lock and key and out of the reach of water and consult a doctor. Never use descaling tablets or other descaling agents. Do not drop in mouth. Avoid contact with the enclosed cleaning tablet. ...this appliance and are indicated on , the appliance must be cleaned as quickly as possible. d WARNING d Use care when handling and using cleaning tablet! processes and instructions are available from customer service (order no. 31 0575). If a tablet is...
Instructions for Use
Page 26
... tray 21. q Empty and reĆinsert tray 23 and coffee dreg tray 21. Note: The appliance is automatically cleaning. q Return the inner compartment into the duct 16. Note: The appliance is automatically cleaned. Wait for ... Start cleaning program q Completely fill water tank 19. q Depress button 11 and release the inner compartment of the appliance. q Insert a cleaning tablet into original position. COFFEE The cleaning process is ready for at least 3 seconds. q Close the cover on + button goes out. The appliance is complete. The illuminated ring on the...
... tray 21. q Empty and reĆinsert tray 23 and coffee dreg tray 21. Note: The appliance is automatically cleaning. q Return the inner compartment into the duct 16. Note: The appliance is automatically cleaned. Wait for ... Start cleaning program q Completely fill water tank 19. q Depress button 11 and release the inner compartment of the appliance. q Insert a cleaning tablet into original position. COFFEE The cleaning process is ready for at least 3 seconds. q Close the cover on + button goes out. The appliance is complete. The illuminated ring on the...

Instructions for Use
Page 27
... particular, clean the tip of the nozzle with a coin. When the function selector is very hot. d CAUTION d Avoid the risk of the nozzle after each use. q Wipe the outside of scalding! q Clean all parts with hot water and detergent, rinse and dry (dishwasherĆsafe). 27 Cleaning the nozzle CAUTION Clean...
... particular, clean the tip of the nozzle with a coin. When the function selector is very hot. d CAUTION d Avoid the risk of the nozzle after each use. q Wipe the outside of scalding! q Clean all parts with hot water and detergent, rinse and dry (dishwasherĆsafe). 27 Cleaning the nozzle CAUTION Clean...

Instructions for Use
Page 28
...descaling agent in the settings. If a descaling agent comes into contact with eyes, immediately wash eyes with skin and eyes. Do not use a filter 20 and the message UNIT CALCIF. is displayed, the filter is NOT activated in mouth. Keep under lock and key and... agent is lit red and the message UNIT CALCIF. Never interrupt the descaling program! Follow the instructions Change settings/ programming - d WARNING d Use care storing and handling descaling agent! Avoid contact with plenty of children. If the appliance is not descaled as instructed, it should be damaged. Filter...
...descaling agent in the settings. If a descaling agent comes into contact with eyes, immediately wash eyes with skin and eyes. Do not use a filter 20 and the message UNIT CALCIF. is displayed, the filter is NOT activated in mouth. Keep under lock and key and... agent is lit red and the message UNIT CALCIF. Never interrupt the descaling program! Follow the instructions Change settings/ programming - d WARNING d Use care storing and handling descaling agent! Avoid contact with plenty of children. If the appliance is not descaled as instructed, it should be damaged. Filter...
Instructions for Use
Page 30
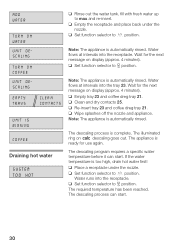
ADD WATER TURN ON WATER UNIT DESCALING TURN ON COFFEE UNIT DESCALING EMPTY TRAYS CLEAN CONTACTS UNIT IS RINSING COFFEE Draining hot water SYSTEM TOO HOT q Rinse out the water tank, fill with fresh water up to 0 position. Water flows at intervals into the tray..., drain hot water first! q Clean and dry contacts 25. The descaling program requires a specific water temperature before it can start . Wait for use again. Water flows at Ăintervals into the receptacle. If the water temperature is automatically rinsed. q Set function selector to U position. The ...
ADD WATER TURN ON WATER UNIT DESCALING TURN ON COFFEE UNIT DESCALING EMPTY TRAYS CLEAN CONTACTS UNIT IS RINSING COFFEE Draining hot water SYSTEM TOO HOT q Rinse out the water tank, fill with fresh water up to 0 position. Water flows at intervals into the tray..., drain hot water first! q Clean and dry contacts 25. The descaling program requires a specific water temperature before it can start . Wait for use again. Water flows at Ăintervals into the receptacle. If the water temperature is automatically rinsed. q Set function selector to U position. The ...

Instructions for Use
Page 31
... the duct. Use a coarser ground coffee. Grinding unit is blocked. The beans are not falling into the grinding unit. Beans are too oily. Use less oily or smaller beans. Use fresh beans. Optimize degree of grinding too fine. The beans are too big or too oily - Unsuitable milk. Degree of grinding. System too hot. Remedial...
... the duct. Use a coarser ground coffee. Grinding unit is blocked. The beans are not falling into the grinding unit. Beans are too oily. Use less oily or smaller beans. Use fresh beans. Optimize degree of grinding too fine. The beans are too big or too oily - Unsuitable milk. Degree of grinding. System too hot. Remedial...

