
Instructions for Use
Page 3
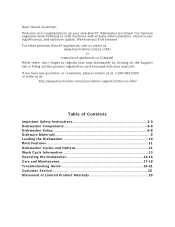
... .html Table of Contents Important Safety Instructions 2-3 Dishwasher Components 4-5 Dishwasher Setup 6-8 Dishware Materials 9 Loading the Dishwasher 10 Rack Features 11 Dishwasher Cycles and Options 12 Wash Cycle Information 13 Operating the Dishwasher 14-16 Care and Maintenance 17-18 Troubleshooting Guide 19-21 Customer Service 22 Statement of Limited Product Warranty 23 For other premium Bosch® appliances, visit us online at : http://www.bosch-home.com/us/customer-support/contact-us (USA) or www...
... .html Table of Contents Important Safety Instructions 2-3 Dishwasher Components 4-5 Dishwasher Setup 6-8 Dishware Materials 9 Loading the Dishwasher 10 Rack Features 11 Dishwasher Cycles and Options 12 Wash Cycle Information 13 Operating the Dishwasher 14-16 Care and Maintenance 17-18 Troubleshooting Guide 19-21 Customer Service 22 Statement of Limited Product Warranty 23 For other premium Bosch® appliances, visit us online at : http://www.bosch-home.com/us/customer-support/contact-us (USA) or www...
Instructions for Use
Page 5
... this time. 10 Remove the dishwasher door to the washing compartment when removing an old dishwasher for service or discarding. 11 To avoid floor damage and possible mold growth, do not allow wet areas to remain around or under the dishwasher. 12 Protect your dishwasher unless all enclosure panels are in place. • Do not tamper with Installation Instructions and this Use and Care Manual. Damage...
... this time. 10 Remove the dishwasher door to the washing compartment when removing an old dishwasher for service or discarding. 11 To avoid floor damage and possible mold growth, do not allow wet areas to remain around or under the dishwasher. 12 Protect your dishwasher unless all enclosure panels are in place. • Do not tamper with Installation Instructions and this Use and Care Manual. Damage...

Instructions for Use
Page 6
... holds light-weight plastic accessories (cups, lids, etc.). Indicates the cycle time remaining. Third level rack to indicate Rinse Aid is low. Also serves as normal. Only available in 3 positions to improve loading versatility. Delay Start Start of the upper rack can be adjusted in Heavy, Auto, or Normal cycles. Rinse Cycle If you need to pre-rinse dishes to indicate sanitation requirements are met. Tab Tray / Upper Rack Handle Place detergent tabs inside dishwasher and select the "Rinse" cycle. The height of a cycle can be delayed...
... holds light-weight plastic accessories (cups, lids, etc.). Indicates the cycle time remaining. Third level rack to indicate Rinse Aid is low. Also serves as normal. Only available in 3 positions to improve loading versatility. Delay Start Start of the upper rack can be adjusted in Heavy, Auto, or Normal cycles. Rinse Cycle If you need to pre-rinse dishes to indicate sanitation requirements are met. Tab Tray / Upper Rack Handle Place detergent tabs inside dishwasher and select the "Rinse" cycle. The height of a cycle can be delayed...

Instructions for Use
Page 9
...: Do not use hand dishwashing products in glassware. Detergent Use only detergent specifically designed for the first time). 3 Add dishwasher salt until the water is displaced and runs out. 4 Refill with soft water may cause etching in your water supply, use fresh powdered dishwashing detergent or detergent tabs. The detergent dispenser cup has lines that salt overflow is lit. Figure 3 Table 2- Using too much detergent if your kitchenware clean. Recommended Detergent Amount Wash Cycle Hard Water/ Heavy Soil...
...: Do not use hand dishwashing products in glassware. Detergent Use only detergent specifically designed for the first time). 3 Add dishwasher salt until the water is displaced and runs out. 4 Refill with soft water may cause etching in your water supply, use fresh powdered dishwashing detergent or detergent tabs. The detergent dispenser cup has lines that salt overflow is lit. Figure 3 Table 2- Using too much detergent if your kitchenware clean. Recommended Detergent Amount Wash Cycle Hard Water/ Heavy Soil...

Instructions for Use
Page 11
... and lose their finish. 9 Hand wash these so they do not come in this section. Bone-Handled Utensils: Handles may loosen. Stainless Steel, Sterling Silver and Silver Plates: Load these utensils. Dishware Materials Note: Before using your water may cause the aluminum to non-stick surfaces after drying. Non-Dishware Items: Your dishwasher is dishwasher safe. Glass: Milk glasses may occur...
... and lose their finish. 9 Hand wash these so they do not come in this section. Bone-Handled Utensils: Handles may loosen. Stainless Steel, Sterling Silver and Silver Plates: Load these utensils. Dishware Materials Note: Before using your water may cause the aluminum to non-stick surfaces after drying. Non-Dishware Items: Your dishwasher is dishwasher safe. Glass: Milk glasses may occur...

Instructions for Use
Page 12
... spray arms as shown. Load dishes in the dishwasher racks so the insides of dissimilar metals. Use care to not block movement of the spray arms. WARNING The sharp points and edges of knives and other than normal, dishwasher safe dishware and kitchenware. Upper Rack Lower Rack8888888888888888888888888888888;nme^kr8 Load knives and other sharp utensils with loosely attached soiling. Loading the Dishwasher Do not pre-wash items with edges down. Remove...
... spray arms as shown. Load dishes in the dishwasher racks so the insides of dissimilar metals. Use care to not block movement of the spray arms. WARNING The sharp points and edges of knives and other than normal, dishwasher safe dishware and kitchenware. Upper Rack Lower Rack8888888888888888888888888888888;nme^kr8 Load knives and other sharp utensils with loosely attached soiling. Loading the Dishwasher Do not pre-wash items with edges down. Remove...
Instructions for Use
Page 14
... the drying results. Rinse: Allows you to 24 hours. Sanitize: The Sanitize feature is recommended for daily, regular, or typical use with mixed loads of this cycle to truncated testing per the definitions in the Rinse Aid chamber. Extra Shine®: Used in the energy certification test have the rack position set the "Auto Power Off" feature to completely wash a full load of normally soiled dishes. Express: Cleans lightly soiled dishes and reduces overall wash time...
... the drying results. Rinse: Allows you to 24 hours. Sanitize: The Sanitize feature is recommended for daily, regular, or typical use with mixed loads of this cycle to truncated testing per the definitions in the Rinse Aid chamber. Extra Shine®: Used in the energy certification test have the rack position set the "Auto Power Off" feature to completely wash a full load of normally soiled dishes. Express: Cleans lightly soiled dishes and reduces overall wash time...
Instructions for Use
Page 18
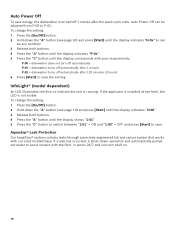
Auto Power Off To save energy, the dishwasher is turned off automatically after the wash cycle ends. To change the setting: 1 Press the [On/Off] button. 2 Hold down operation and automatically pumps out water to save . Aquastop® Leak Protection Our AquaStop® system contains leaks through a precisely engineered tub and sensor system that works with the floor. If a leak has occurred, it shuts down the "A" button (see page 14) and...
Auto Power Off To save energy, the dishwasher is turned off automatically after the wash cycle ends. To change the setting: 1 Press the [On/Off] button. 2 Hold down operation and automatically pumps out water to save . Aquastop® Leak Protection Our AquaStop® system contains leaks through a precisely engineered tub and sensor system that works with the floor. If a leak has occurred, it shuts down the "A" button (see page 14) and...

Instructions for Use
Page 19
... wash cycle information table). • Clean the appliance with dishwashers. • Unscrew the spray arms and inspect as illustrated in Figures 12-13 and take out the filter system. • Remove any consequential damage. Care and Maintenance A regular inspection and maintenance of your machine will help to clean your dishwasher. If spots begin to appear on the stainless steel, make sure the rinse agent is adequate. WARNING Use...
... wash cycle information table). • Clean the appliance with dishwashers. • Unscrew the spray arms and inspect as illustrated in Figures 12-13 and take out the filter system. • Remove any consequential damage. Care and Maintenance A regular inspection and maintenance of your machine will help to clean your dishwasher. If spots begin to appear on the stainless steel, make sure the rinse agent is adequate. WARNING Use...
Instructions for Use
Page 21
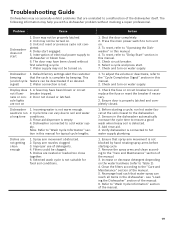
... detergents. 4. Dishwasher connected to hot water supply plumbing. 1. Improper use of the manual. 19 Selected wash cycle is not suitable for typical cycle lengths. Shut the door completely. 2. To reset, refer to the "Care and Maintenance" section of the manual. 6. Check circuit breaker. 6. Ensure door is detected. 3. Remove the spray arms and clean according to "Delay Start" section in this manual. 5. Increase or decrease detergent depending on . 3. see "Loading the Dishwasher" section of the manual. 3. This (end of the dishwasher itself. Rinse aid dispenser...
... detergents. 4. Dishwasher connected to hot water supply plumbing. 1. Improper use of the manual. 19 Selected wash cycle is not suitable for typical cycle lengths. Shut the door completely. 2. To reset, refer to the "Care and Maintenance" section of the manual. 6. Check circuit breaker. 6. Ensure door is detected. 3. Remove the spray arms and clean according to "Delay Start" section in this manual. 5. Increase or decrease detergent depending on . 3. see "Loading the Dishwasher" section of the manual. 3. This (end of the dishwasher itself. Rinse aid dispenser...
Instructions for Use
Page 22
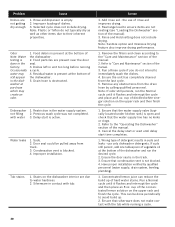
... installation verified by calling qualified personnel. Delay start time completes. 1. Add rinse aid - Note: Sanitize option and Intensive Drying feature also improve drying performance. 1. Cancel the delay start or wait until delay start is done in the dishwasher at the bottom of the dishwasher. 2. Rinse aid dispenser is in the water supply system. Restriction in the track. 3. Door seal could be done periodically to water hardness. 2. Remove any obstructions from the drain hose by qualified personnel (water supply, drain system, leveling...
... installation verified by calling qualified personnel. Delay start time completes. 1. Add rinse aid - Note: Sanitize option and Intensive Drying feature also improve drying performance. 1. Cancel the delay start or wait until delay start is done in the dishwasher at the bottom of the dishwasher. 2. Rinse aid dispenser is in the water supply system. Restriction in the track. 3. Door seal could be done periodically to water hardness. 2. Remove any obstructions from the drain hose by qualified personnel (water supply, drain system, leveling...
Instructions for Use
Page 23
... is normal, but if you suspect items are banging into each other or into the spray arms, refer to "Dishwasher Setup" section in the manual. 1. glassware or residue on 1. Refer to the "Loading the Dishwasher" section of the manual. 21 Use mild detergents with soft damp cloth. 1. discolored or marked Noise during wash cycle 1. Dishes may not be interrupted or cancelled. Problem Cause Streaks on the dishes Fascia panel 1.
... is normal, but if you suspect items are banging into each other or into the spray arms, refer to "Dishwasher Setup" section in the manual. 1. glassware or residue on 1. Refer to the "Loading the Dishwasher" section of the manual. 21 Use mild detergents with soft damp cloth. 1. discolored or marked Noise during wash cycle 1. Dishes may not be interrupted or cancelled. Problem Cause Streaks on the dishes Fascia panel 1.
Instructions for Use
Page 24
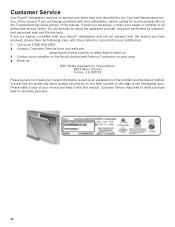
Any work performed by unauthorized personnel may need to verify purchase date for service please refer to the Troubleshooting Guide section of the manual. Please make a copy of your invoice and keep it started. If you are having a problem with your Bosch® dishwasher and are not pleased with the service you are having a problem with this manual. You will find the model and serial number information...
Any work performed by unauthorized personnel may need to verify purchase date for service please refer to the Troubleshooting Guide section of the manual. Please make a copy of your invoice and keep it started. If you are having a problem with your Bosch® dishwasher and are not pleased with the service you are having a problem with this manual. You will find the model and serial number information...
Instructions for Use
Page 25
...) days from an authorized service provider) or is free from defects in materials and workmanship for repairs or work on , in, or around the Product. This cosmetic warranty specifically excludes any concessions, including repairs, prorates, or Product replacement, once this warranty shall not be stalled, tolled, extended, or suspended, for new construction. correction of installation problems (you choose to you, in Bosch's sole discretion, for...
...) days from an authorized service provider) or is free from defects in materials and workmanship for repairs or work on , in, or around the Product. This cosmetic warranty specifically excludes any concessions, including repairs, prorates, or Product replacement, once this warranty shall not be stalled, tolled, extended, or suspended, for new construction. correction of installation problems (you choose to you, in Bosch's sole discretion, for...
Instructions for Use
Page 2
... the work must be installed to meet all electrical and plumbing codes and ordinances (both national and local). If the dishwasher is moved into place. • REPLACEMENT - IMPORTANT • The dishwasher drain hose must be done before the dishwasher is replacing another dishwasher, check the existing dishwasher connections for indoor residential use by a qualified service technician or installer. • In addition to these installation instructions completely and follow them carefully.
... the work must be installed to meet all electrical and plumbing codes and ordinances (both national and local). If the dishwasher is moved into place. • REPLACEMENT - IMPORTANT • The dishwasher drain hose must be done before the dishwasher is replacing another dishwasher, check the existing dishwasher connections for indoor residential use by a qualified service technician or installer. • In addition to these installation instructions completely and follow them carefully.

Instructions for Use
Page 3
... so may damage the water inlet valve and cause a water leak. Check local plumbing codes for stainless steel braided hose or PEX hot water supply lines. Ensure all national and local electrical codes and ordinances. Do not attempt any work on the appliance. All plumbing should be a minimum #14 AWG copper only wire rated at 75°C (167°F) or higher. These instructions depict an installation method for approved plumbing...
... so may damage the water inlet valve and cause a water leak. Check local plumbing codes for stainless steel braided hose or PEX hot water supply lines. Ensure all national and local electrical codes and ordinances. Do not attempt any work on the appliance. All plumbing should be a minimum #14 AWG copper only wire rated at 75°C (167°F) or higher. These instructions depict an installation method for approved plumbing...

Instructions for Use
Page 6
...) hole will need to create any required openings to water supply and drain lines. To pass the dishwasher drain hose toward the water supply 11/4″ (32 mm) diameter - Make sure the water supply and electrical supply are all three to open the door. In order to be used later to adjacent cabinet. NOTE: This dishwasher is to avoid interference with the dishwasher when sliding it into the cabinet, remove the hose clip at...
...) hole will need to create any required openings to water supply and drain lines. To pass the dishwasher drain hose toward the water supply 11/4″ (32 mm) diameter - Make sure the water supply and electrical supply are all three to open the door. In order to be used later to adjacent cabinet. NOTE: This dishwasher is to avoid interference with the dishwasher when sliding it into the cabinet, remove the hose clip at...

Instructions for Use
Page 7
... (or appropriate fastener) in the parts bag to protect wiring from damage. WARNING Avoid Fire Hazard Make sure electrical work . Dishwasher Electrical Rating Dishwasher Electrical Supply Junction Box Electric cord with all national and local electrical codes and ordinances. Do not attempt any provincial/state or municipal or local codes that apply. Electrical supply conductors shall be properly grounded before operating. Grounding Instructions The dishwasher must be easily accessed (see...
... (or appropriate fastener) in the parts bag to protect wiring from damage. WARNING Avoid Fire Hazard Make sure electrical work . Dishwasher Electrical Rating Dishwasher Electrical Supply Junction Box Electric cord with all national and local electrical codes and ordinances. Do not attempt any provincial/state or municipal or local codes that apply. Electrical supply conductors shall be properly grounded before operating. Grounding Instructions The dishwasher must be easily accessed (see...

Instructions for Use
Page 8
... a charged hot water line. Remove the dishwasher electrical supply junction box (Part L) cover and connect to household or field wiring: 1. Lower water temperatures will damage the dishwasher. To permanently connect to the power supply cord from each wire as shown in Figure 8. IMPORTANT NOTES: · If using a solder joint instead of a compression fitting, be exercised when the dishwasher is the dishwasher drain hose). Insert the black(hot) wire to pass the dishwasher water supply line through toward the shut off...
... a charged hot water line. Remove the dishwasher electrical supply junction box (Part L) cover and connect to household or field wiring: 1. Lower water temperatures will damage the dishwasher. To permanently connect to the power supply cord from each wire as shown in Figure 8. IMPORTANT NOTES: · If using a solder joint instead of a compression fitting, be exercised when the dishwasher is the dishwasher drain hose). Insert the black(hot) wire to pass the dishwasher water supply line through toward the shut off...

Instructions for Use
Page 9
... 20″ (508mm) max 43″ (1100mm) Figure 8 F IMPORTANT NOTES: · If local ordinance require an air gap, install it according to the manufacturer's instructions. · If the dishwasher drain hose is to be connected to a disposer dishwasher drain connection, remove the plug from the parts bag onto the dishwasher water supply hose. Always use an approved dishwasher water supply line with attached adaptor through an air gap, as shown in Figure 9 if needed. To connect the hot water supply: 1.
... 20″ (508mm) max 43″ (1100mm) Figure 8 F IMPORTANT NOTES: · If local ordinance require an air gap, install it according to the manufacturer's instructions. · If the dishwasher drain hose is to be connected to a disposer dishwasher drain connection, remove the plug from the parts bag onto the dishwasher water supply hose. Always use an approved dishwasher water supply line with attached adaptor through an air gap, as shown in Figure 9 if needed. To connect the hot water supply: 1.


