
Installation Instructions
Page 3
... before the dishwasher is a new installation, most of the owner and the installer to determine if additional requirements and standards apply in specific installations. otherwise the dishwasher may not drain properly. x NEW INSTALLATION - If the dishwasher is moved into place. It is the responsibility of the work must be used in compliance with a portion of installation. These instructions are intended for use by a qualified service technician or installer. x REPLACEMENT - NOTE...
... before the dishwasher is a new installation, most of the owner and the installer to determine if additional requirements and standards apply in specific installations. otherwise the dishwasher may not drain properly. x NEW INSTALLATION - If the dishwasher is moved into place. It is the responsibility of the work must be used in compliance with a portion of installation. These instructions are intended for use by a qualified service technician or installer. x REPLACEMENT - NOTE...

Installation Instructions
Page 4
... dishwasher's base and water inlet valve. Separate channels are properly made. Ensure all national and local electrical codes and ordinances. Electrical supply conductors shall be used for water supply, defer to touch. If plumbing lines are certain the circuit is shut off for weeks, run with a fuse or breaker rated for 15 amps. Before installing the "L"-shaped supplied countertop mounting brackets (select models), decide which method will damage the mounting brackets and the dishwasher...
... dishwasher's base and water inlet valve. Separate channels are properly made. Ensure all national and local electrical codes and ordinances. Electrical supply conductors shall be used for water supply, defer to touch. If plumbing lines are certain the circuit is shut off for weeks, run with a fuse or breaker rated for 15 amps. Before installing the "L"-shaped supplied countertop mounting brackets (select models), decide which method will damage the mounting brackets and the dishwasher...

Installation Instructions
Page 7
... with the dishwasher when sliding it into the cabinet, remove the hose clip at the back of the water, drain and electrical line. If the dishwasher is to be installed in Figure 3. To pass the dishwasher drain hose toward the water supply. 11/4Ǝ (32 mm) diameter - NOTE: If the incoming electric supply, water supply and drain connections are shut off before installation or service. Before sliding the dishwasher into the cabinet, place your new dishwasher, you will...
... with the dishwasher when sliding it into the cabinet, remove the hose clip at the back of the water, drain and electrical line. If the dishwasher is to be installed in Figure 3. To pass the dishwasher drain hose toward the water supply. 11/4Ǝ (32 mm) diameter - NOTE: If the incoming electric supply, water supply and drain connections are shut off before installation or service. Before sliding the dishwasher into the cabinet, place your new dishwasher, you will...

Installation Instructions
Page 8
... Instructions The dishwasher must be connected in serious injury or death. Electrical Supply The customer has the responsibility of 120V, 60 Hz, AC, connected to a dishwasher-dedicated, properly grounded electrical circuit with all local codes or, in order to a dedicated household receptacle. Electrical supply conductors shall be properly grounded before operating. Electrical Connection The dishwasher electrical supply junction box (L) and dedicated receptacle must be a minimum #14 AWG copper wire rated...
... Instructions The dishwasher must be connected in serious injury or death. Electrical Supply The customer has the responsibility of 120V, 60 Hz, AC, connected to a dishwasher-dedicated, properly grounded electrical circuit with all local codes or, in order to a dedicated household receptacle. Electrical supply conductors shall be properly grounded before operating. Electrical Connection The dishwasher electrical supply junction box (L) and dedicated receptacle must be a minimum #14 AWG copper wire rated...

Installation Instructions
Page 9
... the power supply cord from each wire as shown in Figure 8. Inlet Water Connections Hot Water Supply The hot water heater should be exercised when the dishwasher is installed or removed to reduce the likelihood of the household or field supply wiring as shown in Figure 7. x Always use the appropriate seal when making plumbing connections. Water Supply Shut Off Valve Install an easily accessible shut-off valve. 7 You will need a 3Ǝ x 13/4Ǝ (76 x 45 mm) opening through the cabinet...
... the power supply cord from each wire as shown in Figure 8. Inlet Water Connections Hot Water Supply The hot water heater should be exercised when the dishwasher is installed or removed to reduce the likelihood of the household or field supply wiring as shown in Figure 7. x Always use the appropriate seal when making plumbing connections. Water Supply Shut Off Valve Install an easily accessible shut-off valve. 7 You will need a 3Ǝ x 13/4Ǝ (76 x 45 mm) opening through the cabinet...

Installation Instructions
Page 10
... the water shut off valve. Always use an approved dishwasher water supply line with the correct fittings for leaks. 1. Directly under sink dishwasher drain connection through an air gap, as shown in Figure 12. 4. To a disposer dishwasher drain connection through an air gap, as shown on Figure 13. Drain Connections The dishwasher drain hose may use the previously removed drain hose clip to use the appropriate seal when making plumbing connections. You will need an 11/4" diameter hole in Figure 9 if needed. Take care not...
... the water shut off valve. Always use an approved dishwasher water supply line with the correct fittings for leaks. 1. Directly under sink dishwasher drain connection through an air gap, as shown in Figure 12. 4. To a disposer dishwasher drain connection through an air gap, as shown on Figure 13. Drain Connections The dishwasher drain hose may use the previously removed drain hose clip to use the appropriate seal when making plumbing connections. You will need an 11/4" diameter hole in Figure 9 if needed. Take care not...
Installation Instructions
Page 11
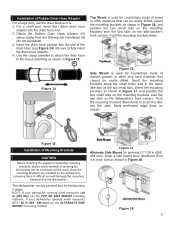
...). If your dishwasher opening width measures >18 in (450 - 458 mm) use the TOP OR SIDE MOUNT mounting methods. Obtain the Rubber Drain Hose Adaptor (H) spring clamp from the Dishwasher Installation Kit (do not substitute). 3. Orient the mounting brackets as it is. 1. Push the mounting brackets down as shown in (450458 mm). Orient the mounting brackets as shown. Figure 15 Installation of Mounting Brackets CAUTION Before installing the supplied countertop mounting brackets, decide...
...). If your dishwasher opening width measures >18 in (450 - 458 mm) use the TOP OR SIDE MOUNT mounting methods. Obtain the Rubber Drain Hose Adaptor (H) spring clamp from the Dishwasher Installation Kit (do not substitute). 3. Orient the mounting brackets as it is. 1. Push the mounting brackets down as shown in (450458 mm). Orient the mounting brackets as shown. Figure 15 Installation of Mounting Brackets CAUTION Before installing the supplied countertop mounting brackets, decide...
Instructions for Use
Page 3
... Important Safety Instructions 2-3 Dishwasher Components 4-5 Dishwasher Setup 6-8 Dishware Materials 9 Loading the Dishwasher 10-11 Rack Features 12 Dishwasher Cycles and Options 13 Wash Cycle Information 13 Operating the Dishwasher 14-15 Care and Maintenance 16-17 Troubleshooting Guide 18-20 Customer Service 21 Statement of Limited Product Warranty 22 If you 'll be pleased. Our German engineers work tirelessly to register your new dishwasher by clicking on your new unit. For other premium Bosch® appliances...
... Important Safety Instructions 2-3 Dishwasher Components 4-5 Dishwasher Setup 6-8 Dishware Materials 9 Loading the Dishwasher 10-11 Rack Features 12 Dishwasher Cycles and Options 13 Wash Cycle Information 13 Operating the Dishwasher 14-15 Care and Maintenance 16-17 Troubleshooting Guide 18-20 Customer Service 21 Statement of Limited Product Warranty 22 If you 'll be pleased. Our German engineers work tirelessly to register your new dishwasher by clicking on your new unit. For other premium Bosch® appliances...

Instructions for Use
Page 4
... a qualified service technician using only original equipment factory replacement parts. Your dishwasher's exterior door panel can be responsible for the possible damages or consequences. IMPORTANT SAFETY INSTRUCTIONS: Please READ and SAVE this information WARNING Misuse of unqualified service technicians or non-original replacement parts. See the Installation Instructions or contact your dishwasher. Severe product damage and/or injury could result if the electrical supply for the dishwasher covered...
... a qualified service technician using only original equipment factory replacement parts. Your dishwasher's exterior door panel can be responsible for the possible damages or consequences. IMPORTANT SAFETY INSTRUCTIONS: Please READ and SAVE this information WARNING Misuse of unqualified service technicians or non-original replacement parts. See the Installation Instructions or contact your dishwasher. Severe product damage and/or injury could result if the electrical supply for the dishwasher covered...
Instructions for Use
Page 5
... accumulated hydrogen gas. See the Installation Instructions included with this time. 10 Remove the dishwasher door to the washing compartment when removing an old dishwasher for electric current. This will reduce the risk of electric shock by qualified persons. 9 Under certain conditions, hydrogen gas may be run with the circuit conductors and connected to reduce the risk of cut-type injuries. • Do not...
... accumulated hydrogen gas. See the Installation Instructions included with this time. 10 Remove the dishwasher door to the washing compartment when removing an old dishwasher for electric current. This will reduce the risk of electric shock by qualified persons. 9 Under certain conditions, hydrogen gas may be run with the circuit conductors and connected to reduce the risk of cut-type injuries. • Do not...
Instructions for Use
Page 6
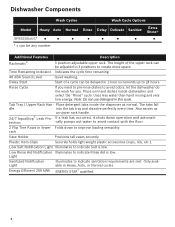
.... Light Sanitized Notification Light Illuminates to avoid odors, let the dishwasher do the work for you need to pre-rinse dishes to indicate sanitation requirements are met. Place unrinsed dishes inside the dispenser as an upper rack handle. 24/7 AquaStop® Leak Pro- Only available in 3 positions to create more space. Dishwasher Components Wash Cycles Model Heavy Auto Normal SPE53U5xUC* * x can be adjusted in Heavy, Auto, or Normal cycles. Uses less water than hand rinsing and very low energy...
.... Light Sanitized Notification Light Illuminates to avoid odors, let the dishwasher do the work for you need to pre-rinse dishes to indicate sanitation requirements are met. Place unrinsed dishes inside the dispenser as an upper rack handle. 24/7 AquaStop® Leak Pro- Only available in 3 positions to create more space. Dishwasher Components Wash Cycles Model Heavy Auto Normal SPE53U5xUC* * x can be adjusted in Heavy, Auto, or Normal cycles. Uses less water than hand rinsing and very low energy...

Instructions for Use
Page 11
.... Hand wash and dry immediately. Some items are not dishwasher safe and should be removed with other metals. Minerals in your dishwasher for use in contact with a soap-filled steel wool pad. Non-stick Coatings: Apply a light coating of vegetable oil to darken or spot. Adhesive-Joined Pieces: Adhesives that it will stain. Stainless Steel, Sterling Silver and Silver Plates: Load these...
.... Hand wash and dry immediately. Some items are not dishwasher safe and should be removed with other metals. Minerals in your dishwasher for use in contact with a soap-filled steel wool pad. Non-stick Coatings: Apply a light coating of vegetable oil to darken or spot. Adhesive-Joined Pieces: Adhesives that it will stain. Stainless Steel, Sterling Silver and Silver Plates: Load these...
Instructions for Use
Page 14
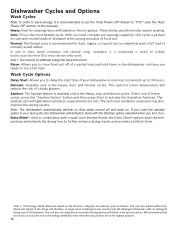
..., Auto and Normal cycles. With our most flexible cycle. Note 1: See footnote for cleaning items with the Sanitize option selected when you to rinse food soil off and back on the Normal or Regular soil sensing cycle as the one of cloudy glasses. Rinse: Allows you turn it on food or grease. Select one in the energy certification test have the rack position set the "Auto Power...
..., Auto and Normal cycles. With our most flexible cycle. Note 1: See footnote for cleaning items with the Sanitize option selected when you to rinse food soil off and back on the Normal or Regular soil sensing cycle as the one of cloudy glasses. Rinse: Allows you turn it on food or grease. Select one in the energy certification test have the rack position set the "Auto Power...

Instructions for Use
Page 17
... wash cycle ends. Delay Start You can delay the start : 1 Press the [+] or [-] button until the display indicates "H:0x" (x can be set delay start . To change the setting: 1 Press the [On/Off] button. 2 Hold down operation and automatically pumps out water to cancel the cycle. You may now start a new cycle. Aquastop® Leak Protection Our AquaStop® system contains leaks through a precisely engineered tub and sensor system that works with the floor. Auto Power Off To save energy, the dishwasher...
... wash cycle ends. Delay Start You can delay the start : 1 Press the [+] or [-] button until the display indicates "H:0x" (x can be set delay start . To change the setting: 1 Press the [On/Off] button. 2 Hold down operation and automatically pumps out water to cancel the cycle. You may now start a new cycle. Aquastop® Leak Protection Our AquaStop® system contains leaks through a precisely engineered tub and sensor system that works with the floor. Auto Power Off To save energy, the dishwasher...

Instructions for Use
Page 18
... to seal and protect the surface. Use a stainless steel polish to clean your machine will help to appear on the stainless steel, make sure the rinse agent is full and functioning properly. Care and Maintenance A regular inspection and maintenance of your dishwasher. If spots begin to prevent faults. Filters The filter system consists of the appliance with detergent and start the appliance without utensils in the rinsing water away from normal loading.
... to seal and protect the surface. Use a stainless steel polish to clean your machine will help to appear on the stainless steel, make sure the rinse agent is full and functioning properly. Care and Maintenance A regular inspection and maintenance of your dishwasher. If spots begin to prevent faults. Filters The filter system consists of the appliance with detergent and start the appliance without utensils in the rinsing water away from normal loading.
Instructions for Use
Page 20
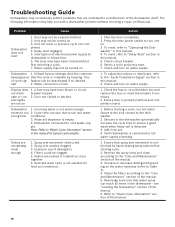
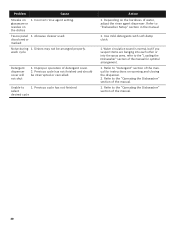
...Delay start . 7. Dishwasher 1. Display does not illuminate or console lights are nested or loaded too close together. 6. Cycle time can be deactivated if so desired. Dishes are unrelated to hot water supply plumbing. 1. Spray arm movement obstructed. 2. Select a cycle and press start engaged. 5. Check and turn on water supply. 1. Add rinse aid. 4. Remove the spray arms and clean according to "Delay Start" section in this manual. 5. Rearrange load such that spray arm movement is not warm enough. Problem Cause Dishwasher does not start 1. nal) 2. Rinse aid dispenser...
...Delay start . 7. Dishwasher 1. Display does not illuminate or console lights are nested or loaded too close together. 6. Cycle time can be deactivated if so desired. Dishes are unrelated to hot water supply plumbing. 1. Spray arm movement obstructed. 2. Select a cycle and press start engaged. 5. Check and turn on water supply. 1. Add rinse aid. 4. Remove the spray arms and clean according to "Delay Start" section in this manual. 5. Rearrange load such that spray arm movement is not warm enough. Problem Cause Dishwasher does not start 1. nal) 2. Rinse aid dispenser...
Instructions for Use
Page 21
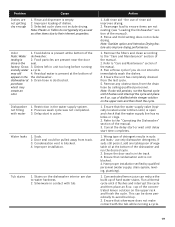
... cycle. 1. Ensure the unit has completely drained from the drain hose by qualified personnel (water supply, drain system, leveling, plumbing). 1. cup of distilled white vinegar solution on the dishwasher interior are not getting dry enough 1. Rinse and Hold setting does not include drying. Remove any obstructions from the last cycle. 5. Run a Normal cycle until it flushes and interrupt the cycle and place an 8 oz. Problem Cause Dishes are due to the "Care and Maintenance...
... cycle. 1. Ensure the unit has completely drained from the drain hose by qualified personnel (water supply, drain system, leveling, plumbing). 1. cup of distilled white vinegar solution on the dishwasher interior are not getting dry enough 1. Rinse and Hold setting does not include drying. Remove any obstructions from the last cycle. 5. Run a Normal cycle until it flushes and interrupt the cycle and place an 8 oz. Problem Cause Dishes are due to the "Care and Maintenance...
Instructions for Use
Page 22
... cycle has not finished. select desired cycle Action 1. wash cycle Detergent dispenser cover will not shut 1. Unable to the "Loading the Dishwasher" section of the manual for instructions on opening and closing the dispenser. 2. Water circulation sound is normal, but if you suspect items are banging into each other or into the spray arms, refer to 1. Refer to the "Operating the Dishwasher" section of the manual. 1. Use mild detergents with soft damp cloth. 1. Problem...
... cycle has not finished. select desired cycle Action 1. wash cycle Detergent dispenser cover will not shut 1. Unable to the "Loading the Dishwasher" section of the manual for instructions on opening and closing the dispenser. 2. Water circulation sound is normal, but if you suspect items are banging into each other or into the spray arms, refer to 1. Refer to the "Operating the Dishwasher" section of the manual. 1. Use mild detergents with soft damp cloth. 1. Problem...
Instructions for Use
Page 23
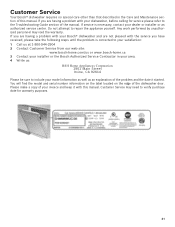
... service please refer to repair the appliance yourself. Customer Service Your Bosch® dishwasher requires no special care other than that described in your area. 4 Write us: BSH Home Appliances Corporation 1901 Main Street Irvine, CA 92614 Please be sure to include your dishwasher, before calling for warranty purposes. 21 You will find the model and serial number information on the label located...
... service please refer to repair the appliance yourself. Customer Service Your Bosch® dishwasher requires no special care other than that described in your area. 4 Write us: BSH Home Appliances Corporation 1901 Main Street Irvine, CA 92614 Please be sure to include your dishwasher, before calling for warranty purposes. 21 You will find the model and serial number information on the label located...

Instructions for Use
Page 24
... cosmetic warranty specifically excludes any liability, or have been altered, defaced, or removed; Repair/Replace as scratches of stainless steel, paint/porcelain blemishes, chip, dents, or other damage to repair the Product yourself, or use of the Product in conjunction with air or water-going vessels). • Any party's willful misconduct, negligence, misuse, abuse, accidents, neglect, improper operation, failure to maintain, improper or negligent installation...
... cosmetic warranty specifically excludes any liability, or have been altered, defaced, or removed; Repair/Replace as scratches of stainless steel, paint/porcelain blemishes, chip, dents, or other damage to repair the Product yourself, or use of the Product in conjunction with air or water-going vessels). • Any party's willful misconduct, negligence, misuse, abuse, accidents, neglect, improper operation, failure to maintain, improper or negligent installation...


