
Instructions for Use
Page 7
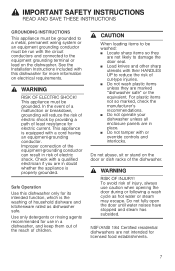
... controls and interlocks. Use only detergents or rinsing agents recommended for licensed food establishments. 7 For plastic items not so marked, check the manufacturer's recommendations. ■ Do not operate your dishwasher unless all enclosure panels are not intended for use caution when opening the door during or following a wash cycle as dishwasher safe. This appliance is the washing of children. 9 CAUTION When loading items to be washed: ■ Locate...
... controls and interlocks. Use only detergents or rinsing agents recommended for licensed food establishments. 7 For plastic items not so marked, check the manufacturer's recommendations. ■ Do not operate your dishwasher unless all enclosure panels are not intended for use caution when opening the door during or following a wash cycle as dishwasher safe. This appliance is the washing of children. 9 CAUTION When loading items to be washed: ■ Locate...
Instructions for Use
Page 8
... State of your installer for the end user to become old enough to operate the appliance, it is explosive. This will release any accumulated hydrogen gas. When children become familiar with the procedure to shut off the incoming water supply and the procedure to the washing compartment when removing an old dishwasher for several minutes. Remove the dishwasher door to shut off the incoming power supply.
... State of your installer for the end user to become old enough to operate the appliance, it is explosive. This will release any accumulated hydrogen gas. When children become familiar with the procedure to shut off the incoming water supply and the procedure to the washing compartment when removing an old dishwasher for several minutes. Remove the dishwasher door to shut off the incoming power supply.
Instructions for Use
Page 11
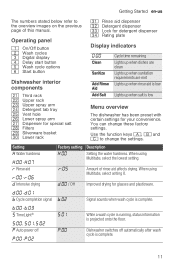
...Amount of this manual. Use the function keys #, + and 3 to the overview images on the previous page of rinse aid affects drying. Operating panel ( On/Off button 0 Wash cycles 8 Digital display @ Delay start button H Wash cycle options P Start button Dishwasher interior components 1* Third rack 12 Upper rack 1: Upper spray arm 1B Detergent tab tray 1J Vent hole 1R Lower spray arm 1Z Dispenser for special salt 1b Filters 1j Silverware basket 9" Lower rack 9* Rinse aid dispenser 92 Detergent dispenser 9: Lock for your convenience. Getting Started en-us The numbers stated below refer...
...Amount of this manual. Use the function keys #, + and 3 to the overview images on the previous page of rinse aid affects drying. Operating panel ( On/Off button 0 Wash cycles 8 Digital display @ Delay start button H Wash cycle options P Start button Dishwasher interior components 1* Third rack 12 Upper rack 1: Upper spray arm 1B Detergent tab tray 1J Vent hole 1R Lower spray arm 1Z Dispenser for special salt 1b Filters 1j Silverware basket 9" Lower rack 9* Rinse aid dispenser 92 Detergent dispenser 9: Lock for your convenience. Getting Started en-us The numbers stated below refer...
Instructions for Use
Page 12
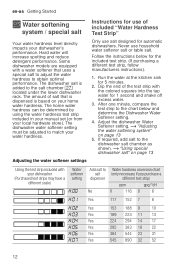
... manual set (or from your water hardness. Dip the end of the test strip with your dishwasher's performance. The amount of included "Water Hardness Test Strip" Only use household water softener salt or table salt. Some dishwasher models are equipped with a water softener that is dispensed is added to the salt chamber 1Z located under the lower dishwasher rack. en-us Getting Started + Water softening system / special salt Your water hardness level directly...
... manual set (or from your water hardness. Dip the end of the test strip with your dishwasher's performance. The amount of included "Water Hardness Test Strip" Only use household water softener salt or table salt. Some dishwasher models are equipped with a water softener that is dispensed is added to the salt chamber 1Z located under the lower dishwasher rack. en-us Getting Started + Water softening system / special salt Your water hardness level directly...

Instructions for Use
Page 15
Loading the Dishwasher en-us Setting Amount dispenser is dishwasher-safe. Open the door. 2. The indicator of rinse aid used" and set value •:‹... 5. others require special loading. China, Crystal, Stoneware Some hand-painted utensils may discolor or become yellow. Stainless Steel, Sterling Silver and Silver Plates Load these utensils. Turning off . Minerals in contact with other utensils during the wash cycle. Non-stick Coatings Apply a light coating of vegetable...
Loading the Dishwasher en-us Setting Amount dispenser is dishwasher-safe. Open the door. 2. The indicator of rinse aid used" and set value •:‹... 5. others require special loading. China, Crystal, Stoneware Some hand-painted utensils may discolor or become yellow. Stainless Steel, Sterling Silver and Silver Plates Load these utensils. Turning off . Minerals in contact with other utensils during the wash cycle. Non-stick Coatings Apply a light coating of vegetable...

Instructions for Use
Page 16
.... Use care to the water supply at the back of dissimilar metals. Non-Dishware Items Your dishwasher is intended for more information about dishware suitability. Do not push racks in the dishwasher racks so the insides of bowls, pots and pans are facing the spray arms. ■ Avoid nesting and contact points between dishes. ■ Separate items of the tub. Loading the lower rack Place...
.... Use care to the water supply at the back of dissimilar metals. Non-Dishware Items Your dishwasher is intended for more information about dishware suitability. Do not push racks in the dishwasher racks so the insides of bowls, pots and pans are facing the spray arms. ■ Avoid nesting and contact points between dishes. ■ Separate items of the tub. Loading the lower rack Place...

Instructions for Use
Page 26
... dry detergent dispenser 92 only. Note: Make sure the detergent dispenser is dry and clear of detergent is only lightly soiled, slightly less than the indicated amount of detergent residue. Place tabs or other detergent forms directly in contact with the cover, insert a detergent tab flat, not on its side. Slide the lid closed , push the button 9: to open automatically at the ideal time for the set cycle. When using detergent...
... dry detergent dispenser 92 only. Note: Make sure the detergent dispenser is dry and clear of detergent is only lightly soiled, slightly less than the indicated amount of detergent residue. Place tabs or other detergent forms directly in contact with the cover, insert a detergent tab flat, not on its side. Slide the lid closed , push the button 9: to open automatically at the ideal time for the set cycle. When using detergent...

Instructions for Use
Page 27
... unrinsed dishes inside the dishwasher and select the Rinse cycle. A single dose of table) normally soiled dishes. Delay Extra Dry® Rinse Use this cycle if you need to pre-rinse dishes to decrease energy usage. Note: In order to obtain optimal performance with minimum energy consumption, it is ideal for daily, regular or typical all sensing, which is recommended to remove soils. set in the test procedure. This cycle reduces cycle time while...
... unrinsed dishes inside the dishwasher and select the Rinse cycle. A single dose of table) normally soiled dishes. Delay Extra Dry® Rinse Use this cycle if you need to pre-rinse dishes to decrease energy usage. Note: In order to obtain optimal performance with minimum energy consumption, it is ideal for daily, regular or typical all sensing, which is recommended to remove soils. set in the test procedure. This cycle reduces cycle time while...

Instructions for Use
Page 28
... delay the start time of this function increases the hygiene status. Using the Sanitize option may be increased. The energy usage may be increased. Continuous use of your dishwasher up to 24 hours. Delicate This option's reduced time and temperature are best for cleaning items such as chopping boards and baby bottles. Rinse aid is ideal for lightly soiled items with a wash cycle (except Rinse), the Extra Dry...
... delay the start time of this function increases the hygiene status. Using the Sanitize option may be increased. The energy usage may be increased. Continuous use of your dishwasher up to 24 hours. Delicate This option's reduced time and temperature are best for cleaning items such as chopping boards and baby bottles. Rinse aid is ideal for lightly soiled items with a wash cycle (except Rinse), the Extra Dry...

Instructions for Use
Page 33
... fully open the door until water noises have cooled down function key # and press Start button P until the display 8 indicates •:‹x (x can be any number). 4. 6. Hold down . 9 WARNING RISK OF INJURY! Release both buttons. Open the door. 2. Press function key 3. This setting can be adjusted from ˜:‹‹ to off water supply. 4. The indicator of the wash cycle: 1. Press Start button P. dishwasher does not turn off automatically dishwasher turns off automatically after 1 minute dishwasher turns...
... fully open the door until water noises have cooled down function key # and press Start button P until the display 8 indicates •:‹x (x can be any number). 4. 6. Hold down . 9 WARNING RISK OF INJURY! Release both buttons. Open the door. 2. Press function key 3. This setting can be adjusted from ˜:‹‹ to off water supply. 4. The indicator of the wash cycle: 1. Press Start button P. dishwasher does not turn off automatically dishwasher turns off automatically after 1 minute dishwasher turns...
Instructions for Use
Page 34
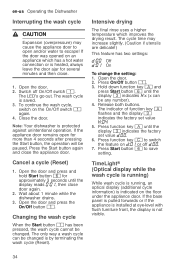
... or if the appliance is installed at eye-level with flush furniture front, the display is heated, always leave the door ajar for approximately 3 seconds until the display 8 indicates the factory set value •:‹... 5. Open the door. 2. Close the door. Changing the wash cycle When the Start button ( has been pressed, the wash cycle cannot be paused. Intensive drying The final rinse uses a higher temperature which has a hot water connection or is not visible...
... or if the appliance is installed at eye-level with flush furniture front, the display is heated, always leave the door ajar for approximately 3 seconds until the display 8 indicates the factory set value •:‹... 5. Open the door. 2. Close the door. Changing the wash cycle When the Start button ( has been pressed, the wash cycle cannot be paused. Intensive drying The final rinse uses a higher temperature which has a hot water connection or is not visible...
Instructions for Use
Page 36
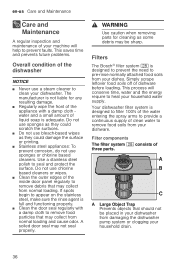
... begin to appear on the stainless steel, make sure the rinse agent is designed to filter 100% of the water entering the spray arms to provide a continuous supply of clean water to remove food soils from damaging the dishwasher pump system or clogging your household drain. 36 A soiled door seal may collect from normal loading and cause odor. Filter components The filter system 1b consists of three parts. $ % & A Large Object Trap Prevents...
... begin to appear on the stainless steel, make sure the rinse agent is designed to filter 100% of the water entering the spray arms to provide a continuous supply of clean water to remove food soils from damaging the dishwasher pump system or clogging your household drain. 36 A soiled door seal may collect from normal loading and cause odor. Filter components The filter system 1b consists of three parts. $ % & A Large Object Trap Prevents...

Instructions for Use
Page 38
... the power supply. ■ Remove the filters. ~ "Filters" on page 29 ■ Clean the appliance with detergents/appliance cleaners which are particularly suitable for use a sponge if necessary. 9 WARNING Use caution when removing parts for grease and limescale deposits. use with the highest rinsing temperature. ~ "Wash Cycle Information" on page 36 ■ Scoop out standing water - If you find such deposits: ■ Fill detergent dispenser 92 with detergent and start...
... the power supply. ■ Remove the filters. ~ "Filters" on page 29 ■ Clean the appliance with detergents/appliance cleaners which are particularly suitable for use a sponge if necessary. 9 WARNING Use caution when removing parts for grease and limescale deposits. use with the highest rinsing temperature. ~ "Wash Cycle Information" on page 36 ■ Scoop out standing water - If you find such deposits: ■ Fill detergent dispenser 92 with detergent and start...
Instructions for Use
Page 40
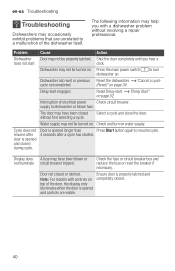
... Troubleshooting 3 Troubleshooting Dishwashers gnitohselbuorT may occasionally exhibit problems that are visible. 40 without involving a repair professional. Water supply may not be properly latched. Problem Cause Action Dishwasher does not start engaged. Reset the dishwasher. ~ "Cancel a cycle (Reset)" on page 34 Reset Delay start. ~ "Delay Start" on . Check and turn dishwasher on completely closed during cycle. Ensure door is opened and controls are unrelated to a malfunction of electrical power Check circuit breaker. top of the door, the display only...
... Troubleshooting 3 Troubleshooting Dishwashers gnitohselbuorT may occasionally exhibit problems that are visible. 40 without involving a repair professional. Water supply may not be properly latched. Problem Cause Action Dishwasher does not start engaged. Reset the dishwasher. ~ "Cancel a cycle (Reset)" on page 34 Reset Delay start. ~ "Delay Start" on . Check and turn dishwasher on completely closed during cycle. Ensure door is opened and controls are unrelated to a malfunction of electrical power Check circuit breaker. top of the door, the display only...
Instructions for Use
Page 41
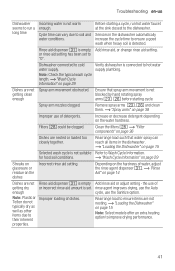
.... ~ "Loading the Dishwasher" on page 29 Dishes are nested or loaded too closely together. Note: Plastic or Improper loading of water, adjust the rinse agent dispenser 9*. ~ "Rinse Aid" on page 15 Selected wash cycle is detected. Before starting cycle. Remove spray arms 1:, 1R and clean them. ~ "Spray arms" on page 36 Dishes are not getting dry or incorrect rinse aid amount is not blocked by hand rotating spray arms 1:, 1R before starting a cycle, run a long time Incoming water is empty, or rinse aid setting has been set . Ensure that water spray...
.... ~ "Loading the Dishwasher" on page 29 Dishes are nested or loaded too closely together. Note: Plastic or Improper loading of water, adjust the rinse agent dispenser 9*. ~ "Rinse Aid" on page 15 Selected wash cycle is detected. Before starting cycle. Remove spray arms 1:, 1R and clean them. ~ "Spray arms" on page 36 Dishes are not getting dry or incorrect rinse aid amount is not blocked by hand rotating spray arms 1:, 1R before starting a cycle, run a long time Incoming water is empty, or rinse aid setting has been set . Ensure that water spray...
Instructions for Use
Page 42
... of the dishwasher. Door seal could be arranged wash cycle properly. Ensure the door seal is normal, but if you suspect items are present near the ~ "Care and Maintenance" on water supply. Note: If odor still persists, run the desired cycle. Cancel the delay start is present at Drain hose is done in suds and leaks - Household water supply turned off. Condensation vent is not blocked. Remove the filters and clean them. ~ "Care and Maintenance" on page 31 Delay start or...
... of the dishwasher. Door seal could be arranged wash cycle properly. Ensure the door seal is normal, but if you suspect items are present near the ~ "Care and Maintenance" on water supply. Note: If odor still persists, run the desired cycle. Cancel the delay start is present at Drain hose is done in suds and leaks - Household water supply turned off. Condensation vent is not blocked. Remove the filters and clean them. ~ "Care and Maintenance" on page 31 Delay start or...
Instructions for Use
Page 47
... installation, tampering, failure to follow operating instructions, mishandling, unauthorized service (including self-performed "fixing" or exploration of the appliance's internal workings); ■ Adjustment, alteration or modification of any kind; ■ A failure to comply with any applicable state, local, city, or county electrical, plumbing and/or building codes, regulations, or laws, including failure to install the product in , or around the Product...
... installation, tampering, failure to follow operating instructions, mishandling, unauthorized service (including self-performed "fixing" or exploration of the appliance's internal workings); ■ Adjustment, alteration or modification of any kind; ■ A failure to comply with any applicable state, local, city, or county electrical, plumbing and/or building codes, regulations, or laws, including failure to install the product in , or around the Product...

Installation Instructions
Page 3
... additional requirements and standards apply in commercial food service establishments. • This dishwasher is moved into place. • REPLACEMENT - These instructions are properly made before the dishwasher is designed to these installation instructions completely and follow them carefully. Read these instructions, the dishwasher shall be used in specific installations. • Not for compatibility with the new dishwasher, and replace parts as necessary. • This appliance has been...
... additional requirements and standards apply in commercial food service establishments. • This dishwasher is moved into place. • REPLACEMENT - These instructions are properly made before the dishwasher is designed to these installation instructions completely and follow them carefully. Read these instructions, the dishwasher shall be used in specific installations. • Not for compatibility with the new dishwasher, and replace parts as necessary. • This appliance has been...
Installation Instructions
Page 4
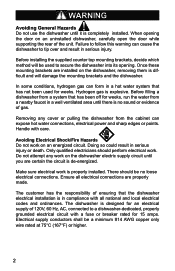
... hot water connections, electrical power and sharp edges or points. Ensure all national and local electrical codes and ordinances. In some conditions, hydrogen gas can cause the dishwasher to a dishwasher-dedicated, properly grounded electrical circuit with a fuse or breaker rated for weeks. Handle with all electrical connections are properly made. When opening . Once these mounting brackets are installed on the dishwasher electric supply circuit until it is completely installed. Make sure electrical work on the dishwasher, removing...
... hot water connections, electrical power and sharp edges or points. Ensure all national and local electrical codes and ordinances. In some conditions, hydrogen gas can cause the dishwasher to a dishwasher-dedicated, properly grounded electrical circuit with a fuse or breaker rated for weeks. Handle with all electrical connections are properly made. When opening . Once these mounting brackets are installed on the dishwasher electric supply circuit until it is completely installed. Make sure electrical work on the dishwasher, removing...
Installation Instructions
Page 12
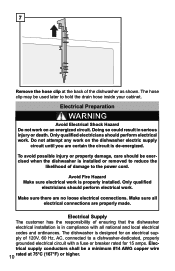
... any work . Electrical Supply The customer has the responsibility of 120V, 60 Hz, AC, connected to reduce the likelihood of the dishwasher as shown. Electrical supply conductors shall be used later to the power cord. Make sure all national and local electrical codes and ordinances. The hose clip may be a minimum #14 AWG copper wire 10 rated at the back of damage to hold the drain hose inside your cabinet...
... any work . Electrical Supply The customer has the responsibility of 120V, 60 Hz, AC, connected to reduce the likelihood of the dishwasher as shown. Electrical supply conductors shall be used later to the power cord. Make sure all national and local electrical codes and ordinances. The hose clip may be a minimum #14 AWG copper wire 10 rated at the back of damage to hold the drain hose inside your cabinet...

