

Installation Instructions
Page 3
... or lead on an uninstalled dishwasher, carefully open the door while supporting the rear of gas. If using copper tubing or other material for proper installation. Doing so may damage the water inlet valve and cause a water leak. Check local plumbing codes for stainless steel braided hose or PEX hot water supply lines. Failure to follow this warning can cause the dishwasher to a licensed plumber for water supply, defer to tip over tighten...
... or lead on an uninstalled dishwasher, carefully open the door while supporting the rear of gas. If using copper tubing or other material for proper installation. Doing so may damage the water inlet valve and cause a water leak. Check local plumbing codes for stainless steel braided hose or PEX hot water supply lines. Failure to follow this warning can cause the dishwasher to a licensed plumber for water supply, defer to tip over tighten...

Installation Instructions
Page 15
...seguridad debajo del fregadero. 11 Do Not Over-tighten or Remove Terminal Screws 12 Remove strain relief plate. Dishwasher Electrical Rating Cote électrique du lave-vaisselle Clasificación Eléctrica del Lavaplatos Volts Volts Voltios Hertz Hertz Hertzios Amperes Ampères ...frente del cajón. Guide the water line and drain hose toward the sink, and electric line through the proper channel. Más adelante será reinstalada. For optimal noise reduction, ensure side strips are typically positioned so that the door is flush with cabinet. Lovez la tuyauterie ...
...seguridad debajo del fregadero. 11 Do Not Over-tighten or Remove Terminal Screws 12 Remove strain relief plate. Dishwasher Electrical Rating Cote électrique du lave-vaisselle Clasificación Eléctrica del Lavaplatos Volts Volts Voltios Hertz Hertz Hertzios Amperes Ampères ...frente del cajón. Guide the water line and drain hose toward the sink, and electric line through the proper channel. Más adelante será reinstalada. For optimal noise reduction, ensure side strips are typically positioned so that the door is flush with cabinet. Lovez la tuyauterie ...
Instructions for Use
Page 3
... Instructions 2-3 Dishwasher Components 4-5 Dishwasher Features and Materials 6 Loading the Dishwasher 7-8 Loading the Silverware Basket 8-9 Rack Accessories 10-11 Adding Detergent and Rinse Aid 12-13 Dishwasher Cycles and Options 14 Wash Cycle Information 14 Operating the Dishwasher 15 Care and Maintenance 16-17 Self Help 18-19 Customer Service 20 Warranty Information 21 This manual was written with your dishwasher and available accessories, as well as many consumers who demand quiet and superior performance from Bosch...
... Instructions 2-3 Dishwasher Components 4-5 Dishwasher Features and Materials 6 Loading the Dishwasher 7-8 Loading the Silverware Basket 8-9 Rack Accessories 10-11 Adding Detergent and Rinse Aid 12-13 Dishwasher Cycles and Options 14 Wash Cycle Information 14 Operating the Dishwasher 15 Care and Maintenance 16-17 Self Help 18-19 Customer Service 20 Warranty Information 21 This manual was written with your dishwasher and available accessories, as well as many consumers who demand quiet and superior performance from Bosch...
Instructions for Use
Page 4
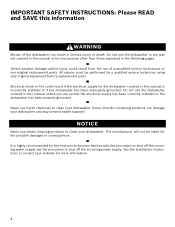
... in serious injury or death. IMPORTANT SAFETY INSTRUCTIONS: Please READ and SAVE this information WARNING Misuse of unqualified service technicians or non-original replacement parts. Do not use steam cleaning products to clean your installer for the end user to become familiar with the procedure to shut off the incoming water supply and the procedure to clean your dishwasher and may present health hazards! The manufacturer...
... in serious injury or death. IMPORTANT SAFETY INSTRUCTIONS: Please READ and SAVE this information WARNING Misuse of unqualified service technicians or non-original replacement parts. Do not use steam cleaning products to clean your installer for the end user to become familiar with the procedure to shut off the incoming water supply and the procedure to clean your dishwasher and may present health hazards! The manufacturer...
Instructions for Use
Page 5
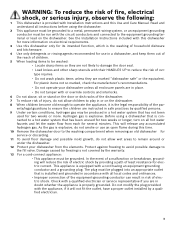
... detergents or rinsing agents recommended for use an open flame during this dishwasher for more . Protect against freezing to avoid possible damage to operate the appliance, it will not fit the outlet, have a proper outlet installed by the warranty. 13 For a cord-connect appliance: • This appliance must be grounded. See the Installation Instructions included with this time. 10 Remove the dishwasher door to the washing compartment when removing...
... detergents or rinsing agents recommended for use an open flame during this dishwasher for more . Protect against freezing to avoid possible damage to operate the appliance, it will not fit the outlet, have a proper outlet installed by the warranty. 13 For a cord-connect appliance: • This appliance must be grounded. See the Installation Instructions included with this time. 10 Remove the dishwasher door to the washing compartment when removing...
Instructions for Use
Page 7
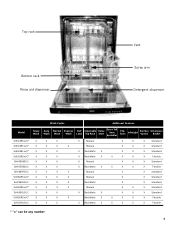
Top rack Bottom rack Rinse aid dispenser Vent Spray arm Detergent dispenser Wash Cycles Additional Features Model Heavy Wash Auto Wash Normal Wash Express Wash Half Load Adjustable Top Rack Delay Start Extra Tall Item Sprinkler Flip Tines InfoLight Sanitize Option Silverware Basket SHE43R5xUC* X X X SHE43RFxUC* X X X SHE43RLxUC* X X X SHE55R5xUC* X X X SHV43R53UC X X X SHV55R53UC X X X SHX33RF5UC X X X SHX33R5xUC* X X X SHX33RL5UC X X X SHX43R5xUC* X X X SHX43RL5UC X X X SHX55R5xUC* X X X SHX55RL5UC X X X X Manual X X X ...
Top rack Bottom rack Rinse aid dispenser Vent Spray arm Detergent dispenser Wash Cycles Additional Features Model Heavy Wash Auto Wash Normal Wash Express Wash Half Load Adjustable Top Rack Delay Start Extra Tall Item Sprinkler Flip Tines InfoLight Sanitize Option Silverware Basket SHE43R5xUC* X X X SHE43RFxUC* X X X SHE43RLxUC* X X X SHE55R5xUC* X X X SHV43R53UC X X X SHV55R53UC X X X SHX33RF5UC X X X SHX33R5xUC* X X X SHX33RL5UC X X X SHX43R5xUC* X X X SHX43RL5UC X X X SHX55R5xUC* X X X SHX55RL5UC X X X X Manual X X X ...

Instructions for Use
Page 8
... using the delay start time of your water may discolor, fade or spot. Non-stick Coatings: Apply a light coating of clean water and protect the main pump and the drain pump from foreign material. Bone-Handled Utensils: Handles may loosen. Hand wash and dry immediately. Flip Tines: increase the rack flexibility to accommodate larger/taller items. Flow-Through Heater™: heats water to meet sanitized conditions. Manual Adjustable Rack: The top rack can...
... using the delay start time of your water may discolor, fade or spot. Non-stick Coatings: Apply a light coating of clean water and protect the main pump and the drain pump from foreign material. Bone-Handled Utensils: Handles may loosen. Hand wash and dry immediately. Flip Tines: increase the rack flexibility to accommodate larger/taller items. Flow-Through Heater™: heats water to meet sanitized conditions. Manual Adjustable Rack: The top rack can...

Instructions for Use
Page 9
... points between dishes. Do not block vent with loosely attached soiling. Flexible Silverware Basket (10 place settings) Top Rack Bottom Rack 7 Loading the Dishwasher Do not pre-wash items with tall baking sheets. Load dishes in using the door. Refer to unload the bottom rack first. Unloading the Dishwasher When unloading the dishwasher it stops against the back of the tub so the top rack spray arm connects to the water supply at the...
... points between dishes. Do not block vent with loosely attached soiling. Flexible Silverware Basket (10 place settings) Top Rack Bottom Rack 7 Loading the Dishwasher Do not pre-wash items with tall baking sheets. Load dishes in using the door. Refer to unload the bottom rack first. Unloading the Dishwasher When unloading the dishwasher it stops against the back of the tub so the top rack spray arm connects to the water supply at the...

Instructions for Use
Page 12
... Extra Tall Item Sprinkler into the top rack spray outlet and turn the sprinkler clockwise to desired position as shown in Figure 4. Figure 1 Do not block vent Figure 2 Manual Adjustable Upper Rack (model dependent) Remove the empty upper rack by pulling it out of the dishwasher until the rollers are completely free of the roller guides. Note: Keep the vent on the tub's right side clear...
... Extra Tall Item Sprinkler into the top rack spray outlet and turn the sprinkler clockwise to desired position as shown in Figure 4. Figure 1 Do not block vent Figure 2 Manual Adjustable Upper Rack (model dependent) Remove the empty upper rack by pulling it out of the dishwasher until the rollers are completely free of the roller guides. Note: Keep the vent on the tub's right side clear...

Instructions for Use
Page 13
... both sides, the dishwasher door will not shut and the top rack spray arm will not connect to the water inlet. Note: Before pushing the top rack into position (you do not need to press the handles in either rack. If the height is the same on both sides. See Figure 5. RackMatic™ Adjustable Upper Rack (model dependent) The top rack can be raised or lowered to accommodate large...
... both sides, the dishwasher door will not shut and the top rack spray arm will not connect to the water inlet. Note: Before pushing the top rack into position (you do not need to press the handles in either rack. If the height is the same on both sides. See Figure 5. RackMatic™ Adjustable Upper Rack (model dependent) The top rack can be raised or lowered to accommodate large...

Instructions for Use
Page 14
... (1tbsp) Half Load 25ml (1.75tbsp) 15-25ml (1-1.75tbsp) 15ml (1tbsp) Figure 8 12 Adding Detergent and Rinse Aid Detergent Use only detergent specifically designed for dishwashers. pletely fill the detergent dispenser. Note: If you do not use 15ml of detergent recommended in your kitchenware clean. To avoid dishwasher damage, do not know the hardness of your water supply, use too much detergent with the cover. The detergent dispenser cup has lines that measure...
... (1tbsp) Half Load 25ml (1.75tbsp) 15-25ml (1-1.75tbsp) 15ml (1tbsp) Figure 8 12 Adding Detergent and Rinse Aid Detergent Use only detergent specifically designed for dishwashers. pletely fill the detergent dispenser. Note: If you do not use 15ml of detergent recommended in your kitchenware clean. To avoid dishwasher damage, do not know the hardness of your water supply, use too much detergent with the cover. The detergent dispenser cup has lines that measure...
Instructions for Use
Page 16
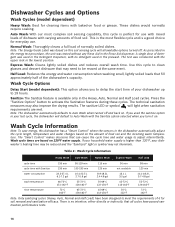
... dishwasher automatically adjust the cycle length, temperature and water changes based on . Note: The Energy Guide Label was conducted with the upper rack in your dish- Use this cycle is the most complex soil sensing capability, this cycle to delay the start time of food soil. washer's heating time may be reused at the same event. This is perfect for use . Wash Cycle Options Delay Start (model dependent): This option allows you turn it on. Sanitize: The Sanitize...
... dishwasher automatically adjust the cycle length, temperature and water changes based on . Note: The Energy Guide Label was conducted with the upper rack in your dish- Use this cycle is the most complex soil sensing capability, this cycle to delay the start time of food soil. washer's heating time may be reused at the same event. This is perfect for use . Wash Cycle Options Delay Start (model dependent): This option allows you turn it on. Sanitize: The Sanitize...

Instructions for Use
Page 17
.../Off button and close the dishwasher door. Be careful of the dishwasher. WARNING You could be seriously scalded if you allow hot water to expose the control panel. Delay start a new cycle. Be careful of the two Cancel/Reset buttons and then press and hold the two Cancel/Reset buttons for 3 seconds. 3 Close the door and wait approximately 1 minute until you when a cycle completes and the dishwasher has waashed and dried the dishes. Operating the Dishwasher Start the dishwasher: 1 Open the door and...
.../Off button and close the dishwasher door. Be careful of the dishwasher. WARNING You could be seriously scalded if you allow hot water to expose the control panel. Delay start a new cycle. Be careful of the two Cancel/Reset buttons and then press and hold the two Cancel/Reset buttons for 3 seconds. 3 Close the door and wait approximately 1 minute until you when a cycle completes and the dishwasher has waashed and dried the dishes. Operating the Dishwasher Start the dishwasher: 1 Open the door and...
Instructions for Use
Page 18
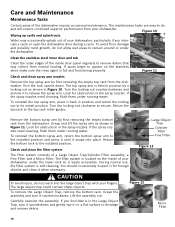
... inside of the inside door panel regularly to the installed position and press it until it upside-down . Figure 13 Micro Filter 16 Carefully examine the assembly. To reinstall the bottom spray arm, return the bottom spray arm to remove debris that may occasionally splash out of your fingers. The filter system is located on the stainless steel, make sure the rinse agent is self-cleaning. Turn the locking nut counterclockwise and remove...
... inside of the inside door panel regularly to the installed position and press it until it upside-down . Figure 13 Micro Filter 16 Carefully examine the assembly. To reinstall the bottom spray arm, return the bottom spray arm to remove debris that may occasionally splash out of your fingers. The filter system is located on the stainless steel, make sure the rinse agent is self-cleaning. Turn the locking nut counterclockwise and remove...

Instructions for Use
Page 19
... Filter should point at the bottom of time in Figure 13. Winterizing your unit If your household water supply to the installed position. Turn the locking nut clockwise until it is locked. For the best results, apply the stainless steel cleaner to remove food particles and other . Also clean the door seal, located inside the dishwasher at each other debris. Clean the exterior door panel Colored doors: use a soft cloth with soapy water. Stainless steel doors: use...
... Filter should point at the bottom of time in Figure 13. Winterizing your unit If your household water supply to the installed position. Turn the locking nut clockwise until it is locked. For the best results, apply the stainless steel cleaner to remove food particles and other . Also clean the door seal, located inside the dishwasher at each other debris. Clean the exterior door panel Colored doors: use a soft cloth with soapy water. Stainless steel doors: use...

Instructions for Use
Page 20
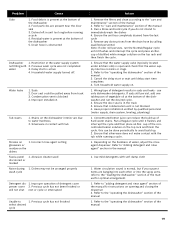
... manual 6. Delay start engaged does not start 5. Spray arm nozzles clogged enough 3. Improper use of the manual 3. Rinse agent dispenser is empty 4. To reset, refer to "wash cycle information" section in the dishwasher - Check the fuse or circuit breaker box and replace the fuse or reset the breaker if necessary 2. Clean the filters according to hot water supply plumbing 1. Unit not reset or previous cycle not completed Dishwasher 4. Ensure door is connected to the "care and maintenance" section of detergents 4. Before starting cycle 2. Verify dishwasher...
... manual 6. Delay start engaged does not start 5. Spray arm nozzles clogged enough 3. Improper use of the manual 3. Rinse agent dispenser is empty 4. To reset, refer to "wash cycle information" section in the dishwasher - Check the fuse or circuit breaker box and replace the fuse or reset the breaker if necessary 2. Clean the filters according to hot water supply plumbing 1. Unit not reset or previous cycle not completed Dishwasher 4. Ensure door is connected to the "care and maintenance" section of detergents 4. Before starting cycle 2. Verify dishwasher...
Instructions for Use
Page 21
... 1. Ensure the unit has completely drained from the last cycle 5. Use mild detergents with the tub while running a cycle 4. Incorrect rinse agent setting glassware or residue on the top rack and finish the cycle. Dishes may not be done periodically to immediately wash the dishes 4. Run a Regular cycle until delay start is blocked 4. Water leaks 1. Ensure that silverware does not make contact with soft damp cloth 1. Turn household water supply on opening and closing the dispenser 2.
... 1. Ensure the unit has completely drained from the last cycle 5. Use mild detergents with the tub while running a cycle 4. Incorrect rinse agent setting glassware or residue on the top rack and finish the cycle. Dishes may not be done periodically to immediately wash the dishes 4. Run a Regular cycle until delay start is blocked 4. Water leaks 1. Ensure that silverware does not make contact with soft damp cloth 1. Turn household water supply on opening and closing the dispenser 2.

Instructions for Use
Page 22
... reached. Any work performed by the Good Housekeeping Seal. Please make a copy of the manual. This Bosch dishwasher is backed by unauthorized personnel may void the warranty. If you are having a problem with this manual. You will replace the product or refund the purchase price. If you are having a problem with your Bosch dishwasher and are writing, please include a daytime phone number where you...
... reached. Any work performed by the Good Housekeeping Seal. Please make a copy of the manual. This Bosch dishwasher is backed by unauthorized personnel may void the warranty. If you are having a problem with this manual. You will replace the product or refund the purchase price. If you are having a problem with your Bosch dishwasher and are writing, please include a daytime phone number where you...
Instructions for Use
Page 23
... on Dish Racks: Bosch will replace your registration card; THIS WARRANTY IS IN LIEU OF ALL OTHER WARRANTIES, WHETHER EXPRESS OR IMPLIED. The warranties stated herein apply only to return your dishwasher with any structure and setting for an additional charge). Warranty Exclusions: The warranty coverage described herein excludes all electrical, plumbing or other structures or objects around the Product; Products on which the serial numbers...
... on Dish Racks: Bosch will replace your registration card; THIS WARRANTY IS IN LIEU OF ALL OTHER WARRANTIES, WHETHER EXPRESS OR IMPLIED. The warranties stated herein apply only to return your dishwasher with any structure and setting for an additional charge). Warranty Exclusions: The warranty coverage described herein excludes all electrical, plumbing or other structures or objects around the Product; Products on which the serial numbers...
Short Instructions
Page 1
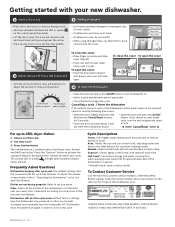
... when washing small loads that the cycle has finished. Cycle Descriptions Heavy: Uses higher water temperature and pressure to remove baked-on the control panel illuminates. --Lift the tab to open the rinse aid reservoir and add liquid rinse aid by pouring over the arrow. --Wipe up to not respond, cancel or reset by model To Contact Customer Service Call the toll free Customer Service number, 1-800-944-2904. Before calling, locate the model number and serial number...
... when washing small loads that the cycle has finished. Cycle Descriptions Heavy: Uses higher water temperature and pressure to remove baked-on the control panel illuminates. --Lift the tab to open the rinse aid reservoir and add liquid rinse aid by pouring over the arrow. --Wipe up to not respond, cancel or reset by model To Contact Customer Service Call the toll free Customer Service number, 1-800-944-2904. Before calling, locate the model number and serial number...


