
Installation Instructions
Page 3
... tighten the 90° elbow. Once these mounting brackets are certain the hot water supply is shut off for soldering and sweating will be a minimum #14 AWG copper only wire rated at least 6 inches (152.4 mm) away from the cabinet can cause the dishwasher to touch. Hydrogen gas is in a well...
... tighten the 90° elbow. Once these mounting brackets are certain the hot water supply is shut off for soldering and sweating will be a minimum #14 AWG copper only wire rated at least 6 inches (152.4 mm) away from the cabinet can cause the dishwasher to touch. Hydrogen gas is in a well...
Instructions for Use
Page 3
To learn more about your dishwasher and available accessories, as well as many consumers who demand quiet and superior performance from Bosch! You have any questions or comments, please contact us at : BSH Home Appliances, Corp. 5551 McFadden Avenue Huntington Beach, CA 92649 Table of... 9 Adding Detergent and Rinse Agent 10-11 Dishwasher Cycles and Options 12 Wash Cycle Information 12 Operating the Dishwasher 13 Care and Maintenance 14-15 Self Help 16-17 Customer Service 18 Warranty Information 19 Congratulations and thank you have joined the many other top quality...
To learn more about your dishwasher and available accessories, as well as many consumers who demand quiet and superior performance from Bosch! You have any questions or comments, please contact us at : BSH Home Appliances, Corp. 5551 McFadden Avenue Huntington Beach, CA 92649 Table of... 9 Adding Detergent and Rinse Agent 10-11 Dishwasher Cycles and Options 12 Wash Cycle Information 12 Operating the Dishwasher 13 Care and Maintenance 14-15 Self Help 16-17 Customer Service 18 Warranty Information 19 Congratulations and thank you have joined the many other top quality...
Instructions for Use
Page 16
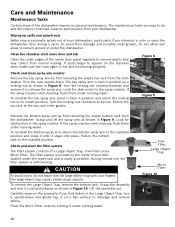
... the assembly and turn it upside-down . If spots begin to secure. Carefully examine the assembly. Fine Filter Large Object Trap Micro Filter Figure 10 14 To reinstall the top spray arm, place it counterclockwise as shown in Figure 10. Flush the Micro Filter clean by first removing the empty top...
... the assembly and turn it upside-down . If spots begin to secure. Carefully examine the assembly. Fine Filter Large Object Trap Micro Filter Figure 10 14 To reinstall the top spray arm, place it counterclockwise as shown in Figure 10. Flush the Micro Filter clean by first removing the empty top...