Installation Instructions
Page 3
... or evidence of gas. Avoiding Electrical Shock/Fire Hazards Do not allow the electrical and water supply lines to secure the dishwasher into its opening the door on the appliance. Before installing the "L"-shaped supplied countertop mounting brackets (select models), decide which... method will damage the mounting brackets and the dishwasher. Doing so could result. All plumbing should be soldered or sweated, keep the heat source at 75°C (167°F) ...
... or evidence of gas. Avoiding Electrical Shock/Fire Hazards Do not allow the electrical and water supply lines to secure the dishwasher into its opening the door on the appliance. Before installing the "L"-shaped supplied countertop mounting brackets (select models), decide which... method will damage the mounting brackets and the dishwasher. Doing so could result. All plumbing should be soldered or sweated, keep the heat source at 75°C (167°F) ...
Instructions for Use
Page 3
... Service 18 Warranty Information 19 Congratulations and thank you from their dishwashers. To learn more about your dishwasher and available accessories, as well as many other top quality Bosch appliances, visit our web site at: www.bosch-home.com/us (USA) or www.bosch-appliances.ca (Canada) If you for the first time. Thank you...
... Service 18 Warranty Information 19 Congratulations and thank you from their dishwashers. To learn more about your dishwasher and available accessories, as well as many other top quality Bosch appliances, visit our web site at: www.bosch-home.com/us (USA) or www.bosch-appliances.ca (Canada) If you for the first time. Thank you...
Instructions for Use
Page 4
...damage and/or injury could result if the electrical supply for the possible damages or consequences. All repairs must be liable for the dishwasher covered in this manual is highly recommended for the end user to become familiar with the procedure to shut off the incoming power ...result in the following pages. Do not use harsh chemicals to shut off the incoming water supply and the procedure to clean your dishwasher and may present health hazards! IMPORTANT SAFETY INSTRUCTIONS: Please READ and SAVE this information WARNING Misuse of unqualified service technicians or non-...
...damage and/or injury could result if the electrical supply for the possible damages or consequences. All repairs must be liable for the dishwasher covered in this manual is highly recommended for the end user to become familiar with the procedure to shut off the incoming power ...result in the following pages. Do not use harsh chemicals to shut off the incoming water supply and the procedure to clean your dishwasher and may present health hazards! IMPORTANT SAFETY INSTRUCTIONS: Please READ and SAVE this information WARNING Misuse of unqualified service technicians or non-...
Instructions for Use
Page 5
...gas is equipped with this Use and Care Manual. For plastic items not so marked, check the manufacturer's recommendations. • Do not operate your dishwasher from each for several minutes. This will reduce the risk of electric shock by the warranty. 13 For a cord-connect appliance: • This...cuttype injuries. • Do not wash plastic items unless they are in risk of least resistance for two weeks or longer, turn on the dishwasher. 8 When children become old enough to the fill valve. Read and understand all local codes and ordinances. • Improper connection of the...
...gas is equipped with this Use and Care Manual. For plastic items not so marked, check the manufacturer's recommendations. • Do not operate your dishwasher from each for several minutes. This will reduce the risk of electric shock by the warranty. 13 For a cord-connect appliance: • This...cuttype injuries. • Do not wash plastic items unless they are in risk of least resistance for two weeks or longer, turn on the dishwasher. 8 When children become old enough to the fill valve. Read and understand all local codes and ordinances. • Improper connection of the...
Instructions for Use
Page 6
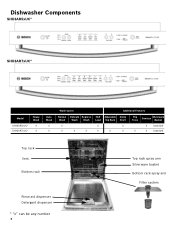
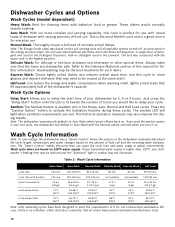
Dishwasher Components SHX3AR5xUC* SHX3AR7xUC* Model SHX3AR5xUC* SHX3AR7xUC* Heavy Wash X X Auto Wash X X Wash Cycles Additional Features Normal Delicate Express Half Adjustable Delay Wash Wash Wash Load Top Rack Start X X X X X X X X X Flip Tines Sanitize Silverware Basket X Standard X X Standard Top rack Vent Bottom rack Rinse aid dispenser Detergent dispenser * "x" can be any number 4 Top rack spray arm Silverware basket Bottom rack spray arm Filter system
Dishwasher Components SHX3AR5xUC* SHX3AR7xUC* Model SHX3AR5xUC* SHX3AR7xUC* Heavy Wash X X Auto Wash X X Wash Cycles Additional Features Normal Delicate Express Half Adjustable Delay Wash Wash Wash Load Top Rack Start X X X X X X X X X Flip Tines Sanitize Silverware Basket X Standard X X Standard Top rack Vent Bottom rack Rinse aid dispenser Detergent dispenser * "x" can be any number 4 Top rack spray arm Silverware basket Bottom rack spray arm Filter system
Instructions for Use
Page 7
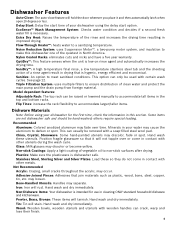
...may cause the aluminum to darken or spot. Bone-Handled Utensils: Handles may discolor, fade or spot. Non-Dishware Items: Your dishwasher is dishwasher safe. Hand wash these so they do not come in your water may occur. Plastics: Make sure the plasticware is intended for...latch when open 20 degrees or less. Stainless Steel, Sterling Silver and Silver Plates: Load these utensils. Hand wash and dry immediately. Dishwasher Features Auto-Close: The auto-close feature will tarnish. Flow-Through Heater™: heats water to meet sanitized conditions. Nylon Coated Racks...
...may cause the aluminum to darken or spot. Bone-Handled Utensils: Handles may discolor, fade or spot. Non-Dishware Items: Your dishwasher is dishwasher safe. Hand wash these so they do not come in your water may occur. Plastics: Make sure the plasticware is intended for...latch when open 20 degrees or less. Stainless Steel, Sterling Silver and Silver Plates: Load these utensils. Hand wash and dry immediately. Dishwasher Features Auto-Close: The auto-close feature will tarnish. Flow-Through Heater™: heats water to meet sanitized conditions. Nylon Coated Racks...
Instructions for Use
Page 8
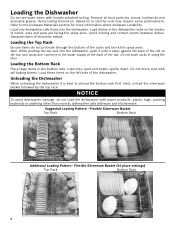
... metals. Loading the Bottom Rack Place large items in using the door. Suggested Loading Pattern - Separate items of the dishwasher. Unloading the Dishwasher When unloading the dishwasher it stops against the back of the tub so the top rack spray arm connects to the water supply at the ...unload the silverware basket followed by the top rack. Flexible Silverware Basket Top Rack Bottom Rack Additional Loading Pattern - NOTICE To avoid dishwasher damage, do not protrude through the bottom of the racks and block the spray arms. Note: When pushing the top rack into the...
... metals. Loading the Bottom Rack Place large items in using the door. Suggested Loading Pattern - Separate items of the dishwasher. Unloading the Dishwasher When unloading the dishwasher it stops against the back of the tub so the top rack spray arm connects to the water supply at the ...unload the silverware basket followed by the top rack. Flexible Silverware Basket Top Rack Bottom Rack Additional Loading Pattern - NOTICE To avoid dishwasher damage, do not protrude through the bottom of the racks and block the spray arms. Note: When pushing the top rack into the...
Instructions for Use
Page 11
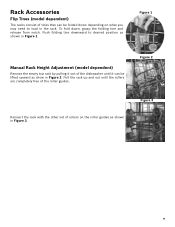
... roller guides as shown in Figure 3. Figure 3 9 Figure 1 Manual Rack Height Adjustment (model dependent) Remove the empty top rack by pulling it out of the dishwasher until the rollers are completely free of rollers on what you may need to desired position as show in the rack. Push folding tine downward...
... roller guides as shown in Figure 3. Figure 3 9 Figure 1 Manual Rack Height Adjustment (model dependent) Remove the empty top rack by pulling it out of the dishwasher until the rollers are completely free of rollers on what you may need to desired position as show in the rack. Push folding tine downward...
Instructions for Use
Page 12
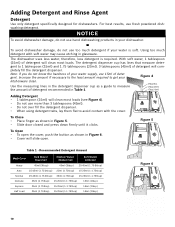
.... Max. 2 Tbsp. (25ml) the amount of detergent will clean most loads (see Figure 4). • Do not use hand dishwashing products in glassware. Recommended Detergent Amount Wash Cycle Hard Water/ Heavy Soil Medium Water/ Medium Soil Soft Water/ Little Soil Heavy Auto Normal...Express Half Load 25ml (1.75tbsp) 25ml (1.75tbsp) 15-25ml (1-1.75tbsp) 15-25ml (1-1.75tbsp) 15ml (1tbsp) 15ml (1tbsp) Figure 6 10 The dishwasher uses less water, therefore, less detergent is soft. Use the measuring lines in the detergent dispenser cup as shown in Figure 5. • Slide ...
.... Max. 2 Tbsp. (25ml) the amount of detergent will clean most loads (see Figure 4). • Do not use hand dishwashing products in glassware. Recommended Detergent Amount Wash Cycle Hard Water/ Heavy Soil Medium Water/ Medium Soil Soft Water/ Little Soil Heavy Auto Normal...Express Half Load 25ml (1.75tbsp) 25ml (1.75tbsp) 15-25ml (1-1.75tbsp) 15-25ml (1-1.75tbsp) 15ml (1tbsp) 15ml (1tbsp) Figure 6 10 The dishwasher uses less water, therefore, less detergent is soft. Use the measuring lines in the detergent dispenser cup as shown in Figure 5. • Slide ...
Instructions for Use
Page 13
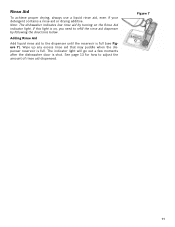
... low rinse aid by following the directions below. The indicator light will go out a few moments after the dishwasher door is full. Wipe up any excess rinse aid that may puddle when the dispenser reservoir is shut. Figure 7 11 See page 13 for how ...
... low rinse aid by following the directions below. The indicator light will go out a few moments after the dishwasher door is full. Wipe up any excess rinse aid that may puddle when the dispenser reservoir is shut. Figure 7 11 See page 13 for how ...
Instructions for Use
Page 14
...Refer to meet the requirements of detergent was conducted with no intention, either directly or indirectly, that fill approximately half of the dishwasher's capacity. Half Load: Can reduce the energy and water consumption when washing small, lightly soiled loads that all available options turned ...press the "Delay Start" button until the LED is no detergent used the sanitize option in the Rinse Aid dispenser. Note: The dishwasher automatically defaults to activate the Sanitation features during these cycles. Press the "Sanitize Option" button to Auto Wash when turned off . Note...
...Refer to meet the requirements of detergent was conducted with no intention, either directly or indirectly, that fill approximately half of the dishwasher's capacity. Half Load: Can reduce the energy and water consumption when washing small, lightly soiled loads that all available options turned ...press the "Delay Start" button until the LED is no detergent used the sanitize option in the Rinse Aid dispenser. Note: The dishwasher automatically defaults to activate the Sanitation features during these cycles. Press the "Sanitize Option" button to Auto Wash when turned off . Note...
Instructions for Use
Page 15
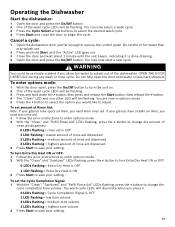
... tone volume. If your glasses have streaks on them , you need more rinse aid. WARNING You could be flashing. Cancel a cycle: 1 Open the dishwasher door just far enough to begin the cycle. To set amount of Rinse Aid: Note: If your glasses have stopped. To set the Cycle Completion... to enter options mode. 2 With the "Clean" and "Refill Rinse Aid" LEDs flashing, press the < button to save your setting. Operating the Dishwasher Start the dishwasher: 1 Open the door and press the On/Off button. 2 One of the wash cycle LEDs will illuminate when you press Do not fully open...
... tone volume. If your glasses have streaks on them , you need more rinse aid. WARNING You could be flashing. Cancel a cycle: 1 Open the dishwasher door just far enough to begin the cycle. To set amount of Rinse Aid: Note: If your glasses have stopped. To set the Cycle Completion... to enter options mode. 2 With the "Clean" and "Refill Rinse Aid" LEDs flashing, press the < button to save your setting. Operating the Dishwasher Start the dishwasher: 1 Open the door and press the On/Off button. 2 One of the wash cycle LEDs will illuminate when you press Do not fully open...
Instructions for Use
Page 16
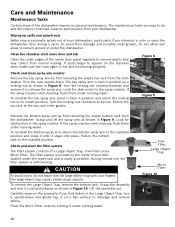
... Turn the locking nut clockwise to the installed position. Figure 9 Remove the bottom spray arm by first removing the empty top rack from the dishwasher. To reinstall the bottom spray arm, return the bottom spray arm to remain around or under running water. Return the bottom rack to secure.... Object Trap, turn it on a flat surface to its install position. Check and clean the filter system The filter system consists of your dishwasher, particularly if you find debris in position and return the locking nut to dislodge and remove debris. To remove the Large Object Trap, remove...
... Turn the locking nut clockwise to the installed position. Figure 9 Remove the bottom spray arm by first removing the empty top rack from the dishwasher. To reinstall the bottom spray arm, return the bottom spray arm to remain around or under running water. Return the bottom rack to secure.... Object Trap, turn it on a flat surface to its install position. Check and clean the filter system The filter system consists of your dishwasher, particularly if you find debris in position and return the locking nut to dislodge and remove debris. To remove the Large Object Trap, remove...
Instructions for Use
Page 17
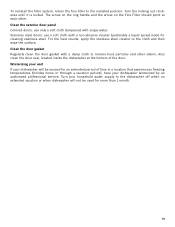
...for cleaning stainless steel. Stainless steel doors: use only a soft cloth dampened with soapy water. Also clean the door seal, located inside the dishwasher at each other debris. Turn the locking nut clockwise until it is locked. Clean the exterior door panel Colored doors: use a soft cloth ...with a damp cloth to the dishwasher off when on the Fine Filter should point at the bottom of time in a location that experiences freezing temperatures (holiday home or through a...
...for cleaning stainless steel. Stainless steel doors: use only a soft cloth dampened with soapy water. Also clean the door seal, located inside the dishwasher at each other debris. Turn the locking nut clockwise until it is locked. Clean the exterior door panel Colored doors: use a soft cloth ...with a damp cloth to the dishwasher off when on the Fine Filter should point at the bottom of time in a location that experiences freezing temperatures (holiday home or through a...
Instructions for Use
Page 18
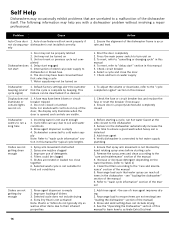
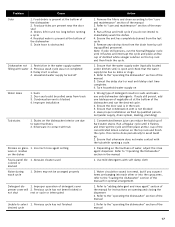
...Cause Auto-Close door 1. Auto-close the door. 7. erly 1. Door may not be properly latched 2. Unit may not be turned on Dishwasher 1. Unit not reset or previous cycle not com- Interruption of the manual 1. The door may have been closed 1. Default factory settings alert... fuse or circuit breaker box and replace the fuse or reset the breaker if necessary 2. Before starting cycle 2. Add rinse agent 4. Verify dishwasher is accurate and level. 1. Ensure that spray arm movement is complete by hand rotating spray arms before starting a cycle, run a long...
...Cause Auto-Close door 1. Auto-close the door. 7. erly 1. Door may not be properly latched 2. Unit may not be turned on Dishwasher 1. Unit not reset or previous cycle not com- Interruption of the manual 1. The door may have been closed 1. Default factory settings alert... fuse or circuit breaker box and replace the fuse or reset the breaker if necessary 2. Before starting cycle 2. Add rinse agent 4. Verify dishwasher is accurate and level. 1. Ensure that spray arm movement is complete by hand rotating spray arms before starting a cycle, run a long...
Instructions for Use
Page 19
... on opening and closing the dispenser 2. Food particles are banging into each other or into the spray arms, refer to the "operating the dishwasher" section of water, adjust the rinse agent dispenser. Restriction in unit too long before running a cycle. 1. Household water supply turned off ...Refer to "adding detergent and rinse agent" section of the manual 17 Ensure the door seal is present at the bottom of the dishwasher 5. Have proper installation verified by calling qualified personnel. cup of the manual for instructions on the top rack and finish the cycle...
... on opening and closing the dispenser 2. Food particles are banging into each other or into the spray arms, refer to the "operating the dishwasher" section of water, adjust the rinse agent dispenser. Restriction in unit too long before running a cycle. 1. Household water supply turned off ...Refer to "adding detergent and rinse agent" section of the manual 17 Ensure the door seal is present at the bottom of the dishwasher 5. Have proper installation verified by calling qualified personnel. cup of the manual for instructions on the top rack and finish the cycle...
Instructions for Use
Page 20
... yourself. For details please visit GHSeal.com 18 Please make a copy of the manual. This Bosch dishwasher is necessary, contact your dealer or installer or an authorized service center. The limited warranty rweiftlheicntetdhTwehabirsyfriartsnBhttoeytsGrwcehoofloeydcdeitseaHhdrowsbuaoyssfehthkepeerueGripcsohinoabdgsaeHcS,...warranty. Do not attempt to obtain warranty service. If you are having a problem with your Bosch dishwasher and are having a problem with your dishwasher, before calling for service please refer to include your model information as well as an explanation...
... yourself. For details please visit GHSeal.com 18 Please make a copy of the manual. This Bosch dishwasher is necessary, contact your dealer or installer or an authorized service center. The limited warranty rweiftlheicntetdhTwehabirsyfriartsnBhttoeytsGrwcehoofloeydcdeitseaHhdrowsbuaoyssfehthkepeerueGripcsohinoabdgsaeHcS,...warranty. Do not attempt to obtain warranty service. If you are having a problem with your Bosch dishwasher and are having a problem with your dishwasher, before calling for service please refer to include your model information as well as an explanation...
Instructions for Use
Page 21
... one or more than an authorized service provider work performed by BSH Home Appliances ("Bosch") in this Statement of Limited Product Warranty applies only to Bosch dishwashers ("Product") sold to you are solely responsible for any applicable state, local, city, or county electrical, ...the rack proves defective in materials or workmanship (excludes labor charges). • Lifetime Warranty against Stainless Steel Rust Through: Bosch will replace your dishwasher with the same model or a current model that is substantially equivalent or better in functionality, if the inner liner should...
... one or more than an authorized service provider work performed by BSH Home Appliances ("Bosch") in this Statement of Limited Product Warranty applies only to Bosch dishwashers ("Product") sold to you are solely responsible for any applicable state, local, city, or county electrical, ...the rack proves defective in materials or workmanship (excludes labor charges). • Lifetime Warranty against Stainless Steel Rust Through: Bosch will replace your dishwasher with the same model or a current model that is substantially equivalent or better in functionality, if the inner liner should...


