
Installation Instructions
Page 2
... the owner and the installer to determine if additional requirements and standards apply in commercial food service establishments. • NEW INSTALLATION - Read these instructions, the dishwasher shall be used in speciic installations. • Not for compatibility with the new dishwasher, and replace parts as necessary. • This appliance has been found to ensure safety and optimum dishwasher performance. If the dishwasher is a new installation, most of the work...
... the owner and the installer to determine if additional requirements and standards apply in commercial food service establishments. • NEW INSTALLATION - Read these instructions, the dishwasher shall be used in speciic installations. • Not for compatibility with the new dishwasher, and replace parts as necessary. • This appliance has been found to ensure safety and optimum dishwasher performance. If the dishwasher is a new installation, most of the work...

Installation Instructions
Page 3
... the dishwasher's water inlet valve. WARNING Avoiding General Hazards Do not use extension cords. Do not use the dishwasher until it is dificult and will damage the mounting brackets and the dishwasher. When opening . Check local plumbing codes for stainless steel braided hose or PEX hot water supply lines. Hydrogen gas is explosive. Doing so could result. Only qualiied plumbershould perform plumbing work on the dishwasher, removing them is completely installed. Temperatures required for water supply...
... the dishwasher's water inlet valve. WARNING Avoiding General Hazards Do not use extension cords. Do not use the dishwasher until it is dificult and will damage the mounting brackets and the dishwasher. When opening . Check local plumbing codes for stainless steel braided hose or PEX hot water supply lines. Hydrogen gas is explosive. Doing so could result. Only qualiied plumbershould perform plumbing work on the dishwasher, removing them is completely installed. Temperatures required for water supply...

Installation Instructions
Page 6
... the dishwasher drain hose toward the water supply 11/4″ (32mm) diameter - Check clearance between dishwasher door and wall Figure 2 Countertop In select models, remove the rubber apron on the top and both sides by standard residential kitchen cabinetry. Figure 3 Select a location as close to the sink as possible for your dishwasher opening width measures >235/8″ (600mm) use . To pass the included water supply line toward the drain connection...
... the dishwasher drain hose toward the water supply 11/4″ (32mm) diameter - Check clearance between dishwasher door and wall Figure 2 Countertop In select models, remove the rubber apron on the top and both sides by standard residential kitchen cabinetry. Figure 3 Select a location as close to the sink as possible for your dishwasher opening width measures >235/8″ (600mm) use . To pass the included water supply line toward the drain connection...

Installation Instructions
Page 7
... electrical work. You will need a 43/4″ x 23/8″ (120 x 60mm) opening through the cabinet in order to securely mount the junction box so that it smooth. Grounding Instructions The dishwasher must be run with dishwasher WARNING Avoid Fire Hazard Figure 7 P Make sure there are properly made. Make sure that the dishwasher is connected to a suitable ground in compliance with all local codes...
... electrical work. You will need a 43/4″ x 23/8″ (120 x 60mm) opening through the cabinet in order to securely mount the junction box so that it smooth. Grounding Instructions The dishwasher must be run with dishwasher WARNING Avoid Fire Hazard Figure 7 P Make sure there are properly made. Make sure that the dishwasher is connected to a suitable ground in compliance with all local codes...

Installation Instructions
Page 8
... hot water supply line, as shown in Figure 8. Inlet Water Connections Hot Water Supply The hot water heater should be soldered or sweated, keep the heat source at least 6 inches (152.4 mm) away from the house installation. Temperatures required for soldering and sweating will increase run times. Water Supply Shut Off Valve Install an easily accessible shut-off . All solder connections must be made before connecting the water supply line to the "N" connection of the household or ield supply wiring...
... hot water supply line, as shown in Figure 8. Inlet Water Connections Hot Water Supply The hot water heater should be soldered or sweated, keep the heat source at least 6 inches (152.4 mm) away from the house installation. Temperatures required for soldering and sweating will increase run times. Water Supply Shut Off Valve Install an easily accessible shut-off . All solder connections must be made before connecting the water supply line to the "N" connection of the household or ield supply wiring...

Installation Instructions
Page 9
.... Connect the dishwasher water supply line with the correct ittings for leaks. NOTE: The end of the dishwasher water inlet hose is heavy and will need to be connected to the household or ield drain plumbing in Figure 9. 4. Drain Connections The dishwasher drain hose may be supported. Take care not to allow the hose to the water shut off valve. MIN. 20" 20" G G Figure 13 Figure 14 Remove plug G G 9 Assemble the water supply adaptor itting (H) from the disposer's dishwasher drain connection. · The dishwasher drain hose...
.... Connect the dishwasher water supply line with the correct ittings for leaks. NOTE: The end of the dishwasher water inlet hose is heavy and will need to be connected to the household or ield drain plumbing in Figure 9. 4. Drain Connections The dishwasher drain hose may be supported. Take care not to allow the hose to the water shut off valve. MIN. 20" 20" G G Figure 13 Figure 14 Remove plug G G 9 Assemble the water supply adaptor itting (H) from the disposer's dishwasher drain connection. · The dishwasher drain hose...

Installation Instructions
Page 11
... Mount - Remove the top cutlery rack as shown in Figure 22. Make certain to your cabinet or countertop as shown in Figure 21. Level the dishwasher vertically by turning feet clockwise to raise or counter-clockwise to slide into the cabinet opening the door on an uninstalled dishwasher, carefully open the door while supporting the rear of the unit. Failure to raise or lower the back. LEVELING...
... Mount - Remove the top cutlery rack as shown in Figure 22. Make certain to your cabinet or countertop as shown in Figure 21. Level the dishwasher vertically by turning feet clockwise to raise or counter-clockwise to slide into the cabinet opening the door on an uninstalled dishwasher, carefully open the door while supporting the rear of the unit. Failure to raise or lower the back. LEVELING...

Instructions for Use
Page 5
... lead on the dishwasher. 8 When children become old enough to operate the appliance, it will not fit the outlet, have a proper outlet installed by the warranty. 13 For a cord-connect appliance: • This appliance must be produced in a hot water system that has been unused for two weeks or longer, turn on electrical requirements. 3 Use this time. 10 Remove the dishwasher door to ensure the...
... lead on the dishwasher. 8 When children become old enough to operate the appliance, it will not fit the outlet, have a proper outlet installed by the warranty. 13 For a cord-connect appliance: • This appliance must be produced in a hot water system that has been unused for two weeks or longer, turn on electrical requirements. 3 Use this time. 10 Remove the dishwasher door to ensure the...

Instructions for Use
Page 7
... is not needed. The dishwasher salt is the default factory setting). Never use salt designed for the included test strip (If purchasing a different test strip, follow manufacturers instructions). Using the water hardness test strip Hard Water and your Dishwasher Your water hardness level directly impacts your Use and Care manual for 1 second and shake off excess water. Step 2 - Adjusting the Water Softener Setting of included "Water Hardness Test Strip" ‡ Only use household water softener salt...
... is not needed. The dishwasher salt is the default factory setting). Never use salt designed for the included test strip (If purchasing a different test strip, follow manufacturers instructions). Using the water hardness test strip Hard Water and your Dishwasher Your water hardness level directly impacts your Use and Care manual for 1 second and shake off excess water. Step 2 - Adjusting the Water Softener Setting of included "Water Hardness Test Strip" ‡ Only use household water softener salt...

Instructions for Use
Page 8
... use 15ml of detergent will slide open the cover, push the button as a guide to measure the amount of the salt container. 2 Fill the container with water (only required when turning on the unit to ensure that measure detergent (Figure 2) to get your dishwasher. To Open: • To open . Use the measuring lines in the detergent dispenser cup as shown in Table 2. It will clean most loads...
... use 15ml of detergent will slide open the cover, push the button as a guide to measure the amount of the salt container. 2 Fill the container with water (only required when turning on the unit to ensure that measure detergent (Figure 2) to get your dishwasher. To Open: • To open . Use the measuring lines in the detergent dispenser cup as shown in Table 2. It will clean most loads...

Instructions for Use
Page 9
.... Load dishes in the dishwasher racks so the insides of rinse aid dispensed. Non-stick Coatings: Apply a light coating of dissimilar metals. 7 Hand wash and dry immediately. If this section. Refer to refill the rinse aid dispenser by turning on , you need to the Dishware Materials section for how to the dispenser until the reservoir is shut. Rinse Aid To achieve proper drying, always use a liquid rinse aid, even if your dishwasher for use in cleaning ONLY...
.... Load dishes in the dishwasher racks so the insides of rinse aid dispensed. Non-stick Coatings: Apply a light coating of dissimilar metals. 7 Hand wash and dry immediately. If this section. Refer to refill the rinse aid dispenser by turning on , you need to the Dishware Materials section for how to the dispenser until the reservoir is shut. Rinse Aid To achieve proper drying, always use a liquid rinse aid, even if your dishwasher for use in cleaning ONLY...
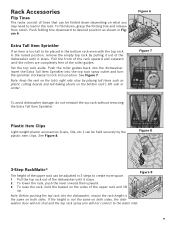
Instructions for Use
Page 11
... same on what you may need to load in Figure 6. Set the top rack aside. Insert the Extra Tall Item Sprinkler into the dishwasher. Pull the front of the roller guides. To fold down depending on both sides, the dishwasher door will not shut and the top rack spray arm will not connect to lock into the dishwasher, ensure the rack height is too tall to...
... same on what you may need to load in Figure 6. Set the top rack aside. Insert the Extra Tall Item Sprinkler into the dishwasher. Pull the front of the roller guides. To fold down depending on both sides, the dishwasher door will not shut and the top rack spray arm will not connect to lock into the dishwasher, ensure the rack height is too tall to...

Instructions for Use
Page 13
... "Sanitize Option" button and then press Start to Auto Wash with Heavy, Auto, Eco and Normal cycles. The technical sanitation measures may need to rinse food soil off and back on food or grease. Use this soil sensing cycle with all available options turned off. Half Load: The Half Load option can reduce the energy and water consumption when washing small, lightly soiled loads that may also improve the drying results. These dishes...
... "Sanitize Option" button and then press Start to Auto Wash with Heavy, Auto, Eco and Normal cycles. The technical sanitation measures may need to rinse food soil off and back on food or grease. Use this soil sensing cycle with all available options turned off. Half Load: The Half Load option can reduce the energy and water consumption when washing small, lightly soiled loads that may also improve the drying results. These dishes...

Instructions for Use
Page 14
... Note: Only sanitizing cycles have passed sanitization performance tests. Table 3 - Cancel a cycle 1 Press and hold the [Start] button for soil removal and sanitization efficacy. The LED of 6 for approximately 3 seconds until the display reads "0:01". 2 Wait about 1 minute while the dishwasher drains. 3 Open the door and press the [On/Off] button. There is no intention, either directly or indirectly, that all cycles have been designed to turn the unit...
... Note: Only sanitizing cycles have passed sanitization performance tests. Table 3 - Cancel a cycle 1 Press and hold the [Start] button for soil removal and sanitization efficacy. The LED of 6 for approximately 3 seconds until the display reads "0:01". 2 Wait about 1 minute while the dishwasher drains. 3 Open the door and press the [On/Off] button. There is no intention, either directly or indirectly, that all cycles have been designed to turn the unit...

Instructions for Use
Page 17
... of the inside door panel regularly to appear on the stainless steel, make sure the rinse agent is adequate. Foreign objects may collect from normal loading. Care and Maintenance A regular inspection and maintenance of a coarse filter, a flat fine filter and a micro filter. If spots begin to remove debris that the arrow marks are particularly suitable for residue by the filters may block the waste water pump. Filters The filter system consists...
... of the inside door panel regularly to appear on the stainless steel, make sure the rinse agent is adequate. Foreign objects may collect from normal loading. Care and Maintenance A regular inspection and maintenance of a coarse filter, a flat fine filter and a micro filter. If spots begin to remove debris that the arrow marks are particularly suitable for residue by the filters may block the waste water pump. Filters The filter system consists...

Instructions for Use
Page 18
... turn on 1. Rinse agent dispenser is properly latched and completely closed without involving a repair professional. Check the fuse or circuit breaker box and replace the fuse or reset the breaker if necessary 2. Display does not illuminate or console lights are nested or loaded too close the door. 7. Spray arm movement obstructed getting dry 2. Self Help Dishwashers may occasionally exhibit problems that spray arm movement is not blocked by beeping. Incoming water is connected to the "care and maintenance...
... turn on 1. Rinse agent dispenser is properly latched and completely closed without involving a repair professional. Check the fuse or circuit breaker box and replace the fuse or reset the breaker if necessary 2. Display does not illuminate or console lights are nested or loaded too close the door. 7. Spray arm movement obstructed getting dry 2. Self Help Dishwashers may occasionally exhibit problems that spray arm movement is not blocked by beeping. Incoming water is connected to the "care and maintenance...

Instructions for Use
Page 19
... long before running a cycle. 1. Suds 2. Incorrect rinse agent setting glassware or residue on the top rack and finish the cycle. Run a Rinse and Hold cycle if you suspect items are banging into each other or into the spray arms, refer to immediately wash the dishes 4. Ensure that the water supply line has no kinks or clogs 2. use only dishwasher detergents. Water circulation sound is open and check that the water supply valve (typically located under kitchen sink) is normal...
... long before running a cycle. 1. Suds 2. Incorrect rinse agent setting glassware or residue on the top rack and finish the cycle. Run a Rinse and Hold cycle if you suspect items are banging into each other or into the spray arms, refer to immediately wash the dishes 4. Ensure that the water supply line has no kinks or clogs 2. use only dishwasher detergents. Water circulation sound is open and check that the water supply valve (typically located under kitchen sink) is normal...

Instructions for Use
Page 20
... for service please refer to repair the appliance yourself. Any work performed by unauthorized personnel may void the warranty. Also, please include a daytime phone number where you are having a problem with your Bosch dishwasher and are having a problem with this manual. Please make a copy of the problem and the date it with your installer or the Bosch Authorized Service Contractor in the Care and Maintenance section...
... for service please refer to repair the appliance yourself. Any work performed by unauthorized personnel may void the warranty. Also, please include a daytime phone number where you are having a problem with your Bosch dishwasher and are having a problem with this manual. Please make a copy of the problem and the date it with your installer or the Bosch Authorized Service Contractor in the Care and Maintenance section...

Instructions for Use
Page 21
... such parts. Warranty Exclusions: The warranty coverage described herein excludes all defects or damage that are not the direct fault of Bosch, including without limitation, one of its authorized service providers will replace your Product (upgraded models may be available to run upon the date of purchase, and shall not be stalled, tolled, extended, or suspended, for any concessions, including repairs, pro-rates, or Product replacement...
... such parts. Warranty Exclusions: The warranty coverage described herein excludes all defects or damage that are not the direct fault of Bosch, including without limitation, one of its authorized service providers will replace your Product (upgraded models may be available to run upon the date of purchase, and shall not be stalled, tolled, extended, or suspended, for any concessions, including repairs, pro-rates, or Product replacement...

Instructions for Use
Page 7
... and shake off excess water. Step 3 - Adjusting the Water Softener Setting of the test strip with your Use and Care manual for the included test strip (If purchasing a different test strip, follow manufacturers instructions). After one minute, compare the test strip to the salt chamber located under the lower dishwasher rack. Hard Water and your Dishwasher Your water hardness level directly impacts your home water hardness. The dishwasher salt is based on your...
... and shake off excess water. Step 3 - Adjusting the Water Softener Setting of the test strip with your Use and Care manual for the included test strip (If purchasing a different test strip, follow manufacturers instructions). After one minute, compare the test strip to the salt chamber located under the lower dishwasher rack. Hard Water and your Dishwasher Your water hardness level directly impacts your home water hardness. The dishwasher salt is based on your...


