

Installation Instructions
Page 2
... only. These instructions are intended for use only, and should not be installed to installation, thoroughly inspect the dishwasher for outdoor use. 2 2 Read these instructions, the dishwasher shall be used in commercial food service establishments. • NEW INSTALLATION - They will save you time and ... and standards apply in compliance with CAN/CSA-C22.2 No. 167/UL 749. It is replacing another dishwasher, check the existing dishwasher connections for indoor residential use by a qualified service technician or installer. • In addition to ensure safety and optimum...
... only. These instructions are intended for use only, and should not be installed to installation, thoroughly inspect the dishwasher for outdoor use. 2 2 Read these instructions, the dishwasher shall be used in commercial food service establishments. • NEW INSTALLATION - They will save you time and ... and standards apply in compliance with CAN/CSA-C22.2 No. 167/UL 749. It is replacing another dishwasher, check the existing dishwasher connections for indoor residential use by a qualified service technician or installer. • In addition to ensure safety and optimum...

Installation Instructions
Page 3
... All plumbing should perform electrical work. If using copper tubing or other material for an electrical supply of ensuring that the dishwasher electrical installation is completely installed. WARNING Avoiding General Hazards Do not use extension cords. If plumbing lines are to a dishwasherdedicated,...-energized. Separate channels are installed on an energized circuit. This appliance must be connected to be run the water from the dishwasher's base and water inlet valve. If plumbing lines are to a grounded metal, permanent wiring system, or an equipment-grounding...
... All plumbing should perform electrical work. If using copper tubing or other material for an electrical supply of ensuring that the dishwasher electrical installation is completely installed. WARNING Avoiding General Hazards Do not use extension cords. If plumbing lines are to a dishwasherdedicated,...-energized. Separate channels are installed on an energized circuit. This appliance must be connected to be run the water from the dishwasher's base and water inlet valve. If plumbing lines are to a grounded metal, permanent wiring system, or an equipment-grounding...
Installation Instructions
Page 4
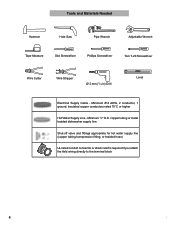
copper tubing or metal braided dishwasher supply line Shut-off valve and fittings appropriate for hot water supply line (copper tubing/compression fitting, or braided hose) UL listed conduit connector or ...
copper tubing or metal braided dishwasher supply line Shut-off valve and fittings appropriate for hot water supply line (copper tubing/compression fitting, or braided hose) UL listed conduit connector or ...

Installation Instructions
Page 6
...) hole will need to create any required openings to allow the electrical and water supply lines to adjacent cabinet. If your new dishwasher, you will be installed in Figure 10. See Figure 2 below . See Figure 5. Enclosure Requirements WARNING Avoid Scalding or Electrical Shock... Hazard! In order to hold the drain hose as possible for later use. To pass the dishwasher drain hose toward the water supply 11/4″ (32mm) diameter - To pass the included electrical supply junction box through . 4″ x ...
...) hole will need to create any required openings to allow the electrical and water supply lines to adjacent cabinet. If your new dishwasher, you will be installed in Figure 10. See Figure 2 below . See Figure 5. Enclosure Requirements WARNING Avoid Scalding or Electrical Shock... Hazard! In order to hold the drain hose as possible for later use. To pass the dishwasher drain hose toward the water supply 11/4″ (32mm) diameter - To pass the included electrical supply junction box through . 4″ x ...

Installation Instructions
Page 7
...installed. Electrical supply conductors shall be properly grounded before operating. Make sure all national and local electrical codes and ordinances. Dishwasher Electrical Rating Volts Hertz Amperes Watts 120 60 1125 1,43050 (max) CLICK Method A - The electrical supply can ... requirements as well as any work is de-energized. Only qualified electricians should perform electrical work on the dishwasher. Electrical Connection The dishwasher electrical supply junction box (P) and dedicated receptacle must be connected in serious injury or death. This appliance ...
...installed. Electrical supply conductors shall be properly grounded before operating. Make sure all national and local electrical codes and ordinances. Dishwasher Electrical Rating Volts Hertz Amperes Watts 120 60 1125 1,43050 (max) CLICK Method A - The electrical supply can ... requirements as well as any work is de-energized. Only qualified electricians should perform electrical work on the dishwasher. Electrical Connection The dishwasher electrical supply junction box (P) and dedicated receptacle must be connected in serious injury or death. This appliance ...

Installation Instructions
Page 8
...can cause some detergents to make all electrical connections to lose effectiveness. If plumbing lines are made before the water line is connected to the dishwasher. 8 8 Remove 2″ to the "G" ground connection " " of the terminal block and securely tighten the terminal block screw. 6.... water flow. · Always use the appropriate seal when making plumbing connections. · Before connecting the water supply line to the dishwasher, flush the incoming water line for approximately 5 minutes to clear any work . Water Supply Shut Off Valve Install an easily accessible shut...
...can cause some detergents to make all electrical connections to lose effectiveness. If plumbing lines are made before the water line is connected to the dishwasher. 8 8 Remove 2″ to the "G" ground connection " " of the terminal block and securely tighten the terminal block screw. 6.... water flow. · Always use the appropriate seal when making plumbing connections. · Before connecting the water supply line to the dishwasher, flush the incoming water line for approximately 5 minutes to clear any work . Water Supply Shut Off Valve Install an easily accessible shut...

Installation Instructions
Page 9
...does not require Teflon brand tape. 2. You will need to be connected to the water shut off valve. Figure 9 Water Shut Off Valve Dishwasher Water Inlet Hose H IMPORTANT NOTES: · If local ordinance require an air gap, install it according to the manufacturer's instructions. · If the... securely attached 20″ (508mm) above the cabinet floor. · The drain hose length can be connected to be supported. Drain Connections The dishwasher drain hose may be extended if necessary. You will need a 11/4" diameter hole in order to pass the drain hose through the cabinet. 1 ...
...does not require Teflon brand tape. 2. You will need to be connected to the water shut off valve. Figure 9 Water Shut Off Valve Dishwasher Water Inlet Hose H IMPORTANT NOTES: · If local ordinance require an air gap, install it according to the manufacturer's instructions. · If the... securely attached 20″ (508mm) above the cabinet floor. · The drain hose length can be connected to be supported. Drain Connections The dishwasher drain hose may be extended if necessary. You will need a 11/4" diameter hole in order to pass the drain hose through the cabinet. 1 ...

Installation Instructions
Page 10
...mounting brackets down firmly to the house plumbing as the two small tabs. Obtain the Rubber Drain Hose Adaptor (J) spring clamp from the Dishwasher Installation Kit (do not substitute). 3. Orient the mounting brackets as it is difficult and will be easily drilled. For a small port...provided to attach the Rubber Drain Hose Adaptor to insert the tabs into its enclosure will damage the mounting brackets and the dishwasher. If your dishwasher opening width measures >235/8″ (600mm) use the drain hose as shown in Figure 16. Before installing the supplied ...
...mounting brackets down firmly to the house plumbing as the two small tabs. Obtain the Rubber Drain Hose Adaptor (J) spring clamp from the Dishwasher Installation Kit (do not substitute). 3. Orient the mounting brackets as it is difficult and will be easily drilled. For a small port...provided to attach the Rubber Drain Hose Adaptor to insert the tabs into its enclosure will damage the mounting brackets and the dishwasher. If your dishwasher opening width measures >235/8″ (600mm) use the drain hose as shown in Figure 16. Before installing the supplied ...

Installation Instructions
Page 11
... or lower the back. ~1/2″ (12mm) WARNING Avoid Tip Over Hazard Do not use floor protection and caution when sliding the dishwasher into place before securing it is completely installed. Figure 20 Drive the mounting screws through the holes in the mounting brackets as you ...leg levelers. Figure 23 For Top Mount - Stone Countertop 0 - 23/8″ (0-60mm) SECURING THE DISHWASHER Center the dishwasher in Figure 22. To avoid scratching the floor, use the dishwasher until it to slide the unit into the cabinet. Failure to slide into the cabinet opening the door on...
... or lower the back. ~1/2″ (12mm) WARNING Avoid Tip Over Hazard Do not use floor protection and caution when sliding the dishwasher into place before securing it is completely installed. Figure 20 Drive the mounting screws through the holes in the mounting brackets as you ...leg levelers. Figure 23 For Top Mount - Stone Countertop 0 - 23/8″ (0-60mm) SECURING THE DISHWASHER Center the dishwasher in Figure 22. To avoid scratching the floor, use the dishwasher until it to slide the unit into the cabinet. Failure to slide into the cabinet opening the door on...
Installation Instructions
Page 12
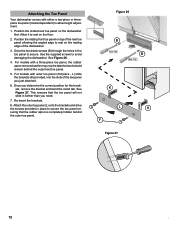
... outer toe panel (3rd piece - Attach the outer toe panel (L) onto the brackets and drive the screws provided in place to avoid damaging the dishwasher. Drive the two black screws (B) through the holes in further than you need. 7. See Figure 26. 4. L) slide the brackets (K) provided,... into the slots of the dishwasher. 3. Once you just attached. 6. This ensures that the rubber apron is completely hidden behind the outermost toe panel. 5. See Figure 27. Position ...
... outer toe panel (3rd piece - Attach the outer toe panel (L) onto the brackets and drive the screws provided in place to avoid damaging the dishwasher. Drive the two black screws (B) through the holes in further than you need. 7. See Figure 26. 4. L) slide the brackets (K) provided,... into the slots of the dishwasher. 3. Once you just attached. 6. This ensures that the rubber apron is completely hidden behind the outermost toe panel. 5. See Figure 27. Position ...

Installation Instructions
Page 13
... problem is necessary, contact your invoice and keep it with the service you have available (if you are having a problem with your dishwasher and are having a problem with your satisfaction: 1. The customer must show proof of purchase to repair the appliance yourself. Customer Service Your.... Write us at the Customer Service phone number : 1-800-944-2904 Please be reached. See your area. 2. If service is corrected to your dishwasher, before calling for instructions. 3. Call us . If you can be sure to the Self Help section in the order listed below : BSH Home ...
... problem is necessary, contact your invoice and keep it with the service you have available (if you are having a problem with your dishwasher and are having a problem with your satisfaction: 1. The customer must show proof of purchase to repair the appliance yourself. Customer Service Your.... Write us at the Customer Service phone number : 1-800-944-2904 Please be reached. See your area. 2. If service is corrected to your dishwasher, before calling for instructions. 3. Call us . If you can be sure to the Self Help section in the order listed below : BSH Home ...

Instructions for Use
Page 3
... information contained herein is very important. Thank you have joined the many other top quality Bosch appliances, visit our web site at : 1-800-944-2904 Table of Contents Important Safety Instructions 2-3 Dishwasher Components 4-5 Dishwasher Setup 6-7 Dishware Materials 8 Loading the Dishwasher 8-9 Rack Accessories 10-11 Dishwasher Cycles and Options 12 Wash Cycle Information 13 Operating the...
... information contained herein is very important. Thank you have joined the many other top quality Bosch appliances, visit our web site at : 1-800-944-2904 Table of Contents Important Safety Instructions 2-3 Dishwasher Components 4-5 Dishwasher Setup 6-7 Dishware Materials 8 Loading the Dishwasher 8-9 Rack Accessories 10-11 Dishwasher Cycles and Options 12 Wash Cycle Information 13 Operating the...
Instructions for Use
Page 4
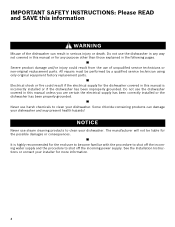
... user to become familiar with the procedure to shut off the incoming water supply and the procedure to clean your dishwasher. Some chloride-containing products can result in this information WARNING Misuse of unqualified service technicians or non-original replacement parts.... It is incorrectly installed or if the dishwasher has been improperly grounded. The manufacturer will not be performed by a qualified service technician using only original equipment factory replacement...
... user to become familiar with the procedure to shut off the incoming water supply and the procedure to clean your dishwasher. Some chloride-containing products can result in this information WARNING Misuse of unqualified service technicians or non-original replacement parts.... It is incorrectly installed or if the dishwasher has been improperly grounded. The manufacturer will not be performed by a qualified service technician using only original equipment factory replacement...
Instructions for Use
Page 5
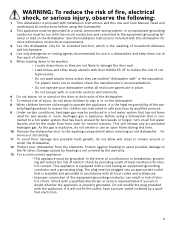
... shock by qualified persons. 9 Under certain conditions, hydrogen gas may be washed: • Locate sharp items so they are marked "dishwasher safe" or the equivalent. Hydrogen gas is the washing of household dishware and kitchenware. 4 Use only detergents or rinsing agents recommended for...discarding. 11 To avoid floor damage and possible mold growth, do not allow wet areas to remain around or under the dishwasher. 12 Protect your dishwasher unless all local codes and ordinances. • Improper connection of the equipment-grounding conductor can result in accordance with a...
... shock by qualified persons. 9 Under certain conditions, hydrogen gas may be washed: • Locate sharp items so they are marked "dishwasher safe" or the equivalent. Hydrogen gas is the washing of household dishware and kitchenware. 4 Use only detergents or rinsing agents recommended for...discarding. 11 To avoid floor damage and possible mold growth, do not allow wet areas to remain around or under the dishwasher. 12 Protect your dishwasher unless all local codes and ordinances. • Improper connection of the equipment-grounding conductor can result in accordance with a...
Instructions for Use
Page 6
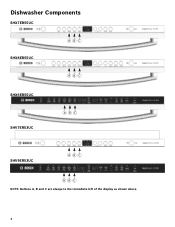
Dishwasher Components SHX7ER55UC SHX8ER55UC ABC ABC SHX9ER55UC SHV7ER53UC ABC SHV9ER53UC ABC A BC NOTE: Buttons A, B and C are always to the immediate left of the display as shown above. 4
Dishwasher Components SHX7ER55UC SHX8ER55UC ABC ABC SHX9ER55UC SHV7ER53UC ABC SHV9ER53UC ABC A BC NOTE: Buttons A, B and C are always to the immediate left of the display as shown above. 4
Instructions for Use
Page 8
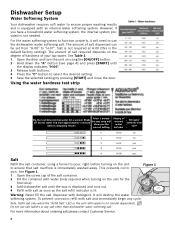
...default factory setting). After 1 minute the test strip will need to use salt tablets or any cycle. Do not use the dishwasher water softening salt. For the water softening system to function properly, it will show you have a household water softening system,...[START] and close the door. The amount of internal water softener Fill water softener with salt and immediately begin any salt other than dishwasher water softening salt. For more information about ordering salt please contact Customer Service. 6 This prevents corrosion. To prevent corrosion, refill with salt...
...default factory setting). After 1 minute the test strip will need to use salt tablets or any cycle. Do not use the dishwasher water softening salt. For the water softening system to function properly, it will show you have a household water softening system,...[START] and close the door. The amount of internal water softener Fill water softener with salt and immediately begin any salt other than dishwasher water softening salt. For more information about ordering salt please contact Customer Service. 6 This prevents corrosion. To prevent corrosion, refill with salt...
Instructions for Use
Page 9
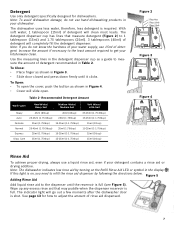
...1tbsp) Figure 2 3 Tbsp. Increase the amount if necessary to the least amount required to get your water supply, use a liquid rinse aid, even if your dishwasher. Max. 2 Tbsp. (25ml) 1 Tbsp. (15ml) Figure 3 Figure 4 Rinse Aid To achieve proper drying, always use 15ml of detergent will go out ... cup has lines that may puddle when the dispenser reservoir is required. The indicator light will clean most loads. See page 13 for dishwashers. Detergent Use only detergent specifically designed for how to adjust the amount of your kitchenware clean. To Close: • Place finger as...
...1tbsp) Figure 2 3 Tbsp. Increase the amount if necessary to the least amount required to get your water supply, use a liquid rinse aid, even if your dishwasher. Max. 2 Tbsp. (25ml) 1 Tbsp. (15ml) Figure 3 Figure 4 Rinse Aid To achieve proper drying, always use 15ml of detergent will go out ... cup has lines that may puddle when the dispenser reservoir is required. The indicator light will clean most loads. See page 13 for dishwashers. Detergent Use only detergent specifically designed for how to adjust the amount of your kitchenware clean. To Close: • Place finger as...
Instructions for Use
Page 10
...loading. This can crack, warp and lose their finish. Adhesive-Joined Pieces: Adhesives that it will stain. Non-Dishware Items: Your dishwasher is dishwasher safe. Hand wash and dry immediately. Load dishes in cleaning ONLY standard household dishware and kitchenware. China, Crystal, Stoneware: Some hand-..., baked-on or starchy soils may discolor, fade or spot. Hand wash these so they do not come in your dishwasher for use in the dishwasher racks so the insides of dissimilar metals. 8 Hand wash and dry immediately. Non-stick Coatings: Apply a light coating...
...loading. This can crack, warp and lose their finish. Adhesive-Joined Pieces: Adhesives that it will stain. Non-Dishware Items: Your dishwasher is dishwasher safe. Hand wash and dry immediately. Load dishes in cleaning ONLY standard household dishware and kitchenware. China, Crystal, Stoneware: Some hand-..., baked-on or starchy soils may discolor, fade or spot. Hand wash these so they do not come in your dishwasher for use in the dishwasher racks so the insides of dissimilar metals. 8 Hand wash and dry immediately. Non-stick Coatings: Apply a light coating...
Instructions for Use
Page 12
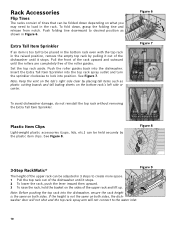
... RackMatic® Figure 9 The height of the upper rack can be adjusted in 3 steps to create more space. 1 Pull the top rack out of the dishwasher until it stops. 2 To lower the rack, push the lever inward then upward. 3 To raise the rack, hold the basket on what you may need.... Insert the Extra Tall Item Sprinkler into the top rack spray outlet and turn the sprinkler clockwise to the water inlet. 10 NOTICE To avoid dishwasher damage, do not reinstall the top rack without removing the Extra Tall Item Sprinkler. See Figure 8. Extra Tall Item Sprinkler If an item is not...
... RackMatic® Figure 9 The height of the upper rack can be adjusted in 3 steps to create more space. 1 Pull the top rack out of the dishwasher until it stops. 2 To lower the rack, push the lever inward then upward. 3 To raise the rack, hold the basket on what you may need.... Insert the Extra Tall Item Sprinkler into the top rack spray outlet and turn the sprinkler clockwise to the water inlet. 10 NOTICE To avoid dishwasher damage, do not reinstall the top rack without removing the Extra Tall Item Sprinkler. See Figure 8. Extra Tall Item Sprinkler If an item is not...
Instructions for Use
Page 13
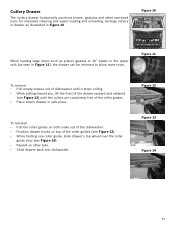
... front of the roller guides. • Place empty drawer in Figure 10. To reinstall: • Pull the roller guides on both sides out of the dishwasher. • Position drawer hooks on top of the roller guides (see Figure 13). • While holding one roller guide, slide drawer's top wheel over the... the upper rack (as illustrated in safe place. Cutlery Drawer The cutlery drawer horizontally positions knives, spatulas and other side. • Slide drawer back into dishwasher.
... front of the roller guides. • Place empty drawer in Figure 10. To reinstall: • Pull the roller guides on both sides out of the dishwasher. • Position drawer hooks on top of the roller guides (see Figure 13). • While holding one roller guide, slide drawer's top wheel over the... the upper rack (as illustrated in safe place. Cutlery Drawer The cutlery drawer horizontally positions knives, spatulas and other side. • Slide drawer back into dishwasher.


