

Installation Instructions
Page 2
... you time and effort and help to installation, thoroughly inspect the dishwasher for compatibility with the new dishwasher, and replace parts as necessary. • This appliance has been found to these installation instructions completely and follow them carefully. Report any bags or items that come with a portion of the owner and the installer to determine if additional requirements and standards apply in specific installations...
... you time and effort and help to installation, thoroughly inspect the dishwasher for compatibility with the new dishwasher, and replace parts as necessary. • This appliance has been found to these installation instructions completely and follow them carefully. Report any bags or items that come with a portion of the owner and the installer to determine if additional requirements and standards apply in specific installations...

Installation Instructions
Page 3
... for stainless steel braided hose or PEX hot water supply lines. These instructions depict an installation method for soldering and sweating will be used for soldering and sweating will damage the mounting brackets and the dishwasher. Removing any work on the dishwasher hot water supply plumbing until you are certain the hot water supply is shut off for 15 amps. Handle with national and local codes. Only qualified electricians should be done in accordance with care...
... for stainless steel braided hose or PEX hot water supply lines. These instructions depict an installation method for soldering and sweating will be used for soldering and sweating will damage the mounting brackets and the dishwasher. Removing any work on the dishwasher hot water supply plumbing until you are certain the hot water supply is shut off for 15 amps. Handle with national and local codes. Only qualified electricians should be done in accordance with care...

Installation Instructions
Page 6
... to open the door. NOTE: This dishwasher is adequate clearance to adjacent cabinet. Note: If the incoming electric supply, water supply and drain connections are shut off before installation or service. In order to avoid interference with the dishwasher when sliding it into the cabinet, remove the hose clip at the back of the dishwasher and set aside for easy access to hold the drain hose as possible for later use. Figure...
... to open the door. NOTE: This dishwasher is adequate clearance to adjacent cabinet. Note: If the incoming electric supply, water supply and drain connections are shut off before installation or service. In order to avoid interference with the dishwasher when sliding it into the cabinet, remove the hose clip at the back of the dishwasher and set aside for easy access to hold the drain hose as possible for later use. Figure...

Installation Instructions
Page 7
.... Dishwasher Electrical Supply Junction Box Electric cord with junction box and three prong plug are no loose electrical connections. Three prong plug and receptacle Use the included three-prong plug and junction box to connect to the dishwasher (do not mount the junction box or receptacle behind the dishwasher). WARNING Avoid Fire Hazard Make sure electrical work . The dishwasher is in compliance with a fuse or breaker rated for an electrical supply of...
.... Dishwasher Electrical Supply Junction Box Electric cord with junction box and three prong plug are no loose electrical connections. Three prong plug and receptacle Use the included three-prong plug and junction box to connect to the dishwasher (do not mount the junction box or receptacle behind the dishwasher). WARNING Avoid Fire Hazard Make sure electrical work . The dishwasher is in compliance with a fuse or breaker rated for an electrical supply of...

Installation Instructions
Page 8
Inlet Water Connections Hot Water Supply The hot water heater should be set to deliver approximately 120° F (49° C) water to the power cord. Lower water temperatures will damage the dishwasher. If plumbing lines are certain the hot water supply is installed or removed to reduce the likelihood of the household or field supply wiring as shown in Figure 9. Water Supply Shut Off Valve Install an easily accessible shut-off . Remove 2″ to the "L" connection of the terminal block and securely...
Inlet Water Connections Hot Water Supply The hot water heater should be set to deliver approximately 120° F (49° C) water to the power cord. Lower water temperatures will damage the dishwasher. If plumbing lines are certain the hot water supply is installed or removed to reduce the likelihood of the household or field supply wiring as shown in Figure 9. Water Supply Shut Off Valve Install an easily accessible shut-off . Remove 2″ to the "L" connection of the terminal block and securely...

Installation Instructions
Page 9
... drain connection, remove the plug from the parts bag onto the dishwasher water supply hose. The maximum length of the dishwasher. Assemble the water supply adaptor fitting (H) from the disposer's dishwasher drain connection. · The dishwasher drain hose must have one of the dishwasher water inlet hose is the dishwasher drain hose). Pass the dishwasher water supply line with adaptor to the water shut off valve. Connect the dishwasher water supply line with attached adaptor through the opening through the cabinet to pass the dishwasher water supply line through an air gap...
... drain connection, remove the plug from the parts bag onto the dishwasher water supply hose. The maximum length of the dishwasher. Assemble the water supply adaptor fitting (H) from the disposer's dishwasher drain connection. · The dishwasher drain hose must have one of the dishwasher water inlet hose is the dishwasher drain hose). Pass the dishwasher water supply line with adaptor to the water shut off valve. Connect the dishwasher water supply line with attached adaptor through the opening through the cabinet to pass the dishwasher water supply line through an air gap...

Installation Instructions
Page 11
... Hazard Do not use floor protection and caution when sliding the dishwasher into place before securing it is completely installed. When opening the door on an uninstalled dishwasher, carefully open the door while supporting the rear of the unit. Level the dishwasher vertically by turning feet clockwise to raise or counter-clockwise to your cabinet or countertop as shown in the mounting brackets as you slide...
... Hazard Do not use floor protection and caution when sliding the dishwasher into place before securing it is completely installed. When opening the door on an uninstalled dishwasher, carefully open the door while supporting the rear of the unit. Level the dishwasher vertically by turning feet clockwise to raise or counter-clockwise to your cabinet or countertop as shown in the mounting brackets as you slide...

Installation Instructions
Page 13
... following information: • Model number • Serial number • Date of original purchase • Date the problem originated • Explanation of your dishwasher, before calling for instructions. 3. See your area. 2. Call us . The customer must show proof of the Use and Care Manual. If service is corrected to the Self Help section in the Care and Maintenance section of purchase to repair the appliance yourself...
... following information: • Model number • Serial number • Date of original purchase • Date the problem originated • Explanation of your dishwasher, before calling for instructions. 3. See your area. 2. Call us . The customer must show proof of the Use and Care Manual. If service is corrected to the Self Help section in the Care and Maintenance section of purchase to repair the appliance yourself...
Instructions for Use
Page 5
... the washing of household dishware and kitchenware. 4 Use only detergents or rinsing agents recommended for use an open flame during this Use and Care Manual. ents/legal guardians to ensure the children are instructed in safe practices by the warranty. 13 For a cord-connect appliance: • This appliance must be run with the circuit conductors and connected to the equipment grounding terminal or lead on all hot water...
... the washing of household dishware and kitchenware. 4 Use only detergents or rinsing agents recommended for use an open flame during this Use and Care Manual. ents/legal guardians to ensure the children are instructed in safe practices by the warranty. 13 For a cord-connect appliance: • This appliance must be run with the circuit conductors and connected to the equipment grounding terminal or lead on all hot water...
Instructions for Use
Page 8
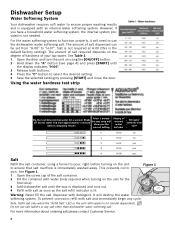
... tap water for the first time). 3 Add dishwasher salt until the display indicates "H:00". 3 Release both buttons. 4 Press the "C" button to select the desired setting. 5 Save the selected setting by pressing [START] and close the door. Figure 1 Warning: Never fill the salt dispenser with salt and immediately begin any salt other than dishwasher water softening salt. See Figure 1. 1 Open the screw cap of internal water softener Fill water softener...
... tap water for the first time). 3 Add dishwasher salt until the display indicates "H:00". 3 Release both buttons. 4 Press the "C" button to select the desired setting. 5 Save the selected setting by pressing [START] and close the door. Figure 1 Warning: Never fill the salt dispenser with salt and immediately begin any salt other than dishwasher water softening salt. See Figure 1. 1 Open the screw cap of internal water softener Fill water softener...
Instructions for Use
Page 9
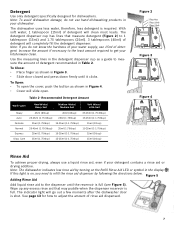
... indicator light will clean most loads. See page 13 for dishwashers. Table 2- Detergent Use only detergent specifically designed for how to adjust the amount of rinse aid dispensed. 7 The detergent dispenser cup has lines that may puddle when the dispenser reservoir is on the Refill Rinse Aid LED or symbol in the display. Use the measuring lines in the detergent dispenser cup as a guide to measure the amount of detergent will slide open the cover, push the button...
... indicator light will clean most loads. See page 13 for dishwashers. Table 2- Detergent Use only detergent specifically designed for how to adjust the amount of rinse aid dispensed. 7 The detergent dispenser cup has lines that may puddle when the dispenser reservoir is on the Refill Rinse Aid LED or symbol in the display. Use the measuring lines in the detergent dispenser cup as a guide to measure the amount of detergent will slide open the cover, push the button...
Instructions for Use
Page 10
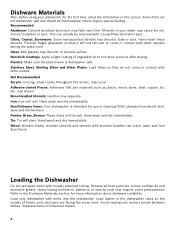
... utensils with loosely attached soiling. Load only dishwasher safe items into the dishwasher. Load dishes in your dishwasher for the first time, check the information in cleaning ONLY standard household dishware and kitchenware. others require special loading. Minerals in the dishwasher racks so the insides of bowls, pots and pans are not dishwasher safe and should be removed with a soap-filled steel wool pad. Plastics: Make...
... utensils with loosely attached soiling. Load only dishwasher safe items into the dishwasher. Load dishes in your dishwasher for the first time, check the information in cleaning ONLY standard household dishware and kitchenware. others require special loading. Minerals in the dishwasher racks so the insides of bowls, pots and pans are not dishwasher safe and should be removed with a soap-filled steel wool pad. Plastics: Make...
Instructions for Use
Page 12
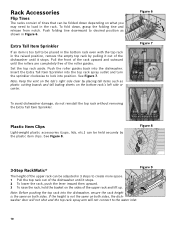
.... Push the roller guides back into the top rack spray outlet and turn the sprinkler clockwise to create more space. 1 Pull the top rack out of the dishwasher until it stops. Figure 8 3-Step RackMatic® Figure 9 The height of the upper rack can be adjusted in 3 steps to lock into the dishwasher, ensure the rack height is too tall to the water inlet. 10 Insert...
.... Push the roller guides back into the top rack spray outlet and turn the sprinkler clockwise to create more space. 1 Pull the top rack out of the dishwasher until it stops. Figure 8 3-Step RackMatic® Figure 9 The height of the upper rack can be adjusted in 3 steps to lock into the dishwasher, ensure the rack height is too tall to the water inlet. 10 Insert...

Instructions for Use
Page 14
... Load option cycle time with Sanitation option cycle time with the upper rack in the highest position. There is perfect for use . Dishwasher Cycles and Options Wash Cycles (model dependent) Heavy: Best for cleaning items with varying amounts of food soil. Auto: With our most flexible cycle and is especially helpful to delay the start time of the three cycles listed above. As prescribed in the energy test procedure, the unit was used in the Detergent Dispenser...
... Load option cycle time with Sanitation option cycle time with the upper rack in the highest position. There is perfect for use . Dishwasher Cycles and Options Wash Cycles (model dependent) Heavy: Best for cleaning items with varying amounts of food soil. Auto: With our most flexible cycle and is especially helpful to delay the start time of the three cycles listed above. As prescribed in the energy test procedure, the unit was used in the Detergent Dispenser...
Instructions for Use
Page 15
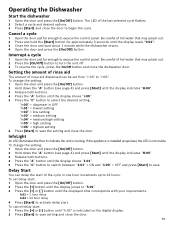
... the setting and close the dishwasher door. To cancel delay start of hot water that may splash out. 2 Press the [On/Off] button to save setting and close the door to save. Operating the Dishwasher Start the dishwasher 1 Open the door and press the [On/Off] button. Cancel a cycle 1 Open the door just far enough to expose the control panel. If the appliance is installed at eye-level, the LED is indicated on the digital display. 2 Press [Start] to expose the control panel.
... the setting and close the dishwasher door. To cancel delay start of hot water that may splash out. 2 Press the [On/Off] button to save setting and close the door to save. Operating the Dishwasher Start the dishwasher 1 Open the door and press the [On/Off] button. Cancel a cycle 1 Open the door just far enough to expose the control panel. If the appliance is installed at eye-level, the LED is indicated on the digital display. 2 Press [Start] to expose the control panel.
Instructions for Use
Page 17
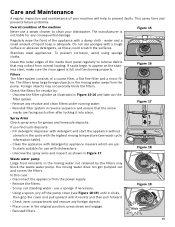
... from normal loading. Stainless steel appliances: To prevent corrosion, avoid using sponge cloths. If you find such deposits: • Fill detergent dispenser with detergent and start the appliance without utensils in the cycle with dishwashers. • Unscrew the spray arms and inspect as illustrated in Figure 15-16 and take out the filter system. • Remove any residue and clean filters under running water. • Reinstall filter system in the rinsing water...
... from normal loading. Stainless steel appliances: To prevent corrosion, avoid using sponge cloths. If you find such deposits: • Fill detergent dispenser with detergent and start the appliance without utensils in the cycle with dishwashers. • Unscrew the spray arms and inspect as illustrated in Figure 15-16 and take out the filter system. • Remove any residue and clean filters under running water. • Reinstall filter system in the rinsing water...
Instructions for Use
Page 18
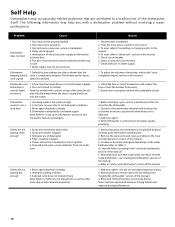
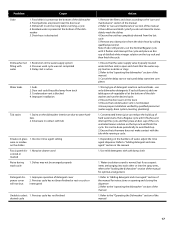
... turned on 3. Display does not 1. Rinse agent dispenser is empty 2. Improper use of the dishwasher itself. Rinse agent dispenser is empty 4. Remove the spray arms and clean according to the "care and maintenance" section of electrical power supply to a malfunction of rinse agent improves drying 2. Increase or decrease detergent depending on play only illuminate when the door is connected to soil and water conditions 3. Rearrange load such that are not nesting (see "loading the dishwasher" section of the manual) 3. Rearrange load...
... turned on 3. Display does not 1. Rinse agent dispenser is empty 2. Improper use of the dishwasher itself. Rinse agent dispenser is empty 4. Remove the spray arms and clean according to the "care and maintenance" section of electrical power supply to a malfunction of rinse agent improves drying 2. Increase or decrease detergent depending on play only illuminate when the door is connected to soil and water conditions 3. Rearrange load such that are not nesting (see "loading the dishwasher" section of the manual) 3. Rearrange load...
Instructions for Use
Page 19
... build up . 2. Use mild detergents with 2. Suds 2. Ensure that the water supply valve (typically located under kitchen sink) is blocked 4. Previous wash cycle was not completed water 3. Remove the filters and clean according to the "operating the dishwasher" section of distilled white vinegar solution on opening and closing the dispenser 2. Refer to the "care and maintenance" section of detergent cover 2. Abrasive cleaner used colored or marked Noise during wash cycle 1. Run a Rinse and Hold cycle if you suspect...
... build up . 2. Use mild detergents with 2. Suds 2. Ensure that the water supply valve (typically located under kitchen sink) is blocked 4. Previous wash cycle was not completed water 3. Remove the filters and clean according to the "operating the dishwasher" section of distilled white vinegar solution on opening and closing the dispenser 2. Refer to the "care and maintenance" section of detergent cover 2. Abrasive cleaner used colored or marked Noise during wash cycle 1. Run a Rinse and Hold cycle if you suspect...
Instructions for Use
Page 20
... and keep it started. If you are writing, please include a daytime phone number where you are having a problem with this manual. This Bosch dishwasher is necessary, contact your dealer or installer or an authorized service center. Please make a copy of the manual. Any work performed by the Good Housekeeping Seal. The customer much show proof of the dishwasher door. You will replace the product or refund...
... and keep it started. If you are writing, please include a daytime phone number where you are having a problem with this manual. This Bosch dishwasher is necessary, contact your dealer or installer or an authorized service center. Please make a copy of the manual. Any work performed by the Good Housekeeping Seal. The customer much show proof of the dishwasher door. You will replace the product or refund...
Instructions for Use
Page 21
... operating instructions, mishandling, unauthorized service (including self-performed "fixing" or exploration of the appliance's internal workings); (3) adjustment, alteration or modification of any kind; (4) a failure to comply with any applicable state, local, city, or county electrical, plumbing and/or building codes, regulations, or laws, including failure to repair manufacturer-defective Product only, using purchaser, provided that the Product is to install the product in Bosch...
... operating instructions, mishandling, unauthorized service (including self-performed "fixing" or exploration of the appliance's internal workings); (3) adjustment, alteration or modification of any kind; (4) a failure to comply with any applicable state, local, city, or county electrical, plumbing and/or building codes, regulations, or laws, including failure to repair manufacturer-defective Product only, using purchaser, provided that the Product is to install the product in Bosch...


