
Instructions for Use
Page 6
... results. Press "B" to select desired setting. . Close the door (for hidden controls only). 300-370 . Using a water hardness test strip _Jrzetn_uchen ojpbay (I mmmml 0 no 0 no H:01 H:02 H:03 H:04 H:05 _H:06 H:07 yes yes yes yes yes _ yes yes from "H:00" to use this is equipped with an internal water...
... results. Press "B" to select desired setting. . Close the door (for hidden controls only). 300-370 . Using a water hardness test strip _Jrzetn_uchen ojpbay (I mmmml 0 no 0 no H:01 H:02 H:03 H:04 H:05 _H:06 H:07 yes yes yes yes yes _ yes yes from "H:00" to use this is equipped with an internal water...

Instructions for Use
Page 8
... not change the amount of rinse-aid dispensed can be set from "r:00" to the dispenser as shown until the display indicates "r:05". Switching off . , "r:01" means the Rinse Agent dispenser is at the lowest setting. , "r:02" means the Rinse Agent dispenser is low setting. , "r:03" means the Rinse Agent dispenser...
... not change the amount of rinse-aid dispensed can be set from "r:00" to the dispenser as shown until the display indicates "r:05". Switching off . , "r:01" means the Rinse Agent dispenser is at the lowest setting. , "r:02" means the Rinse Agent dispenser is low setting. , "r:03" means the Rinse Agent dispenser...
Instructions for Use
Page 14
... is recommended to put a little less detergent in the detergent dispenser than for "A" flashes and display indicates "H:04". , Press "A" until the display shows "1:01" , Press "C" to switch between "1:01" and "1:00" and press START to wash (e.g. with more water Sanitize option * All models are designed to active the Sanitation features. Time remaining...
... is recommended to put a little less detergent in the detergent dispenser than for "A" flashes and display indicates "H:04". , Press "A" until the display shows "1:01" , Press "C" to switch between "1:01" and "1:00" and press START to wash (e.g. with more water Sanitize option * All models are designed to active the Sanitation features. Time remaining...

Instructions for Use
Page 15
...Press button "C" (see page 4) to 24 hours. , Openthe door (forhiddencontrolsonly).Turn uniton usingthe ON/OFFbutton. , Press"+" buttonuntilthe timer programmingdisplayjumpsto 01 . , Press + or- Otherwise, expansion (pressure) may increase slightly. (Caution if utensils are delicate!) , Open the door. (for several minutes ...and then close. ON = d:01 or OFF = d:00 , Close the door (for hidden controls only). , Press the ON/OFF button. If the door was opened ...
...Press button "C" (see page 4) to 24 hours. , Openthe door (forhiddencontrolsonly).Turn uniton usingthe ON/OFFbutton. , Press"+" buttonuntilthe timer programmingdisplayjumpsto 01 . , Press + or- Otherwise, expansion (pressure) may increase slightly. (Caution if utensils are delicate!) , Open the door. (for several minutes ...and then close. ON = d:01 or OFF = d:00 , Close the door (for hidden controls only). , Press the ON/OFF button. If the door was opened ...
Instructions for Use
Page 16
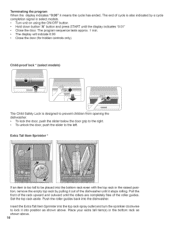
... controls only). To unlock the door, push the slider to the right. . Pull the front of the rack upward and outward until the display indicates "0:01" . Place your extra tall item(s) in select models. . Turn unit on using the ON/OFF button. . Hold down button "A" button and press START until the...
... controls only). To unlock the door, push the slider to the right. . Pull the front of the rack upward and outward until the display indicates "0:01" . Place your extra tall item(s) in select models. . Turn unit on using the ON/OFF button. . Hold down button "A" button and press START until the...


