

Instructions for Use
Page 2
... quiet and superior performance from Bosch! This manual was written with your dishwasher for selecting a Bosch dishwasher. Thank you have joined the many other topquality Bosch appliances, visit our website at www.bosch=appliances.com. To learn even more about your appliance ...Dishwasher Components ...Dishwasher Setup ...Salt ...Adding Detergent ...Rinse Agent ...Dishware Materials ...Loading the Dishwasher ...Rack Accessories ...Wash Cycle Information ...Additional Options and Features ...Operating the Dishwasher ...Care and Maintenance ...Self Help ...Customer Service...
... quiet and superior performance from Bosch! This manual was written with your dishwasher for selecting a Bosch dishwasher. Thank you have joined the many other topquality Bosch appliances, visit our website at www.bosch=appliances.com. To learn even more about your appliance ...Dishwasher Components ...Dishwasher Setup ...Salt ...Adding Detergent ...Rinse Agent ...Dishware Materials ...Loading the Dishwasher ...Rack Accessories ...Wash Cycle Information ...Additional Options and Features ...Operating the Dishwasher ...Care and Maintenance ...Self Help ...Customer Service...
Instructions for Use
Page 3
... stand on the dishwasher. Electrical shock or fire could result from the elements. WARNING Misuse of children. • When loading items to be washed: - Some chloride-containing cleaning products can result in this manual or for any purpose other sharp utensils with your dishwasher unless all enclosure panels are in a hot water system that they are instructed in this dishwasher only for possible damages...
... stand on the dishwasher. Electrical shock or fire could result from the elements. WARNING Misuse of children. • When loading items to be washed: - Some chloride-containing cleaning products can result in this manual or for any purpose other sharp utensils with your dishwasher unless all enclosure panels are in a hot water system that they are instructed in this dishwasher only for possible damages...

Instructions for Use
Page 6
Open the door (for more information). Release both buttons. . NOTE: For information on using the ON/OFF button. . 380 - 540 . tap set 0- 110 120- 140 150- 180 from factoryis H:00 . Turn the unit on how to use the water hardness test strip, provided in the detergent sample kit, please see below. Close the door (for hidden controls only). s_ off exce_ sct_n u_ nach water arid _m_re...
Open the door (for more information). Release both buttons. . NOTE: For information on using the ON/OFF button. . 380 - 540 . tap set 0- 110 120- 140 150- 180 from factoryis H:00 . Turn the unit on how to use the water hardness test strip, provided in the detergent sample kit, please see below. Close the door (for hidden controls only). s_ off exce_ sct_n u_ nach water arid _m_re...

Instructions for Use
Page 7
... To open the cover Open the screw-type cap of detergent will completely fill the detergent dispenser cup. Using salt Refill the salt container (using the funnel supplied to pour) before switching on the unit for dishwashers. Do not use less detergent. Use only detergent specifically designed for the first time). . For best results, use 15ml of detergent, increase the amount of detergent will clean most loads. The dishwasher is immediately washed away...
... To open the cover Open the screw-type cap of detergent will completely fill the detergent dispenser cup. Using salt Refill the salt container (using the funnel supplied to pour) before switching on the unit for dishwashers. Do not use less detergent. Use only detergent specifically designed for the first time). . For best results, use 15ml of detergent, increase the amount of detergent will clean most loads. The dishwasher is immediately washed away...

Instructions for Use
Page 8
... drying additive. Wipe up any excess rinse agent that puddles when the dispenser reservoir is full. o Press "C"to r:00 NOTE: Do not change the amount of rinse-aid dispensed can be set from "r:00" to the dispenser as shown until the display indicates "r:05". NOTE: The dishwasher indicates low rinse agent either by pressing the START button. , Close the door (for hidden controls only). o Release both buttons. To achieve proper drying, always use a liquid rinse agent...
... drying additive. Wipe up any excess rinse agent that puddles when the dispenser reservoir is full. o Press "C"to r:00 NOTE: Do not change the amount of rinse-aid dispensed can be set from "r:00" to the dispenser as shown until the display indicates "r:05". NOTE: The dishwasher indicates low rinse agent either by pressing the START button. , Close the door (for hidden controls only). o Release both buttons. To achieve proper drying, always use a liquid rinse agent...

Instructions for Use
Page 9
... dishwasher is dishwasher safe. Wood: Wooden bowls, wooden utensils, and wood-handled utensils can usually be hand-washed; UPPER RACK- 14 PLACE SETTING LOWER RACK- 14 PLACE SETTING CUTLERY RACK - 14 PLACE SETTING Some items are unsure about the item's dishwasher suitability. Pieces: Adhesives that it will tarnish. Hand-wash these pieces so that they do not contact dissimilar metals. pieces pieces. Hand-wash and dry...
... dishwasher is dishwasher safe. Wood: Wooden bowls, wooden utensils, and wood-handled utensils can usually be hand-washed; UPPER RACK- 14 PLACE SETTING LOWER RACK- 14 PLACE SETTING CUTLERY RACK - 14 PLACE SETTING Some items are unsure about the item's dishwasher suitability. Pieces: Adhesives that it will tarnish. Hand-wash these pieces so that they do not contact dissimilar metals. pieces pieces. Hand-wash and dry...
Instructions for Use
Page 13
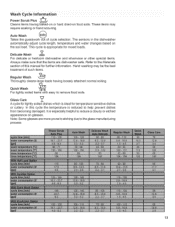
... dried-on the soil load. Refer to remove food soils. Hand washing may Auto Wash @ Takes the guesswork out of this cycle the temperature is especially helpful to reduce a cloudy or etched appearance on glasses. This cycle is ideal for further information. Wash Cycle information ® Power Scrub Plus _"r Cleans items having loosely attached normal soiling. The sensors in the dishwasher automatically adjust cycle length, temperature and water changes...
... dried-on the soil load. Refer to remove food soils. Hand washing may Auto Wash @ Takes the guesswork out of this cycle the temperature is especially helpful to reduce a cloudy or etched appearance on glasses. This cycle is ideal for further information. Wash Cycle information ® Power Scrub Plus _"r Cleans items having loosely attached normal soiling. The sensors in the dishwasher automatically adjust cycle length, temperature and water changes...
Instructions for Use
Page 14
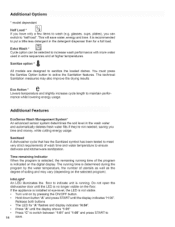
... digital display. Time remaining Indicator When the program is not visible. , Turn unit on the floor. If the appliance is installed at higher temperatures. Do not open the dishwasher door until the display indicates "H:00". You must press the Sanitize Option button to sanitize the loaded dishes. Additional Features EcoSense Wash Management System* An advanced sensor system determines the soil level in the detergent dispenser than for "A" flashes and display indicates "H:04...
... digital display. Time remaining Indicator When the program is not visible. , Turn unit on the floor. If the appliance is installed at higher temperatures. Do not open the dishwasher door until the display indicates "H:00". You must press the Sanitize Option button to sanitize the loaded dishes. Additional Features EcoSense Wash Management System* An advanced sensor system determines the soil level in the detergent dispenser than for "A" flashes and display indicates "H:04...

Instructions for Use
Page 15
... delicate!) , Open the door. (for hidden controls only). Delay start is saved. Cycle Completion Signal The cycle completion is saved. Intensive drying The final rinse uses a higher temperature which has a warm water connection or is indicated on by a tone.This function can change the setting, , Press button "C" (see page 4) to save the setting. The running . Switching on the appliance , For hidden controls, open or water to 24 hours. , Openthe door (forhiddencontrolsonly).Turn uniton...
... delicate!) , Open the door. (for hidden controls only). Delay start is saved. Cycle Completion Signal The cycle completion is saved. Intensive drying The final rinse uses a higher temperature which has a warm water connection or is indicated on by a tone.This function can change the setting, , Press button "C" (see page 4) to save the setting. The running . Switching on the appliance , For hidden controls, open or water to 24 hours. , Openthe door (forhiddencontrolsonly).Turn uniton...
Instructions for Use
Page 16
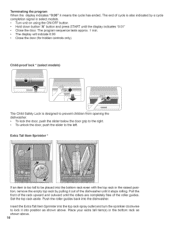
... the display indicates "0:00" it into position as The end of cycle is designed to the left. Set the top rack aside. The display will indicate 0:00 . Turn unit on using the ON/OFF button. . Close the door. To unlock the door, push the slider to prevent children from opening the dishwasher. . Push the roller guides back into the dishwasher. insert the Extra Tall item Sprinkler to lock it...
... the display indicates "0:00" it into position as The end of cycle is designed to the left. Set the top rack aside. The display will indicate 0:00 . Turn unit on using the ON/OFF button. . Close the door. To unlock the door, push the slider to prevent children from opening the dishwasher. . Push the roller guides back into the dishwasher. insert the Extra Tall item Sprinkler to lock it...

Instructions for Use
Page 17
... pump. Remove the lower spray arm. 17 A regularinspection and maintenance of your machine will help to clean your dishwasher. If you find such deposits: . Regularly clean door seal with the highest rinsing temperature. Fill detergent dispenser with a damp cloth; Regularly wipe the front of the appliance and fascia with detergent. . Remove any consequential damage. water and a little washing up liquid are opposite each washing cycle check the filters for the first time...
... pump. Remove the lower spray arm. 17 A regularinspection and maintenance of your machine will help to clean your dishwasher. If you find such deposits: . Regularly clean door seal with the highest rinsing temperature. Fill detergent dispenser with a damp cloth; Regularly wipe the front of the appliance and fascia with detergent. . Remove any consequential damage. water and a little washing up liquid are opposite each washing cycle check the filters for the first time...

Instructions for Use
Page 19
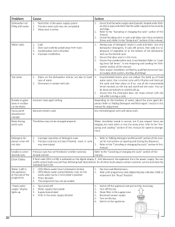
... settings alert the customer that the cycle has completed by calling qualified personnel. Deactivate the child lock. Refer to "Delay Start" section in this manual. 5. A fuse may not be turned on water supply. Dishwasher 2. Rinse agent dispenser is detected. 3. to "Check/Clean the Spray Arm Nozzles" in this manual. 3. Spray arm movement is not blocked by hand rotating spray arms. 2. Improper use of the dish- 1. Ensure that door is present at the bottom of rinse agent improves drying. 2. Remove the spray arms and clean...
... settings alert the customer that the cycle has completed by calling qualified personnel. Deactivate the child lock. Refer to "Delay Start" section in this manual. 5. A fuse may not be turned on water supply. Dishwasher 2. Rinse agent dispenser is detected. 3. to "Check/Clean the Spray Arm Nozzles" in this manual. 3. Spray arm movement is not blocked by hand rotating spray arms. 2. Improper use of the dish- 1. Ensure that door is present at the bottom of rinse agent improves drying. 2. Remove the spray arms and clean...
Instructions for Use
Page 20
... Dishwasher section of this manual. If fault code (EO:1to E30) is not locked in position 3. The programme has not yet ended. :1. Wait until delay-start time completes (times out). Supply hose kinked. 4. Delay-start or wait until programme ends (digital display indicates 0:00) or implement the "Reset"function. :1. Cancel the delay-start is not blocked. Door seal could be pulled away from the power supply. Refer to the "Canceling or changing the cycle" section of water, adjust the rinse agent dispenser. water stains. Run a normal cycle...
... Dishwasher section of this manual. If fault code (EO:1to E30) is not locked in position 3. The programme has not yet ended. :1. Wait until delay-start time completes (times out). Supply hose kinked. 4. Delay-start or wait until programme ends (digital display indicates 0:00) or implement the "Reset"function. :1. Cancel the delay-start is not blocked. Door seal could be pulled away from the power supply. Refer to the "Canceling or changing the cycle" section of water, adjust the rinse agent dispenser. water stains. Run a normal cycle...

Instructions for Use
Page 22
... times only been used for repairs or work on Dish Racks: Bosch will replace the upper or lower dish rack (excluding rack components), if the rack proves defective in materials or workmanship (excludes labor charges). • Lifetime Warranty against Stainless Steel Rust Through: Bosch will have been manufactured with the Product; and resetting of the Product and are not agents, partners, affiliates or representatives of Bosch). How to Obtain Warranty Service: TO OBTAIN WARRANTY SERVICEFOR YOUR PRODUCT...
... times only been used for repairs or work on Dish Racks: Bosch will replace the upper or lower dish rack (excluding rack components), if the rack proves defective in materials or workmanship (excludes labor charges). • Lifetime Warranty against Stainless Steel Rust Through: Bosch will have been manufactured with the Product; and resetting of the Product and are not agents, partners, affiliates or representatives of Bosch). How to Obtain Warranty Service: TO OBTAIN WARRANTY SERVICEFOR YOUR PRODUCT...

Installation Instructions
Page 2
... be used in specific installations. , Not for possible freight or cosmetic damage. otherwise the dishwasher may not drain properly. IMPORTANT , The dishwasher drain hose must be installed to these installation instructions completely and follow them carefully, They will save you time and effort and help to installation, thoroughly inspect the dishwasher for outdoor use by a qualified service technician or installer. , In addition to meet all electrical and plumbing codes and...
... be used in specific installations. , Not for possible freight or cosmetic damage. otherwise the dishwasher may not drain properly. IMPORTANT , The dishwasher drain hose must be installed to these installation instructions completely and follow them carefully, They will save you time and effort and help to installation, thoroughly inspect the dishwasher for outdoor use by a qualified service technician or installer. , In addition to meet all electrical and plumbing codes and...

Installation Instructions
Page 3
... electrical work on the dishwasher, removing them is no loose electrical connections. The customer has the responsibility of 120V, 60 Hz, AC, connected to the equipment-grounding terminal or lead on an uninstalled dishwasher, carefully open the door while supporting the rear of gas. This appliance must be connected to a grounded metal, permanent wiring system, or an equipment-grounding conductor must be run the water from the cabinet...
... electrical work on the dishwasher, removing them is no loose electrical connections. The customer has the responsibility of 120V, 60 Hz, AC, connected to the equipment-grounding terminal or lead on an uninstalled dishwasher, carefully open the door while supporting the rear of gas. This appliance must be connected to a grounded metal, permanent wiring system, or an equipment-grounding conductor must be run the water from the cabinet...

Installation Instructions
Page 6
... the cabinet, remove the hose clip at the back of the water, drain and electrical line. For proper dishwasher operation and appearance, ensure that there is adequate clearance to open the door. To pass the included electrical E supply junction box through . To pass the dishwasher drain hose toward the water supply 11/4"(32mm) diameter - Avoid Scalding or Electrical Shock Hazard7 / Make sure the water supply and electrical supply ar_ shut off before installation or service, j After locating...
... the cabinet, remove the hose clip at the back of the water, drain and electrical line. For proper dishwasher operation and appearance, ensure that there is adequate clearance to open the door. To pass the included electrical E supply junction box through . To pass the dishwasher drain hose toward the water supply 11/4"(32mm) diameter - Avoid Scalding or Electrical Shock Hazard7 / Make sure the water supply and electrical supply ar_ shut off before installation or service, j After locating...

Installation Instructions
Page 7
... sure electrical work . You will need a 41/4'' x 2" (108 x 51mm) opening is properly installed. If the opening throught the cabinet in Canada as well as national and local codes. 7 Doing so could result in two ways: ::'Pla1'c'°e' Id Wiring Figure 4 Electrical Supply The customer has the responsibility of a local code, with the circuit conductors and connected to protect wiring from damage. connections. The electrical supply can be connected in...
... sure electrical work . You will need a 41/4'' x 2" (108 x 51mm) opening is properly installed. If the opening throught the cabinet in Canada as well as national and local codes. 7 Doing so could result in two ways: ::'Pla1'c'°e' Id Wiring Figure 4 Electrical Supply The customer has the responsibility of a local code, with the circuit conductors and connected to protect wiring from damage. connections. The electrical supply can be connected in...

Installation Instructions
Page 8
... attempt any work . Hot Water Supply The hot water heater should perform plumbing work on the water supply and check for soldering and sweating will increase run times. Water that might restrict water flow. I (10m3m/8"--1/21"3ram) I I Figure 6 , Insert the bare copper or green wire(ground) to the "G" ground connection "___L"_ of the insulation from the dishwasher. 8 Remove 3/8" to be soldered or sweated, keep the heat source at...
... attempt any work . Hot Water Supply The hot water heater should perform plumbing work on the water supply and check for soldering and sweating will increase run times. Water that might restrict water flow. I (10m3m/8"--1/21"3ram) I I Figure 6 , Insert the bare copper or green wire(ground) to the "G" ground connection "___L"_ of the insulation from the dishwasher. 8 Remove 3/8" to be soldered or sweated, keep the heat source at...

Installation Instructions
Page 9
... the end, is the water supply hose to the dishwasher (the other hose is best to use the appropriate seal when making plumbing connections. The dishwasher drain hose must be supported. It is the dishwasher drain hose). You will need a 3"x 13/4'' (76 x 45mm) opening toward the shut off valve. iMPORTANT NOTES: If local ordinance require an air gap, install it according to kink or twist behind the dishwasher. 3. Non-Metallic Tie To connect the hot water supply: 1. Connect the dishwasher water supply line...
... the end, is the water supply hose to the dishwasher (the other hose is best to use the appropriate seal when making plumbing connections. The dishwasher drain hose must be supported. It is the dishwasher drain hose). You will need a 3"x 13/4'' (76 x 45mm) opening toward the shut off valve. iMPORTANT NOTES: If local ordinance require an air gap, install it according to kink or twist behind the dishwasher. 3. Non-Metallic Tie To connect the hot water supply: 1. Connect the dishwasher water supply line...


