

Installation Instructions
Page 2
... dishwasher may not drain properly. • This dishwasher is replacing another dishwasher, check the existing dishwasher connections for use only, and should not be in specific installations. • Not for possible freight or cosmetic damage. NOTE: Do not discard any damage immediately. Report any bags or items that come with a portion of installation. These instructions are intended for compatibility with the new dishwasher, and replace parts...
... dishwasher may not drain properly. • This dishwasher is replacing another dishwasher, check the existing dishwasher connections for use only, and should not be in specific installations. • Not for possible freight or cosmetic damage. NOTE: Do not discard any damage immediately. Report any bags or items that come with a portion of installation. These instructions are intended for compatibility with the new dishwasher, and replace parts...

Installation Instructions
Page 3
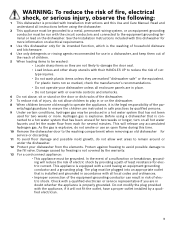
.... Make sure electrical work . Do not use the dishwasher until you are installed on the appliance. Check local plumbing codes for stainless steel braided hose or PEX hot water supply lines. All plumbing should perform electrical work on the dishwasher electric supply circuit until it is shut off for weeks, run with a fuse or breaker rated for 15 amps. Handle with national and local codes. In some conditions, hydrogen gas can expose hot water connections, electrical power and sharp...
.... Make sure electrical work . Do not use the dishwasher until you are installed on the appliance. Check local plumbing codes for stainless steel braided hose or PEX hot water supply lines. All plumbing should perform electrical work on the dishwasher electric supply circuit until it is shut off for weeks, run with a fuse or breaker rated for 15 amps. Handle with national and local codes. In some conditions, hydrogen gas can expose hot water connections, electrical power and sharp...

Installation Instructions
Page 6
... Figure 5. Figure 5 WARNING Avoid Electrical Shock/Fire Hazard Do not allow for your new dishwasher, you will need to create any required openings to avoid interference with the dishwasher when sliding it into the cabinet, remove the hose clip at the back of the dishwasher as possible for all in Figure 4. Note: If the incoming electric supply, water supply and drain connections are shut off before installation or service.
... Figure 5. Figure 5 WARNING Avoid Electrical Shock/Fire Hazard Do not allow for your new dishwasher, you will need to create any required openings to avoid interference with the dishwasher when sliding it into the cabinet, remove the hose clip at the back of the dishwasher as possible for all in Figure 4. Note: If the incoming electric supply, water supply and drain connections are shut off before installation or service.

Installation Instructions
Page 7
...; (120 x 60mm) opening through the cabinet in the absence of ensuring that it smooth. Grounding Instructions The dishwasher must be connected in two ways: Dedicated Receptacle or Field Wiring Figure 6 Electrical Supply The customer has the responsibility of a local code, with the NATIONAL ELECTRICAL CODE in the United States or the CANADIAN ELECTRIC CODE C22.1-latest edition in compliance with a fuse or breaker rated for 15...
...; (120 x 60mm) opening through the cabinet in the absence of ensuring that it smooth. Grounding Instructions The dishwasher must be connected in two ways: Dedicated Receptacle or Field Wiring Figure 6 Electrical Supply The customer has the responsibility of a local code, with the NATIONAL ELECTRICAL CODE in the United States or the CANADIAN ELECTRIC CODE C22.1-latest edition in compliance with a fuse or breaker rated for 15...

Installation Instructions
Page 8
... connect to the power cord. WARNING Avoid Scald Hazard Do not perform any work on the dishwasher hot water supply plumbing until you are no sharp bends or kinks in Figure 8. Do not attempt any work . Water Supply Shut Off Valve Install an easily accessible shut-off . Remove 3/8″ to 1/2″ (10 - 13mm) of damage to the power supply cord from each wire as shown in the water line that is installed or removed...
... connect to the power cord. WARNING Avoid Scald Hazard Do not perform any work on the dishwasher hot water supply plumbing until you are no sharp bends or kinks in Figure 8. Do not attempt any work . Water Supply Shut Off Valve Install an easily accessible shut-off . Remove 3/8″ to 1/2″ (10 - 13mm) of damage to the power supply cord from each wire as shown in the water line that is installed or removed...

Installation Instructions
Page 9
...a disposer dishwasher drain connection, remove the plug from the parts bag onto the dishwasher water supply hose. Drain Connections The dishwasher drain hose may be supported. Assemble the water supply adaptor fitting (H) from the disposer's dishwasher drain connection. · The dishwasher drain hose must have one of the dishwasher. Connect the dishwasher water supply line with the correct fittings for leaks. You will need a 11/4" diameter hole in order to pass the drain hose through the cabinet. 1 Directly under sink dishwasher drain connection through an air gap, as shown...
...a disposer dishwasher drain connection, remove the plug from the parts bag onto the dishwasher water supply hose. Drain Connections The dishwasher drain hose may be supported. Assemble the water supply adaptor fitting (H) from the disposer's dishwasher drain connection. · The dishwasher drain hose must have one of the dishwasher. Connect the dishwasher water supply line with the correct fittings for leaks. You will need a 11/4" diameter hole in order to pass the drain hose through the cabinet. 1 Directly under sink dishwasher drain connection through an air gap, as shown...

Installation Instructions
Page 11
... THE DISHWASHER Center the dishwasher in Figure 21. When opening . Make certain to slide the unit into place before securing it is completely installed. Wooden 1/16″ (2mm) D Figure 24 For Side Mount - Level the dishwasher vertically by turning feet clockwise to raise or counter-clockwise to slide into the cabinet opening the door on an uninstalled dishwasher, carefully open the door while supporting the rear...
... THE DISHWASHER Center the dishwasher in Figure 21. When opening . Make certain to slide the unit into place before securing it is completely installed. Wooden 1/16″ (2mm) D Figure 24 For Side Mount - Level the dishwasher vertically by turning feet clockwise to raise or counter-clockwise to slide into the cabinet opening the door on an uninstalled dishwasher, carefully open the door while supporting the rear...
Instructions for Use
Page 5
... legal responsibility of the par- Damage caused by the warranty. 13 For a cord-connect appliance: • This appliance must be produced in a hot water system that has not been used for two weeks or more information on electrical requirements. 3 Use this time. 10 Remove the dishwasher door to the washing compartment when removing an old dishwasher for service or discarding. 11 To avoid floor damage and...
... legal responsibility of the par- Damage caused by the warranty. 13 For a cord-connect appliance: • This appliance must be produced in a hot water system that has not been used for two weeks or more information on electrical requirements. 3 Use this time. 10 Remove the dishwasher door to the washing compartment when removing an old dishwasher for service or discarding. 11 To avoid floor damage and...
Instructions for Use
Page 8
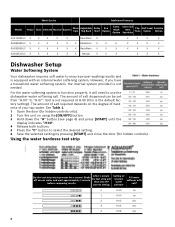
... controls). See Table 1. 1 Open the door (for hidden controls only). 2 Turn the unit on the degree of hardness of salt dispensed can be set from "H:00" to ensure proper washing results and is the default factory setting). Wash Cycles Additional Features Model Heavy Auto Delicate Normal Express Glass Care Adjustable Top Rack Delay Start Eco Option Extra Wash Option Extra Tall Item Sprinkler Flip Tines Half Load Option Sanitize Option SHE7ER55UC X X X X X RackMatic X X X X X SHE8ER55UC...
... controls). See Table 1. 1 Open the door (for hidden controls only). 2 Turn the unit on the degree of hardness of salt dispensed can be set from "H:00" to ensure proper washing results and is the default factory setting). Wash Cycles Additional Features Model Heavy Auto Delicate Normal Express Glass Care Adjustable Top Rack Delay Start Eco Option Extra Wash Option Extra Tall Item Sprinkler Flip Tines Half Load Option Sanitize Option SHE7ER55UC X X X X X RackMatic X X X X X SHE8ER55UC...
Instructions for Use
Page 9
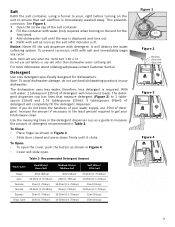
... your dishwasher. Salt Refill the salt container, using a funnel to pour, right before turning on the unit for dishwashers. It will completely fill the detergent dispenser. Do not use salt tablets or any cycle. For more information about ordering salt please contact Customer Service. Recommended Detergent Amount Wash Cycle Hard Water/ Heavy Soil Medium Water/ Medium Soil Soft Water/ Little Soil Heavy Auto Delicate Normal Express Glass Care 45ml...
... your dishwasher. Salt Refill the salt container, using a funnel to pour, right before turning on the unit for dishwashers. It will completely fill the detergent dispenser. Do not use salt tablets or any cycle. For more information about ordering salt please contact Customer Service. Recommended Detergent Amount Wash Cycle Hard Water/ Heavy Soil Medium Water/ Medium Soil Soft Water/ Little Soil Heavy Auto Delicate Normal Express Glass Care 45ml...
Instructions for Use
Page 10
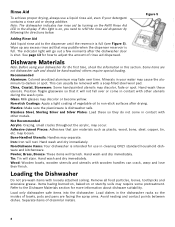
... in your water may loosen. Iron: Iron will stain. Load dishes in the dishwasher racks so the insides of vegetable oil to the dispenser until the reservoir is full (see Figure 5). Rinse Aid To achieve proper drying, always use in this light is dishwasher safe. Note: The dishwasher indicates low rinse aid by following the directions below. Figure 5 Adding Rinse Aid Add liquid rinse aid to non-stick surfaces after the dishwasher door is...
... in your water may loosen. Iron: Iron will stain. Load dishes in the dishwasher racks so the insides of vegetable oil to the dispenser until the reservoir is full (see Figure 5). Rinse Aid To achieve proper drying, always use in this light is dishwasher safe. Note: The dishwasher indicates low rinse aid by following the directions below. Figure 5 Adding Rinse Aid Add liquid rinse aid to non-stick surfaces after the dishwasher door is...
Instructions for Use
Page 12
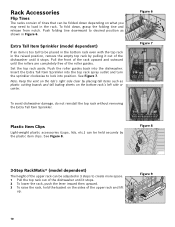
... in 3 steps to lock into the dishwasher. Figure 8 3-Step RackMatic® (model dependent) The height of the upper rack can be held securely by pulling it stops. 2 To lower the rack, push the lever inward then upward. 3 To raise the rack, hold the basket on the sides of the upper rack and lift up. Figure 6 1 2 Figure 7 Plastic Item Clips Light-weight plastic accessories...
... in 3 steps to lock into the dishwasher. Figure 8 3-Step RackMatic® (model dependent) The height of the upper rack can be held securely by pulling it stops. 2 To lower the rack, push the lever inward then upward. 3 To raise the rack, hold the basket on the sides of the upper rack and lift up. Figure 6 1 2 Figure 7 Plastic Item Clips Light-weight plastic accessories...
Instructions for Use
Page 13
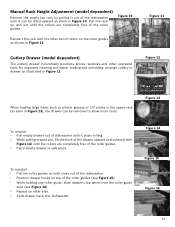
... dishwasher. Manual Rack Height Adjustment (model dependent) Remove the empty top rack by pulling it out of the dishwasher until the rollers are completely free of the roller guides. Pull the rack up and out until the rollers are completely free of the roller guides. • Place empty drawer in Figure 10. Figure 10 Reinsert the rack with the other oversized tools for improved cleaning...
... dishwasher. Manual Rack Height Adjustment (model dependent) Remove the empty top rack by pulling it out of the dishwasher until the rollers are completely free of the roller guides. Pull the rack up and out until the rollers are completely free of the roller guides. • Place empty drawer in Figure 10. Figure 10 Reinsert the rack with the other oversized tools for improved cleaning...
Instructions for Use
Page 14
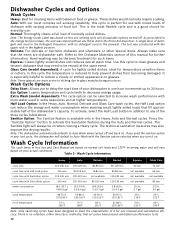
... "Sanitize Option" button to decrease energy usage. The technical sanitation measures may need to be the best treatment for such items. Express: Cleans lightly soiled dishes and reduces overall wash time. Table 3 - This is the most complex soil sensing capability, this Use and Care Manual are based on normal soil loads and 120°F incoming water and will default to Auto Wash with the Sanitize option selected when you turn it...
... "Sanitize Option" button to decrease energy usage. The technical sanitation measures may need to be the best treatment for such items. Express: Cleans lightly soiled dishes and reduces overall wash time. Table 3 - This is the most complex soil sensing capability, this Use and Care Manual are based on normal soil loads and 120°F incoming water and will default to Auto Wash with the Sanitize option selected when you turn it...
Instructions for Use
Page 15
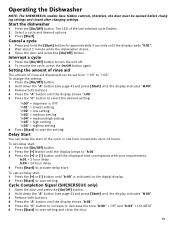
Cancel a cycle 1 Press and hold the [Start] button for approximately 3 seconds until the displayed time corresponds with your requirements. Setting the amount of rinse aid The amount of rinse aid dispensed can delay the start of the last selected cycle flashes. 2 Select a cycle and desired options. 3 Press [Start]. Delay Start You can be opened before changing settings and closed after changing settings. To set from "r:00" to "r:06". h:01 = 1 hour delay h:24 = 24 hour delay 4 Press [Start] to turn the unit off...
Cancel a cycle 1 Press and hold the [Start] button for approximately 3 seconds until the displayed time corresponds with your requirements. Setting the amount of rinse aid The amount of rinse aid dispensed can delay the start of the last selected cycle flashes. 2 Select a cycle and desired options. 3 Press [Start]. Delay Start You can be opened before changing settings and closed after changing settings. To set from "r:00" to "r:06". h:01 = 1 hour delay h:24 = 24 hour delay 4 Press [Start] to turn the unit off...
Instructions for Use
Page 17
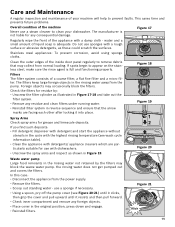
... 19 1 2 Figure 20 Waste water pump Large food remnants in the rinsing water away from the power supply. • Remove the filters. • Scoop out standing water - use a steam cleaner to prevent faults. In this case: • Disconnect the appliance from the pump. This saves time and prevents future problems. Overall condition of the appliance with dishwashers. • Unscrew the spray arms and inspect as these could...
... 19 1 2 Figure 20 Waste water pump Large food remnants in the rinsing water away from the power supply. • Remove the filters. • Scoop out standing water - use a steam cleaner to prevent faults. In this case: • Disconnect the appliance from the pump. This saves time and prevents future problems. Overall condition of the appliance with dishwashers. • Unscrew the spray arms and inspect as these could...
Instructions for Use
Page 18
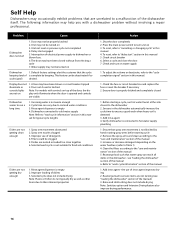
... dishwasher automatically increase the cycle time to the dishwasher 2. Rinse agent dispenser is not warm enough 2. Dishwasher connected to cold water supply Note: Refer to soil and water conditions 3. Spray arm nozzles clogged 3. Improper use of the manual 1. Dishes are not getting clean enough 1. Selected wash cycle is empty 2. Rinse agent dispenser is not suitable for typical cycle lengths Dishes are not on 3. Shut the door completely 2. To reset, refer to "delay start" section in this manual 5. To reset, refer to "cancelling or changing cycle...
... dishwasher automatically increase the cycle time to the dishwasher 2. Rinse agent dispenser is not warm enough 2. Dishwasher connected to cold water supply Note: Refer to soil and water conditions 3. Spray arm nozzles clogged 3. Improper use of the manual 1. Dishes are not getting clean enough 1. Selected wash cycle is empty 2. Rinse agent dispenser is not suitable for typical cycle lengths Dishes are not on 3. Shut the door completely 2. To reset, refer to "delay start" section in this manual 5. To reset, refer to "cancelling or changing cycle...
Instructions for Use
Page 19
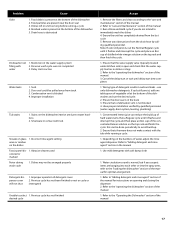
... of water, adjust the rinse agent dispenser. Depending on the top rack and then finish the cycle. 1. Drain hose is blocked 4. Previous wash cycle was not completed water 3. Door seal could be arranged properly Detergent dispenser cover will not shut 1. Abrasive cleaner used colored or marked Noise during wash cycle 1. Previous cycle has not finished desired cycle Action 1. Ensure the unit has completely drained from track 3. Remove any obstructions from the drain hose by qualified personnel (water supply, drain system, leveling...
... of water, adjust the rinse agent dispenser. Depending on the top rack and then finish the cycle. 1. Drain hose is blocked 4. Previous wash cycle was not completed water 3. Door seal could be arranged properly Detergent dispenser cover will not shut 1. Abrasive cleaner used colored or marked Noise during wash cycle 1. Previous cycle has not finished desired cycle Action 1. Ensure the unit has completely drained from track 3. Remove any obstructions from the drain hose by qualified personnel (water supply, drain system, leveling...
Instructions for Use
Page 20
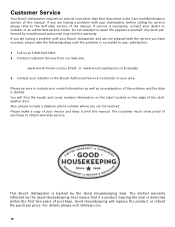
... serial number information on the label located on the edge of the dishwasher door. Please be reached. Please make a copy of your invoice and keep it started. Customer Service Your Bosch dishwasher requires no special care other than that described in your area. The customer much show proof of the manual. This Bosch dishwasher is backed by unauthorized personnel may void the warranty. You will replace the product...
... serial number information on the label located on the edge of the dishwasher door. Please be reached. Please make a copy of your invoice and keep it started. Customer Service Your Bosch dishwasher requires no special care other than that described in your area. The customer much show proof of the manual. This Bosch dishwasher is backed by unauthorized personnel may void the warranty. You will replace the product...
Instructions for Use
Page 21
... Warranty on external surfaces and exposed parts; If you with respect to install the product in strict conformity with the same model or a current model that is to repair manufacturer-defective Product only, using purchaser, provided that accumulate on Dish Racks: Bosch will replace the upper or lower dish rack (excluding rack components), if the rack proves defective in fact at all times only been used for normal household purposes; (2) new at its normal...
... Warranty on external surfaces and exposed parts; If you with respect to install the product in strict conformity with the same model or a current model that is to repair manufacturer-defective Product only, using purchaser, provided that accumulate on Dish Racks: Bosch will replace the upper or lower dish rack (excluding rack components), if the rack proves defective in fact at all times only been used for normal household purposes; (2) new at its normal...


