
Use and Care Guide
Page 2
... quiet and superior performance from Bosch! IMPORTANT SAFETY INSTRUCTIONS...3 Dishwasher Components...4 Dishwasher Features and Options...4-5 Dishware Materials...6 Preparing and Loading the Dishware...6-8 Dishware Preparation ...6 Loading the Dishwasher...6-8 Adding Detergent and Rinse Agent...9-10 Wash Cycles and Options...10 Operating the Dishwasher...11-13 Operating the SHX3AM...11 Operating the SHE5AM...12 Operating the SHE4AM...13 Care and Maintenance...14-16 Detailed Wash Cycle Information/Sanitized...16 Self Help...17-19 Customer Service...20 Statement of Warranties...
... quiet and superior performance from Bosch! IMPORTANT SAFETY INSTRUCTIONS...3 Dishwasher Components...4 Dishwasher Features and Options...4-5 Dishware Materials...6 Preparing and Loading the Dishware...6-8 Dishware Preparation ...6 Loading the Dishwasher...6-8 Adding Detergent and Rinse Agent...9-10 Wash Cycles and Options...10 Operating the Dishwasher...11-13 Operating the SHX3AM...11 Operating the SHE5AM...12 Operating the SHE4AM...13 Care and Maintenance...14-16 Detailed Wash Cycle Information/Sanitized...16 Self Help...17-19 Customer Service...20 Statement of Warranties...
Use and Care Guide
Page 3
... your dishwasher. Read and understand all instructions before using a dishwasher that is connected to a hot water system that they are not likely to the fill valve. Load knives and other than those explained on the door or dish racks of the dishwasher. • To reduce the risk of unqualified service technicians or non-original replacement parts. All repairs must be produced in this Use and Care Manual. Do not use of...
... your dishwasher. Read and understand all instructions before using a dishwasher that is connected to a hot water system that they are not likely to the fill valve. Load knives and other than those explained on the door or dish racks of the dishwasher. • To reduce the risk of unqualified service technicians or non-original replacement parts. All repairs must be produced in this Use and Care Manual. Do not use of...
Use and Care Guide
Page 4
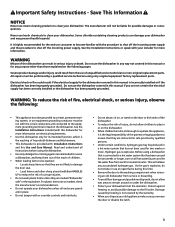
... cuts and nicks, and have a five-year warranty. Flow-Through Heater™: Heats water to a temperature of a rinse agent result in drying that is hygienic, energy efficient, and economical. Triple Filtration System: Three filters ensure distribution of the quietest in North America. Dishwasher Components Vent Door Gasket Top Rack Top Rack Spray Arm Bottom Rack Spray Arm Bottom Rack Filter System (in dishwasher floor) Silverware Basket Detergent Dispenser Rinse Agent Dispenser Model/Serial Number Label Dishwasher Features and Options Noise Reduction System: A two-pump motor...
... cuts and nicks, and have a five-year warranty. Flow-Through Heater™: Heats water to a temperature of a rinse agent result in drying that is hygienic, energy efficient, and economical. Triple Filtration System: Three filters ensure distribution of the quietest in North America. Dishwasher Components Vent Door Gasket Top Rack Top Rack Spray Arm Bottom Rack Spray Arm Bottom Rack Filter System (in dishwasher floor) Silverware Basket Detergent Dispenser Rinse Agent Dispenser Model/Serial Number Label Dishwasher Features and Options Noise Reduction System: A two-pump motor...
Use and Care Guide
Page 5
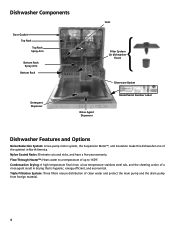
... yes yes Refill Rinse Agent Indicator Light yes yes yes yes yes yes yes Sanitize Light yes yes yes yes yes yes yes Upper Rack Flip Tines yes yes yes yes yes yes yes Lower Rack Flip Tines no yes no no no no no Child Lock Button Suspension no yes yes yes yes no no Silverware Basket standard Height Adjustable no Upper Rack Time Remaining Indicator no flexible...
... yes yes Refill Rinse Agent Indicator Light yes yes yes yes yes yes yes Sanitize Light yes yes yes yes yes yes yes Upper Rack Flip Tines yes yes yes yes yes yes yes Lower Rack Flip Tines no yes no no no no no Child Lock Button Suspension no yes yes yes yes no no Silverware Basket standard Height Adjustable no Upper Rack Time Remaining Indicator no flexible...
Use and Care Guide
Page 6
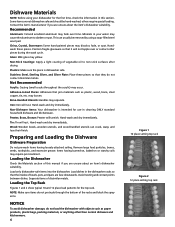
... separate. Bone-Handled Utensils: Handles may loosen. Hand-wash and dry immediately. Remove large food particles, bones, seeds, toothpicks, and excessive grease. Load only dishwasher-safe items into the dishwasher. Avoid nesting and contact points between dishes. Loading the Top Rack Figures 1 and 2 show typical 10 and 12 place load patterns for use in the dishwasher racks so that they do not load the dishwasher with objects...
... separate. Bone-Handled Utensils: Handles may loosen. Hand-wash and dry immediately. Remove large food particles, bones, seeds, toothpicks, and excessive grease. Load only dishwasher-safe items into the dishwasher. Avoid nesting and contact points between dishes. Loading the Top Rack Figures 1 and 2 show typical 10 and 12 place load patterns for use in the dishwasher racks so that they do not load the dishwasher with objects...
Use and Care Guide
Page 7
... back of the tub so the top rack spray arm will connect to make loading the racks easier in some instances. Load pots, pans and bowls upside-down to the point that it until the rollers are completely free of the roller guides. Figure 5 Figure 6 Figure 7 Do not block vent. 7 When the top rack is loaded, push it out of the tub...
... back of the tub so the top rack spray arm will connect to make loading the racks easier in some instances. Load pots, pans and bowls upside-down to the point that it until the rollers are completely free of the roller guides. Figure 5 Figure 6 Figure 7 Do not block vent. 7 When the top rack is loaded, push it out of the tub...
Use and Care Guide
Page 8
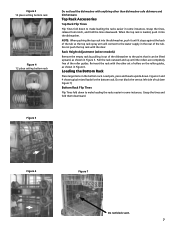
... spoons with their handles down . If large or oddly-shaped items are shown in two halves that they do not nest together. To split the Flexible Silverware Basket: 1. Grasp the basket as shown in Figure 10A, and slide the two halves in opposite directions, as shown in the lower rack, greatly increasing the lower rack's loading versatility. CAUTION The...
... spoons with their handles down . If large or oddly-shaped items are shown in two halves that they do not nest together. To split the Flexible Silverware Basket: 1. Grasp the basket as shown in Figure 10A, and slide the two halves in opposite directions, as shown in the lower rack, greatly increasing the lower rack's loading versatility. CAUTION The...
Use and Care Guide
Page 9
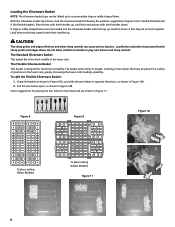
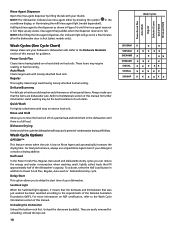
... Rinse Agent • Add Rinse Agent when the light on the control panel illuminates • Lift tab to open the detergent dispenser cover, press the gray release tab as shown in Figure 14. With soft water, 1 tablespoon (15ml) of your water supply, use less detergent. Use the measuring lines in the detergent dispenser cup as recommend in Table 1. (See Figure 12 for dishwashers. Recommended Detergent Amount Wash Cycle Unit Hard Water Type Medium Soft Power...
... Rinse Agent • Add Rinse Agent when the light on the control panel illuminates • Lift tab to open the detergent dispenser cover, press the gray release tab as shown in Figure 14. With soft water, 1 tablespoon (15ml) of your water supply, use less detergent. Use the measuring lines in the detergent dispenser cup as recommend in Table 1. (See Figure 12 for dishwashers. Recommended Detergent Amount Wash Cycle Unit Hard Water Type Medium Soft Power...
Use and Care Guide
Page 10
... remove food soils. Power Scrub Plus Cleans items having loosely attached normal soiling. Auto Wash Cleans large loads with easy to the Dishware Materials section of a partial load and hold them in the countdown display, or illuminating the refill rinse agent light (model dependent). Delay Start This option allows you can reduce the energy and water consumption when washing small, lightly soiled loads that was just washed has been sanitized according to Power Scrub Plus, Regular, Auto wash...
... remove food soils. Power Scrub Plus Cleans items having loosely attached normal soiling. Auto Wash Cleans large loads with easy to the Dishware Materials section of a partial load and hold them in the countdown display, or illuminating the refill rinse agent light (model dependent). Delay Start This option allows you can reduce the energy and water consumption when washing small, lightly soiled loads that was just washed has been sanitized according to Power Scrub Plus, Regular, Auto wash...
Use and Care Guide
Page 11
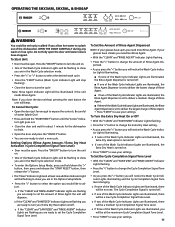
... Tone Level. o If the "CLEAN" and "SANITIZED" and "RINSE AGENT" Indicator Lights are flashing you need more Rinse Agent. OPEN THE DOOR CAREFULLY during any wash or rinse cycle. o If the "CLEAN" and "SANITIZED" Indicator Lights are flashing you close the door without pressing the start a new cycle. Press the "ON/OFF" button to turn your glasses have spots you are ready to adjust. To Cancel the Cycle: • Open the door just far enough to turn the unit on /off. Setting Options (Rinse Agent Amount / Extra Dry Heat Activation / Cycle...
... Tone Level. o If the "CLEAN" and "SANITIZED" and "RINSE AGENT" Indicator Lights are flashing you need more Rinse Agent. OPEN THE DOOR CAREFULLY during any wash or rinse cycle. o If the "CLEAN" and "SANITIZED" Indicator Lights are flashing you close the door without pressing the start a new cycle. Press the "ON/OFF" button to turn your glasses have spots you are ready to adjust. To Cancel the Cycle: • Open the door just far enough to turn the unit on /off. Setting Options (Rinse Agent Amount / Extra Dry Heat Activation / Cycle...
Use and Care Guide
Page 12
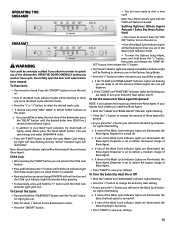
... wash or rinse cycle. Do not fully open the door until the desired delay time (1-24 hrs.) shows in the Options Setup Mode. • Press the ">" button to select the option you are ready to your Extra Dry Heat option on . • The Countdown Display and one of lightly soiled dishes press the "HALF LOAD" button. Press the "ON/OFF" button to begin the cycle (Wash Cycle Indicator Light will stop flashing) Note: Rinse Agent Indicator Light will save energy, water...
... wash or rinse cycle. Do not fully open the door until the desired delay time (1-24 hrs.) shows in the Options Setup Mode. • Press the ">" button to select the option you are ready to your Extra Dry Heat option on . • The Countdown Display and one of lightly soiled dishes press the "HALF LOAD" button. Press the "ON/OFF" button to begin the cycle (Wash Cycle Indicator Light will stop flashing) Note: Rinse Agent Indicator Light will save energy, water...
Use and Care Guide
Page 13
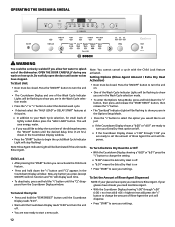
... need more Rinse Agent. If your glasses have streaks you can activate the Child Lock feature. • Press and hold down the "" button. • The "Clean" Indicator Light and at this point. OPEN THE DOOR CAREFULLY during any wash or rinse cycle. o If you would like to adjust o If the "CLEAN" and "RINSE AGENT" Indicator Lights are flashing you would like to delay the start time of the dishwasher press the "DELAY" button until water noises have stopped. This will save energy...
... need more Rinse Agent. If your glasses have streaks you can activate the Child Lock feature. • Press and hold down the "" button. • The "Clean" Indicator Light and at this point. OPEN THE DOOR CAREFULLY during any wash or rinse cycle. o If you would like to adjust o If the "CLEAN" and "RINSE AGENT" Indicator Lights are flashing you would like to delay the start time of the dishwasher press the "DELAY" button until water noises have stopped. This will save energy...
Use and Care Guide
Page 14
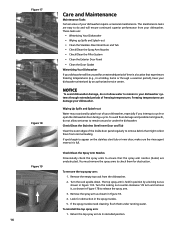
... allow water to remain in your dishwasher systems through a vacation period), have your dishwasher winterized by a locking nut as shown in a holiday home or through extended periods of the inside door panel regularly to remove debris that the spray arm nozzles (holes) are easy to its installed position. If spots begin to appear on the stainless steel tub or inner door, make sure the rinse agent...
... allow water to remain in your dishwasher systems through a vacation period), have your dishwasher winterized by a locking nut as shown in a holiday home or through extended periods of the inside door panel regularly to remove debris that the spray arm nozzles (holes) are easy to its installed position. If spots begin to appear on the stainless steel tub or inner door, make sure the rinse agent...
Use and Care Guide
Page 15
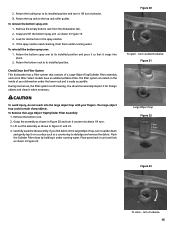
.... Return the locking nut to its installed position and press it under running water. If the spray nozzles need cleaning, flush them under running water. Carefully examine the assembly. Return the top rack to dislodge and remove the debris. Remove the empty bottom rack from the dishwasher tub. 2. You should occasionally inspect it 1/8 turn it snaps into the large object trap with your dishwasher under the lower rack and is...
.... Return the locking nut to its installed position and press it under running water. If the spray nozzles need cleaning, flush them under running water. Carefully examine the assembly. Return the top rack to dislodge and remove the debris. Remove the empty bottom rack from the dishwasher tub. 2. You should occasionally inspect it 1/8 turn it snaps into the large object trap with your dishwasher under the lower rack and is...
Use and Care Guide
Page 16
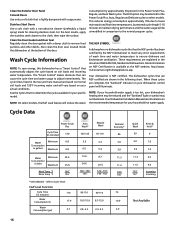
... these cycles are shown in the Power Scrub Plus, Regular, and Auto Wash cycles. Clean the Exterior Door Panel Colored Doors Use only a soft cloth that is lightly dampened with a damp cloth to remove food particles and other debris. For the best results, apply the stainless steel cleaner to adjust intermittently. NOTE: If your household water supply is NSF certified. Your dishwasher is too hot, your dishwasher control panel will reduce the water consumption...
... these cycles are shown in the Power Scrub Plus, Regular, and Auto Wash cycles. Clean the Exterior Door Panel Colored Doors Use only a soft cloth that is lightly dampened with a damp cloth to remove food particles and other debris. For the best results, apply the stainless steel cleaner to adjust intermittently. NOTE: If your household water supply is NSF certified. Your dishwasher is too hot, your dishwasher control panel will reduce the water consumption...
Use and Care Guide
Page 17
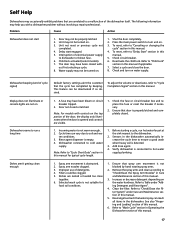
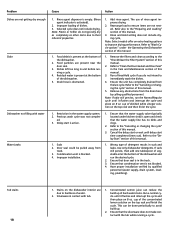
... turned on water supply. Child lock activated (select models). 7. Deactivate the child lock. Check and turn unit on the water hardness. Dishwasher beeping (end of this manual. 6. This feature can vary due to soil and wa- Display does not illuminate or console lights are not on . 1. Door not closed . 1. Rinse agent dispenser is detected. 3. Before starting a cycle, run a long time Dishes aren't getting clean enough 1. Verify dishwasher is not blocked by beeping. Improper use of this manual. 5. Ensure that spray arm movement is connected to hot water supply...
... turned on water supply. Child lock activated (select models). 7. Deactivate the child lock. Check and turn unit on the water hardness. Dishwasher beeping (end of this manual. 6. This feature can vary due to soil and wa- Display does not illuminate or console lights are not on . 1. Door not closed . 1. Rinse agent dispenser is detected. 3. Before starting a cycle, run a long time Dishes aren't getting clean enough 1. Verify dishwasher is not blocked by beeping. Improper use of this manual. 5. Ensure that spray arm movement is connected to hot water supply...
Use and Care Guide
Page 18
... to "Wash Cycle options" under kitchen sink) is not blocked. 4. Remove the filters and clean according to their inherent properties. 1. Remove any obstructions from the drain hose by qualified personnel (water supply, drain system, leveling, plumbing). Cancel the delay-start or wait until delay-start is blocked. 4. Ensure that condensation vent is open and check that the silverware does not make contact with the tub while running a cycle. 4. Have proper installation verified by...
... to "Wash Cycle options" under kitchen sink) is not blocked. 4. Remove the filters and clean according to their inherent properties. 1. Remove any obstructions from the drain hose by qualified personnel (water supply, drain system, leveling, plumbing). Cancel the delay-start or wait until delay-start is blocked. 4. Ensure that condensation vent is open and check that the silverware does not make contact with the tub while running a cycle. 4. Have proper installation verified by...
Use and Care Guide
Page 19
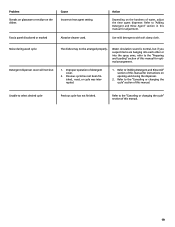
..., reset, or cycle was interrupted. 1. Refer to "Adding Detergent and Rinse Agent" section in this manual for adjustment. Fascia panel discolored or marked Abrasive cleaner used. Refer to the "Canceling or changing the cycle" section of this manual for instructions on opening and closing the dispenser. 2. Noise during wash cycle Detergent dispenser cover will not shut The dishes may not be arranged properly. Unable to the "Preparing and Loading" section of this manual. Water circulation sound is normal...
..., reset, or cycle was interrupted. 1. Refer to "Adding Detergent and Rinse Agent" section in this manual for adjustment. Fascia panel discolored or marked Abrasive cleaner used. Refer to the "Canceling or changing the cycle" section of this manual for instructions on opening and closing the dispenser. 2. Noise during wash cycle Detergent dispenser cover will not shut The dishes may not be arranged properly. Unable to the "Preparing and Loading" section of this manual. Water circulation sound is normal...
Use and Care Guide
Page 20
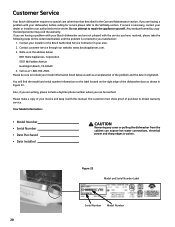
... work performed by unauthorized personnel may void the warranty. If you can expose hot water connections, electrical power and sharp edges or points. If service is corrected to repair the appliance yourself. Also, if you are writing, please include a daytime phone number where you are having a problem with your Bosch dishwasher and are having a problem with this manual. Do not attempt to your dealer or installer...
... work performed by unauthorized personnel may void the warranty. If you can expose hot water connections, electrical power and sharp edges or points. If service is corrected to repair the appliance yourself. Also, if you are writing, please include a daytime phone number where you are having a problem with your Bosch dishwasher and are having a problem with this manual. Do not attempt to your dealer or installer...
Use and Care Guide
Page 21
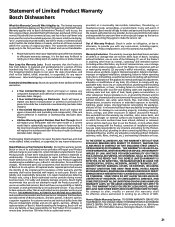
... VOID. Bosch will replace the stainless steel door if the door should rust through (excludes labor charges). in conjunction with air or water-going vessels); (2) any party's willful misconduct, negligence, misuse, abuse, accidents, neglect, improper operation, failure to maintain, improper or negligent installation, tampering, failure to follow operating instructions, mishandling, unauthorized service (including self-performed "fixing" or exploration of the appliance's internal workings); (3) adjustment, alteration...
... VOID. Bosch will replace the stainless steel door if the door should rust through (excludes labor charges). in conjunction with air or water-going vessels); (2) any party's willful misconduct, negligence, misuse, abuse, accidents, neglect, improper operation, failure to maintain, improper or negligent installation, tampering, failure to follow operating instructions, mishandling, unauthorized service (including self-performed "fixing" or exploration of the appliance's internal workings); (3) adjustment, alteration...


