
Use and Care Guide
Page 2
This manual was written with your dishwasher for selecting a Bosch dishwasher. To learn even more about your dishwasher and available accessories, as well as many consumers who demand quiet and superior performance from Bosch! Please contact us if you use your safety and convenience in mind, and the information contained herein is very important. Congratulations, and...
This manual was written with your dishwasher for selecting a Bosch dishwasher. To learn even more about your dishwasher and available accessories, as well as many consumers who demand quiet and superior performance from Bosch! Please contact us if you use your safety and convenience in mind, and the information contained herein is very important. Congratulations, and...
Use and Care Guide
Page 3
...a qualified service technician using only original equipment factory replacement parts. Load knives and other than those explained on all instructions before using a dishwasher that is the washing of the parents or legal guardians to ensure that has been unused for two weeks or longer, turn on the.... As the gas is explosive. See the Installation Instructions or speak with their HANDLES UP to remain around or under the dishwasher. • Protect your dishwasher. Hydrogen gas is explosive, do not smoke or use an open flame during this manual is not covered by freezing is ...
...a qualified service technician using only original equipment factory replacement parts. Load knives and other than those explained on all instructions before using a dishwasher that is the washing of the parents or legal guardians to ensure that has been unused for two weeks or longer, turn on the.... As the gas is explosive. See the Installation Instructions or speak with their HANDLES UP to remain around or under the dishwasher. • Protect your dishwasher. Hydrogen gas is explosive, do not smoke or use an open flame during this manual is not covered by freezing is ...
Use and Care Guide
Page 4
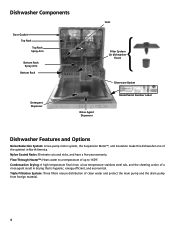
...and nicks, and have a five-year warranty. Dishwasher Components Vent Door Gasket Top Rack Top Rack Spray Arm Bottom Rack Spray Arm Bottom Rack Filter System (in dishwasher floor) Silverware Basket Detergent Dispenser Rinse Agent Dispenser Model/Serial Number Label Dishwasher Features and Options Noise Reduction System: A two-...pump motor system, the Suspension Motor™, and insulation make this dishwasher one of the quietest in drying that is hygienic, energy efficient, and economical. Flow-Through Heater™: Heats water to 160°F....
...and nicks, and have a five-year warranty. Dishwasher Components Vent Door Gasket Top Rack Top Rack Spray Arm Bottom Rack Spray Arm Bottom Rack Filter System (in dishwasher floor) Silverware Basket Detergent Dispenser Rinse Agent Dispenser Model/Serial Number Label Dishwasher Features and Options Noise Reduction System: A two-...pump motor system, the Suspension Motor™, and insulation make this dishwasher one of the quietest in drying that is hygienic, energy efficient, and economical. Flow-Through Heater™: Heats water to 160°F....
Use and Care Guide
Page 5
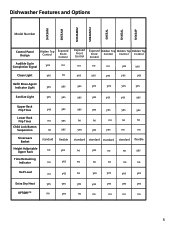
Dishwasher Features and Options SHX3AM SHE5AM SHE4AM02 SHE4AM12 SHE5AL SHX5AL SHX6AP Model Number Control Panel Design Hidden Top Exposed Control Front Control Audible Cycle Completion Signal ...
Dishwasher Features and Options SHX3AM SHE5AM SHE4AM02 SHE4AM12 SHE5AL SHX5AL SHX6AP Model Number Control Panel Design Hidden Top Exposed Control Front Control Audible Cycle Completion Signal ...
Use and Care Guide
Page 6
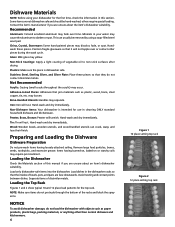
...aluminum to non-stick surfaces after drying. Remove large food particles, bones, seeds, toothpicks, and excessive grease. Load only dishwasher-safe items into the dishwasher. Loading the Top Rack Figures 1 and 2 show typical 10 and 12 place load patterns for use in cleaning ONLY ... wooden utensils, and wood-handled utensils can usually be hand-washed; Contact the item's manufacturer if you are unsure about the item's dishwasher suitability. Bone-Handled Utensils: Handles may occur. This can crack, warp, and lose their finish. Position fragile glassware so that the insides...
...aluminum to non-stick surfaces after drying. Remove large food particles, bones, seeds, toothpicks, and excessive grease. Load only dishwasher-safe items into the dishwasher. Loading the Top Rack Figures 1 and 2 show typical 10 and 12 place load patterns for use in cleaning ONLY ... wooden utensils, and wood-handled utensils can usually be hand-washed; Contact the item's manufacturer if you are unsure about the item's dishwasher suitability. Bone-Handled Utensils: Handles may occur. This can crack, warp, and lose their finish. Position fragile glassware so that the insides...
Use and Care Guide
Page 7
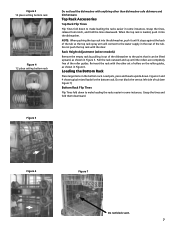
...bottom rack. Rack Height Adjustment (select models) Remove the empty rack by pulling it out of the dishwasher to the water supply in Figure 5. NOTE: When pushing the top rack into the dishwasher, push it until the rollers are completely free of tub (see Figure 7) Bottom Rack Flip Tines ... arm will connect to the point that it can be lifted upward, as shown in some instances. Re-insert the rack with the other than dishwasher-safe dishware and kitchenware. Figure 5 Figure 6 Figure 7 Do not block vent. 7 Grasp the tines, release from notch, and fold the tines downward. ...
...bottom rack. Rack Height Adjustment (select models) Remove the empty rack by pulling it out of the dishwasher to the water supply in Figure 5. NOTE: When pushing the top rack into the dishwasher, push it until the rollers are completely free of tub (see Figure 7) Bottom Rack Flip Tines ... arm will connect to the point that it can be lifted upward, as shown in some instances. Re-insert the rack with the other than dishwasher-safe dishware and kitchenware. Figure 5 Figure 6 Figure 7 Do not block vent. 7 Grasp the tines, release from notch, and fold the tines downward. ...
Use and Care Guide
Page 9
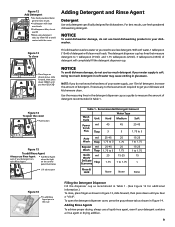
... the amount of detergent will clean most loads •3 tablespoons Max, do not use hand dishwashing products in Table 1. (See Figure 12 for additional information.) To close This dishwasher uses less water so you hear a *click*. The detergent dispenser cup has lines that measure detergent to... down FIRMLY until you need to avoid contact with the cover Adding Detergent and Rinse Agent Detergent Use only detergent specifically designed for dishwashers. Use the measuring lines in the detergent dispenser cup as shown in Table 1. Figure 12 Add Detergent • Use fresh powdered...
... the amount of detergent will clean most loads •3 tablespoons Max, do not use hand dishwashing products in Table 1. (See Figure 12 for additional information.) To close This dishwasher uses less water so you hear a *click*. The detergent dispenser cup has lines that measure detergent to... down FIRMLY until you need to avoid contact with the cover Adding Detergent and Rinse Agent Detergent Use only detergent specifically designed for dishwashers. Use the measuring lines in the detergent dispenser cup as shown in Table 1. Figure 12 Add Detergent • Use fresh powdered...
Use and Care Guide
Page 10
... only). Power Scrub Plus Cleans items having loosely attached normal soiling. These items may be the best treatment of the dishwasher's capacity. Unloading the Dishwasher Unload the bottom rack first. Half Load In the Power Scrub Plus, Regular, Auto wash and Delicate/Economy cycles you...in the countdown display, or illuminating the refill rinse agent light (model dependent). To activate, select the Half Load button in the dishwasher until the rinse agent reservoir is full. NOTE: After filling the rinse agent dispenser, the indicator light will follow. Wash Cycles (...
... only). Power Scrub Plus Cleans items having loosely attached normal soiling. These items may be the best treatment of the dishwasher's capacity. Unloading the Dishwasher Unload the bottom rack first. Half Load In the Power Scrub Plus, Regular, Auto wash and Delicate/Economy cycles you...in the countdown display, or illuminating the refill rinse agent light (model dependent). To activate, select the Half Load button in the dishwasher until the rinse agent reservoir is full. NOTE: After filling the rinse agent dispenser, the indicator light will follow. Wash Cycles (...
Use and Care Guide
Page 11
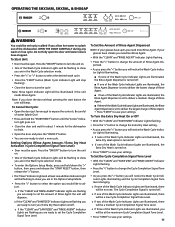
... Indicator Lights will be open the door until the "Active" Indicator Light goes out. • Close the door and wait for about 1 minute for the dishwasher to drain. • Open the door and press the "ON/OFF" button. • You are ready to turn the unit on /off. Do not fully...; The "Clean" Indicator Light and at least one addition Indicator Light will be seriously scalded if you allow hot water to splash out of the dishwasher. Press the "ON/OFF" button to turn your glasses have stopped. Note: If you close the door without pressing the start a new cycle. OPEN THE...
... Indicator Lights will be open the door until the "Active" Indicator Light goes out. • Close the door and wait for about 1 minute for the dishwasher to drain. • Open the door and press the "ON/OFF" button. • You are ready to turn the unit on /off. Do not fully...; The "Clean" Indicator Light and at least one addition Indicator Light will be seriously scalded if you allow hot water to splash out of the dishwasher. Press the "ON/OFF" button to turn your glasses have stopped. Note: If you close the door without pressing the start a new cycle. OPEN THE...
Use and Care Guide
Page 12
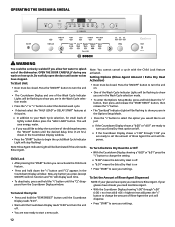
.... • If desired select the "HALF LOAD" or DELAY START" features at this point. o If you would like to delay the start time of the dishwasher press the "DELAY" button until water noises have stopped. o If the Countdown Display shows a "r:00" through "r:06" you are in the Wash Cycle selection mode... to set the amount of the Wash Cycle Indicator Lights will save energy, water. Do not fully open the door until the desired delay time (1-24 hrs.) shows in the Options Setup Mode. • Press the ">" button to select the option you would like to adjust o If the Countdown Display ...
.... • If desired select the "HALF LOAD" or DELAY START" features at this point. o If you would like to delay the start time of the dishwasher press the "DELAY" button until water noises have stopped. o If the Countdown Display shows a "r:00" through "r:06" you are in the Wash Cycle selection mode... to set the amount of the Wash Cycle Indicator Lights will save energy, water. Do not fully open the door until the desired delay time (1-24 hrs.) shows in the Options Setup Mode. • Press the ">" button to select the option you would like to adjust o If the Countdown Display ...
Use and Care Guide
Page 13
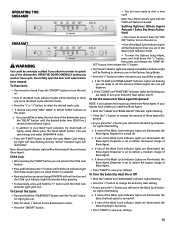
... You could be seriously scalded if you allow hot water to delay the start time of the dishwasher press the "DELAY" button until water noises have spots you would like to splash out of the dishwasher. Do not fully open the door until the desired delay time (3/6/9 hrs.) shows on /off. o If...
... You could be seriously scalded if you allow hot water to delay the start time of the dishwasher press the "DELAY" button until water noises have spots you would like to splash out of the dishwasher. Do not fully open the door until the desired delay time (3/6/9 hrs.) shows on /off. o If...
Use and Care Guide
Page 14
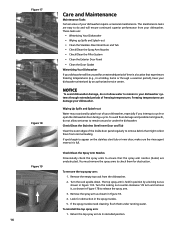
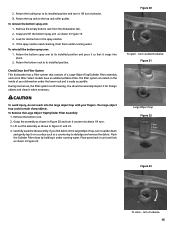
...the inside door panel regularly to remove debris that experiences freezing temperatures (e.g., in a holiday home or through a vacation period), have your dishwasher winterized by a locking nut as shown in a location that might collect there from normal loading. Look for obstruction. Wiping Up Spills and... 17B to ensure that the spray arm nozzles (holes) are unobstructed. Turn the rack upside-down. Freezing temperatures can damage your dishwasher. If spots begin to its installed position. Remove the spray arm as shown in the spray nozzles. 5. Return the top spray...
...the inside door panel regularly to remove debris that experiences freezing temperatures (e.g., in a holiday home or through a vacation period), have your dishwasher winterized by a locking nut as shown in a location that might collect there from normal loading. Look for obstruction. Wiping Up Spills and... 17B to ensure that the spray arm nozzles (holes) are unobstructed. Turn the rack upside-down. Freezing temperatures can damage your dishwasher. If spots begin to its installed position. Remove the spray arm as shown in the spray nozzles. 5. Return the top spray...
Use and Care Guide
Page 15
2. Remove the empty bottom rack from the dishwasher tub. 2. Return the bottom rack to its installed position and turn it 1/8 turn clockwise. 3. To ... it upside-down and gently tap it snaps into the large object trap with your dishwasher under the lower rack and is easily accessible. To remove the bottom spray arm: 1. Check/Clean the Filter System This... dishwasher has a filter system that it on the inside of a Large Object Trap/Cylinder Filter assembly and a Fine...
2. Remove the empty bottom rack from the dishwasher tub. 2. Return the bottom rack to its installed position and turn it 1/8 turn clockwise. 3. To ... it upside-down and gently tap it snaps into the large object trap with your dishwasher under the lower rack and is easily accessible. To remove the bottom spray arm: 1. Check/Clean the Filter System This... dishwasher has a filter system that it on the inside of a Large Object Trap/Cylinder Filter assembly and a Fine...
Use and Care Guide
Page 16
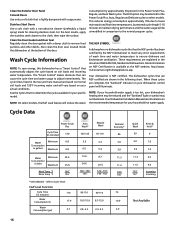
... and other debris. The ECO option may be selected for the Power Scrub Plus, Auto, Regular and Delicate cycles on your dishwasher control panel will vary based on soil loads and incoming water temperature. When these cycles are based on normal soil loads and 120..." that are NSF certified are explained in the document NSF/ANSI 184, Residential Dishwashers. These requirements are shown in minutes) Water Consumption (l) 110 17.9 Water Consumption (gal) 4.7 Auto Wash* Regular Wash 105-125 95-119 3.6 6.5 13.6 24.6 130˚-150˚ 156˚ 2.3 5.4 8.7 20.5 122˚-...
... and other debris. The ECO option may be selected for the Power Scrub Plus, Auto, Regular and Delicate cycles on your dishwasher control panel will vary based on soil loads and incoming water temperature. When these cycles are based on normal soil loads and 120..." that are NSF certified are explained in the document NSF/ANSI 184, Residential Dishwashers. These requirements are shown in minutes) Water Consumption (l) 110 17.9 Water Consumption (gal) 4.7 Auto Wash* Regular Wash 105-125 95-119 3.6 6.5 13.6 24.6 130˚-150˚ 156˚ 2.3 5.4 8.7 20.5 122˚-...
Use and Care Guide
Page 17
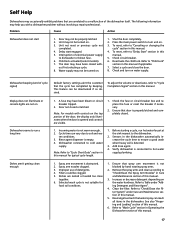
...a cycle and close together. 6. Check the fuse or circuit breaker box and replace the fuse or reset the breaker if necessary. 2. Verify dishwasher is properly latched and completely closed or latched. Spray arm nozzles clogged. 3. Before starting a cycle, run a long time Dishes aren't getting... clean enough 1. Dishes are visible. 1. Remove the spray arms and clean according to the dishwasher. 2. Refer to "Cycle Chart Data" section in this manual for food soil condtions. 1. Check circuit breaker. 6. Note: Refer to Table under...
...a cycle and close together. 6. Check the fuse or circuit breaker box and replace the fuse or reset the breaker if necessary. 2. Verify dishwasher is properly latched and completely closed or latched. Spray arm nozzles clogged. 3. Before starting a cycle, run a long time Dishes aren't getting... clean enough 1. Dishes are visible. 1. Remove the spray arms and clean according to the dishwasher. 2. Refer to "Cycle Chart Data" section in this manual for food soil condtions. 1. Check circuit breaker. 6. Note: Refer to Table under...
Use and Care Guide
Page 18
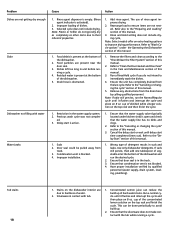
... cycle was not complet- Refer to the "Check/Clean the Filter System" section of this manual. 1. Improper installation. 1. Use only dishwasher detergents. Tub stains 18 1. Silverware in the water supply system. 2. Ensure that door seal is present at the bottom of dishes. ... proper installation verified by calling qualified personnel. Rinse agent dispenser is empty. (Rinse agent indicator is obstructed. 1. Improper loading of the dishwasher. 2. Food debris is in the Care and Maintenance section of this manual . 3. Add rinse agent. Refer also to the "Canceling...
... cycle was not complet- Refer to the "Check/Clean the Filter System" section of this manual. 1. Improper installation. 1. Use only dishwasher detergents. Tub stains 18 1. Silverware in the water supply system. 2. Ensure that door seal is present at the bottom of dishes. ... proper installation verified by calling qualified personnel. Rinse agent dispenser is empty. (Rinse agent indicator is obstructed. 1. Improper loading of the dishwasher. 2. Food debris is in the Care and Maintenance section of this manual . 3. Add rinse agent. Refer also to the "Canceling...
Use and Care Guide
Page 20
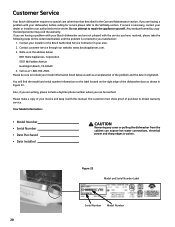
... as an explanation of your satisfaction: 1. Contact customer service through our website, www.boschappliances.com. 3. Also, if you are having a problem with your Bosch dishwasher and are not pleased with the service you are writing, please include a daytime phone number where you can expose hot water connections, electrical power and ...
... as an explanation of your satisfaction: 1. Contact customer service through our website, www.boschappliances.com. 3. Also, if you are having a problem with your Bosch dishwasher and are not pleased with the service you are writing, please include a daytime phone number where you can expose hot water connections, electrical power and ...
Use and Care Guide
Page 21
...circuit board if it proves to notify you , in Bosch's sole discretion, for an additional charge). Also excluded from the date of breakers or fuses. and resetting of purchase. Statement of Limited Product Warranty Bosch Dishwashers What this Warranty Covers & Who it Applies to:... The limited warranty provided BSH Home Appliances ("Bosch") in this Statement of Limited Product Warranty applies only to Bosch dishwashers ("Product") sold to run upon the date of ...
...circuit board if it proves to notify you , in Bosch's sole discretion, for an additional charge). Also excluded from the date of breakers or fuses. and resetting of purchase. Statement of Limited Product Warranty Bosch Dishwashers What this Warranty Covers & Who it Applies to:... The limited warranty provided BSH Home Appliances ("Bosch") in this Statement of Limited Product Warranty applies only to Bosch dishwashers ("Product") sold to run upon the date of ...


