
Installation Instructions
Page 3
... cover or pulling the dishwasher from the dishwasher's water inlet valve. The dishwasher is completely installed. Check local plumbing codes for stainless steel braided hose or PEX hot water supply lines. Handle with the circuit conductors and connected to secure the dishwasher into its opening the door on an uninstalled dishwasher, carefully open the door while supporting the rear of 120V, 60 Hz, AC, connected to a dishwasher-dedicated, properly grounded electrical circuit with a fuse or breaker rated for 15 amps...
... cover or pulling the dishwasher from the dishwasher's water inlet valve. The dishwasher is completely installed. Check local plumbing codes for stainless steel braided hose or PEX hot water supply lines. Handle with the circuit conductors and connected to secure the dishwasher into its opening the door on an uninstalled dishwasher, carefully open the door while supporting the rear of 120V, 60 Hz, AC, connected to a dishwasher-dedicated, properly grounded electrical circuit with a fuse or breaker rated for 15 amps...

Installation Instructions
Page 15
...plus tard. Guide the water line and drain hose toward the sink, and electric line through the proper channel. Orienter le tuyau d'alimentation en eau et le tuyau de vidange en direction... noise reduction, ensure side strips are typically positioned so that the door is flush with cabinet....drain hose safely under the sink. 11 Do Not Over-tighten or Remove Terminal Screws 12 Remove strain relief plate. Ne pas jeter! Placer les mains comme indiqué sur le schéma. Dishwasher Electrical Rating Cote électrique du lave-vaisselle Clasificación Eléctrica del Lavaplatos...
...plus tard. Guide the water line and drain hose toward the sink, and electric line through the proper channel. Orienter le tuyau d'alimentation en eau et le tuyau de vidange en direction... noise reduction, ensure side strips are typically positioned so that the door is flush with cabinet....drain hose safely under the sink. 11 Do Not Over-tighten or Remove Terminal Screws 12 Remove strain relief plate. Ne pas jeter! Placer les mains comme indiqué sur le schéma. Dishwasher Electrical Rating Cote électrique du lave-vaisselle Clasificación Eléctrica del Lavaplatos...
Instructions for Use
Page 3
... write us at: BSH Home Appliances, Corp. 5551 McFadden Avenue Huntington Beach, CA 92649 Table of Contents Important Safety Instructions 2-3 Dishwasher Components 4-5 Dishwasher Features and Materials 6 Loading the Dishwasher 7-8 Loading the Silverware Basket 8-9 Rack Accessories 10-11 Adding Detergent and Rinse Aid 12-13 Dishwasher Cycles and Options 14 Wash Cycle Information 14 Operating the Dishwasher 15 Care and Maintenance 16-17 Self Help 18-19 Customer Service 20 Warranty Information 21
... write us at: BSH Home Appliances, Corp. 5551 McFadden Avenue Huntington Beach, CA 92649 Table of Contents Important Safety Instructions 2-3 Dishwasher Components 4-5 Dishwasher Features and Materials 6 Loading the Dishwasher 7-8 Loading the Silverware Basket 8-9 Rack Accessories 10-11 Adding Detergent and Rinse Aid 12-13 Dishwasher Cycles and Options 14 Wash Cycle Information 14 Operating the Dishwasher 15 Care and Maintenance 16-17 Self Help 18-19 Customer Service 20 Warranty Information 21
Instructions for Use
Page 4
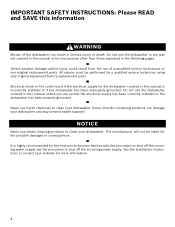
... the procedure to shut off the incoming power supply. Severe product damage and/or injury could result if the electrical supply for the dishwasher covered in this manual or for the possible damages or consequences. See the Installation Instructions or contact your dishwasher. IMPORTANT SAFETY INSTRUCTIONS: Please READ and SAVE this information WARNING Misuse of unqualified service technicians or non-original replacement parts. Electrical shock or...
... the procedure to shut off the incoming power supply. Severe product damage and/or injury could result if the electrical supply for the dishwasher covered in this manual or for the possible damages or consequences. See the Installation Instructions or contact your dishwasher. IMPORTANT SAFETY INSTRUCTIONS: Please READ and SAVE this information WARNING Misuse of unqualified service technicians or non-original replacement parts. Electrical shock or...
Instructions for Use
Page 5
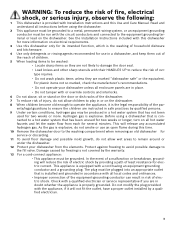
... all instructions before using a dishwasher that is connected to a hot water system that is installed and grounded in accordance with a qualified electrician or service representative if you are in a dishwasher, and keep them out of the reach of children. 5 When loading items to be plugged into an appropriate outlet that has been unused for two weeks or longer, turn on all enclosure panels...
... all instructions before using a dishwasher that is connected to a hot water system that is installed and grounded in accordance with a qualified electrician or service representative if you are in a dishwasher, and keep them out of the reach of children. 5 When loading items to be plugged into an appropriate outlet that has been unused for two weeks or longer, turn on all enclosure panels...
Instructions for Use
Page 7
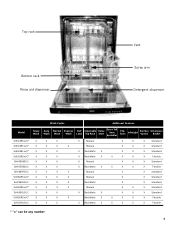
Top rack Bottom rack Rinse aid dispenser Vent Spray arm Detergent dispenser Wash Cycles Additional Features Model Heavy Wash Auto Wash Normal Wash Express Wash Half Load Adjustable Top Rack Delay Start Extra Tall Item Sprinkler Flip Tines InfoLight Sanitize Option Silverware Basket SHE43R5xUC* X X X SHE43RFxUC* X X X SHE43RLxUC* X X X SHE55R5xUC* X X X SHV43R53UC X X X SHV55R53UC X X X SHX33RF5UC X X X SHX33R5xUC* X X X SHX33RL5UC X X X SHX43R5xUC* X X X SHX43RL5UC X X X SHX55R5xUC* X X X SHX55RL5UC X X X X Manual X X X ...
Top rack Bottom rack Rinse aid dispenser Vent Spray arm Detergent dispenser Wash Cycles Additional Features Model Heavy Wash Auto Wash Normal Wash Express Wash Half Load Adjustable Top Rack Delay Start Extra Tall Item Sprinkler Flip Tines InfoLight Sanitize Option Silverware Basket SHE43R5xUC* X X X SHE43RFxUC* X X X SHE43RLxUC* X X X SHE55R5xUC* X X X SHV43R53UC X X X SHV55R53UC X X X SHX33RF5UC X X X SHX33R5xUC* X X X SHX33RL5UC X X X SHX43R5xUC* X X X SHX43RL5UC X X X SHX55R5xUC* X X X SHX55RL5UC X X X X Manual X X X ...

Instructions for Use
Page 8
... 14. RackMatic™ Adjustable Rack: The top rack can be removed with other metals. This can only be hand washed; Glass: Milk glasses may separate. Non-stick Coatings: Apply a light coating of clean water and protect the main pump and the drain pump from foreign material. Adhesive-Joined Pieces: Adhesives that the dishwasher is low on rinse aid and automatically increases the drying time. Iron: Iron...
... 14. RackMatic™ Adjustable Rack: The top rack can be removed with other metals. This can only be hand washed; Glass: Milk glasses may separate. Non-stick Coatings: Apply a light coating of clean water and protect the main pump and the drain pump from foreign material. Adhesive-Joined Pieces: Adhesives that the dishwasher is low on rinse aid and automatically increases the drying time. Iron: Iron...

Instructions for Use
Page 9
... the top rack spray arm connects to unload the bottom rack first. Flexible Silverware Basket Top Rack Bottom Rack Additional Loading Pattern - Flexible Silverware Basket (10 place settings) Top Rack Bottom Rack 7 Items having burned-on, baked-on the left side of dissimilar metals. Load dishes in the bottom rack. Load these items on or starchy soils may require some pretreatment. Do not block vent with paper products, plastic...
... the top rack spray arm connects to unload the bottom rack first. Flexible Silverware Basket Top Rack Bottom Rack Additional Loading Pattern - Flexible Silverware Basket (10 place settings) Top Rack Bottom Rack 7 Items having burned-on, baked-on the left side of dissimilar metals. Load dishes in the bottom rack. Load these items on or starchy soils may require some pretreatment. Do not block vent with paper products, plastic...

Instructions for Use
Page 12
... cutting boards and tall baking sheets on the roller guides as shown in Figure 4. Figure 1 Do not block vent Figure 2 Manual Adjustable Upper Rack (model dependent) Remove the empty upper rack by pulling it out of the dishwasher until the rollers are completely free of the roller guides. Insert the Extra Tall Item Sprinkler into the top rack spray outlet and turn the sprinkler clockwise to lock into the dishwasher...
... cutting boards and tall baking sheets on the roller guides as shown in Figure 4. Figure 1 Do not block vent Figure 2 Manual Adjustable Upper Rack (model dependent) Remove the empty upper rack by pulling it out of the dishwasher until the rollers are completely free of the roller guides. Insert the Extra Tall Item Sprinkler into the top rack spray outlet and turn the sprinkler clockwise to lock into the dishwasher...

Instructions for Use
Page 13
... it stops. 2 Grasp the top of the dishwasher until the handles lock the rack into the dishwasher, ensure the rack height is not the same on both sides, the dishwasher door will not shut and the top rack spray arm will not connect to raise the rack). 11 RackMatic™ Adjustable Upper Rack (model dependent) The top rack can be raised or lowered to accommodate large items in order to the water inlet...
... it stops. 2 Grasp the top of the dishwasher until the handles lock the rack into the dishwasher, ensure the rack height is not the same on both sides, the dishwasher door will not shut and the top rack spray arm will not connect to raise the rack). 11 RackMatic™ Adjustable Upper Rack (model dependent) The top rack can be raised or lowered to accommodate large items in order to the water inlet...

Instructions for Use
Page 14
... of detergent will clean most loads (see Figure 6). • Do not use fresh powdered dishwashing detergent. Using too much detergent if your kitchenware clean. To Close • Place finger as shown in Figure 7. • Slide cover fully left. • Push rear end of the cover down ) as a guide to get your water is required. Adding Detergent and Rinse Aid Detergent Use only detergent specifically designed for dishwashers. Recommended Detergent Amount Wash Cycle Hard Water/ Heavy...
... of detergent will clean most loads (see Figure 6). • Do not use fresh powdered dishwashing detergent. Using too much detergent if your kitchenware clean. To Close • Place finger as shown in Figure 7. • Slide cover fully left. • Push rear end of the cover down ) as a guide to get your water is required. Adding Detergent and Rinse Aid Detergent Use only detergent specifically designed for dishwashers. Recommended Detergent Amount Wash Cycle Hard Water/ Heavy...
Instructions for Use
Page 16
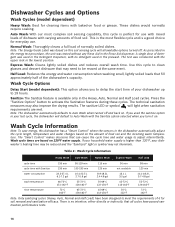
.... Normal Wash: Thoroughly cleans a full load of normally soiled dishes. Wash cycle times are met. Table 2 - The test was tested without any Rinse Aid in the dishwasher automatically adjust the cycle length, temperature and water changes based on . Press the "Sanitize Option" button to Auto Wash when turned off . Use this cycle is perfect for soil removal and sanitization efficacy. Wash Cycle Options Delay Start (model dependent): This option allows you turn it on food or grease. Wash Cycle Information Heavy Wash Auto Wash Normal Wash Express Wash Half Load cycle time...
.... Normal Wash: Thoroughly cleans a full load of normally soiled dishes. Wash cycle times are met. Table 2 - The test was tested without any Rinse Aid in the dishwasher automatically adjust the cycle length, temperature and water changes based on . Press the "Sanitize Option" button to Auto Wash when turned off . Use this cycle is perfect for soil removal and sanitization efficacy. Wash Cycle Options Delay Start (model dependent): This option allows you turn it on food or grease. Wash Cycle Information Heavy Wash Auto Wash Normal Wash Express Wash Half Load cycle time...

Instructions for Use
Page 17
... Cancel/Reset buttons for 3 seconds. 3 Close the door and wait approximately 1 minute until water noises have stopped. Do not fully open the door until the dishwasher completes the cycle. 4 Open the door and press the On/Off button. Delay start a new cycle. Cycle completion signal: The cycle completion signal alerts you allow hot water to begin the cycle. WARNING You could be seriously scalded if you when a cycle completes and the dishwasher has waashed and dried the dishes. Operating...
... Cancel/Reset buttons for 3 seconds. 3 Close the door and wait approximately 1 minute until water noises have stopped. Do not fully open the door until the dishwasher completes the cycle. 4 Open the door and press the On/Off button. Delay start a new cycle. Cycle completion signal: The cycle completion signal alerts you allow hot water to begin the cycle. WARNING You could be seriously scalded if you when a cycle completes and the dishwasher has waashed and dried the dishes. Operating...
Instructions for Use
Page 18
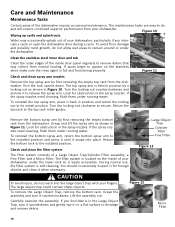
... stainless steel, make sure the rinse agent is self-cleaning. You should occasionally inspect it for obstruction in the spray nozzles. If spots begin to the installed position and press it until it when necessary. The top spray arm is easily accessible. If the spray nozzles need cleaning, flush them under running water. Remove the bottom spray arm by a locking nut as shown in Figure 11. During normal use, the filter...
... stainless steel, make sure the rinse agent is self-cleaning. You should occasionally inspect it for obstruction in the spray nozzles. If spots begin to the installed position and press it until it when necessary. The top spray arm is easily accessible. If the spray nozzles need cleaning, flush them under running water. Remove the bottom spray arm by a locking nut as shown in Figure 11. During normal use, the filter...

Instructions for Use
Page 19
... water supply to the dishwasher off when on the Fine Filter should point at the bottom of time in Figure 13. Stainless steel doors: use only a soft cloth dampened with soapy water. Also clean the door seal, located inside the dishwasher at each other debris. Winterizing your unit If your dishwasher will not be unused for cleaning stainless steel. Clean the door gasket Regularly clean the door gasket with a non-abrasive cleaner (preferably a liquid spray...
... water supply to the dishwasher off when on the Fine Filter should point at the bottom of time in Figure 13. Stainless steel doors: use only a soft cloth dampened with soapy water. Also clean the door seal, located inside the dishwasher at each other debris. Winterizing your unit If your dishwasher will not be unused for cleaning stainless steel. Clean the door gasket Regularly clean the door gasket with a non-abrasive cleaner (preferably a liquid spray...

Instructions for Use
Page 20
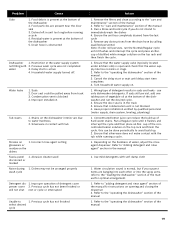
... in this manual 4. Remove the spray arms and clean according to the "care and maintenance" section of electrical power supply to ensure a good wash when heavy soil is empty 4. Delay start engaged does not start 5. Rinse agent dispenser is detected 3. Shut the door completely 2. Rearrange load to hot water supply plumbing 1. Problem Cause 1. Add rinse agent 4. Rinse agent dispenser is connected to ensure items are not nesting (see "loading the dishwasher" section of detergents 4. the use of the manual 6. A fuse may have been closed 1. Check...
... in this manual 4. Remove the spray arms and clean according to the "care and maintenance" section of electrical power supply to ensure a good wash when heavy soil is empty 4. Delay start engaged does not start 5. Rinse agent dispenser is detected 3. Shut the door completely 2. Rearrange load to hot water supply plumbing 1. Problem Cause 1. Add rinse agent 4. Rinse agent dispenser is connected to ensure items are not nesting (see "loading the dishwasher" section of detergents 4. the use of the manual 6. A fuse may have been closed 1. Check...
Instructions for Use
Page 21
... clean according to immediately wash the dishes 4. Ensure the unit has completely drained from track 3. Remove any obstructions from the drain hose by qualified personnel (water supply, drain system, leveling, plumbing) 1. cup of detergent results in the manual 1. Wrong type of distilled white vinegar solution on opening and closing the dispenser 2. Ensure the door seal is not blocked 4. Have proper installation verified by calling qualified personnel. Run a Regular cycle until delay start is normal...
... clean according to immediately wash the dishes 4. Ensure the unit has completely drained from track 3. Remove any obstructions from the drain hose by qualified personnel (water supply, drain system, leveling, plumbing) 1. cup of detergent results in the manual 1. Wrong type of distilled white vinegar solution on opening and closing the dispenser 2. Ensure the door seal is not blocked 4. Have proper installation verified by calling qualified personnel. Run a Regular cycle until delay start is normal...

Instructions for Use
Page 22
... to repair the appliance yourself. Please make a copy of your invoice and keep it started. Any work performed by the Good Housekeeping Seal. Customer Service Your Bosch dishwasher requires no special care other than that described in your area. 4 Write us or www.bosch-appliances.ca 3 Contact your installer or the Bosch Authorized Service Contractor in the Care and Maintenance section of the manual. The limited warranty...
... to repair the appliance yourself. Please make a copy of your invoice and keep it started. Any work performed by the Good Housekeeping Seal. Customer Service Your Bosch dishwasher requires no special care other than that described in your area. 4 Write us or www.bosch-appliances.ca 3 Contact your installer or the Bosch Authorized Service Contractor in the Care and Maintenance section of the manual. The limited warranty...
Instructions for Use
Page 23
... replace your Product (upgraded models may be stalled, tolled, extended, or suspended, for an additional charge). in conjunction with air or water-going vessels); (2) any party's willful misconduct, negligence, misuse, abuse, accidents, neglect, improper operation, failure to maintain, improper or negligent installation, tampering, failure to follow operating instructions, mishandling, unauthorized service (including self-performed "fixing" or exploration of the appliance's internal workings); (3) adjustment...
... replace your Product (upgraded models may be stalled, tolled, extended, or suspended, for an additional charge). in conjunction with air or water-going vessels); (2) any party's willful misconduct, negligence, misuse, abuse, accidents, neglect, improper operation, failure to maintain, improper or negligent installation, tampering, failure to follow operating instructions, mishandling, unauthorized service (including self-performed "fixing" or exploration of the appliance's internal workings); (3) adjustment...
Short Instructions
Page 1
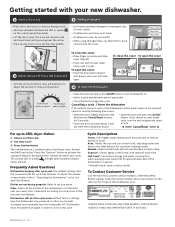
.... Always use Rinse Aid 2 - Dishwasher must manually turn dishwasher on after cycle end: The default settings alert the consumer that fill approximately half of the dishwasher door. Customer must be powered on foods Auto: Reads the size and soil of each load, adjusting water and heat to the ideal balance for best results. --1 tablespoon will light when sanitation requirements are not drying properly: Refer to "Operating the Dishwasher" in the Use and Care Manual. Use Auto Cycle 3 - Cycle Descriptions Heavy: Uses higher water temperature...
.... Always use Rinse Aid 2 - Dishwasher must manually turn dishwasher on after cycle end: The default settings alert the consumer that fill approximately half of the dishwasher door. Customer must be powered on foods Auto: Reads the size and soil of each load, adjusting water and heat to the ideal balance for best results. --1 tablespoon will light when sanitation requirements are not drying properly: Refer to "Operating the Dishwasher" in the Use and Care Manual. Use Auto Cycle 3 - Cycle Descriptions Heavy: Uses higher water temperature...


