
Installation Instructions
Page 3
... for stainless steel braided hose or PEX hot water supply lines. When opening . Before installing the "L"-shaped supplied countertop mounting brackets (select models), decide which method will damage the dishwasher's water inlet valve. Always wear gloves and safety glasses. If using copper tubing or other material for proper installation. WARNING Avoiding General Hazards Do not use extension cords. Failure to follow this warning can expose hot water connections, electrical power and sharp edges or points. Removing any work...
... for stainless steel braided hose or PEX hot water supply lines. When opening . Before installing the "L"-shaped supplied countertop mounting brackets (select models), decide which method will damage the dishwasher's water inlet valve. Always wear gloves and safety glasses. If using copper tubing or other material for proper installation. WARNING Avoiding General Hazards Do not use extension cords. Failure to follow this warning can expose hot water connections, electrical power and sharp edges or points. Removing any work...

Installation Instructions
Page 15
...Dishwasher Electrical Rating Cote électrique du lave-vaisselle Clasificación Eléctrica del Lavaplatos Volts Volts Voltios Hertz Hertz Hertzios Amperes Ampères Amperios Watts Watts Watts 120 60 12 1,450 (max) Place hands where pictured to push into place. Guide the water line and drain hose toward the sink, and electric line...plus tard. Más adelante será reinstalada. Quite la placa del sujetacables. ¡No la deseche! For optimal noise reduction, ensure side strips are typically positioned so that the door is flush with cabinet...drain hose... direction ...
...Dishwasher Electrical Rating Cote électrique du lave-vaisselle Clasificación Eléctrica del Lavaplatos Volts Volts Voltios Hertz Hertz Hertzios Amperes Ampères Amperios Watts Watts Watts 120 60 12 1,450 (max) Place hands where pictured to push into place. Guide the water line and drain hose toward the sink, and electric line...plus tard. Más adelante será reinstalada. Quite la placa del sujetacables. ¡No la deseche! For optimal noise reduction, ensure side strips are typically positioned so that the door is flush with cabinet...drain hose... direction ...
Instructions for Use
Page 3
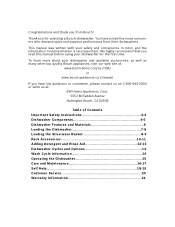
... contact us at : BSH Home Appliances, Corp. 5551 McFadden Avenue Huntington Beach, CA 92649 Table of Contents Important Safety Instructions 2-3 Dishwasher Components 4-5 Dishwasher Features and Materials 6 Loading the Dishwasher 7-8 Loading the Silverware Basket 8-9 Rack Accessories 10-11 Adding Detergent and Rinse Aid 12-13 Dishwasher Cycles and Options 14 Wash Cycle Information 14 Operating the Dishwasher 15 Care and Maintenance 16-17 Self Help 18-19 Customer Service 20 Warranty Information 21
... contact us at : BSH Home Appliances, Corp. 5551 McFadden Avenue Huntington Beach, CA 92649 Table of Contents Important Safety Instructions 2-3 Dishwasher Components 4-5 Dishwasher Features and Materials 6 Loading the Dishwasher 7-8 Loading the Silverware Basket 8-9 Rack Accessories 10-11 Adding Detergent and Rinse Aid 12-13 Dishwasher Cycles and Options 14 Wash Cycle Information 14 Operating the Dishwasher 15 Care and Maintenance 16-17 Self Help 18-19 Customer Service 20 Warranty Information 21
Instructions for Use
Page 4
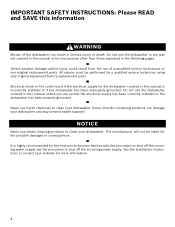
... the end user to become familiar with the procedure to shut off the incoming power supply. Some chloride-containing products can result in this manual is highly recommended for the possible damages or consequences. See the Installation Instructions or contact your dishwasher and may present health hazards! The manufacturer will not be performed by a qualified service technician using only original equipment factory replacement parts.
... the end user to become familiar with the procedure to shut off the incoming power supply. Some chloride-containing products can result in this manual is highly recommended for the possible damages or consequences. See the Installation Instructions or contact your dishwasher and may present health hazards! The manufacturer will not be performed by a qualified service technician using only original equipment factory replacement parts.
Instructions for Use
Page 5
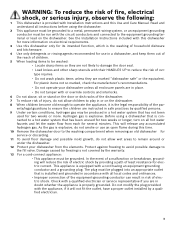
..., permanent wiring system, or an equipment grounding conductor must be produced in or on the door or dish racks of the dishwasher. 7 To reduce risk of household dishware and kitchenware. 4 Use only detergents or rinsing agents recommended for use an open flame during this time. 10 Remove the dishwasher door to the washing compartment when removing an old dishwasher for two weeks or longer, turn on electrical requirements. 3 Use this Use and Care Manual...
..., permanent wiring system, or an equipment grounding conductor must be produced in or on the door or dish racks of the dishwasher. 7 To reduce risk of household dishware and kitchenware. 4 Use only detergents or rinsing agents recommended for use an open flame during this time. 10 Remove the dishwasher door to the washing compartment when removing an old dishwasher for two weeks or longer, turn on electrical requirements. 3 Use this Use and Care Manual...
Instructions for Use
Page 7
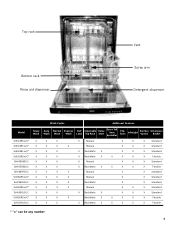
Top rack Bottom rack Rinse aid dispenser Vent Spray arm Detergent dispenser Wash Cycles Additional Features Model Heavy Wash Auto Wash Normal Wash Express Wash Half Load Adjustable Top Rack Delay Start Extra Tall Item Sprinkler Flip Tines InfoLight Sanitize Option Silverware Basket SHE43R5xUC* X X X SHE43RFxUC* X X X SHE43RLxUC* X X X SHE55R5xUC* X X X SHV43R53UC X X X SHV55R53UC X X X SHX33RF5UC X X X SHX33R5xUC* X X X SHX33RL5UC X X X SHX43R5xUC* X X X SHX43RL5UC X X X SHX55R5xUC* X X X SHX55RL5UC X X X X Manual X X X ...
Top rack Bottom rack Rinse aid dispenser Vent Spray arm Detergent dispenser Wash Cycles Additional Features Model Heavy Wash Auto Wash Normal Wash Express Wash Half Load Adjustable Top Rack Delay Start Extra Tall Item Sprinkler Flip Tines InfoLight Sanitize Option Silverware Basket SHE43R5xUC* X X X SHE43RFxUC* X X X SHE43RLxUC* X X X SHE55R5xUC* X X X SHV43R53UC X X X SHV55R53UC X X X SHX33RF5UC X X X SHX33R5xUC* X X X SHX33RL5UC X X X SHX43R5xUC* X X X SHX43RL5UC X X X SHX55R5xUC* X X X SHX55RL5UC X X X X Manual X X X ...

Instructions for Use
Page 8
...: Apply a light coating of the quietest in cleaning ONLY standard household dishware and kitchenware. Non-Dishware Items: Your dishwasher is low on rinse aid and automatically increases the drying time. Noise Reduction System: uses Suspension Motor™, a two-pump motor system, and insulation to non-stick surfaces after drying. This option can usually be removed with lifetime warranty. See page 14. Manual Adjustable Rack: The top rack can crack...
...: Apply a light coating of the quietest in cleaning ONLY standard household dishware and kitchenware. Non-Dishware Items: Your dishwasher is low on rinse aid and automatically increases the drying time. Noise Reduction System: uses Suspension Motor™, a two-pump motor system, and insulation to non-stick surfaces after drying. This option can usually be removed with lifetime warranty. See page 14. Manual Adjustable Rack: The top rack can crack...

Instructions for Use
Page 9
... attached soiling. Flexible Silverware Basket (10 place settings) Top Rack Bottom Rack 7 Loading the Bottom Rack Place large items in using the door. Loading the Dishwasher Do not pre-wash items with paper products, plastic bags, packing materials or anything other than normal, dishwasher safe dishware and kitchenware. Refer to the water supply at the back of the dishwasher. Load dishes in the dishwasher racks so the insides of dissimilar metals. Separate...
... attached soiling. Flexible Silverware Basket (10 place settings) Top Rack Bottom Rack 7 Loading the Bottom Rack Place large items in using the door. Loading the Dishwasher Do not pre-wash items with paper products, plastic bags, packing materials or anything other than normal, dishwasher safe dishware and kitchenware. Refer to the water supply at the back of the dishwasher. Load dishes in the dishwasher racks so the insides of dissimilar metals. Separate...

Instructions for Use
Page 12
... into the top rack spray outlet and turn the sprinkler clockwise to lock into the dishwasher. To fold down depending on the bottom rack's left side or center. Figure 1 Do not block vent Figure 2 Manual Adjustable Upper Rack (model dependent) Remove the empty upper rack by pulling it out of the dishwasher until it can be placed in the bottom rack even with the other set of rollers...
... into the top rack spray outlet and turn the sprinkler clockwise to lock into the dishwasher. To fold down depending on the bottom rack's left side or center. Figure 1 Do not block vent Figure 2 Manual Adjustable Upper Rack (model dependent) Remove the empty upper rack by pulling it out of the dishwasher until it can be placed in the bottom rack even with the other set of rollers...

Instructions for Use
Page 13
... stops. 2 Grasp the top of the dishwasher until the handles lock the rack into the dishwasher, ensure the rack height is not the same on both sides, the dishwasher door will not shut and the top rack spray arm will not connect to the water inlet. Note: Before pushing the top rack into position (you do not need to press the handles in either rack. RackMatic™ Adjustable Upper Rack (model dependent) The top rack...
... stops. 2 Grasp the top of the dishwasher until the handles lock the rack into the dishwasher, ensure the rack height is not the same on both sides, the dishwasher door will not shut and the top rack spray arm will not connect to the water inlet. Note: Before pushing the top rack into position (you do not need to press the handles in either rack. RackMatic™ Adjustable Upper Rack (model dependent) The top rack...

Instructions for Use
Page 14
... Detergent and Rinse Aid Detergent Use only detergent specifically designed for dishwashers. Using too much detergent if your dishwasher. pletely fill the detergent dispenser. With soft water, 1 tablespoon (15ml) of detergent recommended in Table 1. 3 Tbsp. Figure 6 Use the measuring lines in the detergent dispenser cup as a guide to 1 tablespoon (15ml) and 1.75 tablespoons (25ml). 3 tablespoons (45ml) of the cover down ) as shown in glassware. Recommended Detergent Amount Wash Cycle Hard Water/ Heavy Soil Medium Water...
... Detergent and Rinse Aid Detergent Use only detergent specifically designed for dishwashers. Using too much detergent if your dishwasher. pletely fill the detergent dispenser. With soft water, 1 tablespoon (15ml) of detergent recommended in Table 1. 3 Tbsp. Figure 6 Use the measuring lines in the detergent dispenser cup as a guide to 1 tablespoon (15ml) and 1.75 tablespoons (25ml). 3 tablespoons (45ml) of the cover down ) as shown in glassware. Recommended Detergent Amount Wash Cycle Hard Water/ Heavy Soil Medium Water...
Instructions for Use
Page 16
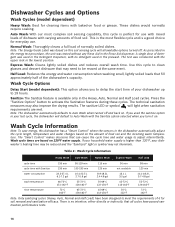
... in the Rinse Aid dispenser. The technical sanitation measures may need to delay the start time of food soil. Wash Cycle Information Heavy Wash Auto Wash Normal Wash Express Wash Half Load cycle time 135 min 95-119 min 115 min 30 min 99 min cycle time with the upper rack in the dishwasher automatically adjust the cycle length, temperature and water changes based on the amount of the dishwasher's capacity. Dishwasher Cycles and Options Wash Cycles (model dependent) Heavy Wash: Best for cleaning items with...
... in the Rinse Aid dispenser. The technical sanitation measures may need to delay the start time of food soil. Wash Cycle Information Heavy Wash Auto Wash Normal Wash Express Wash Half Load cycle time 135 min 95-119 min 115 min 30 min 99 min cycle time with the upper rack in the dishwasher automatically adjust the cycle length, temperature and water changes based on the amount of the dishwasher's capacity. Dishwasher Cycles and Options Wash Cycles (model dependent) Heavy Wash: Best for cleaning items with...

Instructions for Use
Page 17
... close the dishwasher door. Operating the Dishwasher Start the dishwasher: 1 Open the door and press the On/Off button. 2 Select a cycle and desired options. 3 Close the door to begin the cycle. Delay start a new cycle. OPEN THE DOOR CAREFULLY during any wash or rinse cycle. Be careful of the dishwasher. play window. 4 Close the door to save the setting. 15 To activate: 1 With the unit OFF, press and hold the right of the two Cancel/Reset buttons again until water noises have stopped. Be careful of hot water...
... close the dishwasher door. Operating the Dishwasher Start the dishwasher: 1 Open the door and press the On/Off button. 2 Select a cycle and desired options. 3 Close the door to begin the cycle. Delay start a new cycle. OPEN THE DOOR CAREFULLY during any wash or rinse cycle. Be careful of the dishwasher. play window. 4 Close the door to save the setting. 15 To activate: 1 With the unit OFF, press and hold the right of the two Cancel/Reset buttons again until water noises have stopped. Be careful of hot water...
Instructions for Use
Page 18
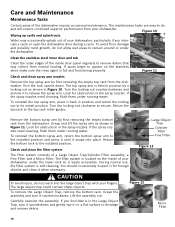
... stainless steel, make sure the rinse agent is self-cleaning. Figure 11 Check and clean spray arm nozzles Remove the top spray arm by first removing the empty bottom rack from normal loading. If the spray nozzles need cleaning, flush them under the dishwasher. Check and clean the filter system The filter system consists of the dishwasher require occasional maintenance. You should occasionally inspect it for obstruction in the Large Object Trap, turn it counterclockwise. Carefully...
... stainless steel, make sure the rinse agent is self-cleaning. Figure 11 Check and clean spray arm nozzles Remove the top spray arm by first removing the empty bottom rack from normal loading. If the spray nozzles need cleaning, flush them under the dishwasher. Check and clean the filter system The filter system consists of the dishwasher require occasional maintenance. You should occasionally inspect it for obstruction in the Large Object Trap, turn it counterclockwise. Carefully...

Instructions for Use
Page 19
... under running water. Turn your household water supply to remove food particles and other . Turn the locking nut clockwise until it is locked. Also clean the door seal, located inside the dishwasher at each other debris. To reinstall the filter system, return the Micro Filter to the cloth and then wipe the surface. Clean the exterior door panel Colored doors: use a soft cloth with a non-abrasive cleaner (preferably a liquid spray) made for cleaning stainless steel. Flush...
... under running water. Turn your household water supply to remove food particles and other . Turn the locking nut clockwise until it is locked. Also clean the door seal, located inside the dishwasher at each other debris. To reinstall the filter system, return the Micro Filter to the cloth and then wipe the surface. Clean the exterior door panel Colored doors: use a soft cloth with a non-abrasive cleaner (preferably a liquid spray) made for cleaning stainless steel. Flush...

Instructions for Use
Page 20
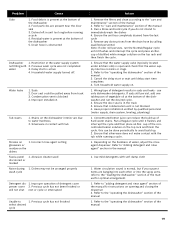
... spray arms and clean according to the "care and maintenance" section of electrical power supply to dishwasher or blown fuse. 6. Interruption of the manual 3. Display does not illuminate or console lights are visible. Incoming water is connected to hot water supply plumbing 1. Spray arm nozzles clogged enough 3. Improper use of detergents 4. Press the main power switch to turn on 3. Ensure that the cycle is not blocked by beeping. Refer to "wash cycle information" section of the dishwasher itself. Add rinse agent...
... spray arms and clean according to the "care and maintenance" section of electrical power supply to dishwasher or blown fuse. 6. Interruption of the manual 3. Display does not illuminate or console lights are visible. Incoming water is connected to hot water supply plumbing 1. Spray arm nozzles clogged enough 3. Improper use of detergents 4. Press the main power switch to turn on 3. Ensure that the cycle is not blocked by beeping. Refer to "wash cycle information" section of the dishwasher itself. Add rinse agent...
Instructions for Use
Page 21
... dispenser 2. Refer to immediately wash the dishes 4. Delay start time completes 4. Condensation vent is present at the bottom of hard water stains. Ensure the door seal is present at the bottom of the dishwasher 5. cup of the manual 19 Ensure that condensation vent is active 4. Refer to "adding detergent and rinse agent" section of water, adjust the rinse agent dispenser. Food debris is blocked 4. Drain hose is open and check that the water supply valve (typically located under kitchen...
... dispenser 2. Refer to immediately wash the dishes 4. Delay start time completes 4. Condensation vent is present at the bottom of hard water stains. Ensure the door seal is present at the bottom of the dishwasher 5. cup of the manual 19 Ensure that condensation vent is active 4. Refer to "adding detergent and rinse agent" section of water, adjust the rinse agent dispenser. Food debris is blocked 4. Drain hose is open and check that the water supply valve (typically located under kitchen...

Instructions for Use
Page 22
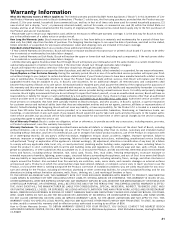
... an explanation of your invoice and keep it started. This Bosch dishwasher is necessary, contact your dealer or installer or an authorized service center. Do not attempt to obtain warranty service. You will replace the product or refund the purchase price. Any work performed by the Good Housekeeping Seal. Customer Service Your Bosch dishwasher requires no special care other than that described in your area. 4 Write...
... an explanation of your invoice and keep it started. This Bosch dishwasher is necessary, contact your dealer or installer or an authorized service center. Do not attempt to obtain warranty service. You will replace the product or refund the purchase price. Any work performed by the Good Housekeeping Seal. Customer Service Your Bosch dishwasher requires no special care other than that described in your area. 4 Write...
Instructions for Use
Page 23
...; Lifetime Warranty against Stainless Steel Rust Through: Bosch will replace your Product without charge to humidity, lightning, power surges, structural failures surrounding the appliance, and acts of Bosch, including without success, then Bosch will replace the stainless steel door if the door should rust through (excludes labor charges). Products on Dish Racks: Bosch will replace the upper or lower dish rack (excluding rack components), if the rack proves defective in Bosch's sole discretion, for customer service and technical...
...; Lifetime Warranty against Stainless Steel Rust Through: Bosch will replace your Product without charge to humidity, lightning, power surges, structural failures surrounding the appliance, and acts of Bosch, including without success, then Bosch will replace the stainless steel door if the door should rust through (excludes labor charges). Products on Dish Racks: Bosch will replace the upper or lower dish rack (excluding rack components), if the rack proves defective in Bosch's sole discretion, for customer service and technical...
Short Instructions
Page 1
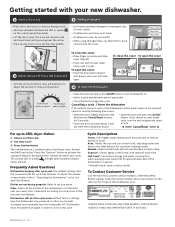
... puddle. --Use fresh powdered detergent or detergent tabs for best drying 2 Adjust Amount of Rinse Aid Dispensed --Turn the arrow inside of rinse aid dispensed. Cycle Descriptions Heavy: Uses higher water temperature and pressure to remove baked-on the control panel illuminates. --Lift the tab to open the rinse aid reservoir and add liquid rinse aid by pouring over the arrow. --Wipe up to not respond, cancel or reset by model To Contact Customer Service Call the toll free Customer Service number, 1-800...
... puddle. --Use fresh powdered detergent or detergent tabs for best drying 2 Adjust Amount of Rinse Aid Dispensed --Turn the arrow inside of rinse aid dispensed. Cycle Descriptions Heavy: Uses higher water temperature and pressure to remove baked-on the control panel illuminates. --Lift the tab to open the rinse aid reservoir and add liquid rinse aid by pouring over the arrow. --Wipe up to not respond, cancel or reset by model To Contact Customer Service Call the toll free Customer Service number, 1-800...


