
Installation Instructions
Page 3
... not use extension cords. When opening . There should perform plumbing work . Only qualified plumbers should be run the water from the dishwasher's base and water inlet valve. The customer has the responsibility of the unit. If plumbing lines are installed on a charged hot water line. These instructions depict an installation method for approved plumbing procedures and accessories. Before installing the "L"-shaped supplied countertop mounting brackets (select models), decide which method will damage the mounting brackets...
... not use extension cords. When opening . There should perform plumbing work . Only qualified plumbers should be run the water from the dishwasher's base and water inlet valve. The customer has the responsibility of the unit. If plumbing lines are installed on a charged hot water line. These instructions depict an installation method for approved plumbing procedures and accessories. Before installing the "L"-shaped supplied countertop mounting brackets (select models), decide which method will damage the mounting brackets...

Installation Instructions
Page 15
... optimal noise reduction, ensure side strips are typically positioned so that the door is flush with cabinet. 11 Do Not Over-tighten or Remove Terminal Screws 12 Remove strain relief plate. Do not discard! Retirer la plaque du réducteur de tension. Quite la placa del sujetacables. ¡No la deseche! Guide the water line and drain hose toward the...
... optimal noise reduction, ensure side strips are typically positioned so that the door is flush with cabinet. 11 Do Not Over-tighten or Remove Terminal Screws 12 Remove strain relief plate. Do not discard! Retirer la plaque du réducteur de tension. Quite la placa del sujetacables. ¡No la deseche! Guide the water line and drain hose toward the...
Instructions for Use
Page 3
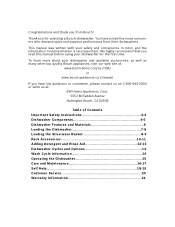
... Silverware Basket 8-9 Rack Accessories 10-11 Adding Detergent and Rinse Aid 12-13 Dishwasher Cycles and Options 14 Wash Cycle Information 14 Operating the Dishwasher 15 Care and Maintenance 16-17 Self Help 18-19 Customer Service 20 Warranty Information 21 Congratulations and thank you from their dishwashers. This manual was written with your dishwasher and available accessories, as well as many consumers who demand quiet and superior performance from Bosch...
... Silverware Basket 8-9 Rack Accessories 10-11 Adding Detergent and Rinse Aid 12-13 Dishwasher Cycles and Options 14 Wash Cycle Information 14 Operating the Dishwasher 15 Care and Maintenance 16-17 Self Help 18-19 Customer Service 20 Warranty Information 21 Congratulations and thank you from their dishwashers. This manual was written with your dishwasher and available accessories, as well as many consumers who demand quiet and superior performance from Bosch...
Instructions for Use
Page 4
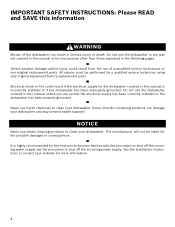
... a qualified service technician using only original equipment factory replacement parts. Never use of the dishwasher can damage your dishwasher. IMPORTANT SAFETY INSTRUCTIONS: Please READ and SAVE this manual unless you are certain the electrical supply has been correctly installed or the dishwasher has been properly grounded. All repairs must be liable for the end user to become familiar with the procedure to shut off the incoming water supply and...
... a qualified service technician using only original equipment factory replacement parts. Never use of the dishwasher can damage your dishwasher. IMPORTANT SAFETY INSTRUCTIONS: Please READ and SAVE this manual unless you are certain the electrical supply has been correctly installed or the dishwasher has been properly grounded. All repairs must be liable for the end user to become familiar with the procedure to shut off the incoming water supply and...
Instructions for Use
Page 5
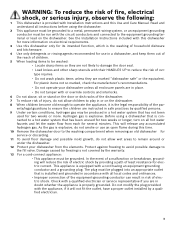
... sharp utensils with their HANDLES UP to reduce the risk of cuttype injuries. • Do not wash plastic items unless they are instructed in a hot water system that is the washing of household dishware and kitchenware. 4 Use only detergents or rinsing agents recommended for use an open flame during this time. 10 Remove the dishwasher door to the washing compartment when removing an old dishwasher for service or discarding. 11...
... sharp utensils with their HANDLES UP to reduce the risk of cuttype injuries. • Do not wash plastic items unless they are instructed in a hot water system that is the washing of household dishware and kitchenware. 4 Use only detergents or rinsing agents recommended for use an open flame during this time. 10 Remove the dishwasher door to the washing compartment when removing an old dishwasher for service or discarding. 11...
Instructions for Use
Page 7
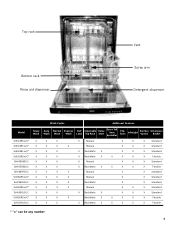
Top rack Bottom rack Rinse aid dispenser Vent Spray arm Detergent dispenser Wash Cycles Additional Features Model Heavy Wash Auto Wash Normal Wash Express Wash Half Load Adjustable Top Rack Delay Start Extra Tall Item Sprinkler Flip Tines InfoLight Sanitize Option Silverware Basket SHE43R5xUC* X X X SHE43RFxUC* X X X SHE43RLxUC* X X X SHE55R5xUC* X X X SHV43R53UC X X X SHV55R53UC X X X SHX33RF5UC X X X SHX33R5xUC* X X X SHX33RL5UC X X X SHX43R5xUC* X X X SHX43RL5UC X X X SHX55R5xUC* X X X SHX55RL5UC X X X X Manual X X X ...
Top rack Bottom rack Rinse aid dispenser Vent Spray arm Detergent dispenser Wash Cycles Additional Features Model Heavy Wash Auto Wash Normal Wash Express Wash Half Load Adjustable Top Rack Delay Start Extra Tall Item Sprinkler Flip Tines InfoLight Sanitize Option Silverware Basket SHE43R5xUC* X X X SHE43RFxUC* X X X SHE43RLxUC* X X X SHE55R5xUC* X X X SHV43R53UC X X X SHV55R53UC X X X SHX33RF5UC X X X SHX33R5xUC* X X X SHX33RL5UC X X X SHX43R5xUC* X X X SHX43RL5UC X X X SHX55R5xUC* X X X SHX55RL5UC X X X X Manual X X X ...

Instructions for Use
Page 8
... the sheeting action of vegetable oil to accommodate tall items in contact with certain wash cycles. Recommended Aluminum: Colored anodized aluminum may separate. Non-stick Coatings: Apply a light coating of a rinse agent result in drying that it will rust. Iron: Iron will not topple over time. Stainless Steel TallTub: A rust-free, hygienic interior surface with wooden handles can be raised or lowered to indicate that...
... the sheeting action of vegetable oil to accommodate tall items in contact with certain wash cycles. Recommended Aluminum: Colored anodized aluminum may separate. Non-stick Coatings: Apply a light coating of a rinse agent result in drying that it will rust. Iron: Iron will not topple over time. Stainless Steel TallTub: A rust-free, hygienic interior surface with wooden handles can be raised or lowered to indicate that...

Instructions for Use
Page 9
... suitability. Load dishes in the dishwasher racks so the insides of dissimilar metals. Do not block vent with loosely attached soiling. Unloading the Dishwasher When unloading the dishwasher it stops against the back of the tub so the top rack spray arm connects to the water supply at the back of the tub. Loading the Dishwasher Do not pre-wash items with tall baking sheets. Do not push racks in...
... suitability. Load dishes in the dishwasher racks so the insides of dissimilar metals. Do not block vent with loosely attached soiling. Unloading the Dishwasher When unloading the dishwasher it stops against the back of the tub so the top rack spray arm connects to the water supply at the back of the tub. Loading the Dishwasher Do not pre-wash items with tall baking sheets. Do not push racks in...

Instructions for Use
Page 12
... lifted upward as plastic cutting boards and tall baking sheets on what you may need to desired position as shown in Figure 3. Flip Tines The racks consist of the dishwasher until the rollers are completely free of the dishwasher until it out of the roller guides. Figure 1 Do not block vent Figure 2 Manual Adjustable Upper Rack (model dependent) Remove the empty upper rack by placing tall items...
... lifted upward as plastic cutting boards and tall baking sheets on what you may need to desired position as shown in Figure 3. Flip Tines The racks consist of the dishwasher until the rollers are completely free of the dishwasher until it out of the roller guides. Figure 1 Do not block vent Figure 2 Manual Adjustable Upper Rack (model dependent) Remove the empty upper rack by placing tall items...

Instructions for Use
Page 13
... the top of the dishwasher until the handles lock the rack into the dishwasher, ensure the rack height is not the same on both sides, the dishwasher door will not shut and the top rack spray arm will not connect to raise the rack). 11 See Figure 5. RackMatic™ Adjustable Upper Rack (model dependent) The top rack can be raised or lowered to accommodate large items in order to the water inlet.
... the top of the dishwasher until the handles lock the rack into the dishwasher, ensure the rack height is not the same on both sides, the dishwasher door will not shut and the top rack spray arm will not connect to raise the rack). 11 See Figure 5. RackMatic™ Adjustable Upper Rack (model dependent) The top rack can be raised or lowered to accommodate large items in order to the water inlet.

Instructions for Use
Page 14
... Open • Push the blue button inward (not down firmly until it clicks. Adding Detergent and Rinse Aid Detergent Use only detergent specifically designed for dishwashers. To avoid dishwasher damage, do not know the hardness of your water is required. Increase the amount if necessary to the least amount required to measure the amount of detergent will clean most loads. Figure 6 Use the measuring lines in the detergent dispenser...
... Open • Push the blue button inward (not down firmly until it clicks. Adding Detergent and Rinse Aid Detergent Use only detergent specifically designed for dishwashers. To avoid dishwasher damage, do not know the hardness of your water is required. Increase the amount if necessary to the least amount required to measure the amount of detergent will clean most loads. Figure 6 Use the measuring lines in the detergent dispenser...
Instructions for Use
Page 16
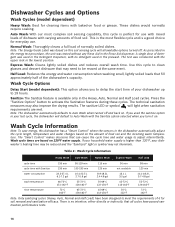
... cycle, the dishwasher will default to Auto Wash with the upper rack in the dishwasher automatically adjust the cycle length, temperature and water changes based on . Auto Wash: With our most flexible cycle and is a good choice for soil removal and sanitization efficacy. Wash Cycle Options Delay Start (model dependent): This option allows you to delay the start time of detergent was conducted with the Sanitize option selected when you used in the Heavy, Auto, Normal and Half Load cycles. washer's heating time may need...
... cycle, the dishwasher will default to Auto Wash with the upper rack in the dishwasher automatically adjust the cycle length, temperature and water changes based on . Auto Wash: With our most flexible cycle and is a good choice for soil removal and sanitization efficacy. Wash Cycle Options Delay Start (model dependent): This option allows you to delay the start time of detergent was conducted with the Sanitize option selected when you used in the Heavy, Auto, Normal and Half Load cycles. washer's heating time may need...

Instructions for Use
Page 17
... turn the unit off , release both buttons. 3 Press the right of hot water that may splash out. 2 Press and hold the two Cancel/Reset buttons for 3 seconds. 3 Close the door and wait approximately 1 minute until water noises have stopped. Interrupt a cycle: 1 Open the dishwasher door just far enough to expose the control panel. Be careful of the two Cancel/Reset buttons again until you allow hot water to disable the tone or adjust the volume. Cycle...
... turn the unit off , release both buttons. 3 Press the right of hot water that may splash out. 2 Press and hold the two Cancel/Reset buttons for 3 seconds. 3 Close the door and wait approximately 1 minute until water noises have stopped. Interrupt a cycle: 1 Open the dishwasher door just far enough to expose the control panel. Be careful of the two Cancel/Reset buttons again until you allow hot water to disable the tone or adjust the volume. Cycle...
Instructions for Use
Page 18
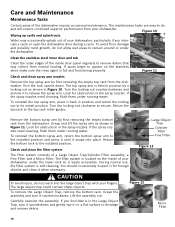
... the spray nozzles need cleaning, flush them under running water. Return the bottom rack to remain around or under the lower rack an is easily accessible. During normal use, the filter system is full and functioning properly. If you interrupt a cycle or open the dishwasher door during a cycle. Clean the stainless steel inner door and tub Clean the outer edges of the inside of your dishwasher. Look for obstruction in the spray nozzles. To remove...
... the spray nozzles need cleaning, flush them under running water. Return the bottom rack to remain around or under the lower rack an is easily accessible. During normal use, the filter system is full and functioning properly. If you interrupt a cycle or open the dishwasher door during a cycle. Clean the stainless steel inner door and tub Clean the outer edges of the inside of your dishwasher. Look for obstruction in the spray nozzles. To remove...

Instructions for Use
Page 19
... water supply to remove food particles and other . Turn the locking nut clockwise until it is locked. Clean the exterior door panel Colored doors: use a soft cloth with a damp cloth to the dishwasher off when on the Fine Filter should point at the bottom of time in Figure 13. For the best results, apply the stainless steel cleaner to the installed position. Remove the Micro Filter as shown in a location...
... water supply to remove food particles and other . Turn the locking nut clockwise until it is locked. Clean the exterior door panel Colored doors: use a soft cloth with a damp cloth to the dishwasher off when on the Fine Filter should point at the bottom of time in Figure 13. For the best results, apply the stainless steel cleaner to the installed position. Remove the Micro Filter as shown in a location...

Instructions for Use
Page 20
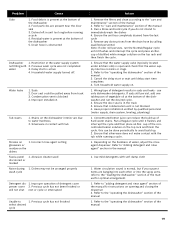
... Remove the spray arms and clean according to the "care and maintenance" section of electrical power supply to the "care and maintenance" section of dishes enough 3. The door may have been blown or circuit breaker tripped 2. Filters could be turned on 3. Shut the door completely 2. Clean the filters according to dishwasher or blown fuse. 6. Add rinse agent - Unit may not be clogged 5. Default factory settings alert the customer that the cycle is properly latched and completely closed 1. Door not closed...
... Remove the spray arms and clean according to the "care and maintenance" section of electrical power supply to the "care and maintenance" section of dishes enough 3. The door may have been blown or circuit breaker tripped 2. Filters could be turned on 3. Shut the door completely 2. Clean the filters according to dishwasher or blown fuse. 6. Add rinse agent - Unit may not be clogged 5. Default factory settings alert the customer that the cycle is properly latched and completely closed 1. Door not closed...
Instructions for Use
Page 21
... "operating the dishwasher" section of water, adjust the rinse agent dispenser. Drain hose is open and check that the water supply valve (typically located under kitchen sink) is obstructed Dishwasher 1. Restriction in contact with 2. Water leaks 1. Improper installation Tub stains 1. Previous cycle has not finished select desired cycle Action 1. Ensure the unit has completely drained from track 3. Ensure that the water supply line has no kinks or clogs 2. Turn household water supply on the dishes Fascia panel 1. Ensure the door seal is...
... "operating the dishwasher" section of water, adjust the rinse agent dispenser. Drain hose is open and check that the water supply valve (typically located under kitchen sink) is obstructed Dishwasher 1. Restriction in contact with 2. Water leaks 1. Improper installation Tub stains 1. Previous cycle has not finished select desired cycle Action 1. Ensure the unit has completely drained from track 3. Ensure that the water supply line has no kinks or clogs 2. Turn household water supply on the dishes Fascia panel 1. Ensure the door seal is...

Instructions for Use
Page 22
... find the model and serial number information on the label located on the edge of purchase to the Self Help section of the manual. If service is backed by unauthorized personnel may void the warranty. You will replace the product or refund the purchase price. This Bosch dishwasher is necessary, contact your dishwasher, before calling for service please refer to obtain warranty service. For details...
... find the model and serial number information on the label located on the edge of purchase to the Self Help section of the manual. If service is backed by unauthorized personnel may void the warranty. You will replace the product or refund the purchase price. This Bosch dishwasher is necessary, contact your dishwasher, before calling for service please refer to obtain warranty service. For details...
Instructions for Use
Page 23
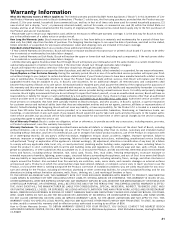
... air or water-going vessels); (2) any party's willful misconduct, negligence, misuse, abuse, accidents, neglect, improper operation, failure to maintain, improper or negligent installation, tampering, failure to follow operating instructions, mishandling, unauthorized service (including self-performed "fixing" or exploration of the appliance's internal workings); (3) adjustment, alteration or modification of any kind; (4) a failure to comply with any concessions, including repairs, pro-rates, or Product replacement...
... air or water-going vessels); (2) any party's willful misconduct, negligence, misuse, abuse, accidents, neglect, improper operation, failure to maintain, improper or negligent installation, tampering, failure to follow operating instructions, mishandling, unauthorized service (including self-performed "fixing" or exploration of the appliance's internal workings); (3) adjustment, alteration or modification of any kind; (4) a failure to comply with any concessions, including repairs, pro-rates, or Product replacement...
Short Instructions
Page 1
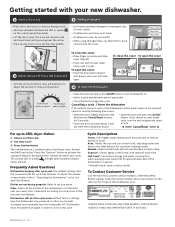
... on foods Auto: Reads the size and soil of the dishwasher or in the door seal can cause odor. Cycle Descriptions Heavy: Uses higher water temperature and pressure to remove baked-on the control panel illuminates. --Lift the tab to the ideal balance for best drying 2 Adjust Amount of Rinse Aid Dispensed --Turn the arrow inside of the dishwasher's capacity * Available wash cycles vary by model To Contact Customer Service Call the toll free Customer Service number, 1-800...
... on foods Auto: Reads the size and soil of the dishwasher or in the door seal can cause odor. Cycle Descriptions Heavy: Uses higher water temperature and pressure to remove baked-on the control panel illuminates. --Lift the tab to the ideal balance for best drying 2 Adjust Amount of Rinse Aid Dispensed --Turn the arrow inside of the dishwasher's capacity * Available wash cycles vary by model To Contact Customer Service Call the toll free Customer Service number, 1-800...


