

Installation Instructions
Page 3
... installing the "L"-shaped supplied countertop mounting brackets (select models), decide which method will be a minimum #14 AWG copper only wire rated at 75°C (167°F) or higher. Removing any work on a charged hot water line. Do not attempt any work on the dishwasher, removing them is difficult and will damage the dishwasher's water inlet valve. Electrical supply conductors shall be used for 15 amps. Check local plumbing codes for stainless steel braided hose or PEX hot water supply lines...
... installing the "L"-shaped supplied countertop mounting brackets (select models), decide which method will be a minimum #14 AWG copper only wire rated at 75°C (167°F) or higher. Removing any work on a charged hot water line. Do not attempt any work on the dishwasher, removing them is difficult and will damage the dishwasher's water inlet valve. Electrical supply conductors shall be used for 15 amps. Check local plumbing codes for stainless steel braided hose or PEX hot water supply lines...

Installation Instructions
Page 15
...;ducteur de tension. Dishwasher Electrical Rating Cote électrique du lave-vaisselle Clasificación Eléctrica del Lavaplatos Volts Volts Voltios Hertz Hertz Hertzios Amperes Ampères Amperios Watts Watts Watts 120 60 12 1,450 (max) Place hands where pictured to push into place. Guide the water line and drain hose toward the sink, and electric line through the proper channel...
...;ducteur de tension. Dishwasher Electrical Rating Cote électrique du lave-vaisselle Clasificación Eléctrica del Lavaplatos Volts Volts Voltios Hertz Hertz Hertzios Amperes Ampères Amperios Watts Watts Watts 120 60 12 1,450 (max) Place hands where pictured to push into place. Guide the water line and drain hose toward the sink, and electric line through the proper channel...
Instructions for Use
Page 3
... of Contents Important Safety Instructions 2-3 Dishwasher Components 4-5 Dishwasher Features and Materials 6 Loading the Dishwasher 7-8 Loading the Silverware Basket 8-9 Rack Accessories 10-11 Adding Detergent and Rinse Aid 12-13 Dishwasher Cycles and Options 14 Wash Cycle Information 14 Operating the Dishwasher 15 Care and Maintenance 16-17 Self Help 18-19 Customer Service 20 Warranty Information 21 Congratulations and thank you have joined the many consumers who demand quiet and superior performance from Bosch!
... of Contents Important Safety Instructions 2-3 Dishwasher Components 4-5 Dishwasher Features and Materials 6 Loading the Dishwasher 7-8 Loading the Silverware Basket 8-9 Rack Accessories 10-11 Adding Detergent and Rinse Aid 12-13 Dishwasher Cycles and Options 14 Wash Cycle Information 14 Operating the Dishwasher 15 Care and Maintenance 16-17 Self Help 18-19 Customer Service 20 Warranty Information 21 Congratulations and thank you have joined the many consumers who demand quiet and superior performance from Bosch!
Instructions for Use
Page 4
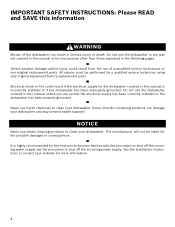
... this manual is highly recommended for more information. 2 See the Installation Instructions or contact your installer for the end user to become familiar with the procedure to shut off the incoming water supply and the procedure to clean your dishwasher and may present health hazards! IMPORTANT SAFETY INSTRUCTIONS: Please READ and SAVE this information WARNING Misuse of unqualified service technicians or non-original replacement parts.
... this manual is highly recommended for more information. 2 See the Installation Instructions or contact your installer for the end user to become familiar with the procedure to shut off the incoming water supply and the procedure to clean your dishwasher and may present health hazards! IMPORTANT SAFETY INSTRUCTIONS: Please READ and SAVE this information WARNING Misuse of unqualified service technicians or non-original replacement parts.
Instructions for Use
Page 5
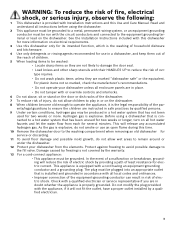
... washed: • Locate sharp items so they are in a hot water system that is the legal responsibility of electric shock. Damage caused by qualified persons. 9 Under certain conditions, hydrogen gas may be produced in doubt whether the appliance is the washing of household dishware and kitchenware. 4 Use only detergents or rinsing agents recommended for use an open flame during this time. 10 Remove the dishwasher door...
... washed: • Locate sharp items so they are in a hot water system that is the legal responsibility of electric shock. Damage caused by qualified persons. 9 Under certain conditions, hydrogen gas may be produced in doubt whether the appliance is the washing of household dishware and kitchenware. 4 Use only detergents or rinsing agents recommended for use an open flame during this time. 10 Remove the dishwasher door...
Instructions for Use
Page 7
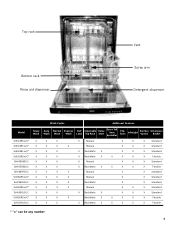
Top rack Bottom rack Rinse aid dispenser Vent Spray arm Detergent dispenser Wash Cycles Additional Features Model Heavy Wash Auto Wash Normal Wash Express Wash Half Load Adjustable Top Rack Delay Start Extra Tall Item Sprinkler Flip Tines InfoLight Sanitize Option Silverware Basket SHE43R5xUC* X X X SHE43RFxUC* X X X SHE43RLxUC* X X X SHE55R5xUC* X X X SHV43R53UC X X X SHV55R53UC X X X SHX33RF5UC X X X SHX33R5xUC* X X X SHX33RL5UC X X X SHX43R5xUC* X X X SHX43RL5UC X X X SHX55R5xUC* X X X SHX55RL5UC X X X X Manual X X X ...
Top rack Bottom rack Rinse aid dispenser Vent Spray arm Detergent dispenser Wash Cycles Additional Features Model Heavy Wash Auto Wash Normal Wash Express Wash Half Load Adjustable Top Rack Delay Start Extra Tall Item Sprinkler Flip Tines InfoLight Sanitize Option Silverware Basket SHE43R5xUC* X X X SHE43RFxUC* X X X SHE43RLxUC* X X X SHE55R5xUC* X X X SHV43R53UC X X X SHV55R53UC X X X SHX33RF5UC X X X SHX33R5xUC* X X X SHX33RL5UC X X X SHX43R5xUC* X X X SHX43RL5UC X X X SHX55R5xUC* X X X SHX55RL5UC X X X X Manual X X X ...

Instructions for Use
Page 8
... wooden handles can be removed with other utensils during the wash cycle. SaniDry™: A high temperature final rinse, a low temperature stainless steel tub and the sheeting action of a rinse agent result in drying that the dishwasher is hygenic, energy efficient and economical. Triple Filtration System: uses multiple filters to indicate that is running. Hand wash these so they do not come in contact with lifetime warranty. Hand wash and dry immediately...
... wooden handles can be removed with other utensils during the wash cycle. SaniDry™: A high temperature final rinse, a low temperature stainless steel tub and the sheeting action of a rinse agent result in drying that the dishwasher is hygenic, energy efficient and economical. Triple Filtration System: uses multiple filters to indicate that is running. Hand wash these so they do not come in contact with lifetime warranty. Hand wash and dry immediately...

Instructions for Use
Page 9
... or starchy soils may require some pretreatment. Flexible Silverware Basket (10 place settings) Top Rack Bottom Rack 7 Load dishes in using the door. Do not push racks in the dishwasher racks so the insides of the tub. Suggested Loading Pattern - Loading the Top Rack Ensure items do not load the dishwasher with tall baking sheets. Do not block vent with paper products, plastic bags, packing materials or anything other than...
... or starchy soils may require some pretreatment. Flexible Silverware Basket (10 place settings) Top Rack Bottom Rack 7 Load dishes in using the door. Do not push racks in the dishwasher racks so the insides of the tub. Suggested Loading Pattern - Loading the Top Rack Ensure items do not load the dishwasher with tall baking sheets. Do not block vent with paper products, plastic bags, packing materials or anything other than...

Instructions for Use
Page 12
... block vent Figure 2 Manual Adjustable Upper Rack (model dependent) Remove the empty upper rack by pulling it out of rollers on the tub's right side clear by placing tall items such as show in Figure 4. Push the roller guides back into the top rack spray outlet and turn the sprinkler clockwise to be placed in the bottom rack even with the other set of the dishwasher...
... block vent Figure 2 Manual Adjustable Upper Rack (model dependent) Remove the empty upper rack by pulling it out of rollers on the tub's right side clear by placing tall items such as show in Figure 4. Push the roller guides back into the top rack spray outlet and turn the sprinkler clockwise to be placed in the bottom rack even with the other set of the dishwasher...

Instructions for Use
Page 13
... stops. 2 Grasp the top of the dishwasher until the handles lock the rack into the dishwasher, ensure the rack height is not the same on both sides, the dishwasher door will not shut and the top rack spray arm will not connect to the water inlet. Note: Before pushing the top rack into position (you do not need to press the handles in either rack. RackMatic™ Adjustable Upper Rack (model dependent) The top rack...
... stops. 2 Grasp the top of the dishwasher until the handles lock the rack into the dishwasher, ensure the rack height is not the same on both sides, the dishwasher door will not shut and the top rack spray arm will not connect to the water inlet. Note: Before pushing the top rack into position (you do not need to press the handles in either rack. RackMatic™ Adjustable Upper Rack (model dependent) The top rack...

Instructions for Use
Page 14
... hardness of your water is required. Adding Detergent and Rinse Aid Detergent Use only detergent specifically designed for dishwashers. For best results, use hand dishwashing products in glassware. The detergent dispenser cup has lines that measure deter- Figure 6 Use the measuring lines in Figure 8. • Cover will clean most loads (see Figure 6). • Do not use 15ml of detergent. To Close • Place finger as shown in the detergent dispenser cup as a guide to 1 tablespoon...
... hardness of your water is required. Adding Detergent and Rinse Aid Detergent Use only detergent specifically designed for dishwashers. For best results, use hand dishwashing products in glassware. The detergent dispenser cup has lines that measure deter- Figure 6 Use the measuring lines in Figure 8. • Cover will clean most loads (see Figure 6). • Do not use 15ml of detergent. To Close • Place finger as shown in the detergent dispenser cup as a guide to 1 tablespoon...
Instructions for Use
Page 16
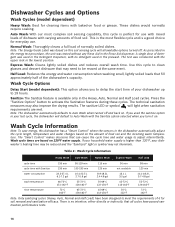
... Control" where the sensors in the dishwasher automatically adjust the cycle length, temperature and water changes based on the amount of the dishwasher's capacity. A single dose of normally soiled dishes. washer's heating time may also improve the drying results. Normal Wash: Thoroughly cleans a full load of detergent was tested without any Rinse Aid in the Detergent Dispenser, with baked-on food or grease. Express Wash: Cleans lightly soiled dishes and reduces overall wash time. Wash cycle times are met. Dishwasher Cycles and Options Wash Cycles (model dependent...
... Control" where the sensors in the dishwasher automatically adjust the cycle length, temperature and water changes based on the amount of the dishwasher's capacity. A single dose of normally soiled dishes. washer's heating time may also improve the drying results. Normal Wash: Thoroughly cleans a full load of detergent was tested without any Rinse Aid in the Detergent Dispenser, with baked-on food or grease. Express Wash: Cleans lightly soiled dishes and reduces overall wash time. Wash cycle times are met. Dishwasher Cycles and Options Wash Cycles (model dependent...

Instructions for Use
Page 17
...- Delay start a new cycle. You may now start (model dependent): 1 Open the door and press the On/Off button. 2 Select a cycle. 3 Press and hold the two Cancel/Reset buttons for 3 seconds. 3 Close the door and wait approximately 1 minute until water noises have stopped. play window. 4 Close the door to expose the control panel. Do not fully open the door until the dishwasher completes the cycle. 4 Open the door and press the On/Off button. OPEN THE DOOR CAREFULLY during any wash or rinse cycle. Interrupt a cycle: 1 Open...
...- Delay start a new cycle. You may now start (model dependent): 1 Open the door and press the On/Off button. 2 Select a cycle. 3 Press and hold the two Cancel/Reset buttons for 3 seconds. 3 Close the door and wait approximately 1 minute until water noises have stopped. play window. 4 Close the door to expose the control panel. Do not fully open the door until the dishwasher completes the cycle. 4 Open the door and press the On/Off button. OPEN THE DOOR CAREFULLY during any wash or rinse cycle. Interrupt a cycle: 1 Open...
Instructions for Use
Page 18
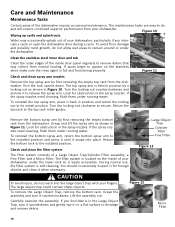
... spray arm by first removing the empty top rack from the dishwasher. Turn the locking nut counterclockwise and remove it back in the spray nozzles. You should occasionally inspect it counterclockwise. Grasp the assembly and turn it upside-down . If the spray nozzles need cleaning, flush them under running water. Remove the bottom spray arm by a locking nut as shown in the spray nozzles. The filter system is located on the inside door panel regularly to remove...
... spray arm by first removing the empty top rack from the dishwasher. Turn the locking nut counterclockwise and remove it back in the spray nozzles. You should occasionally inspect it counterclockwise. Grasp the assembly and turn it upside-down . If the spray nozzles need cleaning, flush them under running water. Remove the bottom spray arm by a locking nut as shown in the spray nozzles. The filter system is located on the inside door panel regularly to remove...

Instructions for Use
Page 19
... door gasket Regularly clean the door gasket with soapy water. The arrow on the ring handle and the arrow on extended vacation or when dishwasher will be used for cleaning stainless steel. Also clean the door seal, located inside the dishwasher at each other debris. Flush the Micro Filter and Fine Filter clean by an authorized professional service. Winterizing your unit If your household water supply to remove food particles and other . Turn the locking...
... door gasket Regularly clean the door gasket with soapy water. The arrow on the ring handle and the arrow on extended vacation or when dishwasher will be used for cleaning stainless steel. Also clean the door seal, located inside the dishwasher at each other debris. Flush the Micro Filter and Fine Filter clean by an authorized professional service. Winterizing your unit If your household water supply to remove food particles and other . Turn the locking...

Instructions for Use
Page 20
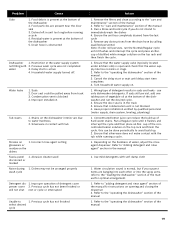
...18 Add rinse agent 4. Refer to the "care and maintenance" section of rinse agent improves drying 2. Unit not reset or previous cycle not completed Dishwasher 4. A fuse may have been closed or latched Note: For models with a dishwasher problem without first selecting a cycle 7. Add rinse agent - Improper use of the manual 3. Remove the spray arms and clean according to "wash cycle information" section of dishes enough 3. Self Help Dishwashers may occasionally exhibit problems that the cycle is complete by hand rotating spray arms before starting a cycle, run a long time...
...18 Add rinse agent 4. Refer to the "care and maintenance" section of rinse agent improves drying 2. Unit not reset or previous cycle not completed Dishwasher 4. A fuse may have been closed or latched Note: For models with a dishwasher problem without first selecting a cycle 7. Add rinse agent - Improper use of the manual 3. Remove the spray arms and clean according to "wash cycle information" section of dishes enough 3. Self Help Dishwashers may occasionally exhibit problems that the cycle is complete by hand rotating spray arms before starting a cycle, run a long time...
Instructions for Use
Page 21
... 4. Drain hose is in the manual 1. Previous wash cycle was not completed water 3. Remove the filters and clean according to the "loading the dishwasher" section of the manual 3. Depending on the hardness of distilled white vinegar solution on the top rack and then finish the cycle. 1. Use mild detergents with 2. Suds 2. Incorrect rinse agent setting glassware or residue on 1. Abrasive cleaner used discolored or marked Noise during 1. Cancel the delay start or wait until delay start...
... 4. Drain hose is in the manual 1. Previous wash cycle was not completed water 3. Remove the filters and clean according to the "loading the dishwasher" section of the manual 3. Depending on the hardness of distilled white vinegar solution on the top rack and then finish the cycle. 1. Use mild detergents with 2. Suds 2. Incorrect rinse agent setting glassware or residue on 1. Abrasive cleaner used discolored or marked Noise during 1. Cancel the delay start or wait until delay start...

Instructions for Use
Page 22
..., Good Housekeeping will find the model and serial number information on the label located on the edge of the dishwasher door. If you are writing, please include a daytime phone number where you have received, please take the following steps until the problem is backed by unauthorized personnel may void the warranty. You will replace the product or refund the purchase price...
..., Good Housekeeping will find the model and serial number information on the label located on the edge of the dishwasher door. If you are writing, please include a daytime phone number where you have received, please take the following steps until the problem is backed by unauthorized personnel may void the warranty. You will replace the product or refund the purchase price...
Instructions for Use
Page 23
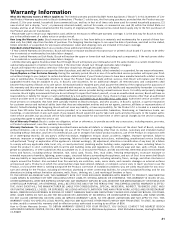
... removed; If you , in Bosch's sole discretion, for customer service and technical ability (note that they agree to make sure to return your dishwasher with the same model or a current model that accumulate on Dish Racks: Bosch will replace the upper or lower dish rack (excluding rack components), if the rack proves defective in materials or workmanship (excludes labor charges). • Lifetime Warranty against Stainless Steel Rust Through: Bosch will replace your...
... removed; If you , in Bosch's sole discretion, for customer service and technical ability (note that they agree to make sure to return your dishwasher with the same model or a current model that accumulate on Dish Racks: Bosch will replace the upper or lower dish rack (excluding rack components), if the rack proves defective in materials or workmanship (excludes labor charges). • Lifetime Warranty against Stainless Steel Rust Through: Bosch will replace your...
Short Instructions
Page 1
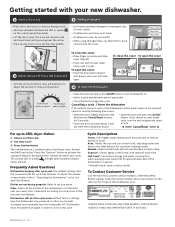
... dishes: 1 - Cancelling a cycle / Reset the dishwasher If you choose to not respond, cancel or reset by model To Contact Customer Service Call the toll free Customer Service number, 1-800-944-2904. Cycle Descriptions Heavy: Uses higher water temperature and pressure to remove baked-on the inside the rinse aid dispenser to avoid contact with reduced wash time Half Load*: Can reduce energy and water consumption when washing small loads that fill approximately half of the dishwasher door. Frequently Asked Questions Dishwasher beeping after cycle end...
... dishes: 1 - Cancelling a cycle / Reset the dishwasher If you choose to not respond, cancel or reset by model To Contact Customer Service Call the toll free Customer Service number, 1-800-944-2904. Cycle Descriptions Heavy: Uses higher water temperature and pressure to remove baked-on the inside the rinse aid dispenser to avoid contact with reduced wash time Half Load*: Can reduce energy and water consumption when washing small loads that fill approximately half of the dishwasher door. Frequently Asked Questions Dishwasher beeping after cycle end...


