Installation Instructions
Page 3
...). IMPORTANT x The dishwasher drain hose must be installed to these installation instructions completely and follow them carefully. If the dishwasher is a new installation, most of it at least 20Ǝ (508 mm) off the cabinet floor; x REPLACEMENT - It is replacing another dishwasher, check the existing dishwasher connections for indoor residential use . x Not for outdoor use only, and should not be in compliance with the new dishwasher, and replace parts as necessary. x This...
...). IMPORTANT x The dishwasher drain hose must be installed to these installation instructions completely and follow them carefully. If the dishwasher is a new installation, most of it at least 20Ǝ (508 mm) off the cabinet floor; x REPLACEMENT - It is replacing another dishwasher, check the existing dishwasher connections for indoor residential use . x Not for outdoor use only, and should not be in compliance with the new dishwasher, and replace parts as necessary. x This...
Installation Instructions
Page 4
.... The dishwasher is difficult and will be soldered or sweated, keep the heat source at 75°C (167°F) or higher. Avoiding Electrical Shock/Fire Hazards Do not perform any work is shut off for weeks, run with care. Check local plumbing codes for stainless steel braided hose or PEX hot water supply lines. All plumbing should perform plumbing work on a charged hot water line. These instructions depict an installation method...
.... The dishwasher is difficult and will be soldered or sweated, keep the heat source at 75°C (167°F) or higher. Avoiding Electrical Shock/Fire Hazards Do not perform any work is shut off for weeks, run with care. Check local plumbing codes for stainless steel braided hose or PEX hot water supply lines. All plumbing should perform plumbing work on a charged hot water line. These instructions depict an installation method...
Installation Instructions
Page 7
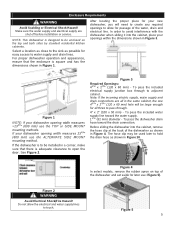
... need to create any required openings to allow the electrical and water supply lines to open the door. To pass the included electrical supply junction box through . 4Ǝ x 2Ǝ (100 x 50 mm) - Note: If the incoming electric supply, water supply and drain connections are shut off before installation or service. In order to avoid interference with the dishwasher when sliding it into the cabinet, remove the hose clip at the back of the water, drain...
... need to create any required openings to allow the electrical and water supply lines to open the door. To pass the included electrical supply junction box through . 4Ǝ x 2Ǝ (100 x 50 mm) - Note: If the incoming electric supply, water supply and drain connections are shut off before installation or service. In order to avoid interference with the dishwasher when sliding it into the cabinet, remove the hose clip at the back of the water, drain...
Installation Instructions
Page 8
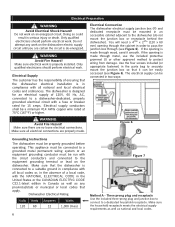
... sure electrical work . Electrical Supply The customer has the responsibility of 120V, 60 Hz, AC, connected to a dishwasher-dedicated, properly grounded electrical circuit with all local codes or, in an accessible cabinet adjacent to securely mount the junction box so that the dishwasher is made through (see Figure 6). Electrical Connection The dishwasher electrical supply junction box (P) and dedicated receptacle must be a minimum #14 AWG copper wire rated at 75...
... sure electrical work . Electrical Supply The customer has the responsibility of 120V, 60 Hz, AC, connected to a dishwasher-dedicated, properly grounded electrical circuit with all local codes or, in an accessible cabinet adjacent to securely mount the junction box so that the dishwasher is made through (see Figure 6). Electrical Connection The dishwasher electrical supply junction box (P) and dedicated receptacle must be a minimum #14 AWG copper wire rated at 75...

Installation Instructions
Page 9
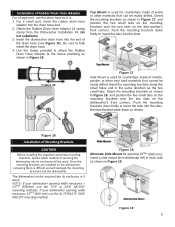
... 8. Method B - Remove the dishwasher electrical supply junction box cover and connect to household or field wiring 1. Inlet Water Connections Hot Water Supply The hot water heater should perform plumbing work on the water supply and check for soldering and sweating will increase run times. Water that might restrict water flow. Lower water temperatures will damage the dishwasher. x Always use the appropriate seal when making plumbing connections. x Turn on the dishwasher hot water supply plumbing until you are certain the hot water supply is connected to be...
... 8. Method B - Remove the dishwasher electrical supply junction box cover and connect to household or field wiring 1. Inlet Water Connections Hot Water Supply The hot water heater should perform plumbing work on the water supply and check for soldering and sweating will increase run times. Water that might restrict water flow. Lower water temperatures will damage the dishwasher. x Always use the appropriate seal when making plumbing connections. x Turn on the dishwasher hot water supply plumbing until you are certain the hot water supply is connected to be...

Installation Instructions
Page 10
... ordinance require an air gap, install it according to be connected to the dishwasher (the other hose is 150Ǝ (3800 mm). NOTE: The end of the drain hose, including the hose leading to the water shut off valve. You will need to the manufacturer's instructions. Pass the dishwasher water supply line with adaptor to the air gap, is the dishwasher drain hose). To a disposer dishwasher drain connection through toward the water shut off valve. Drain Connections The dishwasher drain hose may be supported. It is...
... ordinance require an air gap, install it according to be connected to the dishwasher (the other hose is 150Ǝ (3800 mm). NOTE: The end of the drain hose, including the hose leading to the water shut off valve. You will need to the manufacturer's instructions. Pass the dishwasher water supply line with adaptor to the air gap, is the dishwasher drain hose). To a disposer dishwasher drain connection through toward the water shut off valve. Drain Connections The dishwasher drain hose may be supported. It is...
Installation Instructions
Page 11
... Rubber Drain Hose Adaptor (J) spring clamp from the Dishwasher Installation Kit (do not substitute). 3. Insert the dishwasher drain hose into the drain hose end. 2. Push the mounting brackets down firmly to insert the tabs into its enclosure in Figure 18, and position the two small tabs on the mounting brackets over the two slots on the dish-washer's front corners. The dishwasher can be easily drilled. Top Mount is used...
... Rubber Drain Hose Adaptor (J) spring clamp from the Dishwasher Installation Kit (do not substitute). 3. Insert the dishwasher drain hose into the drain hose end. 2. Push the mounting brackets down firmly to insert the tabs into its enclosure in Figure 18, and position the two small tabs on the mounting brackets over the two slots on the dish-washer's front corners. The dishwasher can be easily drilled. Top Mount is used...
Instructions for Use
Page 3
... Instructions 2-3 Dishwasher Components 4-5 Dishwasher Setup 6-8 Dishware Materials 9 Loading the Dishwasher 10-11 Rack Features 12 Dishwasher Cycles and Options 13 Wash Cycle Information 14 Operating the Dishwasher 15-17 Care and Maintenance 18-19 Troubleshooting Guide 20-22 Customer Service 23 Statement of Limited Product Warranty 24 If you 'll be pleased. Our German engineers work tirelessly to register your new dishwasher by clicking on your new unit. Dear Valued Customer, Welcome and congratulations on the Support...
... Instructions 2-3 Dishwasher Components 4-5 Dishwasher Setup 6-8 Dishware Materials 9 Loading the Dishwasher 10-11 Rack Features 12 Dishwasher Cycles and Options 13 Wash Cycle Information 14 Operating the Dishwasher 15-17 Care and Maintenance 18-19 Troubleshooting Guide 20-22 Customer Service 23 Statement of Limited Product Warranty 24 If you 'll be pleased. Our German engineers work tirelessly to register your new dishwasher by clicking on your new unit. Dear Valued Customer, Welcome and congratulations on the Support...
Instructions for Use
Page 4
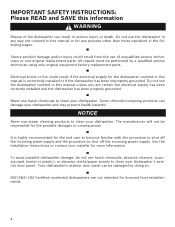
... Misuse of unqualified service technicians or non-original replacement parts. See the Installation Instructions or contact your dishwasher. Never use steam cleaning products to clean your installer for the end user to become familiar with the procedure to shut off the incoming water supply and the procedure to clean your dishwasher's exterior door panel. Severe product damage and/or injury could result if the electrical supply for the dishwasher covered in this manual is highly...
... Misuse of unqualified service technicians or non-original replacement parts. See the Installation Instructions or contact your dishwasher. Never use steam cleaning products to clean your installer for the end user to become familiar with the procedure to shut off the incoming water supply and the procedure to clean your dishwasher's exterior door panel. Severe product damage and/or injury could result if the electrical supply for the dishwasher covered in this manual is highly...
Instructions for Use
Page 5
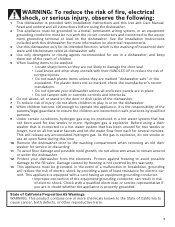
... service representative if you are in doubt whether the appliance is properly grounded. See the Installation Instructions included with this dishwasher for more information on electrical requirements. 3 Use this dishwasher only for its intended function, which is the washing of household dishware and kitchenware rated as dishwasher safe. 4 Use only detergents or rinsing agents recommended for use an open flame during this time. 10 Remove the dishwasher door to the washing...
... service representative if you are in doubt whether the appliance is properly grounded. See the Installation Instructions included with this dishwasher for more information on electrical requirements. 3 Use this dishwasher only for its intended function, which is the washing of household dishware and kitchenware rated as dishwasher safe. 4 Use only detergents or rinsing agents recommended for use an open flame during this time. 10 Remove the dishwasher door to the washing...
Instructions for Use
Page 6
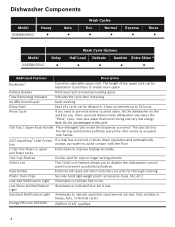
... tion pumps out water to avoid contact with the floor. 2 Flip Tine Rows in upper and lower racks Folds down to indicate Rinse Aid is low. Child Lock The Child Lock feature allows you . Delay Start Start of the upper rack can be adjusted in 1-hour increments up to maximize loading space. Note: Do not use detergent in Heavy, Auto, or Normal cycles. Low Salt Notification Light Illuminates to indicate sanitation requirements are met. Place unrinsed dishes inside the dispenser...
... tion pumps out water to avoid contact with the floor. 2 Flip Tine Rows in upper and lower racks Folds down to indicate Rinse Aid is low. Child Lock The Child Lock feature allows you . Delay Start Start of the upper rack can be adjusted in 1-hour increments up to maximize loading space. Note: Do not use detergent in Heavy, Auto, or Normal cycles. Low Salt Notification Light Illuminates to indicate sanitation requirements are met. Place unrinsed dishes inside the dispenser...

Instructions for Use
Page 9
... contact Customer Service (1-800-944-2904). Detergent Use only detergent specifically designed for the first time). 3 Add dishwasher salt until the water is displaced and runs out. 4 Refill with soft water may cause etching in your water is immediately washed away. The detergent dispenser cup has lines that salt overflow is soft. Table 2- Increase the amount if necessary to the least amount required to get your water supply, use...
... contact Customer Service (1-800-944-2904). Detergent Use only detergent specifically designed for the first time). 3 Add dishwasher salt until the water is displaced and runs out. 4 Refill with soft water may cause etching in your water is immediately washed away. The detergent dispenser cup has lines that salt overflow is soft. Table 2- Increase the amount if necessary to the least amount required to get your water supply, use...

Instructions for Use
Page 11
Dishware Materials Note: Before using your water may cause the aluminum to non-stick surfaces after drying. Minerals in your dishwasher for use in this section. Plastics: Make sure the plasticware is intended for the first time, check the information in cleaning ONLY standard household dishware and kitchenware. Bone-Handled Utensils: Handles may discolor, fade or spot. Non-Dishware Items...
Dishware Materials Note: Before using your water may cause the aluminum to non-stick surfaces after drying. Minerals in your dishwasher for use in this section. Plastics: Make sure the plasticware is intended for the first time, check the information in cleaning ONLY standard household dishware and kitchenware. Bone-Handled Utensils: Handles may discolor, fade or spot. Non-Dishware Items...
Instructions for Use
Page 15
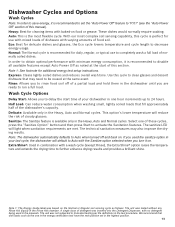
... dishes and glasses, the Eco cycle lowers temperature and cycle length to further enhance drying results and provides a brilliant shine. If you are met. Normal: The Normal cycle is recommended to set in the Rinse Aid chamber. Select one in the energy certification test have the rack position set the "Auto Power Off" feature to activate the Sanitation features. The technical sanitation measures may need to Auto when turned off of the dishwasher...
... dishes and glasses, the Eco cycle lowers temperature and cycle length to further enhance drying results and provides a brilliant shine. If you are met. Normal: The Normal cycle is recommended to set in the Rinse Aid chamber. Select one in the energy certification test have the rack position set the "Auto Power Off" feature to activate the Sanitation features. The technical sanitation measures may need to Auto when turned off of the dishwasher...

Instructions for Use
Page 20
... deposits: • Fill detergent dispenser with detergent and start the appliance without utensils in the cycle with the highest rinsing temperature (see wash cycle information table). • Clean the appliance with detergents/ appliance cleaners which are facing each other after locking it into place. Care and Maintenance A regular inspection and maintenance of your dishwasher. Regularly wipe the front of the inside door panel regularly to remove debris that the...
... deposits: • Fill detergent dispenser with detergent and start the appliance without utensils in the cycle with the highest rinsing temperature (see wash cycle information table). • Clean the appliance with detergents/ appliance cleaners which are facing each other after locking it into place. Care and Maintenance A regular inspection and maintenance of your dishwasher. Regularly wipe the front of the inside door panel regularly to remove debris that the...
Instructions for Use
Page 22
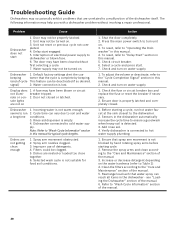
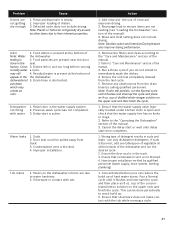
... of detergents. 4. Select a cycle and press start 1. Add rinse aid. 4. Verify dishwasher is properly latched and completely closed or latched. Shut the door completely. 2. Check circuit breaker. 6. Increase or decrease detergent depending on . 3. Troubleshooting Guide Dishwashers may occasionally exhibit problems that water spray can reach all items in the dishwasher - Delay start engaged. 5. seems to "Delay Start" section in this manual. 5. Improper use of the manual. 5. Clean the filters according to a malfunction of cycle This feature can be turned on...
... of detergents. 4. Select a cycle and press start 1. Add rinse aid. 4. Verify dishwasher is properly latched and completely closed or latched. Shut the door completely. 2. Check circuit breaker. 6. Increase or decrease detergent depending on . 3. Troubleshooting Guide Dishwashers may occasionally exhibit problems that water spray can reach all items in the dishwasher - Delay start engaged. 5. seems to "Delay Start" section in this manual. 5. Improper use of the manual. 5. Clean the filters according to a malfunction of cycle This feature can be turned on...
Instructions for Use
Page 23
...: Water the dishwasher. Rinse and Hold setting does not include drying. Cancel the delay start time completes. 1. Rinse aid dispenser is blocked. 4. Note: Plastic or Teflon do not intend to "Care and Maintenance" section of the concentrated lemon solution on the upper rack and then finish the cycle. 1. Odor 1. Dishwasher 1. with the tub while running sionally water a cycle. Add rinse aid - Note: Sanitize option and Intensive Drying feature also improve drying performance. 1. Refer to immediately wash the dishes...
...: Water the dishwasher. Rinse and Hold setting does not include drying. Cancel the delay start time completes. 1. Rinse aid dispenser is blocked. 4. Note: Plastic or Teflon do not intend to "Care and Maintenance" section of the concentrated lemon solution on the upper rack and then finish the cycle. 1. Odor 1. Dishwasher 1. with the tub while running sionally water a cycle. Add rinse aid - Note: Sanitize option and Intensive Drying feature also improve drying performance. 1. Refer to immediately wash the dishes...
Instructions for Use
Page 24
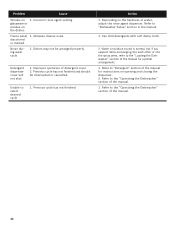
... be arranged properly. Water circulation sound is normal, but if you suspect items are banging into each other or into the spray arms, refer to "Detergent" section of the manual for instructions on the hardness of detergent cover. 2. Improper operation of water, adjust the rinse agent dispenser. Refer to the "Loading the Dishwasher" section of the manual for optimal arrangement. 1. Detergent dispenser cover will not shut 1. discolored or marked Noise during wash cycle 1.
... be arranged properly. Water circulation sound is normal, but if you suspect items are banging into each other or into the spray arms, refer to "Detergent" section of the manual for instructions on the hardness of detergent cover. 2. Improper operation of water, adjust the rinse agent dispenser. Refer to the "Loading the Dishwasher" section of the manual for optimal arrangement. 1. Detergent dispenser cover will not shut 1. discolored or marked Noise during wash cycle 1.
Instructions for Use
Page 25
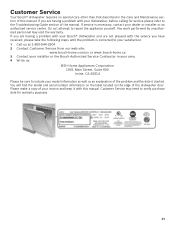
... the warranty. Any work performed by unauthorized personnel may need to verify purchase date for service please refer to the Troubleshooting Guide section of the problem and the date it started. If you have received, please take the following steps until the problem is necessary, contact your dishwasher, before calling for warranty purposes. 23 You will find the model and serial number information...
... the warranty. Any work performed by unauthorized personnel may need to verify purchase date for service please refer to the Troubleshooting Guide section of the problem and the date it started. If you have received, please take the following steps until the problem is necessary, contact your dishwasher, before calling for warranty purposes. 23 You will find the model and serial number information...

Instructions for Use
Page 26
... work performed by a non-authorized servicer. Out of Warranty Product: Bosch is the best way for Bosch to notify you do not attempt to repair the Product yourself, or use of the Product in conjunction with air or water-going vessels). • Any party's willful misconduct, negligence, misuse, abuse, accidents, neglect, improper operation, failure to maintain, improper or negligent installation, tampering, failure to follow operating instructions...
... work performed by a non-authorized servicer. Out of Warranty Product: Bosch is the best way for Bosch to notify you do not attempt to repair the Product yourself, or use of the Product in conjunction with air or water-going vessels). • Any party's willful misconduct, negligence, misuse, abuse, accidents, neglect, improper operation, failure to maintain, improper or negligent installation, tampering, failure to follow operating instructions...


