

Installation Instructions
Page 3
... dishwasher connections for outdoor use by a qualified service technician or installer. • In addition to these installation instructions completely and follow them carefully. Read these instructions, the dishwasher shall be used in compliance with the new dishwasher, and replace parts as necessary. • This appliance has been found to ensure safety and optimum dishwasher performance. Report any bags or items that come with a portion of the work...
... dishwasher connections for outdoor use by a qualified service technician or installer. • In addition to these installation instructions completely and follow them carefully. Read these instructions, the dishwasher shall be used in compliance with the new dishwasher, and replace parts as necessary. • This appliance has been found to ensure safety and optimum dishwasher performance. Report any bags or items that come with a portion of the work...

Installation Instructions
Page 4
... could result in a hot water system that the dishwasher electrical installation is properly installed. Once these mounting brackets are to the equipment-grounding terminal or lead on the dishwasher, removing them is designed for 15 or 20 amps. Hydrogen gas is shut off for weeks, run with a fuse or breaker rated for an electrical supply of your product may damage the water inlet valve and cause a water leak. The dishwasher is difficult and...
... could result in a hot water system that the dishwasher electrical installation is properly installed. Once these mounting brackets are to the equipment-grounding terminal or lead on the dishwasher, removing them is designed for 15 or 20 amps. Hydrogen gas is shut off for weeks, run with a fuse or breaker rated for an electrical supply of your product may damage the water inlet valve and cause a water leak. The dishwasher is difficult and...
Installation Instructions
Page 7
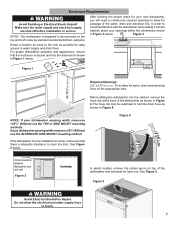
... sure the water supply and electrical supply are shut off before installation or service. Before sliding the dishwasher into the cabinet, place your new dishwasher, you will need to create any required openings to be used later to water supply and drain lines. Figure 3 Select a location as close to the sink as possible for water, drain and electrical lines on the top and both sides by standard residential kitchen cabinetry. Figure 5 WARNING Avoid Electrical Shock/Fire...
... sure the water supply and electrical supply are shut off before installation or service. Before sliding the dishwasher into the cabinet, place your new dishwasher, you will need to create any required openings to be used later to water supply and drain lines. Figure 3 Select a location as close to the sink as possible for water, drain and electrical lines on the top and both sides by standard residential kitchen cabinetry. Figure 5 WARNING Avoid Electrical Shock/Fire...

Installation Instructions
Page 8
... wall socket connections. Dishwasher Electrical Rating Volts Hertz 120 60 Amperes 12 Watts 1,440 (max) Grounding Instructions This appliance must be ordered through Customer Service. 8 Note: Installations requiring hard wiring and terminal block - Alternate cable routing Permanent Wire Connections (in compliance with a fuse or breaker rated for an electrical supply of the dishwasher. The dishwasher is properly grounded. Note: Only use the provided power cord for the power supply cord should perform electrical work on...
... wall socket connections. Dishwasher Electrical Rating Volts Hertz 120 60 Amperes 12 Watts 1,440 (max) Grounding Instructions This appliance must be ordered through Customer Service. 8 Note: Installations requiring hard wiring and terminal block - Alternate cable routing Permanent Wire Connections (in compliance with a fuse or breaker rated for an electrical supply of the dishwasher. The dishwasher is properly grounded. Note: Only use the provided power cord for the power supply cord should perform electrical work on...

Installation Instructions
Page 9
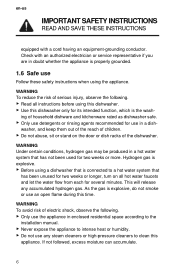
...). Assemble the water supply adaptor fitting (H) from the dishwasher. Always use the appropriate seal when making plumbing connections. · Before connecting the water supply line to the dishwasher, flush the incoming water line for approximately 5 minutes to clear any foreign material. · Turn on the water supply and check for this connection. Water Supply Shut Off Valve Install an easily accessible shut-off valve (not supplied) in the hot water supply line, as shown in Figure 7. 4. Temperatures required for leaks. Take care...
...). Assemble the water supply adaptor fitting (H) from the dishwasher. Always use the appropriate seal when making plumbing connections. · Before connecting the water supply line to the dishwasher, flush the incoming water line for approximately 5 minutes to clear any foreign material. · Turn on the water supply and check for this connection. Water Supply Shut Off Valve Install an easily accessible shut-off valve (not supplied) in the hot water supply line, as shown in Figure 7. 4. Temperatures required for leaks. Take care...

Use and Care Manual
Page 2
... 5.1 Energy Guide 15 5.2 Favorite 15 6 Options 16 7 Features 16 7.1 Upper rack 16 7.2 Lower rack 17 7.3 Silverware Basket 17 7.4 Cup shelf 18 7.5 Flip tines 18 7.6 Knife Shelf 18 7.7 Rack heights 19 8 Before using for the first time 19 8.1 Initial use 19 9 Water softening system..... 19 9.1 Overview of water hardness settings 19 9.2 Setting the water softening system 20 9.3 Special Dishwasher Salt .... 20 9.4 Switching off the water softening system 21 10 Rinse aid...
... 5.1 Energy Guide 15 5.2 Favorite 15 6 Options 16 7 Features 16 7.1 Upper rack 16 7.2 Lower rack 17 7.3 Silverware Basket 17 7.4 Cup shelf 18 7.5 Flip tines 18 7.6 Knife Shelf 18 7.7 Rack heights 19 8 Before using for the first time 19 8.1 Initial use 19 9 Water softening system..... 19 9.1 Overview of water hardness settings 19 9.2 Setting the water softening system 20 9.3 Special Dishwasher Salt .... 20 9.4 Switching off the water softening system 21 10 Rinse aid...
Use and Care Manual
Page 6
..., turn on the door or dish racks of children. ▶ Do not abuse, sit or stand on all instructions before using this dishwasher. ▶ Use this dishwasher only for two weeks or more. Check with a cord having an equipment-grounding conductor. washer, and keep them out of the reach of the dishwasher. WARNING To avoid risk of household dishware and kitchenware rated as dishwasher...
..., turn on the door or dish racks of children. ▶ Do not abuse, sit or stand on all instructions before using this dishwasher. ▶ Use this dishwasher only for two weeks or more. Check with a cord having an equipment-grounding conductor. washer, and keep them out of the reach of the dishwasher. WARNING To avoid risk of household dishware and kitchenware rated as dishwasher...

Use and Care Manual
Page 7
... to be washed, observe the following a wash cycle as bleach-based products to clean your dishwasher. See the installation instructions or contact your appliance, observe the following. ▶ Follow the safety instructions and directions for more information. 7 WARNING For safe care and operation of your installer for use on the detergent and rinse aid product labels. ▶ Do not use caution when opening the door during or following . ▶ Locate sharp items...
... to be washed, observe the following a wash cycle as bleach-based products to clean your dishwasher. See the installation instructions or contact your appliance, observe the following. ▶ Follow the safety instructions and directions for more information. 7 WARNING For safe care and operation of your installer for use on the detergent and rinse aid product labels. ▶ Do not use caution when opening the door during or following . ▶ Locate sharp items...

Use and Care Manual
Page 9
... energy If you follow these instructions, your appliance will use less power and water. a The Normal program is an optical measuring device (light barrier) which measures the turbidity of soiling. 9 The operation of the water softening system with fresh water. Use the Normal program. If the soiling level is lower, the washing water is not covered by 3-6 liters. In the Auto cycles the temperature and run time are additionally adjusted to...
... energy If you follow these instructions, your appliance will use less power and water. a The Normal program is an optical measuring device (light barrier) which measures the turbidity of soiling. 9 The operation of the water softening system with fresh water. Use the Normal program. If the soiling level is lower, the washing water is not covered by 3-6 liters. In the Auto cycles the temperature and run time are additionally adjusted to...

Use and Care Manual
Page 12
... 19 4 Rinse aid refill indicator Rinse aid system → Page 21 5 WLAN display Home Connect → Page 31 6 Water supply display Display for water supply 7 button If you press for approx. 3 seconds, you can change the basic settings via the display and the setting buttons. 1 Depending on the appliance specifications 12 You can open the basic settings. 8 Start button Starting the wash cycle → Page 28 9 Cycle buttons and options Cycles Options 10 Remote Start 11 Electronic delay time Setting the electronic delay time → Page...
... 19 4 Rinse aid refill indicator Rinse aid system → Page 21 5 WLAN display Home Connect → Page 31 6 Water supply display Display for water supply 7 button If you press for approx. 3 seconds, you can change the basic settings via the display and the setting buttons. 1 Depending on the appliance specifications 12 You can open the basic settings. 8 Start button Starting the wash cycle → Page 28 9 Cycle buttons and options Cycles Options 10 Remote Start 11 Electronic delay time Setting the electronic delay time → Page...

Use and Care Manual
Page 14
...; Washing pots ¡ Pre-Rinse and pans, non- ¡ Cleaning 151 °F - en-us Dishwasher Cycles Dishwasher Cycles 5 Dishwasher Cycles Dishwasher Cycles Below is switched off or rinse aid needs to normal conditions and a water hardness of 16 20 °E. The running time depends on the water temperature, the quantity of dishware, the level of soiling: ¡ Intermediate rinse ¡ Removing com- ¡ Final rinse 154 °F mon household ¡ Drying food remnants lightly dried-on...
...; Washing pots ¡ Pre-Rinse and pans, non- ¡ Cleaning 151 °F - en-us Dishwasher Cycles Dishwasher Cycles 5 Dishwasher Cycles Dishwasher Cycles Below is switched off or rinse aid needs to normal conditions and a water hardness of 16 20 °E. The running time depends on the water temperature, the quantity of dishware, the level of soiling: ¡ Intermediate rinse ¡ Removing com- ¡ Final rinse 154 °F mon household ¡ Drying food remnants lightly dried-on...

Use and Care Manual
Page 23
... washing and drying results we recommend using a separate rinse aid. 23 Liquid detergent Liquid detergent works faster and is not designated for shorter cycles. This may leak out despite the detergent dispenser being closed. times tabs do not need to remove colored stains, e.g. The dosage can only be used to be reduced. ¡ Adjust the rinse aid and the water softening system settings in accordance with the detergent or combination detergent in everyday use the Delay Start...
... washing and drying results we recommend using a separate rinse aid. 23 Liquid detergent Liquid detergent works faster and is not designated for shorter cycles. This may leak out despite the detergent dispenser being closed. times tabs do not need to remove colored stains, e.g. The dosage can only be used to be reduced. ¡ Adjust the rinse aid and the water softening system settings in accordance with the detergent or combination detergent in everyday use the Delay Start...

Use and Care Manual
Page 26
... not block the spray arms - low dishes to cool for examples of how to load your appliance efficiently, free of the detergent dispenser. 1. NOTICE: Avoid dishwasher damage ▶ Do not load the dishwasher with the openings facing down . - Do not place small parts in the collecting tray and do not prerinse dishware under running water. 2. To save energy and water, load the machine with the number of food...
... not block the spray arms - low dishes to cool for examples of how to load your appliance efficiently, free of the detergent dispenser. 1. NOTICE: Avoid dishwasher damage ▶ Do not load the dishwasher with the openings facing down . - Do not place small parts in the collecting tray and do not prerinse dishware under running water. 2. To save energy and water, load the machine with the number of food...

Use and Care Manual
Page 28
... option. a The cycle is selected. ▶ Press the button for the wash cycle. 3. Requirements ¡ Pressing Start to be deactivated. Press . ware while the appliance is set and the cycle button flashes. Press . Press . a The wash cycle has ended when the display shows "0h:00m". lay time. Use to set options to prevent unintentional operation, e.g. by default. After starting the appliance, the door has to begin a wash cycle ¡ Setting Delay time and press-
... option. a The cycle is selected. ▶ Press the button for the wash cycle. 3. Requirements ¡ Pressing Start to be deactivated. Press . ware while the appliance is set and the cycle button flashes. Press . Press . a The wash cycle has ended when the display shows "0h:00m". lay time. Use to set options to prevent unintentional operation, e.g. by default. After starting the appliance, the door has to begin a wash cycle ¡ Setting Delay time and press-

Use and Care Manual
Page 38
... or indicator ▶ Install the inlet hose without kinks. Unscrew the water connection. 1 Depending on eliminat- Please read the information on the appliance specifications 38 Operate the appliance with the Water softening system.1 E:30-00 lights up al- Switch off the water faucet. 4. ing issues before contacting Customer Service. Turn off the water faucet. 2. The flow rate must be at least 10 l/min when the water supply is...
... or indicator ▶ Install the inlet hose without kinks. Unscrew the water connection. 1 Depending on eliminat- Please read the information on the appliance specifications 38 Operate the appliance with the Water softening system.1 E:30-00 lights up al- Switch off the water faucet. 4. ing issues before contacting Customer Service. Turn off the water faucet. 2. The flow rate must be at least 10 l/min when the water supply is...

Use and Care Manual
Page 40
... breaker. 5. Use a different combined detergent with drying. → Page 14 Some option buttons decrease the drying result. Insert the power cord plug of the appliance in recesses of the appliance or switch off the water faucet. ‒ Pull out the power cord plug. ‒ Contact customer service → Page 50 and give the error code. No rinse aid used has a poor drying performance. 1. Set the amount of rinse aid", Page 22 Cycle or cycle option...
... breaker. 5. Use a different combined detergent with drying. → Page 14 Some option buttons decrease the drying result. Insert the power cord plug of the appliance in recesses of the appliance or switch off the water faucet. ‒ Pull out the power cord plug. ‒ Contact customer service → Page 50 and give the error code. No rinse aid used has a poor drying performance. 1. Set the amount of rinse aid", Page 22 Cycle or cycle option...

Use and Care Manual
Page 46
... Reset. ▶ → "Terminating the wash cycle", Page 29 Appliance cannot be Software update is not es- ▶ Check the wireless network connection of rinse aid. Connection to home network is a technical error. ▶ Please consult the information on support in the documents supplied for correctly. Home Connect set incorrectly. Refill indicator for No rinse aid. Appliance door is switched off . ▶ Set the amount of your router. Clean...
... Reset. ▶ → "Terminating the wash cycle", Page 29 Appliance cannot be Software update is not es- ▶ Check the wireless network connection of rinse aid. Connection to home network is a technical error. ▶ Please consult the information on support in the documents supplied for correctly. Home Connect set incorrectly. Refill indicator for No rinse aid. Appliance door is switched off . ▶ Set the amount of your router. Clean...

Use and Care Manual
Page 49
... To avoid damage to the dishwasher. Disconnect the appliance from the appliance. 2. Remove dishware from the power supply. 2. Turn off the appliance. 8. Detach the drinking water con- Note: Always transport the dishwasher upright to cabinet parts. 6. Install the filter system. 10.Insert the upper and lower rack. Secure loose parts. 3. To drain the appliance, terminate the wash cycle after approx. 4 minutes. → "Terminating the wash cycle", Page 29 7. Transportation, storage...
... To avoid damage to the dishwasher. Disconnect the appliance from the appliance. 2. Remove dishware from the power supply. 2. Turn off the appliance. 8. Detach the drinking water con- Note: Always transport the dishwasher upright to cabinet parts. 6. Install the filter system. 10.Insert the upper and lower rack. Secure loose parts. 3. To drain the appliance, terminate the wash cycle after approx. 4 minutes. → "Terminating the wash cycle", Page 29 7. Transportation, storage...

Use and Care Manual
Page 50
... Product Warranty, from the power outlet. ▶ Cut the power cord and remove the door upon discarding the appliance. ▶ Check your appliance. To empty the residual water out of the appliance, detach the supply hose and let the water drain out. 18.4 Disposal of your appliance's details and the Customer Service telephone number will enable you to find the model number (E-Nr.), the production number (FD) and the consecutive numbering...
... Product Warranty, from the power outlet. ▶ Cut the power cord and remove the door upon discarding the appliance. ▶ Check your appliance. To empty the residual water out of the appliance, detach the supply hose and let the water drain out. 18.4 Disposal of your appliance's details and the Customer Service telephone number will enable you to find the model number (E-Nr.), the production number (FD) and the consecutive numbering...

Product Spec Sheet
Page 1
...-compliant Dishwasher 300 Series - The RackMatic® adjustable upper rack can be lifted and lowered to change product materials and specifications, at any time, without notice. General Properties Number of wash cycles 5 Number of options 5 Special Program Machine Care dBA 46 Drying system PureDry Third rack No Rack adjustability 3-step RackMatic® Tub material Stainless steel Control type Buttons Concealed water Yes heating element Leak protection system 24/7 AquaStop® Plus Water softener Yes Five-level wash Yes ChildLock Yes Home Connect...
...-compliant Dishwasher 300 Series - The RackMatic® adjustable upper rack can be lifted and lowered to change product materials and specifications, at any time, without notice. General Properties Number of wash cycles 5 Number of options 5 Special Program Machine Care dBA 46 Drying system PureDry Third rack No Rack adjustability 3-step RackMatic® Tub material Stainless steel Control type Buttons Concealed water Yes heating element Leak protection system 24/7 AquaStop® Plus Water softener Yes Five-level wash Yes ChildLock Yes Home Connect...

