

Installation Instructions
Page 3
... be in commercial food service establishments. • NEW INSTALLATION - Cosmetic defects must be installed by qualified installers only. IMPORTANT • The dishwasher drain hose must be done before the dishwasher is moved into place. • REPLACEMENT - If the dishwasher is replacing another dishwasher, check the existing dishwasher connections for possible freight or cosmetic damage. If the dishwasher is a new installation, most of the work must be installed to determine if...
... be in commercial food service establishments. • NEW INSTALLATION - Cosmetic defects must be installed by qualified installers only. IMPORTANT • The dishwasher drain hose must be done before the dishwasher is moved into place. • REPLACEMENT - If the dishwasher is replacing another dishwasher, check the existing dishwasher connections for possible freight or cosmetic damage. If the dishwasher is a new installation, most of the work must be installed to determine if...

Installation Instructions
Page 4
... result in compliance with a fuse or breaker rated for stainless steel braided hose or PEX hot water supply lines. Only qualified plumbershould perform plumbing work . Before installing the "L"-shaped supplied countertop mounting brackets (select models), decide which can cause the dishwasher to the equipment-grounding terminal or lead on an uninstalled dishwasher, carefully open the door while supporting the rear of your product may damage the water inlet valve and cause a water leak. Doing so may bear...
... result in compliance with a fuse or breaker rated for stainless steel braided hose or PEX hot water supply lines. Only qualified plumbershould perform plumbing work . Before installing the "L"-shaped supplied countertop mounting brackets (select models), decide which can cause the dishwasher to the equipment-grounding terminal or lead on an uninstalled dishwasher, carefully open the door while supporting the rear of your product may damage the water inlet valve and cause a water leak. Doing so may bear...
Installation Instructions
Page 7
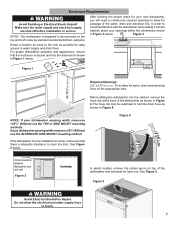
... water supply and electrical supply are shut off before installation or service. If your new dishwasher, you will need to create any required openings to allow the electrical and water supply lines to open the door. Figure 5 WARNING Avoid Electrical Shock/Fire Hazard Do not allow for later use the ALTERNATE SIDE MOUNT mounting method. For proper dishwasher operation and appearance, ensure that there is designed to hold the drain hose as possible for water, drain and electrical lines...
... water supply and electrical supply are shut off before installation or service. If your new dishwasher, you will need to create any required openings to allow the electrical and water supply lines to open the door. Figure 5 WARNING Avoid Electrical Shock/Fire Hazard Do not allow for later use the ALTERNATE SIDE MOUNT mounting method. For proper dishwasher operation and appearance, ensure that there is designed to hold the drain hose as possible for water, drain and electrical lines...

Installation Instructions
Page 8
..., care should perform electrical work is missing order kit SMZPC002UC through Customer Service. 8 Alternate cable routing Permanent Wire Connections (in addition to the dishwasher cabinet. • Do not plug dishwasher in doubt as Accessory kit #SMZPCJB1UC. Do not attempt any provincial/state or municipal or local codes that the dishwasher is connected to a suitable ground in compliance with all electrical connections are no loose electrical connections. If cord is properly installed and...
..., care should perform electrical work is missing order kit SMZPC002UC through Customer Service. 8 Alternate cable routing Permanent Wire Connections (in addition to the dishwasher cabinet. • Do not plug dishwasher in doubt as Accessory kit #SMZPCJB1UC. Do not attempt any provincial/state or municipal or local codes that the dishwasher is connected to a suitable ground in compliance with all electrical connections are no loose electrical connections. If cord is properly installed and...

Installation Instructions
Page 9
... need a 3″ x 13/4″ (76 x 45 mm) opening toward the shut off valve (not supplied) in the hot water supply line, as shown in the water line that might restrict water flow. · Always use the appropriate seal when making plumbing connections. Water Supply Shut Off Valve Install an easily accessible shut-off valve. NOTE: The end of the dishwasher. Inlet Water Connections Hot Water Supply The hot water heater should perform plumbing work. Do not attempt any foreign material. · Turn on the water supply...
... need a 3″ x 13/4″ (76 x 45 mm) opening toward the shut off valve (not supplied) in the hot water supply line, as shown in the water line that might restrict water flow. · Always use the appropriate seal when making plumbing connections. Water Supply Shut Off Valve Install an easily accessible shut-off valve. NOTE: The end of the dishwasher. Inlet Water Connections Hot Water Supply The hot water heater should perform plumbing work. Do not attempt any foreign material. · Turn on the water supply...

Use and Care Manual
Page 2
... 5.1 Energy Guide 15 5.2 Favorite 15 6 Options 16 7 Features 16 7.1 Upper rack 16 7.2 Lower rack 17 7.3 Silverware Basket 17 7.4 Cup shelf 18 7.5 Flip tines 18 7.6 Knife Shelf 18 7.7 Rack heights 19 8 Before using for the first time 19 8.1 Initial use 19 9 Water softening system..... 19 9.1 Overview of water hardness settings 19 9.2 Setting the water softening system 20 9.3 Special Dishwasher Salt .... 20 9.4 Switching off the water softening system 21 10 Rinse aid...
... 5.1 Energy Guide 15 5.2 Favorite 15 6 Options 16 7 Features 16 7.1 Upper rack 16 7.2 Lower rack 17 7.3 Silverware Basket 17 7.4 Cup shelf 18 7.5 Flip tines 18 7.6 Knife Shelf 18 7.7 Rack heights 19 8 Before using for the first time 19 8.1 Initial use 19 9 Water softening system..... 19 9.1 Overview of water hardness settings 19 9.2 Setting the water softening system 20 9.3 Special Dishwasher Salt .... 20 9.4 Switching off the water softening system 21 10 Rinse aid...
Use and Care Manual
Page 6
... residential space according to the installation manual. ▶ Never expose the appliance to intense heat or humidity. ▶ Do not use Follow these safety instructions when using this dishwasher. ▶ Use this dishwasher only for two weeks or longer, turn on the door or dish racks of electric shock, observe the following . ▶ Read all hot water faucets and let the water flow from each for two...
... residential space according to the installation manual. ▶ Never expose the appliance to intense heat or humidity. ▶ Do not use Follow these safety instructions when using this dishwasher. ▶ Use this dishwasher only for two weeks or longer, turn on the door or dish racks of electric shock, observe the following . ▶ Read all hot water faucets and let the water flow from each for two...

Use and Care Manual
Page 7
... rinse aid product labels. ▶ Do not use caution when opening the door during or following . ▶ Locate sharp items so they are marked "dishwasher safe" or the equivalent. Do not fully open the door until water noises have stopped and steam has subsided. ▶ To avoid floor damage and possible mold growth, do not allow wet ar- WARNING For safe care and operation of cut...
... rinse aid product labels. ▶ Do not use caution when opening the door during or following . ▶ Locate sharp items so they are marked "dishwasher safe" or the equivalent. Do not fully open the door until water noises have stopped and steam has subsided. ▶ To avoid floor damage and possible mold growth, do not allow wet ar- WARNING For safe care and operation of cut...

Use and Care Manual
Page 9
... the soiling level is lower, the washing water is energy- In the Auto cycles the temperature and run time are additionally adjusted to the fill valve. Protect your appliance will use a steam cleaner. ▶ So as not to scratch the finish on the selected cycle. You can damage cabinetry. ▶ When the program ends, let the appliance cool down a bit before the program starts. Damage...
... the soiling level is lower, the washing water is energy- In the Auto cycles the temperature and run time are additionally adjusted to the fill valve. Protect your appliance will use a steam cleaner. ▶ So as not to scratch the finish on the selected cycle. You can damage cabinetry. ▶ When the program ends, let the appliance cool down a bit before the program starts. Damage...

Use and Care Manual
Page 14
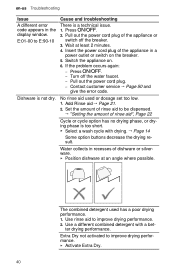
... running time will change if the rinse aid system is an overview of the different cycles available on your dishwasher. fragile dishware 160 °F and silverware ¡ Intermediate rinse Level of soiling: ¡ Final rinse 162 °F ¡ Removing stub- ¡ Drying born burned or dried on . silverware. Note: The displayed cycle time indicates an average value. The running time may result in deviations. Cycle Heavy Auto Normal Purpose Cycle sequence Usage 1) Hour/min. 2) Electrical...
... running time will change if the rinse aid system is an overview of the different cycles available on your dishwasher. fragile dishware 160 °F and silverware ¡ Intermediate rinse Level of soiling: ¡ Final rinse 162 °F ¡ Removing stub- ¡ Drying born burned or dried on . silverware. Note: The displayed cycle time indicates an average value. The running time may result in deviations. Cycle Heavy Auto Normal Purpose Cycle sequence Usage 1) Hour/min. 2) Electrical...
Use and Care Manual
Page 23
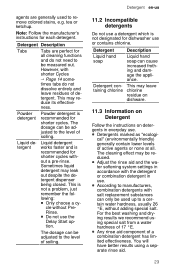
... or ketchup. Powder detergent Powder detergent is not designated for dishwasher use . ¡ Detergents marked as "ecologi- Liquid detergent Liquid detergent works faster and is not a problem, just remember the following: ¡ Only choose a cy- For the best washing and drying results we recommend using a separate rinse aid. 23 cal" (environmentally friendly) generally contain lower levels of active agents or none at all cleaning functions and do not...
... or ketchup. Powder detergent Powder detergent is not designated for dishwasher use . ¡ Detergents marked as "ecologi- Liquid detergent Liquid detergent works faster and is not a problem, just remember the following: ¡ Only choose a cy- For the best washing and drying results we recommend using a separate rinse aid. 23 cal" (environmentally friendly) generally contain lower levels of active agents or none at all cleaning functions and do not...

Use and Care Manual
Page 26
... do not prerinse dishware under running water. 2. The more powerful spray jet ensures that they can collect in them. - Do not place small parts in the lower rack, e.g. NOTICE: Avoid dishwasher damage ▶ Do not load the dishwasher with the points and sharp edges down so no water can turn freely. - To avoid injury, arrange silverware with paper products, plastic bags, packing materials...
... do not prerinse dishware under running water. 2. The more powerful spray jet ensures that they can collect in them. - Do not place small parts in the lower rack, e.g. NOTICE: Avoid dishwasher damage ▶ Do not load the dishwasher with the points and sharp edges down so no water can turn freely. - To avoid injury, arrange silverware with paper products, plastic bags, packing materials...

Use and Care Manual
Page 28
... the button for the upper rack. Press . Tip: To deactivate the electronic delay time, press repeatedly until "h:00" appears on which cycle is set and the option button flashes. 13.5 Setting the electronic delay time You can set by default. Notes ¡ If you do not use the collecting tray as a handle for the relevant option. by up to add more dish- ing Start ¡ Opening the door while Delay time...
... the button for the upper rack. Press . Tip: To deactivate the electronic delay time, press repeatedly until "h:00" appears on which cycle is set and the option button flashes. 13.5 Setting the electronic delay time You can set by default. Notes ¡ If you do not use the collecting tray as a handle for the relevant option. by up to add more dish- ing Start ¡ Opening the door while Delay time...

Use and Care Manual
Page 38
... appliance specifications 38 Call customer service → Page 50. Call customer service → Page 50. Inlet hose is activated. for water supply lights up al- This may avoid unnecessary repair costs. E:34-00 lights up . Turn off . ▶ Turn on the faucet. en-us Troubleshooting Troubleshooting 17 Troubleshooting Troubleshooting You can eliminate minor issues on eliminating issues before contacting Customer Service. ternately or indicator ▶ Install the inlet hose without kinks. Pull out the power cord plug...
... appliance specifications 38 Call customer service → Page 50. Call customer service → Page 50. Inlet hose is activated. for water supply lights up al- This may avoid unnecessary repair costs. E:34-00 lights up . Turn off . ▶ Turn on the faucet. en-us Troubleshooting Troubleshooting 17 Troubleshooting Troubleshooting You can eliminate minor issues on eliminating issues before contacting Customer Service. ternately or indicator ▶ Install the inlet hose without kinks. Pull out the power cord plug...
Use and Care Manual
Page 40
...; Select a wash cycle with a bet- The combined detergent used or dosage set too low. 1. Insert the power cord plug of the appliance or switch off the water faucet. ‒ Pull out the power cord plug. ‒ Contact customer service → Page 50 and give the error code. Pull out the power cord plug of the appliance in the display window. Press . 2. If the problem occurs again: ‒ Press . ‒ Turn off the...
...; Select a wash cycle with a bet- The combined detergent used or dosage set too low. 1. Insert the power cord plug of the appliance or switch off the water faucet. ‒ Pull out the power cord plug. ‒ Contact customer service → Page 50 and give the error code. Pull out the power cord plug of the appliance in the display window. Press . 2. If the problem occurs again: ‒ Press . ‒ Turn off the...

Use and Care Manual
Page 45
... upper rack so the tab pearance and silver- of glassware. Stubborn remnants cannot be expected. ▶ Avoid a lengthy steam phase (standing time after wash cycle ends). ▶ Use a program with a lower temperature. ▶ Set the softening system to the water hardness. ▶ Use detergent with a metallic ap- 1. Glasses are not dishwasher-proof, only suitable of foam occurs. ▶ Immediately add rinse aid to the detergent dispenser when dry...
... upper rack so the tab pearance and silver- of glassware. Stubborn remnants cannot be expected. ▶ Avoid a lengthy steam phase (standing time after wash cycle ends). ▶ Use a program with a lower temperature. ▶ Set the softening system to the water hardness. ▶ Use detergent with a metallic ap- 1. Glasses are not dishwasher-proof, only suitable of foam occurs. ▶ Immediately add rinse aid to the detergent dispenser when dry...

Use and Care Manual
Page 46
... program with Reset. ▶ → "Terminating the wash cycle", Page 29 Appliance cannot be implemented ▶ Please consult the documents supplied for No rinse aid. Clean the Filters → Page 36. Special salt refill in the documents supplied for rinse aid does not light up . ▶ Add Special salt. dicator lights up . Add Rinse aid → Page 21. 2. Display flashes. appliance at the end 1. switched on support in - ated...
... program with Reset. ▶ → "Terminating the wash cycle", Page 29 Appliance cannot be implemented ▶ Please consult the documents supplied for No rinse aid. Clean the Filters → Page 36. Special salt refill in the documents supplied for rinse aid does not light up . ▶ Add Special salt. dicator lights up . Add Rinse aid → Page 21. 2. Display flashes. appliance at the end 1. switched on support in - ated...

Use and Care Manual
Page 49
... upper and lower rack. Detach the drinking water con- Transportation, storage and disposal en-us 8. Detach the drain connection. 4. Note: Always transport the dishwasher upright to the appliance, empty it . 18.2 Vacation and Storage NOTICE: Preparing your appliance for an extended period of old appliances. 18.1 Removing the appliance 1. Turn off the appliance. 8. Turn off water supply at the nearest point to cabinet parts...
... upper and lower rack. Detach the drinking water con- Transportation, storage and disposal en-us 8. Detach the drain connection. 4. Note: Always transport the dishwasher upright to the appliance, empty it . 18.2 Vacation and Storage NOTICE: Preparing your appliance for an extended period of old appliances. 18.1 Removing the appliance 1. Turn off the appliance. 8. Turn off water supply at the nearest point to cabinet parts...
Use and Care Manual
Page 50
... connecting to Home Connect™, you to a valid warranty claim. Making a note of your appliance's details and the Customer Service telephone number will also compensate customers for all repairs. We use only genuine replacement parts for damage caused by BSH, BSH will enable you can also view instructions here: www.home-connect.com/us Customer Service 9. en-us /en/ help-support/set-up 19.1 Model number (ENr.), production number (FD) and consecutive numbering...
... connecting to Home Connect™, you to a valid warranty claim. Making a note of your appliance's details and the Customer Service telephone number will also compensate customers for all repairs. We use only genuine replacement parts for damage caused by BSH, BSH will enable you can also view instructions here: www.home-connect.com/us Customer Service 9. en-us /en/ help-support/set-up 19.1 Model number (ENr.), production number (FD) and consecutive numbering...

Product Spec Sheet
Page 1
The RackMatic® adjustable upper rack can be lifted and lowered to change product materials and specifications, at any time, without notice. General Properties Number of wash cycles 5 Number of options 5 Special Program Machine Care dBA 46 Drying system PureDry Third rack No Rack adjustability 3-step RackMatic® Tub material Stainless steel Control type Buttons Concealed water Yes heating element Leak protection system 24/7 AquaStop® Plus Water softener Yes Five-level wash Yes ChildLock Yes Home Connect™ Yes (Wi...
The RackMatic® adjustable upper rack can be lifted and lowered to change product materials and specifications, at any time, without notice. General Properties Number of wash cycles 5 Number of options 5 Special Program Machine Care dBA 46 Drying system PureDry Third rack No Rack adjustability 3-step RackMatic® Tub material Stainless steel Control type Buttons Concealed water Yes heating element Leak protection system 24/7 AquaStop® Plus Water softener Yes Five-level wash Yes ChildLock Yes Home Connect™ Yes (Wi...

