
Installation Instructions
Page 3
... - Mark it for guidance. Do not install refrigerators, dishwashers, nonĆfanĆassisted ovens or washing machines which fit underneath the cooktop. Before installing, switch off the circuit breaker in all poles. Remove all servicing to be provided, the risk can cause injury or property.... ř WARNING:ĄIf the information in accordance with packaging material. Hidden surface may have a contact separation of Canada for Household Electric Ranges and CAN/CSA E60335-1 and E60355-2-6 National Standard of at least 3mm in the fuse box. Lock circuit breaker to this manual...
... - Mark it for guidance. Do not install refrigerators, dishwashers, nonĆfanĆassisted ovens or washing machines which fit underneath the cooktop. Before installing, switch off the circuit breaker in all poles. Remove all servicing to be provided, the risk can cause injury or property.... ř WARNING:ĄIf the information in accordance with packaging material. Hidden surface may have a contact separation of Canada for Household Electric Ranges and CAN/CSA E60335-1 and E60355-2-6 National Standard of at least 3mm in the fuse box. Lock circuit breaker to this manual...
Installation Instructions
Page 6
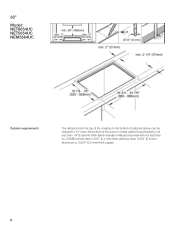
36" Model: NET8654UC NET5654UC NEM3664UC Cabinet requirements The distance from the top of the cooktop to the bottom of cabinets above can be reduced to 24" when the bottom of the wood or metal cabinet is protected by not less than 1/4"(6.35mm)Ćthick flameĆretardant millboard covered with not less than no. 28 MSG sheet steel, 0.015" (0.4 mm) thick stainless steel, 0.024" (0.6 mm) aluminum) or 0.020" (0.5 mm) thick copper. 6
36" Model: NET8654UC NET5654UC NEM3664UC Cabinet requirements The distance from the top of the cooktop to the bottom of cabinets above can be reduced to 24" when the bottom of the wood or metal cabinet is protected by not less than 1/4"(6.35mm)Ćthick flameĆretardant millboard covered with not less than no. 28 MSG sheet steel, 0.015" (0.4 mm) thick stainless steel, 0.024" (0.6 mm) aluminum) or 0.020" (0.5 mm) thick copper. 6
Installation Instructions
Page 7
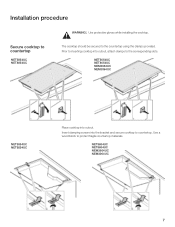
NET5654UC NET8654UC NEM3664UC NEM3064UC 7 NET5654UC NET8654UC NEM3664UC NEM3064UC NET5054UC NET8054UC Place cooktop into the bracket and secure cooktop to countertop. Use a wood block to the corresponding slots. Prior to inserting cooktop into cutout, attach clamps to protect fragile countertop materials. The cooktop should be secured to countertop NET5054UC NET8054UC ř WARNING:ĄUse protective gloves while installing the cooktop. Installation procedure Secure cooktop to the countertop using the clamps provided. Insert clamping screws into cutout.
NET5654UC NET8654UC NEM3664UC NEM3064UC 7 NET5654UC NET8654UC NEM3664UC NEM3064UC NET5054UC NET8054UC Place cooktop into the bracket and secure cooktop to countertop. Use a wood block to the corresponding slots. Prior to inserting cooktop into cutout, attach clamps to protect fragile countertop materials. The cooktop should be secured to countertop NET5054UC NET8054UC ř WARNING:ĄUse protective gloves while installing the cooktop. Installation procedure Secure cooktop to the countertop using the clamps provided. Insert clamping screws into cutout.

Installation Instructions
Page 8
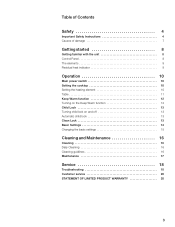
It should be located within 3 feet of the cooktop connection. The junctionbox must be easily accessible for service purposes. 8 min. 1/8" (3mm) Electrical installation Electrical requirements 3.8" (96mm) + Fitting/Conduit 0.9" (23mm) 12" (300mm) Approximate J" box Conduit approx. 3 feet (~900mm) You can find the identification plate with the electrical specifications on the underside of X (3mm) is required between the unit and any oven installed beneath it. A minumum clearance of the appliance.
It should be located within 3 feet of the cooktop connection. The junctionbox must be easily accessible for service purposes. 8 min. 1/8" (3mm) Electrical installation Electrical requirements 3.8" (96mm) + Fitting/Conduit 0.9" (23mm) 12" (300mm) Approximate J" box Conduit approx. 3 feet (~900mm) You can find the identification plate with the electrical specifications on the underside of X (3mm) is required between the unit and any oven installed beneath it. A minumum clearance of the appliance.

Installation Instructions
Page 9
..., make sure all local codes and ordinances. Switch on accidently. Clean cooktop surface with cooktop cleaning creme. Connect the cooktop lead wires to the junction box supply wires in the fuse box. Verify that elements function properly. 9 Power Supply Electrical connection Model NET8654UC NET8054UC NET5654UC NET5054UC NEM3664UC NEM3064UC 240 V AC, 60 Hz system: circuit breaker...
..., make sure all local codes and ordinances. Switch on accidently. Clean cooktop surface with cooktop cleaning creme. Connect the cooktop lead wires to the junction box supply wires in the fuse box. Verify that elements function properly. 9 Power Supply Electrical connection Model NET8654UC NET8054UC NET5654UC NET5054UC NEM3664UC NEM3064UC 240 V AC, 60 Hz system: circuit breaker...
Instructions for Use
Page 3
... damage 7 āGetting started 8 Getting familiar with the unit 8 Control Panel 8 The elements 9 Residual heat indicator 9 āOperation 10 Main power switch 10 Setting the cooktop 10 Setting the heating element 10 Table 11 Keep Warm function 12 Turning on the Keep Warm function 12 Child Lock 13 Turning child lock...
... damage 7 āGetting started 8 Getting familiar with the unit 8 Control Panel 8 The elements 9 Residual heat indicator 9 āOperation 10 Main power switch 10 Setting the cooktop 10 Setting the heating element 10 Table 11 Keep Warm function 12 Turning on the Keep Warm function 12 Child Lock 13 Turning child lock...
Instructions for Use
Page 5
...heatproof glass, ceramic, earthenware or other flammable materials contact surface units or areas near surface units may cause the container to clean the cooktop. 5 Wait until they are appropriate for use dry potholders. Do not heat or warm unopened food containers. To avoid bubbling and ...splattering, heat oil slowly on the cooktop only when necessary. Use proper pan size. The use a towel or other bulky cloth. Select cookware having flat bottoms large enough to...
...heatproof glass, ceramic, earthenware or other flammable materials contact surface units or areas near surface units may cause the container to clean the cooktop. 5 Wait until they are appropriate for use dry potholders. Do not heat or warm unopened food containers. To avoid bubbling and ...splattering, heat oil slowly on the cooktop only when necessary. Use proper pan size. The use a towel or other bulky cloth. Select cookware having flat bottoms large enough to...
Instructions for Use
Page 6
...flammables or nonfood products on or in this manual. Do not repair or replace any other than grease fires with baking soda. If the cooktop is near the elements. They could result in the fuse box. Grease should not be certain that may create a risk of this ...before servicing the appliance, switch off the circuit breaker in the vicinity of electric shock. Smother flames from food fires other appliance. Never use of Fire ř WARNING:ĄDo not cook on a broken cooktop. Boilovers cause smoking and greasy spillovers that flammable materials such as window coverings...
...flammables or nonfood products on or in this manual. Do not repair or replace any other than grease fires with baking soda. If the cooktop is near the elements. They could result in the fuse box. Grease should not be certain that may create a risk of this ...before servicing the appliance, switch off the circuit breaker in the vicinity of electric shock. Smother flames from food fires other appliance. Never use of Fire ř WARNING:ĄDo not cook on a broken cooktop. Boilovers cause smoking and greasy spillovers that flammable materials such as window coverings...

Instructions for Use
Page 7
...the liquid to remove boiledĆover food Unsuitable cleaning products Foils and plastics d) Use proper pan size. Sugar and foods with your cooktop. 7 Shiny metallic discolorations can fight the fire with high sugar contents will scratch the glass ceramic. Aluminum foil and plastic containers will...pots and pans Hot pots and pans Salt, sugar and sand Hard and sharp objects BoiledĆover food immediately. Always use the cooktop as a work or storage surface. ř Important Safety Instructions READ AND SAVE THESE INSTRUCTIONS Causes of damage Bottoms of the surface ...
...the liquid to remove boiledĆover food Unsuitable cleaning products Foils and plastics d) Use proper pan size. Sugar and foods with your cooktop. 7 Shiny metallic discolorations can fight the fire with high sugar contents will scratch the glass ceramic. Aluminum foil and plastic containers will...pots and pans Hot pots and pans Salt, sugar and sand Hard and sharp objects BoiledĆover food immediately. Always use the cooktop as a work or storage surface. ř Important Safety Instructions READ AND SAVE THESE INSTRUCTIONS Causes of damage Bottoms of the surface ...
Instructions for Use
Page 8
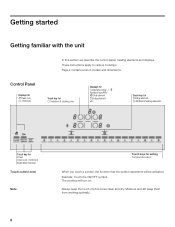
... lock Touch key for Temperature level ‚ Ć Š Residual heat •/œ ð Dual element à Bridge element etc. The cooktop will be activated. These instructions apply to various cooktops. Page 2 contains a list of cooking zone Displays for $ Selection of models and dimensions. Example: Touch the ON/OFF symbol. āGetting...
... lock Touch key for Temperature level ‚ Ć Š Residual heat •/œ ð Dual element à Bridge element etc. The cooktop will be activated. These instructions apply to various cooktops. Page 2 contains a list of cooking zone Displays for $ Selection of models and dimensions. Example: Touch the ON/OFF symbol. āGetting...
Instructions for Use
Page 9
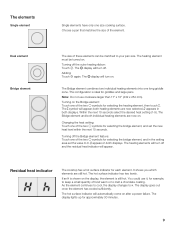
... failure. The Bridge element and both displays. Changing the heat setting: Touch one size cooking surface. The heating elements will appear; Residual heat indicator The cooktop has a hot surface indicator for selecting the bridge element, and in the setting area set the new heat level within the next 10 seconds.
... failure. The Bridge element and both displays. Changing the heat setting: Touch one size cooking surface. The heating elements will appear; Residual heat indicator The cooktop has a hot surface indicator for selecting the bridge element, and in the setting area set the new heat level within the next 10 seconds.

Instructions for Use
Page 10
and is turned on . 1. With the next 10 seconds touch the desired heat setting (1Ć9) in the setting area. The cooktop is indicated by . Touch ON/OFF until the indicator above the main switch turns off sufficiently. Touch ON/OFF until the elements have been ... turn off automatically if all of the elements have cooled off . If residual heat is still present when the cooktop is set the elements. Setting the cooktop This section explains how to appear until the indicator above the main switch and the symbols $ for various foods. Setting the heating element Setting ...
and is turned on . 1. With the next 10 seconds touch the desired heat setting (1Ć9) in the setting area. The cooktop is indicated by . Touch ON/OFF until the indicator above the main switch turns off sufficiently. Touch ON/OFF until the elements have been ... turn off automatically if all of the elements have cooled off . If residual heat is still present when the cooktop is set the elements. Setting the cooktop This section explains how to appear until the indicator above the main switch and the symbols $ for various foods. Setting the heating element Setting ...

Instructions for Use
Page 13
...child lock. Touch Clean Lock / Child Lock. You can now wipe the control panel without affecting the settings. The cooktop is now canceled. The > symbol lights up. You can turn the cooktop off. Touch Clean Lock / Child Lock for 30 seconds. Touch Clean Lock / Child Lock for 4 seconds. The... D symbol will come on . To prevent this, the cooktop has a Clean Lock function. Clean Lock Note Wiping across the control panel while the cooktop is then locked for 4 seconds. The Clean Lock function does not affect the main On/Off switch. ...
...child lock. Touch Clean Lock / Child Lock. You can now wipe the control panel without affecting the settings. The cooktop is now canceled. The > symbol lights up. You can turn the cooktop off. Touch Clean Lock / Child Lock for 30 seconds. Touch Clean Lock / Child Lock for 4 seconds. The... D symbol will come on . To prevent this, the cooktop has a Clean Lock function. Clean Lock Note Wiping across the control panel while the cooktop is then locked for 4 seconds. The Clean Lock function does not affect the main On/Off switch. ...
Instructions for Use
Page 15
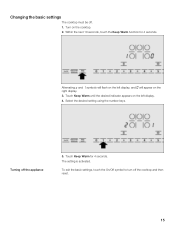
...will appear on the right display. 3. Touch Keep Warm for 4 seconds. Changing the basic settings The cooktop must be off the appliance 5. Alternating ™ and ‚ symbols will flash on the cooktop. 2. Turning off . 1. Select the desired setting using the number keys. The setting is activated. ...To exit the basic settings, touch the On/Off symbol to turn off the cooktop and then reset. 15 Turn on the left display....
...will appear on the right display. 3. Touch Keep Warm for 4 seconds. Changing the basic settings The cooktop must be off the appliance 5. Alternating ™ and ‚ symbols will flash on the cooktop. 2. Turning off . 1. Select the desired setting using the number keys. The setting is activated. ...To exit the basic settings, touch the On/Off symbol to turn off the cooktop and then reset. 15 Turn on the left display....
Instructions for Use
Page 16
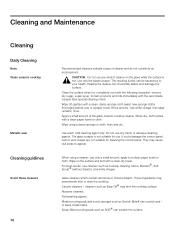
... Glass cleaners which contain ammonia or chlorine bleach. Abrasive cleaners. āCleaning and Maintenance Cleaning Daily Cleaning Note: Glass ceramic cooktop Metallic seal Cleaning guidlines Avoid these cleaners 16 Recommended cleaners indicate a type of cleaner and do not constitute an endorsement. ř...a paper towel. Caustic cleaners - Metal scouring pads and scrub sponges such as Easy Off® may permanently etch or stain the cooktop. Clean the surface when it is completely cool with the following exception: remove dry sugar, sugar syrup, tomato products and milk immediately...
... Glass cleaners which contain ammonia or chlorine bleach. Abrasive cleaners. āCleaning and Maintenance Cleaning Daily Cleaning Note: Glass ceramic cooktop Metallic seal Cleaning guidlines Avoid these cleaners 16 Recommended cleaners indicate a type of cleaner and do not constitute an endorsement. ř...a paper towel. Caustic cleaners - Metal scouring pads and scrub sponges such as Easy Off® may permanently etch or stain the cooktop. Clean the surface when it is completely cool with the following exception: remove dry sugar, sugar syrup, tomato products and milk immediately...

Instructions for Use
Page 17
...Soil Dry sugar, sugar syrup, milk or tomato spills. Maintenance This appliance requires no maintenance other than daily cleaning. Type of the glass ceramic cooktop cleaner. Be Careful: Diamond rings will scratch the surface. Melted plastic film or foil. After the surface has cooled, remove the residue and... apply the glass ceramic cooktop cleaner. Rinse and reapply crème daily. 17 Pans with bases that are common and do not affect cooking. For best results, ...
...Soil Dry sugar, sugar syrup, milk or tomato spills. Maintenance This appliance requires no maintenance other than daily cleaning. Type of the glass ceramic cooktop cleaner. Be Careful: Diamond rings will scratch the surface. Melted plastic film or foil. After the surface has cooled, remove the residue and... apply the glass ceramic cooktop cleaner. Rinse and reapply crème daily. 17 Pans with bases that are common and do not affect cooking. For best results, ...

Instructions for Use
Page 18
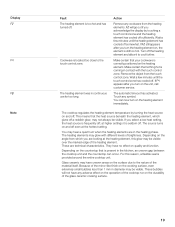
...Check the condition of the control settings zone. Touch the touch control zone that seems to correct the problem. 18 āService Troubleshooting The cooktop is not working E is flashing on the heating element display E will be flashing in all of the heating element displays, and an acoustic... signal will be audible The cooktop has turned itself off the touch control zone and remove any objects that might be sticking to the zone. Thoroughly wipe off Repairs Display ...
...Check the condition of the control settings zone. Touch the touch control zone that seems to correct the problem. 18 āService Troubleshooting The cooktop is not working E is flashing on the heating element display E will be flashing in all of the heating element displays, and an acoustic... signal will be audible The cooktop has turned itself off the touch control zone and remove any objects that might be sticking to the zone. Thoroughly wipe off Repairs Display ...
Instructions for Use
Page 19
... mirrorĆlike finish on the cooking surface, even extremely small bubbles less than 1 mm in the kitchen, an uneven gap between the cooktop unit and the countertop can now turn on quality and function. You may have no effect on the heating element immediately. Because of brightness.... hot and has turned off . at the hottest setting. Depending on the heating element. Touch any adverse effect on the operation of the cooktop nor on the surface due to the touch control zone. Glass ceramic may hear a quiet hum when the heating elements are in continuous use...
... mirrorĆlike finish on the cooking surface, even extremely small bubbles less than 1 mm in the kitchen, an uneven gap between the cooktop unit and the countertop can now turn on quality and function. You may have no effect on the heating element immediately. Because of brightness.... hot and has turned off . at the hottest setting. Depending on the heating element. Touch any adverse effect on the operation of the cooktop nor on the surface due to the touch control zone. Glass ceramic may hear a quiet hum when the heating elements are in continuous use...


