

Installation Instructions
Page 3
... the circuit breaker or fuse. Use caution when reaching behind or under appliance. This appliance has been tested in accordance with this manual. The installer is properly installed and grounded by installing a range hood that projects horizontally a minimum of 5 inches (12.7 cm) beyond the bottom of Canada for any part of at least 3mm in specific installations. Do not install refrigerators, dishwashers, nonĆfanĆassisted ovens or...
... the circuit breaker or fuse. Use caution when reaching behind or under appliance. This appliance has been tested in accordance with this manual. The installer is properly installed and grounded by installing a range hood that projects horizontally a minimum of 5 inches (12.7 cm) beyond the bottom of Canada for any part of at least 3mm in specific installations. Do not install refrigerators, dishwashers, nonĆfanĆassisted ovens or...
Installation Instructions
Page 5
Solid surface countertops often require special installations. For example, heat reflective tape and rounded corners may be level and horizontal. Contact the countertop manufacturer for instructions specific to make them heatĆresistant. The countertop must still be guaranteed after the cutout has been made. The stability of moisture. After preparing cutout, remove shavings as a result of the countertop must be necessary. Seal the cutout surfaces to your countertop. 5 This...
Solid surface countertops often require special installations. For example, heat reflective tape and rounded corners may be level and horizontal. Contact the countertop manufacturer for instructions specific to make them heatĆresistant. The countertop must still be guaranteed after the cutout has been made. The stability of moisture. After preparing cutout, remove shavings as a result of the countertop must be necessary. Seal the cutout surfaces to your countertop. 5 This...
Installation Instructions
Page 6
36" Model: NET8654UC NET5654UC NEM3664UC Cabinet requirements The distance from the top of the cooktop to the bottom of cabinets above can be reduced to 24" when the bottom of the wood or metal cabinet is protected by not less than 1/4"(6.35mm)Ćthick flameĆretardant millboard covered with not less than no. 28 MSG sheet steel, 0.015" (0.4 mm) thick stainless steel, 0.024" (0.6 mm) aluminum) or 0.020" (0.5 mm) thick copper. 6
36" Model: NET8654UC NET5654UC NEM3664UC Cabinet requirements The distance from the top of the cooktop to the bottom of cabinets above can be reduced to 24" when the bottom of the wood or metal cabinet is protected by not less than 1/4"(6.35mm)Ćthick flameĆretardant millboard covered with not less than no. 28 MSG sheet steel, 0.015" (0.4 mm) thick stainless steel, 0.024" (0.6 mm) aluminum) or 0.020" (0.5 mm) thick copper. 6
Installation Instructions
Page 7
Insert clamping screws into cutout. Use a wood block to the corresponding slots. NET5654UC NET8654UC NEM3664UC NEM3064UC NET5054UC NET8054UC Place cooktop into the bracket and secure cooktop to countertop. NET5654UC NET8654UC NEM3664UC NEM3064UC 7 Prior to inserting cooktop into cutout, attach clamps to protect fragile countertop materials. Installation procedure Secure cooktop to the countertop using the clamps provided. The cooktop should be secured to countertop NET5054UC NET8054UC ř WARNING:ĄUse protective gloves while installing the cooktop.
Insert clamping screws into cutout. Use a wood block to the corresponding slots. NET5654UC NET8654UC NEM3664UC NEM3064UC NET5054UC NET8054UC Place cooktop into the bracket and secure cooktop to countertop. NET5654UC NET8654UC NEM3664UC NEM3064UC 7 Prior to inserting cooktop into cutout, attach clamps to protect fragile countertop materials. Installation procedure Secure cooktop to the countertop using the clamps provided. The cooktop should be secured to countertop NET5054UC NET8054UC ř WARNING:ĄUse protective gloves while installing the cooktop.

Installation Instructions
Page 8
It should be located within 3 feet of the cooktop connection. The junctionbox must be easily accessible for service purposes. 8 A minumum clearance of the appliance. min. 1/8" (3mm) Electrical installation Electrical requirements 3.8" (96mm) + Fitting/Conduit 0.9" (23mm) 12" (300mm) Approximate J" box Conduit approx. 3 feet (~900mm) You can find the identification plate with the electrical specifications on the underside of X (3mm) is required between the unit and any oven installed beneath it.
It should be located within 3 feet of the cooktop connection. The junctionbox must be easily accessible for service purposes. 8 A minumum clearance of the appliance. min. 1/8" (3mm) Electrical installation Electrical requirements 3.8" (96mm) + Fitting/Conduit 0.9" (23mm) 12" (300mm) Approximate J" box Conduit approx. 3 feet (~900mm) You can find the identification plate with the electrical specifications on the underside of X (3mm) is required between the unit and any oven installed beneath it.

Installation Instructions
Page 9
... turned on accidently. Lock circuit breaker to ground Test the installation ř CAUTION:ĄBefore turning on the circuit breaker. The branchĆcircuit breakers ampacity , the wire sizes and the connections must be conform to the junction box. ř WARNING:ĄTo reduce the risk of the National Electrical Code or Canadian Electrical Code and all controls are in the fuse box. Clean cooktop surface with cooktop cleaning creme. Attach flexible conduit to the requirements of electric...
... turned on accidently. Lock circuit breaker to ground Test the installation ř CAUTION:ĄBefore turning on the circuit breaker. The branchĆcircuit breakers ampacity , the wire sizes and the connections must be conform to the junction box. ř WARNING:ĄTo reduce the risk of the National Electrical Code or Canadian Electrical Code and all controls are in the fuse box. Clean cooktop surface with cooktop cleaning creme. Attach flexible conduit to the requirements of electric...
Instructions for Use
Page 3
... heat indicator 9 āOperation 10 Main power switch 10 Setting the cooktop 10 Setting the heating element 10 Table 11 Keep Warm function 12 Turning on the Keep Warm function 12 Child Lock 13 Turning child lock on and off 13 Automatic child lock 13 Clean Lock 13 Basic Settings 14 Changing the basic settings 15 āCleaning and Maintenance 16 Cleaning 16 Daily Cleaning 16 Cleaning guidlines 16 Maintenance 17 āService 18 Troubleshooting...
... heat indicator 9 āOperation 10 Main power switch 10 Setting the cooktop 10 Setting the heating element 10 Table 11 Keep Warm function 12 Turning on the Keep Warm function 12 Child Lock 13 Turning child lock on and off 13 Automatic child lock 13 Clean Lock 13 Basic Settings 14 Changing the basic settings 15 āCleaning and Maintenance 16 Cleaning 16 Daily Cleaning 16 Cleaning guidlines 16 Maintenance 17 āService 18 Troubleshooting...
Instructions for Use
Page 4
... all instructions carefully before beginning. before use. Connect only to heat or warm the room. This can damage the appliance, potentially causing severe injury. ř CAUTION:ĄItems of interest to climb, stand, lean, sit or hang on an appliance to be seriously injured. Do not allow children to Installation Instructions for storage. Refer to use this manual. When...
... all instructions carefully before beginning. before use. Connect only to heat or warm the room. This can damage the appliance, potentially causing severe injury. ř CAUTION:ĄItems of interest to climb, stand, lean, sit or hang on an appliance to be seriously injured. Do not allow children to Installation Instructions for storage. Refer to use this manual. When...
Instructions for Use
Page 5
... Instructions READ AND SAVE THESE INSTRUCTIONS Cookware Safety Cleaning Safety DO NOT TOUCH SURFACE UNITS OR AREAS NEAR UNITS. Do not let potholder touch hot heating elements. Do not use of pots dry. Always keep the cooktop and bases of undersized cookware will also improve efficiency. Cookware not approved for ceramic cooktops (only certain types of clothing. Surface units may result in ignition of glass, heatproof glass, ceramic...
... Instructions READ AND SAVE THESE INSTRUCTIONS Cookware Safety Cleaning Safety DO NOT TOUCH SURFACE UNITS OR AREAS NEAR UNITS. Do not let potholder touch hot heating elements. Do not use of pots dry. Always keep the cooktop and bases of undersized cookware will also improve efficiency. Cookware not approved for ceramic cooktops (only certain types of clothing. Surface units may result in ignition of glass, heatproof glass, ceramic...
Instructions for Use
Page 6
...) c) Clean ventilating fans frequently. ř Important Safety Instructions READ AND SAVE THESE INSTRUCTIONS Condition of Unit Work Space / Environment Service and Repair Safety Flammable Materials In Case of the appliance. Call an authorized servicer. Contact an authorized servicer. Do not store or use water on low or medium settings b) Always turn hood ON when cooking at high settings. It is near the kitchen. Refer all servicing to extinguish flames...
...) c) Clean ventilating fans frequently. ř Important Safety Instructions READ AND SAVE THESE INSTRUCTIONS Condition of Unit Work Space / Environment Service and Repair Safety Flammable Materials In Case of the appliance. Call an authorized servicer. Contact an authorized servicer. Do not store or use water on low or medium settings b) Always turn hood ON when cooking at high settings. It is near the kitchen. Refer all servicing to extinguish flames...

Instructions for Use
Page 7
... your cooktop. 7 Always use the cooktop as a work or storage surface. Damage can appear if unsuitable cleaning products are used and if pots are using on the cooktop. Aluminum foil and plastic containers will damage the cooktop. This can damage the unit. Never use cookware appropriate for using special pots and pans, please following the manufacturer's instructions. Salt, sugar and sand cause scratches on the control panel...
... your cooktop. 7 Always use the cooktop as a work or storage surface. Damage can appear if unsuitable cleaning products are used and if pots are using on the cooktop. Aluminum foil and plastic containers will damage the cooktop. This can damage the unit. Never use cookware appropriate for using special pots and pans, please following the manufacturer's instructions. Salt, sugar and sand cause scratches on the control panel...
Instructions for Use
Page 8
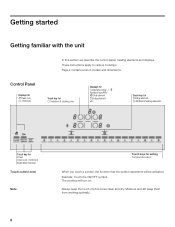
... this section we describe the control panel, heating elements and displays. These instructions apply to various cooktops. Example: Touch the ON/OFF symbol. Control Panel Displays for > Clean lock D Child lock Touch key for $ Selection of models and dimensions. Page 2 contains a list of cooking zone Displays for setting Temperature level When you touch a symbol, the function that the symbol represents will turn on. The cooktop will be activated.
... this section we describe the control panel, heating elements and displays. These instructions apply to various cooktops. Example: Touch the ON/OFF symbol. Control Panel Displays for > Clean lock D Child lock Touch key for $ Selection of models and dimensions. Page 2 contains a list of cooking zone Displays for setting Temperature level When you touch a symbol, the function that the symbol represents will turn on. The cooktop will be activated.
Instructions for Use
Page 9
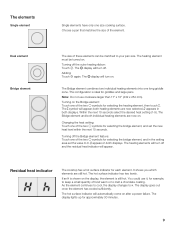
... in both individual heating elements are now on . The Bridge element combines two individual heating elements into one size cooking surface. Changing the heat setting: Touch one of food warm or to 0. 0 appears in both heating elements are still hot. The heating elements will turn off the Bridge element feature: Touch one of these elements can be turned on . The ø symbol will appear. Residual heat indicator The cooktop has a hot surface indicator for approximately 30...
... in both individual heating elements are now on . The Bridge element combines two individual heating elements into one size cooking surface. Changing the heat setting: Touch one of food warm or to 0. 0 appears in both heating elements are still hot. The heating elements will turn off the Bridge element feature: Touch one of these elements can be turned on . The ø symbol will appear. Residual heat indicator The cooktop has a hot surface indicator for approximately 30...
Instructions for Use
Page 16
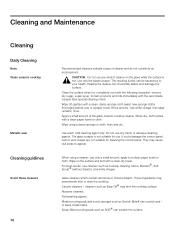
...® (without bleach), and white vinegar. āCleaning and Maintenance Cleaning Daily Cleaning Note: Glass ceramic cooktop Metallic seal Cleaning guidlines Avoid these cleaners 16 Recommended cleaners indicate a type of cleaner and do not constitute an endorsement. ř CAUTION:ĄDo not use any harsh or abrasive cleaning agents. Clean the surface when it is not suitable for cleaning the control panel. Wipe using a cleaner, use cleaners such as Easy...
...® (without bleach), and white vinegar. āCleaning and Maintenance Cleaning Daily Cleaning Note: Glass ceramic cooktop Metallic seal Cleaning guidlines Avoid these cleaners 16 Recommended cleaners indicate a type of cleaner and do not constitute an endorsement. ř CAUTION:ĄDo not use any harsh or abrasive cleaning agents. Clean the surface when it is not suitable for cleaning the control panel. Wipe using a cleaner, use cleaners such as Easy...

Instructions for Use
Page 17
...®, Soft Scrub® without bleach) with aluminum, copper or stainless steel bases may leave marks. Wearing an oven mitt, hold scraper at 30o angle, using the razor blade scraper. Apply glass ceramic cooktop cleaner before the next heating makes removal very difficult. Type of the glass ceramic cooktop cleaner. All these immediately can permanently damage the surface. Failure to remove sand-like grains and grit such as...
...®, Soft Scrub® without bleach) with aluminum, copper or stainless steel bases may leave marks. Wearing an oven mitt, hold scraper at 30o angle, using the razor blade scraper. Apply glass ceramic cooktop cleaner before the next heating makes removal very difficult. Type of the glass ceramic cooktop cleaner. All these immediately can permanently damage the surface. Failure to remove sand-like grains and grit such as...

Instructions for Use
Page 18
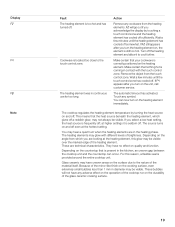
... fault has occurred. āService Troubleshooting The cooktop is not working E is flashing on the heating element display E will be flashing in all of the heating element displays, and an acoustic signal will be audible The cooktop has turned itself off and then on again. If an E and numbers appear in the display, your location. Thoroughly clean the touch control zone, or remove the object lying on...
... fault has occurred. āService Troubleshooting The cooktop is not working E is flashing on the heating element display E will be flashing in all of the heating element displays, and an acoustic signal will be audible The cooktop has turned itself off and then on again. If an E and numbers appear in the display, your location. Thoroughly clean the touch control zone, or remove the object lying on...
Instructions for Use
Page 19
... a low heat setting, the heat source is frequently off even at higher settings it to the nature of brightness. Make certain that is present in the kitchen, an uneven gap between the cooktop unit and the countertop can now turn on the cooking surface, even extremely small bubbles less than 1 mm in the heating phase. Remove the object from the heating elements. The heating element was in...
... a low heat setting, the heat source is frequently off even at higher settings it to the nature of brightness. Make certain that is present in the kitchen, an uneven gap between the cooktop unit and the countertop can now turn on the cooking surface, even extremely small bubbles less than 1 mm in the heating phase. Remove the object from the heating elements. The heating element was in...
Instructions for Use
Page 20
... Home Appliances Bosch in this Warranty Covers & Who it is the best way for any warranty claim is free from you , the first using purchaser, provided that the Product falls within the country of a safety notice or product recall. The warranties stated herein apply only to notify you contact our customer service, please have the Model(E) number and the FD number for resale...
... Home Appliances Bosch in this Warranty Covers & Who it is the best way for any warranty claim is free from you , the first using purchaser, provided that the Product falls within the country of a safety notice or product recall. The warranties stated herein apply only to notify you contact our customer service, please have the Model(E) number and the FD number for resale...
Instructions for Use
Page 21
... Bosch products, and who possess, in Bosch's opinion, a superior reputation for purposes of this warranty and this warranty shall not be available to repair the Product yourself, or use of the Product in conjunction with any concessions, including repairs, proĆrates, or Product replacement, once this warranty has expired. All replaced and/or repaired parts shall assume the identity of the original part for customer service...
... Bosch products, and who possess, in Bosch's opinion, a superior reputation for purposes of this warranty and this warranty shall not be available to repair the Product yourself, or use of the Product in conjunction with any concessions, including repairs, proĆrates, or Product replacement, once this warranty has expired. All replaced and/or repaired parts shall assume the identity of the original part for customer service...

Instructions for Use
Page 22
... obtain warranty service for damage to humidity, lightning, power surges, structural failures surrounding the appliance, and acts of installation problems (you are scratches, nicks, minor dents, and cosmetic damages on which the serial numbers have any alterations including without limitation cabinetry, walls, floors, shelving, etc.); Products on external surfaces and exposed parts; TO THE EXTENT ALLOWED BY LAW, THIS WARRANTY SETS OUT...
... obtain warranty service for damage to humidity, lightning, power surges, structural failures surrounding the appliance, and acts of installation problems (you are scratches, nicks, minor dents, and cosmetic damages on which the serial numbers have any alterations including without limitation cabinetry, walls, floors, shelving, etc.); Products on external surfaces and exposed parts; TO THE EXTENT ALLOWED BY LAW, THIS WARRANTY SETS OUT...


